
Likes
Comments
Share


@Appoldro420
Follow
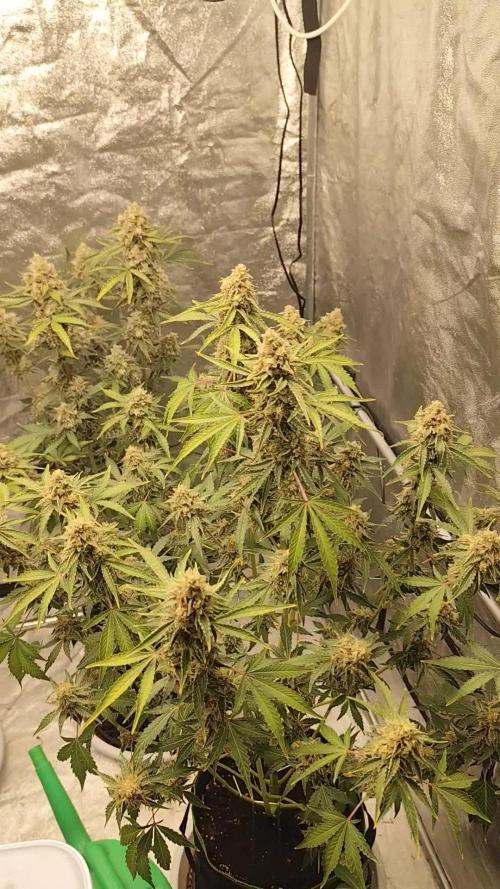
This week in my grow room has been full of developments. First, I added additional lights because I couldn't get the relative humidity (RH) under control. I ordered a dehumidifier, but it will take a few weeks to arrive, so I had to find a temporary solution. I also emptied the reservoir and refilled it with fresh water and nutrients. I secured the net to ensure it stays in place under tension. In two days, I plan to switch the light schedule to 12/12, hoping the plants will stretch a bit during the switch to avoid having overly large buds that aren't evenly spread.
Seventeen hours later, I decided to keep the lights on a 16/8 schedule for a few more days. The plants are starting to show signs of something happening, so I want to see how they develop. I will keep you updated on the progress. Then, I received a message from my supplier that the dehumidifier would arrive today. Great news—time to spice things up!
On June 2nd, the dehumidifier arrived, and I managed to get my Vapor Pressure Deficit (VPD) to 1.17! This is fantastic news, and I'm very curious how this will affect water usage. The dehumidifier seems pretty powerful, with water literally dripping out of the hose, so I'm no longer worried about high humidity levels. It's a shame it doesn't have a range setting, but I couldn't expect more for the price. I'm considering ordering the Dimlux Auxbox to set a working range and separate day/night settings. Thankfully, the dehumidifier has an auto-restart function after a power loss.
On June 3rd, the night is over, and while my values are now more stable, I haven't noticed any significant differences in water absorption. What I do notice is that the pots seem much drier. The difference in leaf temperature compared to the room temperature has increased slightly, now about a 2˚C difference, indicating that evaporation has increased somewhat. Despite the dehumidifier cooling the air, the room temperature has risen. This is explainable since dry air heats up faster than humid air. The CO2 heater is also running significantly longer. So, although there are no immediately visible differences, there are indeed some changes.
Today is the last short night of 8 hours, and tomorrow will be the first night of 12 hours. I am contemplating doing a 10-hour night first and will decide later tonight. After closely reviewing the video footage, I noticed some divergent colors on the leaves. My pH is currently 6.4, which I had adjusted to compensate for the low pH last week—a foolish decision in coco, I know. I plan to make videos of each individual plant for my records to investigate further. The light is too intense to inspect them up close, so the videos will help me get a better look.


Likes
14
Share


@Ready2inhale
Follow
Day 28 flower.! 😏Almost halfway. Had to get a larger area bc the 10x10 bedroom wasn't cutting it. Hard to water when plants fill tha whole room😭. So I upgraded and got a 10x20 workshop behind my house and wired a 100 amp subpanel in there so I should be good for abt 10K watts next grow😎... if I can wire my whole shop on FaceTime with a friend who is a certified electrician then trust me anybody can do it. Yes it was my first time wiring ANYTHING in my life. Which is crazy. It pays to have great friends.


Likes
11
Share


@Shenelly78
Follow
Start of week 5 . Flowering is really picking up. And the ladies seem happy. Fed with straight water today. All the girls have received a defoliation and lst adjustments. Watered with phed 6.2. On January 20th. Blondie is short and bushy so far only measures 11 inches tall. She has started to show signs of flowering but no real flowers yet. She's running behind alittle for sure. The Banana Purple Punch is measuring at 20 inches tall by 22 inches wide. Fast Bud Mixed Auto Pat Benatar is 15 1/2 inches and 18 inches wide. Mixed Auto Blondie is 11 inches tall and 13 inches . End of week 5. Watered the girls with a gallon each of 6.5 ph water. Blondie is a short girl and she's a little behind in her flowering.


Likes
21
Share


@Gruenerfinger85
Follow
Hi meine Garten Freunde ich hoffe Ihr hattet eine sonnige Woche.
Die Pflanzen haben jetzt die 11 Blüte Woche hinter sich gebracht, und somit kommen wir dem Ende immer näher.
Jeden zweiten Tag schau ich nach den Trichomen, und ich muss sagen das die Köpfe sehr reif aussehen.
Ich gebe den Pflanzen maximal eine Woche dann können sie geköpft werden.
Seit Anfang dieser Woche gebe ich schon gar keine Nährstoffe zum gießwasser.
Ich hoffe das die n diesen Pflanzen nicht soviele seeds zu finden sind, ich gehe aber davon aus das in der einen oder anderen ein paar vorhanden sein wird.
Ich habe vor ein paar Tagen zwei Super Silver Haze Pflanzen geerntet und die waren förmlich verseucht mit Seeds.
Ich muss aber gestehen das diese direkt neben den zwittrigen Pflanzen standen, und somit am meisten abbekommen haben.
Ich habe nicht komplett mitgezählt haber es müssen um die 400-500 Seeds sein. Ich
hoffe das die Pflanzen die ich jetzt noch habe größtenteils verschont geblieben sind.
Ich danke euch fürs vorbeischauen.
Wie immer könnt ihr gerne ein Like da lassen und mir folgen.
Ich werde mich wieder melden wenn es soweit ist, bis dahin wünsch ich euch einen angenehmen Tag.


Likes
43
Share


@Regenwurm
Follow
Den Ladies geht es ganz gut. Sie werden immer hungriger. Das Wachstum läuft gut, ich hoffe das geht so noch in diesem Tempo 1-2 Wochen weiter. Interessant ist, dass die Blackberry und Purple Lemonade eher aussehen wie eine Sativa, und der Hybrid Orange Sherbert bei dem am meisten Sativa drin ist, aussieht wie eine Indica ! Wir werden sehen…. Die Blackberry und Purple Lemonade sind von der Entwicklung ca. 1,5 Wochen voraus. Das Klima ist nach wie vor optimal, sie mögen das Blütelicht wie gesagt sehr gerne. Die aktive Zuluft läuft Konstant während der Beleuchtung. Da die Pflanzen sehr gesund aussehen, werde ich die Düngemenge minimal bis gar nicht korrigieren. Gießintervalle ca. 2,5-3 Tage mit jeweils 2 Liter. LST nur noch vereinzelt, Sie sollen jetzt wachsen, minimal entlaubt
Likes
5
Share


@wheedtobeus420
Follow
Day 75. She’s huge and in the dark ice flushing. She smells amazing. I can not wait! 🎂🎂🎂🎂 we also added another meet Mortimer


Likes
9
Share


@Hazebuster888
Follow
Habe 2 tage mit dem schneiden verbracht..
Total getrocknet: 750g 👌😊😁


Likes
7
Share


Likes
11
Share


@Mazgoth
Follow
Too much stress,really cold environment,some times with the grow light off the temperature is around 13/15C and the air goes direct to this plant because the fan is close enough,the
Plant doesn’t give up and has some over feed too,idk why but I’m using nutrients after 15/20 days and half of dosage that BioBizz says and I still have over feed a little bit and nutrient lockout maybe because I’m using some Bio Molasses Blackstrap but if I’m using molasses I’m not using bio grow and I’m using like 3/4ml per L.The LST is because the plant got really tall that the grow lamp couldn’t go higher because of my grow tent size and I needed to break the top cola.

Likes
23
Share


@MadeInGermany
Follow
Day 27
since the time change to 12/12 hrs.
Hey everyone 😃.
This week the lady has developed very well 👍.
Their stretch is very nice and the buds are starting to develop really well 😊.
There aren't any problems, and I'm really excited to see what she'll do until next week 😍.
Until then, I wish you all a lot of fun with this update, stay healthy 🙏🏻 and let it grow 🍀🌱
You can buy this Strain at
https://thecaliconnection.com/seeds/girls-scout-cookies-34.html
You can buy the fertilizer at
https://www.greenbuzzliquids.com/
Type:
Girls Scout Cookies
☝️🏼
Genetics:
GSC Tint Mint
👍
Vega lamp:
2 x Todogrow Led
Quantum Board 100 W
💡
Bloom Lamp :
2 x Todogrow Led
Cxb 3590 COB 3500 K 205W
💡💡☝️🏼
Soil :
Canna Coco Professional +
☝️🏼
Fertilizer:
Green Buzz Liquids :
Organic Grow Liquid
Organic Bloom Liquid
Organic more PK
More Roots
Fast Buds
Humic Acid Plus
Growzyme Big Fruits
Clean Fruits
Cal / Mag
Organic Ph - Pulver
☝️🏼🌱
Water:
Osmosis water mixed with normal water (24 hours stale that the chlorine evaporates) to 0.2 - 0.4 EC. Add Cal / Mag 2 ml per l water every 2 waterings . Ph with Organic Ph - Pulver to 5.8 .

Likes
14
Share


@Leeyum
Follow
Okay had to start 2 purple strains one of them being LSD-25 and the other Blackberry in the second journal. I still have 2 open air pots filled to the brim with fox farm ocean forest, froggy frog, and coco choir in approximately a 2:1:1 ratio. I'm still anticipating the unreleased strains from fastbuds fingers crossed. I placed both these girls taproot down right before the Eclipse.
Day 1 above ground: August 23rd.
I like to stretch them early to allow for more room for watering since I like to bush them out. Stretching them early allows for a long strong stem and hopefully sets the precedent for future growth rate. Stretched them out s littlllllle too much haha forgot my light was in 50%. No harm no fail. I'll take better pics when they take off.
Processing
Likes
68
Share


@themartian911
Follow
hello some news on vegetation day 22,
start the bio grow, and bend the four Lateral head, and crap when i bend a stem has cracked but she is not cut I straighten them with a piece of iron she can go back. 😀👍

Likes
2
Share

@xipo86
Follow
Day 70
Pound cake & Northern lights are finisihing very good.. fatter by the day and loud smell
Lemon Cherry Cookies still 3 weeks to go.. smell to lemon is one of a kind... wow
Likes
4
Share


@DontStopBelievn
Follow
First full week in 1 gallon pots. They will need to be topped soon, most likely between this weekend and early next week before update.
After the light goes off, I've been foliar feeding with a fine mist of 1:4 dilution of my usual hydro vegetative solution: 3.5 grams of General Hydroponics MaxiGrow, 3mL of Botanicare Cal/Mag, 4mL of Botanicare Hydroguard per gallon. adjusted using General Hydroponics pH down. Solution is stored in an aerated bucket. Will be moving to a 1:1 dilution.


Likes
136
Share


@Kitties_and_Colas
Follow
~_~_~_~_~_~_~_~_~_~_~_~_~_~_~_~_~_~_~_~_~_~_~_~_~_~_~_~_~_~_~_~_~_~_~_~_~_~_~_~_~_~_~_~_~_~_~_~_~_~_~_~_~_~_~_~_~_~_~_~_~_~_~_~_~_~_~_~_~_~_~_~_~_~_~_~_~_~_~_~_~_~_~_
💡🌱🤘🐱 Week 10 of flower! Amber trichomes are starting to form, we're cloudy in most sections but there's still a bunch of clear a little deeper in. This is probably their last full week..we cut all nutrients nearly a month ago and have been watering heavy (as we typically do during flush) but they have only lightened slightly, we use a soilless media which should be completely flushed out by now but most the leaflets are still super dark, after seeing several other grows of this strain we assume it must be characteristic of B.B..we have 4 grow areas in our grow room and the Bangers can be smelled over everything else.. It smells like Fruit Loops with notes of gasoline 🍓⛽...The SP-3000 by MarsHydro is an absolute beast in a 4x2, this is our 2nd grow under The SP-3000 and we completely filled the 4x2 on both occasions. Each run resulted in massive, compact Buds just covered in resin..its without a doubt the best LED of its size we have in house or have ever been privileged to use honestly...
Full disclosure: we got a little impatient starring at these girls, so we (well I did lol) pulled down a bud 2 days ago (approx. 10grams) and immediately threw it in the oven for decarb..we made a 5oz batch of tincture and this is easily the "speediest" Seedsman strain I've tried to date, its a surprisingly clear headed high, definitely a daytime smoke..however, may have a different opinion after a proper dry and cure..we'll update our smoke report after drying...thanks as always for dropping by and happy harvests everyone!! ❤️💡🌱
⚡Mars Hydro/SP-3000⚡ Specifications ⚙️:
Diodes: Samsung LM301B / Osram 660nm (960 total!)
Driver: Meanwell 300watt 🔌 (300W±5% @AC120V-277V)
PPF: 824umol/S ☢️
PPE: 2.8 µmol/j 〰️〰️
Lifespan: 50k+ hrs ⌛
Weight: 10.1 lbs (4.6kg)
Veg Coverage: 3 x 5 ft 🌱
Flowering Coverage: 2 x 4 ft 🌼
-The SP-3000 uses an aluminum heatsink (no fan) and the driver can be placed outside the tent 🌡️⬇️
-IP65 waterproof ratings, tolerant to high humidity grow environments 💦 ..
-Up to 15 can be daisy-chained together and all controlled from a single light! 💡~💡~💡~💡~💡
~_~_~_~_~_~_~_~_~_~_~_~_~_~_~_~_~_~_~_~_~_~_~_~_~_~_~_~_~_~_~_~_~_~_~_~_~_~_~_~_~_~_~_~_~_~_~_~_~_~_~_~_~_~_~_~_~_~_~_~_~_~_~_~_~_~_~_~_~_~_~_~_~_~_~_~_~_~_~_~_~_~_~_


Processing
Likes
24
Share

@MadeInGermany
Follow
Hi guys :-) .
There isn't really anything to report this week 🙈🌱🙏🏻.
The plant develops very nicely and gets its first real pairs .
Watering is rarely and rarely, since they have an optimal air humidity in the upper range between 75% and 82% 👍.
I wish you all a lot of fun with the diary and a nice week 👍😊.
Stay healthy and let it grow.
Type:
Runtz
☝️🏼
Genetics:
Zkittlez x Gelato
👍
Vega lamp: 2 x Todogrow Led
Quantum Board 100 W
💡
Bloom Lamp : 2 x Todogrow Led
Cxb 3590 COB 3500 K 220 W
💡💡☝️🏼
Earth: Canna Bio
☝️🏼
Fertilizer: Monster Bud Mix
☝️🏼🌱
Water: Osmosis water mixed with normal water (24 hours stale that the chlorine evaporates) to 0.2 EC. Add Cal / Mag to 0.4 Ec Ph with Organic Ph - to 6.0 - 6.3
💦💧