
Likes
Comments
Share


@DrGreenThumb95
Follow
This week has been horrible and I've been combatting the heat as we have had a heat wave so been some serious high temps 30-31 but I've swapped out my hps for a new led light hopefully this will help also I did a flush day 77 ready for week 3
Happy Growing!👊👍

Likes
176
Share


@DevilsBud
Follow
Week 5 Flowering phase Cookies Gelato supported by @Marshydro
Unboxing tomorrow stay tuned !!!
special thanks to @Marshydro
From tomorrow 20/07/2021
I will be teleporting my plants into another atmosphere 🖖🚀☄️👾
I will be growing completely @Marshydro
Tent+lamp
Mars Hydro TS-1000
Mars Hydro GT 100x100x180cm(3.3'x3.3'x5.9')
Come that a look at website of marshydro:
www.marshydro.eu
https://www.marshydro_aliexpress.
Day 28 IT IS TIME!!!!
READY FOR LIFT OFF IN 10!!!!!
9
8
7
6
5
4
3
2
1
LIFT OFF HEADING FOR MARSHYDRO!!!!!
The launch of the marshydro tent was a great success! A simple and easy setup! From the moment you open the box you know you have a high quality product! 👌🏻👌🏻👌🏻. I literally had the tent up in 20 min! While setting up the marshydro tent i could already see the huge difference in the quality of the material. This mylar is awesome and when compared to the mylar in my old tent there is immediately a huge improvement in quality, brand and results! 💪🏻💪🏻👌🏻👌🏻.MarsHydro save me with the height problem i had the 20 cm Extra is blessing in the sky my plants love it
Day 29 Cookies Gelato
Hallo Growmies what a day what a day i loving the new and improved marshydro.eu set up . The peek hole is perfect no more opening the tent All the time 🤯 mind blown . It's definitely Lock All Light Inside and No light leaks or rips 💯🚀 the cookies gelato have some tall stalks but also a large amount of very low one's i am trying to give them some more light
I Gave them a full range of nutrients today 1,25 L. pH 6.2
And boy o boy they are looking good I am very excited for the weeks to come
These quality products are from marshydro and are available at:
www.marshydro.eu
Mars Hydro TS-1000 LED Lamp
Mars Hydro GT 100x100x180cm(3.3'x3.3'x5.9') Tent
Day 30 Cookies Gelato
Everything is going oké 💪🏻💪🏻 . Small Cookies Gelato buds getting good and frosty because i move the lamp a little . I checked the Runoff water pH and ppm. And the pH was fine around 6.3 the ppm was a little to high so i probably have to lower down next watering with nutrients . Other than that humidity and temperature are 👌🏻. The environment of the baby's are out of this world . Loving the Marshydro set up even i am running a TS-1000 in a 100X100X180 tent it works like a charm absolute little power house 💪🏻💪🏻. The GT100X100X180 is doing wonderful Love everything about it the zipper are top Notch the strong heavy-duty SBS zippers and double layer lining to create a light-proof seal.
Also made nice video today come have look and see what you think of it.
These quality products are from marshydro and are available at:
www.marshydro.eu
Mars Hydro TS-1000 LED Lamp
Mars Hydro GT 100x100x180cm(3.3'x3.3'x5.9') Tent
Day 31 Cookies Gelato
Starting of today with making the new nutrients bottle for next watering . Cookies Gelato looking better and better and starting to smell . Defoliation is not needed anymore. So where good on that . I own the marshydro TS-1000 lamp now for couple of months. And it's simply perfect the dimmer is great for all your stages of the grow . Also i love that the power bill not going to be sky high 🤣🤣 because of the very low Power Draw off : 150W ±10%👌🏻 .
Some good news today by Mars hydro they provide me with discount code so
Come visit www.marshydro.eu
for your best gear and use the PROMO CODE: DEVILSBUD
And you will get a nice discount.
Day 32 Cookies Gelato
Everything good in the hood. Did nothing today but looked at them and admire them in full glory how they are developing . Squeeze the buds a little and Damm there sticky as hell very Citrus, Earthy smell coming off the cookies gelato 🤤 Never went this far in growing stage. I did for my other diaries the transplant to there soil pots let th germinate for 48 hours and drop straight into soil . I ain't doing the wet towel anymore ones i see they open up drop them like there soft 🤣
Come look at my other diaries! I appreciate it a lot 🤘🏻
Come visit www.marshydro.eu
for your best gear and use the PROMO CODE: DEVILSBUD
And you will get a nice discount.
Day 33 Cookies Gelato
Gave the Cookies Gelato a 1L water per plant they are fine easy day today . The humidity i finally tuned out . Nice steady 55% and after watering will not go up dither then 65%. Def the chance in brand off tent work miracles . before i had mastergrow 👎🏻not air and light tight . Zipper keep getting stuck to the unstitched fabric not good . The marshydro tent Tho 💯 better in every way and i know now . The High-quality 1680D canvas being double stitched is killer
Come look at my other diaries! I appreciate it a lot 🤘🏻
Come visit www.marshydro.eu
for your best gear and use the PROMO CODE: DEVILSBUD
And you will get a nice discount.
DAY 34 END OF WEEK 5 OF FLOWERING!!!!!
What a great week for cookies Gelato and Critical and me! 😎 With a new complete marshydro setup straight up best thing ever. the Marshydro TS-1000 works how lamp needs to work. And has every handy things you can think off dimmer, Daisy chain,removeble driver to place outside the tent . What more do you want . TO SMOKE THOSE DELICIOUS BUDSSSSS 🤣🤣🤣🤣. But patience is a virtue they say . Hurry the F up 😎 . See you hopefully in next week's thanks for stopping by and you know Growmies . Don't reach for the stars but go for marshydro .
Come look at my other diaries! I appreciate it a lot 🤘🏻
Come visit www.marshydro.eu
for your best gear and use the PROMO CODE: DEVILSBUD
Mars Hydro tent handy info
Lock All Light Inside: MARS HYDRO Grow Tent Interior is made of diamond mylar. Non-toxic to the environment, no harm to plants. High-quality 1680D canvas being double stitched, (ALL OTHERS BRAND grow tent is 601D canvas) which is tear-proof for perfect light locking, No light leaks or rips at all.
Durability Grow Tent :Stable Metal corner adapters and poles are the trustful supporters of the tent. No rusting nor paint-falling. Quick easy tool-free installation. Carries strong heavy-duty SBS zippers, double layer lining to create a light-proof seal.
Easy Observation of your Plants: Special peek👀 window made by double layers of cloths. Observe the growing conditions of your plants without opening the tent and avoid disturbing plants. The peek window also serves to dissipate heat and ventilate air.
Removable Tray Keep Clean: The package includes a removable waterproof floor tray to hold soil and fallen leaves. The tray can be taken out easily to wash. Removable and water-proof cleaning easy.
Good Ventilation&Fast Assembly: Circular double-sleeved vent holes with adjustable nylon strap for air circulation by exhaust fan, ducting, carbon filter, or reflector. Better allows proper light, heat, and airflow. Quick tool-free installation. Reinforced by a sturdy metal frame to ensure security and stability, supports up to 140lb. Perfectly safeguard your plants to thrive even in winter.

Likes
1
Share


@RezaM
Follow
This week, I gave my plants more fertilizer to test if they show any signs of burning. Now, I'm stressed out! I think I should give myself some seaweed to relieve the stress 😂
The girls show signs of calcium deficiency. I sprayed a small amount of calcium and magnesium on them to help them recover faster. I’m not sure why the new leaves are very pale. Could they be lacking iron? I think the high soil moisture might be causing issues with iron absorption, but I’m not completely sure. I’ll wait and see what happens this week. Considering that I use regular water, I expected them not to have a calcium deficiency.

Likes
7
Share


@Tazard
Follow
I started her flushing this week. I think she wants another week to ripen so I don’t plan to chop her until next Saturday (29/2). She is still filling in the runs on her tops. Two weeks ago I wouldn’t have thought she could but there’s been plenty of calyx growth and the runs are nearly gone 😃.

Likes
59
Share


@Salokin
Follow
These ladies are developing very nicely, the left and middle one already started to bulk heavily over the course of the last week, while the one that got wind stress is trailing a little behind and will probably take a little longer. For the other two I would guesstimate that I can start flushing by the end of the week. The trichomes on the two are completely milky, however with no signal of amber yet
Likes
8
Share


@bkickstand
Follow
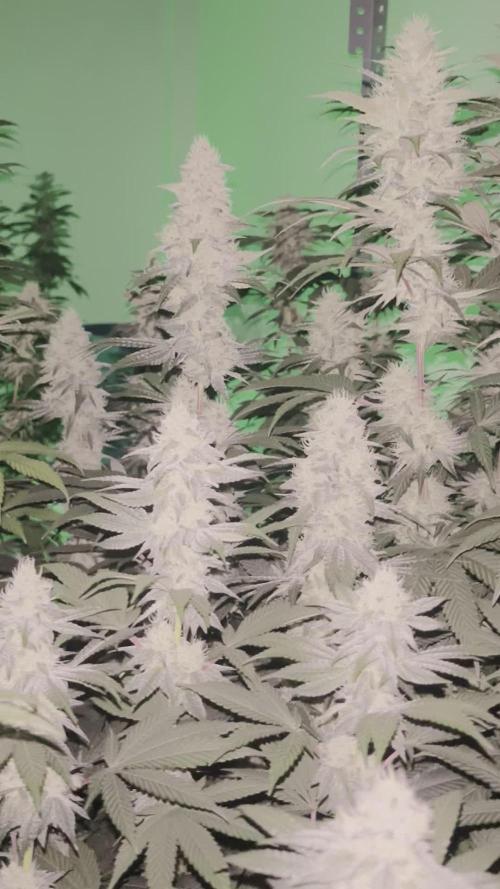
Week 14: Northern Lights Sisters Update
The Northern Lights sisters are progressing beautifully into their flowering stage. Charlotte, the tall phenotype, continues to hold a strong Christmas tree structure, while Makayla, the low-profile phenotype, remains compact with dense bud development.
The buds on both plants are thickening up nicely, and the pistils are beginning to show that classic change in appearance as they mature. The overall health of both plants is strong, and I am closely monitoring the bud development on both the main colas and the lower sites to ensure they continue to fill out as expected for this stage of the cycle.
I'm excited to put my new digital microscope to use for a more granular view of their progress as they move further into the final phases of flowering. Everything is looking steady and on track.

Likes
151
Share


@BioBuds
Follow
Well, what we feared, became a reality, one of the regular XTrakush plants is a male. This is why I planted two and I'm happy it seems to be only the one. But with the canopy going nice and full it hurt to get it out. Of course, I hoped to have two females but nature went its course. Considered leaving it in, to pollinate the others, or keeping it somewhere, but I do not have the space or light for it.
Thus with pain in my gut, I went about getting her out. I notice a nice developed root system, very healthy, which was very hard to get loose. After shaking the soil off I have a rootball the same size as after my whole grow last time. I could lift the whole 57 ltr bag by lifting the plant. Sturdy stem, thick solid branches. This is what I was aiming for and it works. The soil again is proving itself to be a winner.
The light this low gives some higher temps as expected, but manageable within ranges. The SP-3000 is performing really well and I cant wait to see the bud development coming weeks. I'm sure it will deliver a great amount of bigger buds looking at all the flower sites and the thick branches that support them.
Remember to check in on www.mars-hydro.com, they have awesome deals now for Black Friday!
I'm giving more water now, once in two days instead of three. They seem to need it with the higher temps. The plants seem to take the light well on only 45 cm.
I've started adding the BAC Organic Bloom Nutrition. It is designed to work with the microorganisms I added with the micro life. With this I do a little bit of Calmag, but not so much, since I don't see any evidence of shortages, again proving my soil is dialed in for growing under LED perfectly.
All in all, even with a minor setback, all is ready to pull in a mega harvest.
Thanks for checking in again!! Hug Bud & Sunshine.
Likes
10
Share


Likes
2
Share

@Smev1337
Follow
5th week and both of the Lemon Cherry Gelato's are growing firmly good 💪 i love to see these strong branches that will support the whole buds on top later which will be insane 🔥🤝 not so many pictures this week because i forgot to take some more in that week😓 but happy growing all ✌️💚😎

Likes
2
Share


@heinzhammer
Follow
Raised EC to 1.9-2.0 ish
pH 5.8
Raised the Lights to the maximum height.
Tops-to-Light-distance around 25-30cm
Buds are bulking up daily!
This run is smooth as hell. No deficiencies, no pests, plants look happy from beginning until now....
Lets hope the last 5 weeks will be ok!

Likes
5
Share


@Ninjabuds
Follow
Man, that plant is really taking off. It's finally starting to look just like the good old Gas House Parent. I can almost smell it already. Can't wait to see how much bigger it gets!
Well, another year has come and gone. Yesterday was New Year's Eve, and I want to wish all of you a happy and healthy 2025. May this year bring you all the things you've been wishing for. Let's make this the best year yet!
Likes
8
Share

@Ribemarti
Follow
QUE CAMBIO EN 10 DIAS IMPRESIONANTE, ESTAN ENGORDANDO MUY BIEN, ME HAN SORPENDIDO ESTE CAMBIO TAN GRANDE
ESTAN BEBIENDO CADA 2 DIAS CONSUMEN MUCHOS NUTRIENTES PERO ES PORQUE HAY MUCHO FRUTO QUE ALIMENTAR
ESTOY REGANDO CON 2 LITROS CADA PLANTA CADA 2 DIAS
EC 1850 PH 6,6
Likes
20
Share


@Susquihanna
Follow
Frosty Frostbanger isn't growing any taller. I started measuring the cola today for height and width. It is 10 inches tall and I am not really sure how one determines its width. I took a picture and will ask a question to someone who is more experienced than me. I plan on entering this cola in a contest, however, I don't really know what I am going up against. :)😬
I have continued to feed my plant on a regular basis. It has been hot enough here in this area that I water/feed on a daily basis.
We have a few more weeks to go until its harvest time. I am curious to see how big the buds are going to get.
I can definitely see the dense, tight, resin-soaked buds that glitter like fresh snow in a sparkling winter wonderland as per its description of Fast Buds. . Buds also appear to be very compact. And, it is definitely putting of a super strong smell.
That's all for now, Stay tuned for more news next week.
Susquihanna
Likes
5
Share


@Renatissima
Follow
* Watering 2l every 3 days, no nutrients
* Always tuck in the leaves to expose lower tops
* Check the trichomes for amber
Likes
21
Share


@Lontra
Follow
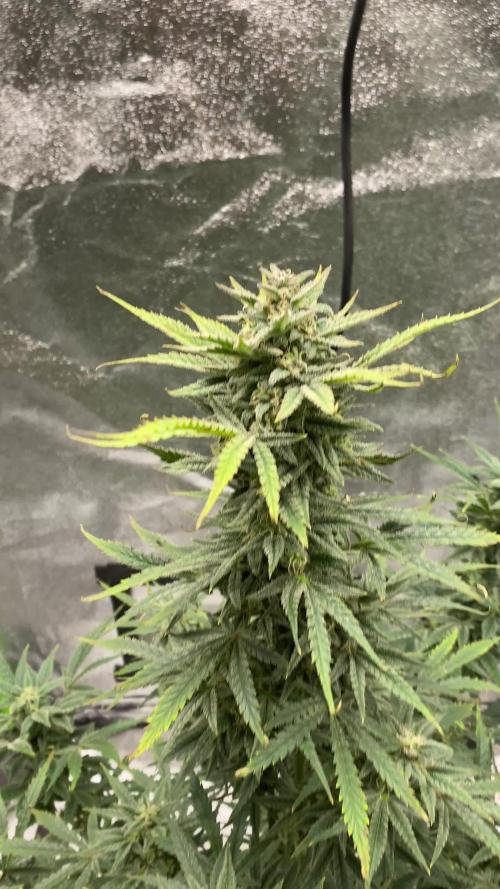
day 51:
I did some smaller repositioning and defoliation. It looks like she liked the more of nutrients i gave her yesterday. The buds are getting bigger, the pistils start to change their color and more trichomes are getting cloudy.
day 52:
Just visual check and filling up humidifier.
day 53:
Watering day. I increased the amount of Bio-Bloom, Top-Max and Bio-Heaven to 3ml/l. I'm now at about 6 liters of water every 3 days.
day 54:
Just visual check and filling up humidifier.
day 55:
Just visual check and filling up humidifier. The buds are getting bigger and more dense. From now I will have a close look at the pistils and the trichomes to decide when I will start to give her only plain (ph-regulated) water. I guess we have about 2-3 weeks to go from now. What are you thinking?
day 56:
Watering day. As most of the pistils are still white and most of the trichomes still clear, I gave her about 6 liters of water full of nutrients.
day 57:
While checking on her, I noticed some "burned" looking leaf tips. I guess that could've been a little too much nutrients last time. Overall she is looking happy.

Likes
3
Share


@KannaGrowing
Follow
Esta semana, poca cosa a añadir, tan solo que continuamos como la semana pasada.
Riegos alternos entre abono y agua, según tabla de fertilización de JUJU Royal by BioBizz.
Hemos aumentado la potencia de extracción para evitar olores.
Likes
3
Share


@CityFarmer
Follow
Hello everyone,
Well the greenhouse is packed.and hard to move around in so I did a little video...
See you guys next week.... 🤘🤘🤙🤙👍👍
Likes
21
Share


@Hashy
Follow
********************************************
Week 12 Mid flower (week 6 flower)
********************************************
Light cycle=12/12
Light Power=160w 67%
Extractor controller settings (during lights on).
High temp= 26c
Temp step=0c
High Rh= 50%
Rh step=0%
Speed max=10
Speed min=3
Extractor controller settings (during lights off).
High temp= 21c
Temp step=0c
High Rh= 55%
Rh step=0%
Speed max=10
Speed min=3
Smart controller settings (during lights on).
Lights on=9.00am
Radiator on= -22.5c
Radiator off=+23.0c
Top fan on=
Smart controller settings (during lights off).
Lights off=9.00pm
Radiator on=-18.5c
Radiator off=+19.0c
Top fan on
VPD aim=1.0-1.5
DLI aim=40-45
EC aim=1.0-1.8
PH aim=6.0-6.5
💧💧💧💧💧💧💧💧💧💧💧💧💧💧💧💧
NPK= 10-19-30
Method= Automatic
Feed=Flower nutes
Neutralise=0.1ml/L
Plagron bloom=5ml/L
Plagron Power buds=1ml/L
Green Sensation=1ml/L
Easy Ph Up=0.053ml/L
(1ml=23 drops, each drop is 0.043ml)
Ec=1.75 PH=6.3/6.2
Runs=18
Run times=4mins (0.3L each)
Gap times=16 mins
Total runtime=72mins(5.5L each)
Total flowrate= 152ml/min(76ml/min each)
Auto start time=10.00am
Auto stop time=15.44pm
💧💧💧💧💧💧💧💧💧💧💧💧💧💧💧💧
********************************************
********************************************
📅22/12/24 Sunday (Day 78)(flower day 38)
📋
💧
Automatic mid bloom nutes
Ph up=0.64ml, 15 drops
Ec=1.75 PH=6.3/6.2
Volume=12L
Volume left=1L
Volume used=11L(152ml/min)
Volume each=5.5L(76ml/min)
Runoff.
Total runoff=0.7L
Ec=4.0 PH=/6.1
💧
📅23/12/24 Monday (Day 79)(flower day 39)
📋
📅24/12/24 Tuesday (Day 80)(flower day 40)
📋 Christmas Eve.
📅25/12/24 Wednesday (Day 81)(flower day 41)
📋Christmas Day. Have a merry Christmas.
📅26/12/24 Thursday (Day 82)(flower day 42)
📋 Boxing Day.
💧
Automatic mid bloom nutes
Ph up=0.69ml, 16 drops
Ec=1.8 PH=6.3/6.2
Volume=13L
Volume left=2L
Volume used=11L(152ml/min)
Volume each=5.5L(76ml/min)
Runoff.
Total runoff=1.0L
Ec=4.4 PH=/6.2
💧
Leaf tips are getting burnt and runoff Ec is climbing so just water next time, should have really just been water this cycle.
📅27/12/24 Friday (Day 83)(flower day 43)
📋
📅28/12/24 Saturday (Day 84)(flower day 44)
📋H=93cm D=22cm Dli=46 8 ppfd=1080
********************************************
Weekly roundup.
📋 Good week considering how close she is to the light, she does have some damage from the light but not as much as I was expecting. Next week she'll get a little less intensity when I turn the power down a bit. The weather is still fairly cold so used 34.17Kw £8.64 on the radiator.
Back soon.
Take it easy.
********************************************

Likes
55
Share


@Bread_n_Buds
Follow
And here we are at the end of this magnificent journey on the spaceship Black Orchid Automatic, a phenomenal strain from Zamnesia, it is the last beauty harvested more or less at the same time as the others but shown separately for the amount of important photos that I am taking.
Please take a look at the macros (micro) and let me know what you think.
This week I'm talking about the harvest of the third and last lady, the purple one, very purple to be clear.
She grew a lot, she matured quite quickly and produced a lot of resin. The flowers are quite hard and of a wonderfully wonderful color.
The smell is very particular probably from the purple / cookies / cake area but the strong point of this beauty are the trichomes. The girl offers a park of trichomes of a disarming beauty, the more I shot the more I wanted to shoot, I was left speechless for real. We have purple stuff in the stem, purple noba in the gland, totally purple stuff in the stem with amber gland, glands in various shades of purple. Wonder for real. There is still something transparent but it had to come venia, like animals feel earthquakes I start to feel the mold in advance, or maybe I'm paranoid, anyway we are mostly cloudy, something amber and a thousand shades of purple and something even transparent.
For me it's fine like this baby. Harvest time, in the drying room.
I strongly recommend you to try this strain both in the feminized version and this one in the photoperiod version, if this plant doesn't convince you wait to see the next two that I will publish in the next two weeks but they have already been harvested.
The taste is still CALI in sense of purple part of cookies family. We feel like we're teleporting to Los Angeles with Snoop making a blunt, incredible California flavor, to be clear in a coffee shop in Amsterdam you would pay 25 to 30 euros per gram.
Everything has always been grown with Plagron Pro Mix soil which I found exceptional, I was used to using Light Mix but I had probably underestimated the power and cleanliness of going 100% organic. It has an absorption coefficient that I find very pleasant, it dries with less aggressiveness than the light mix so you will not have that phenomenon that when the plant is too dry the water goes down. With this soil it is more difficult as it is more difficult to have midges. In my MODEST opinion pre-fertilized are fertile ground for ground midges with this soil I have had ZERO GNATS, before ever.
Information and personalized cards on the Plagron website
---- at the link --- https://plagron.com/en
The plant has eaten the 100% Organic feeding of Plagron: Alga Grow and Alga Bloom as basic nutrients, the rooting Power Roots, the amino acids of Sugar Royal, the Enzymes of Pure Zym that eat the dead parts in the soil, Power Buds that always gives us immense satisfaction with rapidity of start of flowering and composition of the buds, the legendary Green Sensation that now needs no introduction, a name a guarantee. Also the foliar Vita Race used for the first time with success.
The fertilizer kits that you can find on the Zamnesia website are perfect for this purpose, there is everything. Choose them based on their mineral/organic composition and the soil you have chosen.
at the link --- https://www.zamnesia.io/it/11457-plagron-easy-pack-natural.html
The growbox is the DS120w by Secret Jardin as well as the DF16 ventilation system and all the fans
at the link --- https://www.secretjardin.com
The light was supplied in the past by Viparspectra and it went crazy but it came back to me to produce very well too...
at the link --- https://www.viparspectra.com
A fantastic selection of seeds, a headshop and a selection of exceptional accessories on the world of cannabis, many other things about mushrooms, health, well-being and all the beautiful things that nature offers only on the Zamnesia website
at the link --- www.zamnesia.com
Instagram ----
@zam.nesia - @zamnesiawebshop - @zamnesia_usa - @bread_n_buds

Likes
12
Share


@DeepWaterCulture
Follow
Smell
Increased a lot this week and got that real sticky-icky-ickyness to the touch now it’s like glue :) and smells fire…
So fruity and sweet took a few more fans off possibly almost all apart from a few lol got a bit aggressive with her so she paid me back by giving me hives or whatever the bumps on my arms I always get are haha 😂 but yeah to allow the lighter green lower bits to get a little
More light for the last few weeks 💚🔥💪