The Grow Awards 2026 🏆 


Likes
Comments
Share
@hfwbr420
Follow
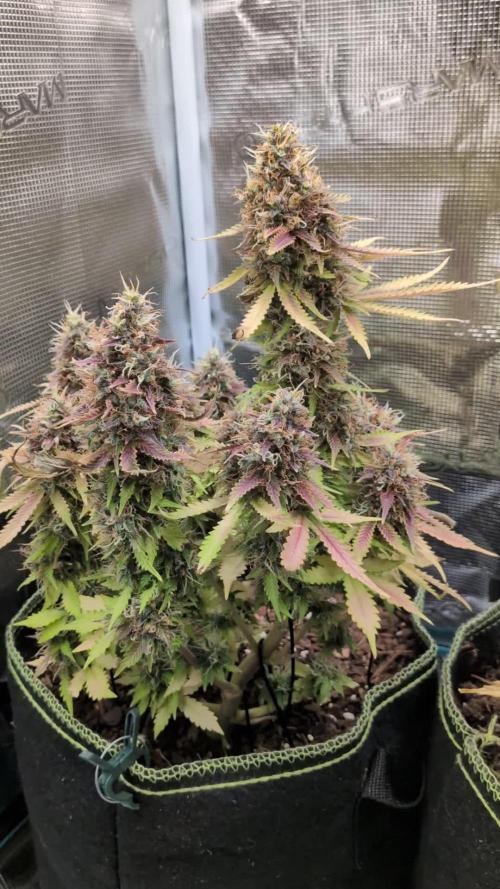
Everything is running beautifully. The plants are showing their first buds.
Had to remove a lot of leafs because there was a humidity problem I couldnt get rid of.
Any tips for improvement are allways welcome! :)
Likes
8
Share
@artems
Follow
In the first week after switching to a 12/12 light cycle, the plant appears healthy and hasn't shown rapid growth yet, but its green mass is increasing rapidly 🌱. All seems promising for the flowering phase ahead! 😊

Likes
3
Share
@therealgrowmie
Follow
We’re now in the final stage of the grow. The plants are receiving plain water only, and we’re just watching and waiting for the right harvest window to open up.
Trichomes are still showing some clear heads, so I estimate we’ve got around 10 days left, give or take. That would bring us to a total of 14 weeks from sprout to harvest, which is definitely on the longer side for modern autoflowers — but every strain is different!
Leaves are fading fast, senescence is well underway, and everything is pointing towards the final phase. Now it’s all about patience, letting them finish strong to maximise flavour, smoothness, and yield.
---
Grow Conditions (still consistent):
💧 Watering: 1500ml every third day
🌱 Nutrients: None (flushing, previously BioBizz schedule)
💡 Light Intensity: ~1000 PPFD
🌡️ VPD: ~1.82 kPa
🌞 Temp: ~28°C
💦 RH: ~50%

Likes
3
Share
@Krautbauern
Follow
Our Calmag arrived on day 28. All the ladies were immediately cast.
On day 30, the plants looked better, but were still lacking. We therefore applied a foliar fertilizer which hopefully helped as an immediate solution.

Likes
11
Share
@wheedtobeus420
Follow
Day 45 for this beautiful lady. She’s very impressive. I’m happy with how she’s turning out. Fast buds really knocked this one out of the park. Can’t wait to watch her swell and bulk. She isn’t too stinky yet can’t wait to find out what she will smell like. She’s big and bushy which is awesome because she was just a little baby I wasn’t sure about her potential but boy oh boy she’s grown up.

Likes
10
Share
@NirvanaGrower
Follow
At the end of week 10 I have splited main stems and after 5-7days I'll harvest all of them. Before that plants will be in dark for 24 hours.


Likes
361
Share
@Ju_Bps
Follow
Hello my friendly growmies 👩🌾👨🌾🌲🌲,
This Fat Banana 🍌😋 continue to grow fast this week, look really happy in the 11l pot and look in love under the TS1000.
I've removed the 2 first stage, by experience I know will don't give good stuff.
I don't know if I'll let grow the plants or if lst, I'll have the week to think about.
💦I give water each 2 days and more and more this week
250 ml Water + RQS Grow Tab (1/2 for 2.2l )
300 ml Water + cannazym
350 ml Water + RQS Grow Tab + Boost
@PH6
Lamp @60%
Thanks community for follow, likes, comments, always a pleasure 👩🌾👨🌾❤️🌲
Mars Hydro - TS1000 💡💡
https://www.mars-hydro.com/ts-1000-led-grow-light
Mars Hydro - FC3000 💡💡
https://www.mars-hydro.com/fc-3000-samsung-lm301b-led-grow-light
RQS - Fat Banana Auto 🍌🍌🌲🌲
https://www.royalqueenseeds.com/autoflowering-cannabis-seeds/487-fat-banana-automatic.html
Likes
11
Share
@adam_pawloski87
Follow
Such an amazing flower, really great especially a phenomenal hash producer yall will be super satisfied with this one!! She’s a shorty but Make sure you top 4 to 6 times or even more to have all them gooey bud producing heads , Dirtyblonde is absolutely an amazing plant!!

Likes
21
Share
@DeeDeeKushner
Follow
Day 35 of flower. Nothing much has changed from the week before. Did some minor defoliation and watered as usual. We’re on cruise control and just keeping my eye on them daily. 35 days left until harvest! Catch yall on the next update! ✌️🏾

Likes
29
Share
@MELs_Garden
Follow
Del 20 al 26 de julio
Cambio de sala y todo tira bien (un poco de calor). Ayer quitamos alguna hoja y los brotecillos bajeros más pequeños.
Ahora mismo está en un armario de 0.8×0.8 m, 3 tiras led Grow the jungle de 15w, un deshumificador VDL y un ventilador. Tenemos puesto el extractor VRK para la salida y ahora mismo la intraccion es pasiva. En principio la dejaremos ahi una semana más hasta que coja más altura pero bueno, ya se verá.
jejeje
21 de julio
Realizamos riego en tierra con 1l.
1 vitamax + 2.5 Bud fuel pro + 2 bloom fuel + 0.16 Mammoth P + 0.3 silica power
PH : 5.7
Th20 : 24.5°C
Ec 1ms
22 de julio
A este paso tal vez la semana que viene pasemos a flora, los brotes están entre 10 y 20 cm. Buscamos que el brote más corto este entre los 20 o 25cm para pasar a flora. Las temperaturas siguen bastante altas a pesar de que estamos a unos 28°C de media, esperemos que llueva pronto Jajajaja
23 de julio
Riego foliar con tierra de diatomeas como preventivo.
24 de julio
Por un lado, se nos han quedado restos blancos de la tierra de diatomeas pero nada grave, la retiramos con un pincel y dejamos que el resto haga su función.
Hoy realizamos riego , probamos los pollitos azules
Riego con 1,5l aprox de agua + 0,08g de vegetative growth booster de grotek.
PH 5,6
EC 0,2ms
Th20: 23,5°C
Dicen que estos polvos tiran muy bien, veremos que tal.
26 de julio
Hoy ponemos el quemador de azufre a funcionar por unas 5h como preventivo. Seguimos en las mismas de siempre, quería pasarla a florecer mañana pero visto lo visto le daremos una ulimta semana para que obtener un buen tamaño. Eliminamos algunos sumideros y hacemos un riego foliar con Delta nueve usando 4,5ml•l.
Temperaturas sobre los 27°C y humedades entre 55/65%
Hemos visto algunas marcas de carencia de calcio Asique esta semana iremos subiendo los nutrientes.
Likes
13
Share
@TheMightyHermit
Follow
Honey Cream is almost ready (Aiming for 15% amber trichomes), another week or two and the first tops will come out. The smell is very pleasant, a bubble gum, sweet and almost ripe berry smells, very intoxicant !
Power flower is stacking nicely, but still with no smell, very frosty too.
Special queen #1 is also doing amazingly, specially being in a pot, 2.25m and stacking EVERYWHERE ! The smell reminds me of an amnesia haze, very pungent on the nose !
Old Lemongrass is doing a little bit worse, her leaves yellowed a lot, but hopefully it will get fixed by next week. Trichome production is considerably slower than all the other strains, but she is stacking for sure.
Smells of a very pleasant sweet lemon.


Likes
9
Share
@BelgianBudtender
Follow
Hey farmers,
It's day 107 and I'm going to call it done, there's a few amber trichomes and she could probably go ANOTHER week but I need my flower tent.
This plant went way overtime, and I made a lot of mistakes, but she smells great and one thing is for sure, I'll have a ton of weed in a few weeks.
So, this week I flushed and next week I will harvest, the next update to this diary will be post dry, but before cure. As tradition, I'll have a sneaky taste before putting her in jars.
For my next cycle I will be upgrading my lights to Mars Hydro FCE 3000, going from 150w to a whopping 300w. I'll probably get a 3x3 in the near future, too.
As always, stay safe and happy farming!


Likes
1
Share
@lemoncake420
Follow
They’re on day day 35. The Ak rushed in front of the others, she’s getting frosty. The one in the back (super lemon) is taking her time, just beginning to flower. I’m bottom feeding them, in a bucket of water. They seem to like it, I water every other day. Thinking about some defoliation
Likes
33
Share
@Ema26
Follow
Hey guys! I chopped all the top half of the plant on 6/4 21:30 and the bottom half on 7/4 23:00. It’s now the 9/4 at 11:30 all of it sits in jars. Dried quicker than I wanted it to but all the buds were very dry too touch so I jarred them. I figured it was easier to remove moisture from the jars than it is to put moisture back into them so hopefully this plan works out🤞 she has a hay smell to her and I’m hoping this goes while curing her. All the nugs look great and some are mega dense and others are very airy. The more airy ones being from lower down I just didn’t have time to keep her going. She weighed in at 110+ grams wet, But I didn’t weigh any of the lower nugs. Dry weight all combined is 35.8 grams. 9.2g from the bottom half and 26.6g from the top half. I’ll re weigh it once I’m done curing. Very happy with this first grow I wasn’t expecting to have this good of a finish even if it isn’t the best💪 both jars are around 21c, the jar with smaller nugs has been sat at 55%-65% and the bigger nugs are getting up to %70 so I’ve been opening the big ones letting the humidity go back down again. I don’t expect to get the drying and curing done %100 but that’s what the first grow is all about. Roll on to my next 3 plants harvest day😎 I smoked all the material that went through the sieve while trimming and damnnn.. tasted like something out of Amsterdam. If the flowers end up like that I’ll be very happy😁 I’ll be adding a smoke report once she’s ready, really looking forward to it🤣
Id like to give a huge thanks to everyone who has helped and advised me on this journey! I’m taking all the info onto my next grow a lot more confident. My next 3 plants are doing brilliantly so far I’d appreciate it if you’d check them out! Onwards and upwards, stay safe and happy growing everyone!
With thanks Ema26😎🍁🌱

Likes
42
Share
@Master_weeda
Follow
Bonjour à tous les padawans et maîtres jedis
Tout d'abord merci à Tom de seedsman pour ses graines ainsi que greenhouse de me permettre de faire cette culture en m'offrant le feeding greenhouse
Je rappelle que cultive simultanément 9 pots de 10 et 11 litres dans une box prévu pour 4 et que je n'utilise que le strict minimum du matériel nécessaire à une culture correcte au prix le plus bas possible
MATÉRIEL CONFIGURATION
Box 80×80×160
Lampe led Lampwin 300 watts ×2
Ventilateur à pince 15 watts
Xiaomi Deerma humidificateurs 5L
Hygrometre thermomètre
Extracteur PROFAN 107 m3/h - 100
Prise programmable électronique ×2
1 pot carré noir 10 litres
Green house feeding enhancer
Green house feeding biobloom
Green house feeding biogrow
Substrat biobizz ligthmix
Fil de fer et pince coupante
Microscope
Petite balance de précision
CULTURE ÉTAPE PAR ÉTAPE
J'ai tout dabord fais germé ma graine avec le easy start de Royal queen seed et je suis agréablement surpris car franchement le taux de réussite est très élevé (17 graines sur 19) simple d'utilisation et très efficace.
Une fois la plantule sortie et d'une hauteur de 2 ou 3 centimètres je la prend délicatement et la place directement dans son pot définitif. Je préconise des pots allant entre 10 litres et 15 litres pour des autofloraisons cultivées en intérieur.
Le pot aura été préalablement préparé (video dans diarie) avec 30 grammes d'engrais greenhouse feeding biobloom et 30 grammes de greenhouse feeding biogrow, soit l'équivalent de 3 grammes par litre de substrat.
Je dépose donc la plantule dans son pot définitif je recouvre un peu de avec de la terre je tasse légèrement et j'arrose pour garder le substrat humide pas plus
Je place ma lampe led 300watts à environ 90 centimètres de la plantule avec un cycle de lumière de 24/24 pendant une semaine. Au début de la semaine 2 le cycle de lumière passera en 20/4 grace a un programmateur car c'est pour moi le cycle de lumière qui offre le meilleur rendement pour une autofloraison.
Jour1: léger arrosage
Jour2: léger arrosage
Jour3: la plantule commence à être plus vigoureuse mise en place de la ventilation pour augmenter sa masse racinaire et léger arrosage
Jour4: arrosage avec un litre et demi d'eau ph6.3 à laquelle j'ai ajouté 0.9 gramme de greenhouse feeding enhancer (soit 0.6 gramme par litre d'eau)
Jour5: aucune technique spéciale
Jour6: aucune technique spéciale
Semaine agréablement calme sans problème ni carence apparente
Que la force soit avec vous !
Likes
5
Share
@Vega0284
Follow
First day of week 6! Looks like what transplant shock I was afraid of never materialized so that's a plus. I did however discover 2 things that have been bothering me. The first was random discoloration and spotting on some leaves, I had no idea that it was due to me spilling watering nutrients on the leaves, so I dug a small canal around the main stem of the plant. Now I just pour water evenly around the canal. The second was, why is my plant so small. Most other Blue Dreams I've seen seem to get really tall and stretch upwards. Mines just seems to get bushier. After more and more research, and probably one of the most obvious things to more experienced growers, is that it's not stretching so much because it doesn't need to. So at least my light is on point. I watered regularly today for the first time since transplant, but only used a quarter of a gallon.

Likes
15
Share
@AlienScrOG
Follow
is the one of the first auto ... is veri good .. but i want to grow again....... about norther light i have burn the pistilll ... cry cry ... i have use so much pk .. is not in the vid but the day after vid all is burn and brown ...... omg fail pk .. 1 years ago ... now ?? look my new diary <font style="vertical-align: inherit;"><font style="vertical-align: inherit;">👽 </font></font>

Likes
Comments
Share
@GreeneScene
Follow
Week#7 Day#44 Update: shes looking nice and bushy from the ponytailing. I gave her a half a gallon of water and she drank it right up . I gave it to her day 42 I believe I noticed her leaves droopy. I still have not topped her yet there’s atleast 13 main arms needing to be pinched out currently.
I’m still riding the fence with whether I’ll top dress feed her and keep her in this pot for one more month or will I transplant her up and boost the feed proportionately with the increased pot size .
Week#7 Day#45 update since I can’t seem to stop riding the fence on the methods I want to use to grow this plant I decided I atleast needed to do a heavy defoliation to expose those growth sites to encourage more branching . I could continue with ponytailing & defoliation for a while I just keep kicking the can around on whether topping will make this healthy vigorous growing plant better . It’s already doing everything I could ever want in terms of lateral growth . Could it stand to be a bit more vigorous on the upwards growth ? Sure , however I’ve still got 3 ladies maturing up in this tent that I need to move out so I’m sort of happy shes not requiring a lot of leg room know what I mean ?
I think as the fan leaves grow out I’ll pony tail up each top again .
Week#7 Day#46
No changes
Week#7 Day#47: started pony tailing her tops as the fan leaves get large enough to pin up I’ll cover as many as possible to let those lower growths get growing .
Week#7 Day#48: still pony tailing tops 😁 we’ll make her into a
Week#7 Day#49: those new fan leaves neeed to be pony tailed but are also incredibly yellow . I wanted to try putting the dry amendment at the bottom of my planter but for the sake of time I won’t experiment & have wasted a 2 weeks considering I knew last week she “ should be getting hungry “ & it’ll take 1 week of top watering before these dry amendments are available to the plant so she may stay e looking deficient. I gave her 2 heaping tablespoons & watered her in with 1/2 gallon of ph’d water with (organic)cal mag .
Likes
3
Share
@BubatzSherrif
Follow
Grow Diaries Report: A Challenging Week 🌱✈️
Week 6 – Plant Update
This week brought a mix of growth and setbacks. While the plant continued to thrive with her characteristic stretch and bushiness, there were a couple of hiccups to navigate—one caused by me and the other by circumstance.
Challenges This Week
Limited LST: Unfortunately, I accidentally half-snapped a branch during training. While the branch is still attached and seems to be recovering, it limited my ability to continue LST effectively this week.
No Photos: I was on vacation during most of the week, so I wasn’t able to document her progress with pictures this time around.
Progress Despite Setbacks
Despite these challenges, she’s looking healthy and continues to grow vigorously. The snapped branch has been gently supported, and I’ll be keeping a close eye on its recovery.
What’s Next?
Allow the damaged branch to heal naturally—no more training on it for now.
Resume LST cautiously next week to manage her height and improve the canopy structure.
Prepare to monitor her closely as I settle back in and ensure she hasn’t faced any additional issues during my absence.
Conclusion
This week had its ups and downs, but overall, she’s pushing through like a champ. Hoping for smoother sailing next week as I’m back to give her the attention she deserves! 🌿
If anyone has tips for dealing with a partially snapped branch, feel free to share below! 😊
