The Grow Awards 2026 🏆
Likes
Comments
Share
@Akthree
Follow
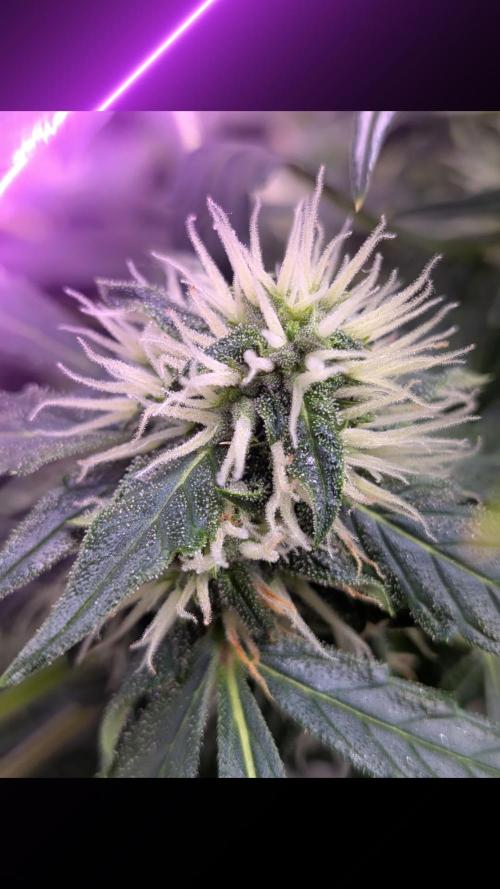
At the end of week 5 the plant started to transition into flowering
Likes
34
Share
~_~_~_~_~_~_~_~_~_~_~_~_~_~_~_~_~_~_~_~_~_~_~_~_~_~_~_~_~_~_~_~_~_~_~_~_~_~_~_~_~_~_~_~_~_~_~_~_~_~_~_~_~_~_~_~_~_~_~_~_~_~_~_~_~_~_~_~_~_~_~_~_~_~_~_~_~_~_~_~_~_~_ ❤️💡🌱😽💨 It's been a good week! We're really hurting for calmag but we just placed another order, we hope it arrives before their color slides anymore.. all plants were overfed about 1.5 weeks ago (I blame my husband lol), they are still really dark in places with some clawing but are starting to bounce back.. the node spacing is fantastic, the Solux350 @75% is a ton of light, we raised another few inches until we get some more calmag in them..not too much else to report, thanks for dropping by and happy harvests everyone!! ❤️🌱💡 ⚡Hortibloom/Solux 350⚡ Specifications ⚙️: Diodes: Samsung LM281 Pro / Osram DR (1,440 total)💡 Driver: Inventronics 350 watt🔌 PPF: 1015 μmol/s ☢️ PPE: 2.9 µmol/j 〰️〰️ Lifespan: 50k+ hrs ⌛ Weight: 14.3lbs lbs (6.5kg) Veg Coverage: 5 x 5 ft 🌱 Flowering Coverage: 4 x 4 ft 🌼 -Uses an aluminum heatsink (no fan), quiet while operating 👂⬇️ -IP65 waterproof ratings, tolerant to high humidity grow environments 💦 -May be daisy-chained via RJ14 and managed from a single controller 💡~💡~💡~💡~💡 🌎 https://hortibloom.com/products/solux-350-led-grow-light ~_~_~_~_~_~_~_~_~_~_~_~_~_~_~_~_~_~_~_~_~_~_~_~_
Likes
10
Share
@Sundance
Follow
I continue with the same setting. I have 18/6 nice grow and flowering. Plants are healthy. This week I just started with Green sensation additive.
Likes
Comments
Share
@MrStarOn3
Follow
At the end of week 3 I topped one of the strawberry cough they are all looking good and starting to veg I’m all caught up with the grow diary’s and will add at the end of every week. I’m in Australia and did start a little late into the season but hope to get a decent grow in they will be at my brothers once transplanted and he has a few aswel that I will add into the grow log nothing but sun and water only use a little thrive that’s from Bunnings that I get from my pops shed. They will be in a nicer cleaner soil when transplanted into veggie beds and will have chicken poo as a nutrient source first time ever using chicken poo so see how it goes. Will keep the grow log updated and hopefully everything goes all well for the travel and transplant for the plants in the next few days
Likes
32
Share
🍼Greenhouse Feeding BioGrow & BioBloom ⛺️MARSHYDRO The ⛺️ has a small door 🚪 on the sides which is useful for mid section groom room work. 🤩 ☀️ by VIPARSPECTRA (models: P2000 & XS 2000) 🌱 DUTCH HEADSHOP SEEDS: www.dutch-headshop.eu www.dutch-headshop.nl ONE STOP SHOP . 100% germination success on first try! . Very friendly customer service . Best bio-seed packaging . Sells other products @ best prices: . Nutrients . Vaporizers . Smoking accessories (grinders, cones) . CBD Tinctures . Resin Extracts . Boveda humidity packs . Ziplock bags . Other health supplements such as: . Lion’s Mane Organic Capsules . Hemp Seed coffee
Likes
32
Share
@Fatnastyz
Follow
10/22 She grows! 😁 In the home stretch, just giving water when needed. Shes so photogenic! .
Likes
8
Share
@Kirsten
Follow
30.4.25: This worked out very nicely 👌 I just found Ecothrives' new, Trace! I was looking for Cal-Mag with no NPK. I came across this, I'm genuinely so excited to get using this! Ecothrive has the best products, hands down. As fate would have it, the plants are looking pretty dry! I'm going to be watering with the Trace and Biosys. Let's see what happens 😁 6 litres of dechlorinated water PH'd to 6.1 contained: ♡ 3ml of Ecothrive Trace ♡ 1/4 Tsp (2.4ml) Ecothrive Biosys Let's see how we're looking in a few days after the first Ecothrive Trace application! The plants received 3 litres of this feed each. PPM: 475 PH 6.0 1.5.25: I mixed a foliar feed with my new Ecothrive Trace. I filled a 250ml spray bottle with dechlorinated water PH'd to 6.0 with 4ml Ecothrive Trace. I used the entire bottle in 3 plants throughout the course of the day. The fan is very strong, so it didn't take long to dry. However, I did keep the lights dimmer to ensure no leaves were burnt. Additionally, I spent more time than I care to admit massaging the foliar spray into the leaves 😅 I also moved the LED lights up as Northern Lights is still stretching. Par was about 600-700. Which may be too much. I'll keep an eye on it. I also watered with 1.5 litres of dechlorinated water PH'd to 6.0 to Northern Lights. 2.5.25: I watered 1 litre today. With Greenleaf Nutrients Bud Explosion PK booster 1/2 Tsp dissolved in dechlorinated water PH'd to 5.9. PPM came out high at 1300, so I watered another litre through just plain, PH'd to 6.2. 5.5.25: FastBuds Mystery seed #1 is focusing on bud building. There are certainly chunky buds beginning to form here! 😍 She has pretty well stopped stretching, and so she's shorter than Northern Lights, which is still growing vertically, this is a little unfortunate as they're no longer a Sea Of Green. Unless Northern Lights is a tidal wave 😅 So because the canopy is no longer uniform, the lighting is difficult to dial in. Which has never been my strong point. Her leaves are still very dark. I'm going to top dress with Ecothrive Life Cycle, but because of the darkness of leaves, I won't add the Ecothrive Charge. Which is mainly more vegetative growth needs. Which will contain more nitrogen, which we certainly don't need any more of at this stage. Plant top dressed with; ♡ 2 Tbs of Ecothrive Life Cycle ♡ 1 Cup Worm Castings ♡ 1 Cup Canna Coco ♡ 1.25 Cups Perlite I watered in with 2 ltrs of dechlorinated water PH'd to 6.3 containing .25g of Ecothrive Biosys. So far, she's doing great, I've never grown FastBuds without topping them, so maybe they will grow taller without that training technique. We will try that with our next FastBuds strain. I'm not sure when I'll grow another FastBuds as I've got the rest of the year booked up. The tent is in demand! 😅 Nonetheless, they are always sturdy plants, which is great, of course. This next week will just be monitoring of excess/ deficiency of nutrients and probably another foliar spray of the new Ecothrive Trace. I have removed a few fan leaves at the lower canopies. As well as removing all the LST clips. Next week, we might remove all the fabric ties too, I'll see how we're looking. That's pretty much it! Thanks for checking out my diary and hanging out 💚✌️🍃😊🌱
Likes
88
Share
🌾 Harvest Day — The Grand Finale of the Eternity Grow Cup 🌾 Days 72–73 | Trimmed on May 25 | Posted May 27 What a journey this has been — and what a finish. These five incredible Runtz phenos have now completed their cycle, and today, we celebrate the final stage of their flowering life: the Harvest. We sent the girls into darkness on Day 70, allowing them a full 48+ hours of rest and reset. The dark period was just a bit longer, truth be told, because time… it flows as it must. This extended dark time helps increase resin production, allowing the trichomes to mature just that final bit more. On Days 72 and 73, we harvested them with care and reverence. Each plant was hung upside down, whole, in a perfectly controlled 60% humidity environment for 13 full days. Before hanging, we gently removed only the fan leaves, leaving all trichome-rich sugar leaves in place — a natural armor for the delicate resin glands during drying. Why do we do this? Because those sugar leaves help protect the essential oils and terpenes, preserving potency, flavor, and aroma for the smoothest experience later on. 🌿 The Dry Room & The Trichome Guardians Throughout the drying, we used a moisture meter to monitor the moisture content in the stems. Once it dropped to around 12–13%, we knew it was time. This tool is a simple but game-changing ally in ensuring a perfect dry — not too fast, not too slow. We then trimmed everything by hand over a 6.5-hour focused session. Armed with trim bins and good energy, we collected an abundance of glistening trichome heads in the process — a golden bonus from these resin-packed beauties. The leaves themselves told a story: deep purples, near-black shades, autumn fades and metallic tones — just stunning. Each girl was trimmed in order: #5 → #4 → #3 → #2 → #1, revealing dense, chunky buds all the way from top to bottom. Not a single pop-corn bud among them — only rock-solid nugs, heavyweight champions in every sense. 📦 Cure Begins – Grove Bags & Glass Jars Once trimmed, the buds were tucked carefully into Grove Bags and glass jars, each stabilized at around 61% RH. The Grove Bags handle the microclimate beautifully, keeping humidity between 58–61%, perfect for preserving all that hard-earned quality. We’re now opening the jars daily, monitoring aroma and feel. This part of the process — the cure — is where the soul of the flower truly comes to life. ☀️ UV, Reds & The Perfect Run Part of what made this run so special was the precision in light spectrum. 40% whites, full reds, UV and IR, and the girls responded like royalty. The UV pushed trichome development to the max. The deep reds gave us thickness, color, and weight. All of it under ThinkGrow Model Ones powered through the Trolmaster ecosystem — everything syncing in harmony. This run was stable, lush, expressive — a grower’s dream. To my eyes, this was a perfect run. ⚖️ Final Yield: 1,302 Grams (1.3 kg) In a 4x4 tent — that’s just 1.2m x 1.2m for metric friends — we pulled in 1,302 grams of flower, not even counting the buds that were taken for filming, photos, or “quality control testing” along the way. 😉 Dense. Loud. Sticky. Resinous. 🌿 The Hidden Half: A Tribute to the Roots In every grow, there’s a part we don’t always see — a part that lives underground, quietly holding everything together. The roots. And this time, I wanted to honor them too. When we unpotted the plants after harvest, we were met with massive, dense root systems, completely filling the Autopot trays. These roots were vibrant, white and healthy, looking like noodles in a thick herbal soup — a true sign of vitality. The Autopots system, combined with the Aptus Holland Clean Program and Plagron Green Sensation, made sure they had the perfect environment to expand, absorb, and thrive. The PRO-MIX soil was the perfect foundation — light, fluffy, with excellent aeration. It all worked in harmony. After unpotting, I carefully washed every root system, removing all soil to prepare them for the next chapter of their story. Now, they’re hanging and drying — and will be left to cure for at least one month, possibly more, in a dry, dark, and well-ventilated space. But why keep the roots? Because cannabis roots hold ancient value — both medicinal and ritualistic. Though they don’t contain cannabinoids like THC or CBD, they are rich in alkaloids, triterpenoids, sterols, and other therapeutic compounds that can be anti-inflammatory, analgesic, antifungal, and calming. Medicinal Benefits of Cannabis Roots: • Friedelin – known for liver protection and anti-inflammatory effects • Pentacyclic triterpenoids – believed to support immune and anti-tumor functions • Alkaloids – some studies suggest pain-relief and muscle-soothing properties • High levels of fiber and tannins – excellent for digestive and skin applications 🍵 Root Medicine — Ways to Use Dried Roots: Once fully dried (they should snap like twigs, not bend), they can be gently crushed, powdered, or infused: 🌿 Cannabis Root Tea Soothing & Detoxifying • 1 tablespoon of dried, ground roots • 3 cups of filtered water • Simmer gently (do not boil) for 20–30 minutes • Add a bit of ginger or lemon for taste • Sip warm, especially good for menstrual discomfort, inflammation, and general relaxation 🍲 Healing Root Soup Base Brothy & Nourishing • Add a handful of dried roots into a veggie broth or bone broth • Simmer for 2+ hours • Strain before serving • This adds a subtle earthy tone and allows the healing properties to infuse your meal Topical Root Cream or Balm Great for sore muscles or irritated skin • Infuse roots in olive oil or coconut oil (low heat, 2–3 hours) • Strain and mix with beeswax to form a balm • Add essential oils like lavender or eucalyptus • Apply to temples, joints, or sore areas 🛁 Root Soak Bath Perfect for grounding and full-body relief • Bundle dried roots in muslin or cheesecloth • Steep in hot bathwater for 15 minutes before entering • Let the soak draw out toxins and ease tension ⸻ The roots are more than just the anchor of the plant. They are its memory, its foundation, its quiet miracle. By using them, we honor the entire lifecycle — nothing is wasted, and everything has a purpose. This part of the process is new for many growers, and I truly encourage anyone reading this to try saving and reusing the roots. Dry them, process them gently, and let them offer you one final gift. Much love to Aptus Holland, Plagron, Autopots, and PRO-MIX — this wouldn’t have been possible without their harmony working underground while the beauty bloomed above. 🌱 The Gift That Keeps Giving: Reusing the Soil As we say goodbye to one incredible season, we begin quietly preparing for the next. But not everything gets thrown away. In this garden, nothing is wasted. Just like the roots, the soil gets another life. After each harvest, I carefully remove the remaining roots and break up the soil. I inspect it, rejuvenate it with compost and beneficial microbes when needed, and most importantly, I repurpose it — giving it a second life in my outdoor veggie garden. Why do I do it? Because this soil has already done something extraordinary. It has supported life, held moisture, breathed air, balanced nutrients, and fed plants that became medicine. It’s not just dirt — it’s a living ecosystem. And to throw it away would be to ignore its potential. In my veggie garden, this recycled soil now nurtures cucumbers, tomatoes, courgettes, and so many other little miracles waiting to unfold. It’s a beautiful way of continuing the cycle, taking all the energy and intention that was once used to grow cannabis and transferring it into growing food. 🌞🍅🥒 🌾 The Benefits of Reusing Soil: • Sustainability — less waste, less environmental impact • Cost-effective — no need to constantly buy fresh medium • Soil memory — rich in organic material, microbial life, and structure • Nutrient potential — amended soil still holds value for many plants • A deeper connection — a way to honor the entire cycle of growth When we reuse our soil, we’re not just being resourceful — we’re believing in tomorrow. We’re trusting that what we’ve built can be rebuilt. That what has been used can become useful again. That from what seems like an ending, something new can always emerge. And maybe that’s the most powerful message of all in this journey: Planting is believing in tomorrow. 🌍🌱 Every seed in the ground is a little act of faith. So as this season comes to a close, the first tomatoes have been planted. The cucumbers are reaching for the sun. The courgettes are settling in. And the same soil that once gave us dense, resinous flowers is now feeding the vegetables that will grace the table. From harvest to hope — the cycle continues. And it’s beautiful. 🎉 The Final Touches Fun fact: • Trimmed on May 25 • Photo shoot on May 26 • This report: May 27 • Dry Bud Exclusive Photo Set: Coming soon Stay tuned — the next upload will be something special, just in time before the Eternity Grow Cup closes on May 31st. ⸻ 💚 Thank You To Zamnesia — your genetics were nothing short of extraordinary. To GrowDiaries, for hosting such a powerful space for community. To everyone following this journey, your support, love, and kind words fuel this project and keep the spirit alive. Let’s keep pushing boundaries, together. With roots deep in the earth and eyes on the stars — the next chapter begins soon. Much Growers love always, 🌱 Dog Doctor Official 🌱 Genetics - Runtz https://www.zamnesia.com/6000-zamnesia-seeds-runtz-feminized.html Nutrients - Plagron https://plagron.com/en/hobby - Aptus Holland https://aptus-holland.com/ Controls - Trol Master https://www.trolmaster.eu/ LED - https://www.futureofgrow.com/en LED - https://www.thinkgrowled.com Soil - https://www.promixgardening.com/en Germination - Cannakan https://cannakan.com/?srsltid=AfmBOopXr-inLXajXu3QFgKXCXXos4F1oEvScjMKIB5MR5dk8-GJ-F49 DOGDOCTOR 15% off Smoking Papers - https://ziggioriginal.com/ Terpene saver - https://grovebags.com/ As always thank you all for stopping by, for the love and for it all , this journey of mine wold just not be the same without you guys, the love and support is very much appreciloved and i fell honored with you all in my life With true love comes happiness Always believe in your self and always do things expecting nothing and with an open heart , be a giver and the universe will give back to you in ways you could not even imagine so As always, this is shared for educational purposes, aiming to spread understanding and appreciation for this plant. The journey with nature is one of discovery, creativity, and respect. Let’s celebrate it responsibly and continue to learn and grow together! Growers Love To you All 💚 #EternityGrowCup #RuntzHunt #GrowersLove #CannabisCommunity #AptusHolland #ProMixSoil #TrolMaster #Zamnesia #Plagron #ZiggiPapers #Grovebags
Likes
41
Share
Hey guys. For this week i upload some videos 1 video per plant. I am not giving any more the bio nova autoflower supermix, i m thinking on let them going only with water until the end, but lets see. Plant 5 is close to harvest i think on the end of this week. Plant 1 and 4 are doing good on flowering. Plant 2 is slowly flowering Plant 3 is still in middle of the transition to flowering, is going very slow. I think she probably is blocked because of the size of the pot and light . When i harvest plant 5 the others will have more space, and i can bend some branches to increase the bud quality. The big question is, when harvest? its the first time im doing this and i am afraid of doing that wrong. Hope the videos can help someone to help me :D I have also made a video of plant 5 on a more close look, not to much quality but for now its what i can get , sorry 28/05 day 69 small trichome update of plant 3,4 and 5. Plant 1 and 2 still on pre flowering analysing the trichomes, i would say, Plant 3 and 4 need almost 2 more weeks Plant 5 - probably only 1 week more, so up to almost week 12 plant 1 and 2 - will take much time as fotoperiodic LOL
Likes
10
Share
Week 14, looking good. Just trying to keep an even canopy, and upping the feed as and when needed 🙌🏽💚
Likes
11
Share
Georgeus strain smell taste energetic and beautiful buds with bloody red with tricomes snow 😎🙌🏻
Likes
33
Share
Día 88 y penúltimo antes del corte. Ya se aplicó Flawless Finish para un acabado impecable como su nombre lo indica. Siempre prefiero hacer el lavado de raiz solo aplicando agua en las últimas 2 semanas, pero esta vez lo hice aplicando el finalizador y luego los últimos riegos con agua purificada. La verdad es que estoy contento con los resultados de esta nena, que es hermosa por cierto, desprende olores ácidos, cítricos, dulces. Los colores son hermosos y las flores están rebosantes de tricomas, lo que la vuelve muy vistosa. Es todo por ahora, estaré manteniendoles informados en estos últimos días. Buenos humos! 👽
Likes
9
Share
@Xabii
Follow
This is the start of my second grow and also second Northern Light Auto from RQS, the goal is to hit #1 in g/plant for that Strain. I didn't take as many notes as in the last grow but there are timelapses, some photos and metrics from probes. Started with 3 Seeds and then picked the 2 strongest. The System is a NFT System but due to the size of the tube and root growths the solution with submerge the roots ~70% later on. To combat that I use 3 small 1.5w air pumps, these are super silent, if one dies I got 2 more running and to be honest air pumps used in DWC systems are often oversized and rely on Broscience. In my Salad/Herb NFT Systems I don't use any air pumps and the plants are just fine and grow great. This time I added sprinklers to humidify the air inside the tube, slightly moisturize the Rockwool and speed up root growths. Spoiler: Was a great success :) The ratios for the fertilizers are not accurate in the following weeks, I have a 120l Reservoir that is filled 90-110l I top it up once or twice a week to sustain PH and EC, if you want to copy it just go by the EC and use the B (Calcinit) and A (Kristalon Blue/Orange) 50/50. I mix the solution myself with dry salts that I bought in bulk 25kg bags. 4l Water(distilled/RO preferably, tap water is OK) + 1kg salts mixes just fine, keep the solution dark and cool and it will stay stable for months. Dry salts don't expire if kept cool and dry so only mix what you need and keep the rest stored as dry salts. 40ml A + 40ml B is about 2EC and 6PH with my tap water, very similar to Canna, Plagron etc. isn't it? just with the twist that I pay ~20% of the known brands. P2O5, K2O, MgO etc. are always the same as long as they are produced by a good manufacturer, Yara is a world leader in fertilizer production just not to be found in you general hydroponics or hardware store. Any other known manufacturer is fine as well, pick the cheapest. Check Hoocho on Youtube to see a guide on how to mix your own solutions, it ain't that difficult trust me. From week 5 onwards I also use Oxygen granulate (KMPS, CAS-70693-62-8, 2KHSO₅ * KHSO₄ * K₂SO₄) if you want to use this check pool supply stores and buy the cheapest. Keep this one dry, cool and dark. I used a old pill bottle to keep some ready to go because it came in a 1kg container and I only need 2-4g per serving + the bottle has a silica pack in the cap. From week 6 onwards I used Haifa Grow Clean for Details check week 6, I use this one as dry salts and add it directly to the tank, it does not interact in a bad way with the solution. For meassurements I use a generic 8in1 Meter "PH-W218" branded by many companies, as usual, check stores and buy the cheapest. (Check week 1 for an image of it) I got mine from Aliexpress for ~70€ it uses the Tuya app so you can always check your metrics and export them aswell. The PH and EC probe are accurate and are giving me stable results for almost 1 year now, I re calibrate the PH probe once in a while and it is tops 0.15 off after a month, always double check your results with PH drops/paper. Bluelab is... A LOT more expensive for less value. For the timelapses I use 2 Tappo C210 2k Cameras, these have the ability to make the stream available trough RTSP so that you can access it trough a link in a browser and that way I snap a Screenshot with a raspberry pi :) after that I just render it with blender to a timelapse. Sadly they seem to have trouble with the bright lights and I get image trouble over the course of the day, if you have a recommendation hit me up :) The script I use to take the Images: #!/bin/bash ########################################################################################################################################## ##### A script to save images from a rtsp capeable IP cam, Tapo C210 (2k image quality) for example in my case. ##### Images are saved in a directory named "2024_01_01" for example, it uses the "date" command within the system it is running on. ##### You can then render the images to a timelapse, I use blender for that. ########################################################################################################################################## RTSP_URL_LEFT="rtsp://:@:/stream1" #sets the variable for cam LEFT access RTSP_URL_RIGHT="rtsp://:@:/stream1" #sets the variable for cam RIGHT access while true; do TIMESTAMP=$(date +"%Y_%m_%d_%H_%M_%S") #sets the timestamp variable DIRECTORYLEFT=/$(date +"%Y_%m_%d") #sets the directory variable with current day for LEFT DIRECTORYRIGHT=/$(date +"%Y_%m_%d") #sets the directory variable with current day for RIGHT mkdir -p "${DIRECTORYLEFT}" #makes a directory for each day if it doesn't exist for LEFT mkdir -p "${DIRECTORYRIGHT}" #makes a directory for each day if it doesn't exist for RIGHT ffmpeg -y -i "${RTSP_URL_LEFT}" -frames:v 1 -vf "format=yuvj420p" "${DIRECTORYLEFT}/${TIMESTAMP}.jpg" #captures a frame from the RTSP stream and save it as a JPEG image for LEFT ffmpeg -y -i "${RTSP_URL_RIGHT}" -frames:v 1 -vf "format=yuvj420p" "${DIRECTORYRIGHT}/${TIMESTAMP}.jpg" #captures a frame from the RTSP stream and save it as a JPEG image for RIGHT ################################################################################################################################ ##### Waits for 180 seconds, change that depending on how precise you want the timelapse to be, less waiting = more images ################################################################################################################################ sleep 180 done Hope you like my diary, leave a comment and a like if you like it :)
Likes
3
Share
Did a bit of lst and a feeding of 20ml bloom and barely and 5ml of grow and she loving it.
Processing
Likes
18
Share
2nd week into flowering and she stretch a bit. Had to lst the sides more to get the middle nodes strecthing.. only fed tap water every 2 days as needed..kept an eye on the temps and humidity . 60°-80° / 40%-55%. .so far no issues. Easy enjoyable organic grow only using kindsoil super soil and cocoloco bush doctor with some cover crops alfalfa and clovers...some companion plants dill,basil,cilantro, clovers in a pot next to it to repel all sorts of critters....will update next week on the growth. Enjoy.
Likes
8
Share
@Kirsten
Follow
17.3.25: I've starred a Hulkberry auto. This was the first pack of seeds I bought! I realised it was mostly sativa, but now I'm ready to give it a go! Made my soil mix, which I will update next week. Planted the seed into an RQS seed starter plug. Mainly to keep the seed in place when watering. Join my journey and hang out 🌱✌️