
Likes
Comments
Share


@TerpTurtle
Follow
She's praying under that 350R
Stretch has been easily managed, growing about 17.5 inches the first 2 weeks with nice tight node spacing
Vibranium absorbing all energies, and giving back with superhuman properties

Likes
10
Share


@M3_Growing
Follow
Could have let her ripe a little longer and let lower buds fatten up more, but I've decided it's time now.
Harvested on 09.Nov.2023-Day 70
This little plant produced a lot of nice Business just 70 days. I am very happy with Gorilla Cookies and will definetly grow it again.
Thé plant loves LST and its highly recommended to increse thé yield. It felt like flower starts in week 3 but the plant continues to grow until like week 9 or 10..so high yield in short time is not just possible but likely.

Likes
16
Share


@Canadian
Follow
I did not now the weight of how much dry or wet flower I have because I decided to freeze right away all of the flower and after 24 hours in the fridge I created bubble hash unfortunately I only took pictures of the first batch total amount 58.6 grams of bubble hash of excellent quality despite treating this plant really badly it give me a very abundant flower With incredible density

Likes
53
Share


@StaresAtPlants
Follow
Mid week is day 21 of flower. I'll do one more leaf strip in the next few days and then I should be done screwing around in the tent with these ladies.
I'm extremely happy with how the canopy filled out. Just a couple of weeks ago I had to cull 3 of my 8 and that left a void.
The last leaf strip is done. I also removed the trellis netting. I am unsure if this was a good idea or not. As far as I figure, My canopy did fill the 5'x5' but it doesn't any more. Now that the scrog net is down everything "stood tall". The reason I removed it is so I could make sure that 1. I could strip everything that I wanted/needed to before everything turns woody and fragile. 2. get to my plants to make sure that no Male flowers surfaced. I did consider putting it back in but then I though of harvest time, what if one in the back is ready before the one in the front, that is gonna suck to pull out. So I left the net out. My hypothesis is that as the buds start to gain weight, the weight will get the branches to come down and spread out again. If the weight seems like it may break limbs, at that point I will apply the scrog net as more of a trellis net that will be easily removed. It's weird, two nights ago I was dreaming that I was in a panic looking for plant yoyo's. I was dreaming that my kolas were so huge that they were snapping. LOL Hopefully it wasn't a dream and it was more of a vision.
I have still been feeding by my pH range. I still haven't had to use any pH up or down in the last 18 days. I have noticed that flower isn't as forgiving as veg cycle. I do have one strain that is showing leaf tip burn so I have decided drop my EC enough to let my pH rise a bit more quickly. In the flower cycle the plants seem to be more finicky with their uptake. If It's too strong they leaf tip burn within a couple of days so if you need to make changes you can't tip toe like in veg. You need to aggressively get back into range because the plant isn't going to wait for you. It's clock is ticking and it's going with or without you.
After my recent leaf strip, my humidity has been lower than ideal so I will probably be putting a humidifier in shortly. I have been using the dimmer to dim my lights to 75% but I would rather have them at 100.
I am looking forward to what the next 5 weeks bring so I hope you all stay with to see how this turns out.
Grower's Love To You All!


Processing
Likes
13
Share


@Cheesefarmer420
Follow
This plant has a solid stench of pure ripe lemons. So much aroma and color in every bud, purples, to dark green, to lime green, to solid frost. This one definitely a fun strain to watch grow and tend too for the last few months. She’s definitely a hungry girl, seemed to be the only strain out of the three that accepted and thrived with full feed nutrients. Would definitely recommend this Strain to someone For a nice uplifting day smoke, also seems to do me good for some pain and stress relief.
Likes
7
Share


@Cannabiszimba
Follow
coloquei ela no grow e vou deixar umas 2 semanas, está chovendo muito aqui na rua e iria quebrar os galhos. depois ela volta pra rua pra iniciar a floração. talvez eu coloque ela num vaso de 15 gallons, atualmente está em 8 gallons.

Likes
4
Share


@Kelly420
Follow
Okay so after 48 hours instead of 24 of darkness. These ladies were begging to be chopped with how much more intense the smell got. Cheesy , sweet , skunky , and a floral incense kind of scent. Made lots of finger hash just getting them off the plants , already smoked.
I’m about 75% done with chopping all the major tops. This time I decided to cut off the branches and dry on an eight tier 24” diameter rack off Amazon. All 8 tiers are full with gorgeous top colas.
I’m drooling. Can’t believe just how much bud this is turning out to be. They are dense , and oozing. Not going to get a wet weight because this is just too much. But holding the rack it’s like 20 lbs or more. My scales don’t go that high. Lol.
Gotta say it, I think my buds look 10 times better than the advertisement photos g13 lab’s mozzarella. My 2 cents and honest opinion. Please do give me your opinions.
I know I didn’t show the full grow because life gets busy. My next grow I want to control the humidity and heat levels a bit better. Or just humidity and run co2 to withstand higher temps. I have every angle of the grow under my tips now. It feels amazing to have this kind of harvest after the dedication these plants received. I’m Convinced…. rdwc with a water chiller , is by far the best way to do hydro. When it’s dry I’ll add the final weights.
My nutrient reg is this. Jacks 321 , botanic are cal mag plus, hydroguard,PK booster is flower fuel(purple can off Amazon) and unsulfured molasses. If you don’t have an ability to keep water at 70 degrees then only use jacks hydroguard and cal mag. You’ll still do well but that molasses , that sauce is the boss.

Likes
24
Share


@SaulGoodman420
Follow
Hot dry weather, so having to water every other day. Harvesting the StarDawg this week :)


Likes
21
Share


@Fullmeltalchemist
Follow
Alright I've updated this postmortem and cure just to give an idea of what I was up to during the dry and cure weeks. This grow was a ton of work and I'm very please with the results. I learned a ton about soil and environment control and really feel like I'm gaining confidence and coming into my own as a cultivator.
I've been playing a lot with ice water hash and rosin and have set some neat goals for the future like hunting ice water hash cultivars, going perpetual and expanding the amount of canopy I can work with by building a network of remote-operated satellite flower tents in friends' and family's abodes . I'm not sure I'll go through all this effort of documentation here again, but please follow along on my instagram, stay in touch and chill out with me sometime @Fullmeltalchemist.00
All in all, I was running 1000w of quantum board across three tents and pulled just over 1100 grams, which was a big goal of mine.
Thanks for all the advice and love growmies! And thanks growdiaries for the platform. It's been coo.


Likes
7
Share


@greensubrange
Follow
Day 39 - 26.06
Set new light, 200watt led
plus new swing fan
Day 44 - 01.07 - Defoliation 50 leafs cut

Processing
Likes
12
Share


@NorthEuropeanGrower
Follow
Weather is getting a bit better this week. Almost no rain anymore and much more sun comparing to last week. Blueberry Ghost OG and Kali AK still don't want to start flowering, but they slowed down from growing taller at least, so there are hope of they to start flowering soon (hopefully).


Likes
11
Share


@Sechlaw
Follow
Everything is good the smell is starting to getting so sweet ! Critical Mass is getting fluffy, frosty and soooo sticky !! Chocolate Haze is packing big long buds, can't wait !!!
Ps : Sorry for the mess in the order of the pics ! 😅

Likes
49
Share


@masterofsmeagol
Follow
9/5 Beautiful weather. The smell is amazing. Much stronger than previous years. I watered everything 2 gallons yesterday with the exception of the 10 and the tub. Found a few moth larvae but I found many more lady bug larvae. Flowers are EXPLODING! I've got one pheno that I think will be done in two weeks. I'm close to the flowering time on that strain anyway amd I labeled flower late. I need to bring my loup and check trichs. Such an exciting time of year! Leaf blower started and I was able to blow off the entire garden.
UPDATE: WENT OVER WITH THE TRICH SCOPE AND LOOKED AT THE 10TH PLANETS. VERY FROSTY! THEY HAVE SOME PLUMPING UP TO DO AND THE PISTLES NEED TO RETRACT A BIT MORE ON SOME OF THE FLOWERS. WE'RE GETTING CLOSE THOUGH. PISTLES ARE CHANGING IRANGE AND RED AND STRARTING TO RETRACT. BUDS ARE SWELLING (ON EVERYTHING). I DID NOTICE THAT THE PLANT WITH THOSE MARKINGS HAD SOME APHIDS ON IT. I HAVE A SHIT TON OF LADY BUGS/BEETLES AND THERE LARVAE. THEYVE BEEN DOING A GOOD JOB KEEPING THINGS IN CHECK. THAT AND MY CAGE IS BETWEEN TWO BIRD FEEDERS SO BIRDS ARE ALWAYS DARTING IN AND OUT SO I ASSUME THEYRE EATING SOMETHING. THIS IS BY FAR MY BEST YEAR SO FAR. PURPLE PUNCH HAS DENSE COLAS BIT LOTS OF PISTOLS STILL YELLOW REACHING UO TO FORM WHAT WILL BE MASSIVE COLAS. I THINK IM GOING TO HAVE TWO LITER COLA BOTTLE SIZED COLAS ON ONE PLANT. ILL BE SURPRISED IF I DIDNT. THERE ARE TWO PHENOMES OF THE BLUEBERRY CHEESE IT SEEMS. THREE ARE MUCH FURTHER ALONG THEN THE OTHER TWO. THOSE TOTHER TWO LOOK FAR MORE SATIVAISH. I'M SUPER EXCITED FOR THE NEXT COUPLE WEEKS!
9/6 Brought the trich scope over last night. Things are getting frosty and coming along quite nicely. The smell when I walk in the cage now is overwhelming. It's like getting hit in the face with a wet bud. I've been noticing more and more lady bug larvae. I noticed a bud worm and tried to find it again after I entered the cage and one if the large lady bug larvae was eating it! Debating whether or not to apply BT. Still have what looks like a calcium deficiency on that one plant but I lose less and less leaves each day. It soesnt have MANY more big fan leaves to keep dropping. Oh well. I'm keeping an eye on it and as long as it's not pests or fungal than whatever. That plant is flowering rapidly to catch up with her sisters. Since my return at growing cannabis I would say rhis has been my best yet. I am super proud with how things are going. If I can keep poo this up for another month I'll be golden. I plan to harvest the 10th planet's in stages (when ready). At least with the two up front and MAYBE the other. That way it would give a chance for the bottom that disnt get as much sun as the top to "catch up". I've do s rhis before with monster crops and it worked good. I plan on watering tonight. Leaves are turning yell8w and dieing on tje big cheese and the two purple punches in the back. I think that I've used most nutrients from my soil and what I'm putting back in isn't enough to cover their needs. When I fed the p.p. in the tub I could notice that it's leaves started greening right up. I'll check last feed and if I need to ill up the dosage. 10th planet doesn't really like a lot of nutes so I have to be careful. This is something lots have discovered. Exciting time! Had a stranger last night but nobody can get past the dog or the motion sensors or the cacophony of measures I've taken to secure my medicine. Not even sure it was a person but still. The fence is electrified at night so they can have fun trying.
UPDATE: Sunny and like 85 all day. Went over around two and noticed a 10th planet slightly drooping. Everything was super light. I gave all the 20's 2 gallons the 30 on the grow bag got 2.5 the 30 in the tub got 1, the 10 got 1 and the 50 got 2. I then fed. Since the 10th planet's are a little further ahead I fed them a little different. I just removed the grow big since they are really green anyway and I also upped the liquid kool bloom to 1 tsp per gallon and fed a quart to everything. A little more for the 10th planet 30gal in the bag and the blueberry cheese in the fifty. The rest of the feed was the same as listed above. Seeing TONS of lady big larvae. Have to he careful when defoliating as I want them to stick around.
9/7 FED and watered yesterday. We've had some super hot weather lately. Hottest all summer. In the 80s-90s. Got a ladder and inspected buds. Found some bud rot on the purple punch. Sucks having to cut off the top of a cola but if I don't it will just spread. This purple punch still has long stigmas reaching up to form a solid cola on the branch. I know it's got a little ways to go. One of the 10th planet phenos on the other hand is looking close to done. Trichs are frosty and milky not much amber. Stigmas turned red and have retracted into the bud. I'm going to wait for this tester to dry and take it from there. We are supposed to get a few days of rain coming up. I don't want to risk all those beautiful ALMOST finished buds to bud rot. I may move it into the garage if we get a lot if rain. Let it have a few days of darkness. Or I could just open the door and it would still get sun and remain dry. This strain smells and looks SOOO good. I can't wait to try it. I'm going backbover to check all the tops. The blue cheese plants are HUGE! With HUGE buds. The trichs just aren't developed enough. It is super frosty but the flowers haven't taken on that swell. It's happening ob one plant and its looking like the colas will he like two liter soda bottles. The thing is that's an awful lot of room for mold. Oh well. That's how I grew them. One thing is for certain. After seeing what the pillars can do I can't rely on the lady bugs to get rid of them all. I'll be spraying BT tonight on everything but that early 10th planet phenome.
UPDATE: INSTALLED MORE CAMS. I HAVE ONE 10TH PLANET THAT IS LOOKING PRETTY GOOD. REAL CLOSE. IM GOING TO SMOKE THE TESTER BUD FIRST BUT I THINK IM GOING TO HARVEST THE EARLY PHENOME IN PARTS. LOOKING AT THE WEATHER IT APPEARS WE ARE GOING TO HAVE SEVERAL DAYS OF RAIN. IF SO ILL TAKE THE TOP AND LET THE UNDER CANOPY DEVELOP MORE. ILL LEAVE THE OTHER TWO 10TH PLANETS THAT WERE MONSTER CROPPED AS THEY STILL HAVE SOME SWELLING TO DO. I LOOKED AT TRICHS WITH A JEWLERS LOUPE. I REALL MISS MY USB SCOPE. PURPLE PUNCH HAS THE BIGGEST FLOWERS BUT THE ARENY AS DEVELOPED. I NEED TO GET ANOTHER. ITS WORTJ EVERY PENNY. I GOT ON A LADDER AND CHECKED THE TOP COLAS FOR DAMAGE OR ROT. NOTHING SO FAR KNOCK ON WOOD. EACH PLANT HAS A UNIQUE SMELL BUT WHEN YOU ENTER THE GARDEN THE BLEND TOGETHER AND ITS LIKE GETTING HIT WITH A WET BUD IN TGE FACE. I SHOULD GO SPRAY EVERYTHING ELSE WITH BT TONIGHT. LADY BUGS CAN ONLY DO SO MUCH.
9/8 Cut some bud rot off a 10th planet and a purple punch. Definitely from pillars. Doesn't hurt that it's been 90 with 90rh. Thunderstorms are coming and it's gonna rain a few days. Plants will need water I'm sure. I tried some of the purple punch bud I cut off (after I dug all the rot out) and it was good! That plant still has white stigmas as and can go a lot longer. Trich scope says the 10th planet's are done. I'm taking the tops off two before the rain starts. I'll leave the one that's a LITTLE further behind and see what comes of it. Even the more sativa dominant blue cheese plants are frosting up quit nicely. I haven't been able to put up videos as my phone has been full and it wouldn't let me even TAKE a video. I need to spray bt tonight. I went through the garden this morning and despite all the lady bugs I found two more bud worms. I think taking the stuff that's done off those two plants is the smart thing to do. I should take all three and just leave the bottoms but I'll just go with the two. I'll update later after I figure out what I'm going to do.
UPDATE: TOOK MOST OF THE 10TH PLANET AS IT WAS DONE. I WOULD'VE TAKEN ONE OF THE OTHER 10TH PLANETS BUT IT TOOK WAAAY TO LONG. WATERED EVERYTHING 2 GALLONS EXCEPT 1 FOR THE 10 AND TuB AND 2.5 FOR MY 10TH P IN THE 30. ILL HAVE TO FINISH AND UPLOAD THIS SHIT LATER. I DID A VIDEO.
9/9 Most of one 10th planet is hanging. Big yield. Looking at the trichs I think Im going to take the other one that looks done. If i did id do the same thing. I did with the other. Take the tops and allow the bottom to develop a little more. Smoked the tester bud and was pleasantl u surprised. Im not using that for acsmoke report. Purple punch and blue cheese both need more time bit are swelling like crazy. Colas should be two liter bottles. Worried about bud rot with buds that big. Thos morning four birds were perched on my cage. I see them dart in and out grabbing a snack. I have let my 'leafing' and general upkeep slip. My wife has been sick and I've been in the hospital with her. So I need to defoliate some things and I'd like to chop that other 10th planet and leave the biggest one a little longer. This one i think has reached diminishing returns or damb close. I don't know if the video uploaded. Havent been doing many because my phone was full and it wouldn't even open the camera. I never said I wad tech savvy. I'll keep this updated. Fucking video keeps resizing but won't fully upload and I've got 5g right now so it must be the site. Been at the hospital all day with 5g and can't upload videos. It's the site.
9/10 Wife was rushed to emergency surgery. Was in hospital all day yesterday. Was able to take the top half of the krber 10th planet that was done. I need to water but it's 100% chance of rain. If i don't make it out dadxwill have to do it. Boy this strain is pungent. BUDS are getting way bigger and trichs are piling on. It's been a great finishing season so far. This will be one of my best years. I'll take more pictures qnd videos as soon as I'm not in an emergency situation. I tried uploading the video again but it loads and then won't resize. It's super annoying and I'm now unable to upload videos. Great.
UPDATE: GOT HOME AT LIKE 8. NOW I REALLY NEED AN ATTORNEY. NINE HOURS AT THE ER. FOUR OUT OF 7 DAYS. I DEFOLIATED DEAD LEAVES BUT IM WAY BEHIND. IVE GOT SOME TRIMMIMG TO DO. IM GLAD I PULLED THAT 10TH PLANET TOPS OFF THOSE 2 PLANTS BEFORE THIS RAIN. THE TRICHSCARE AMBER. ITS SO STICKY BUGS WILL LAND AND CANT TAKE OFF LOL. ILL GET SOME PICTURES OF SOME STUFF DRIED TOMORROW. PICS UPLOAD VIDEOS WONT. THEY WONT RESIZE.
9/11 Finally got some rain yesterday. Still need to apply BT. I've found some rot and just removed the whole bud. Also seeing some septoria on one plant. It's everywhere though and I don't change my clothes like I should. Having been in the ER for 9hrs 4 out of 7 days my plants were neglected. I defoliated dead and dieing leaves. Still don't know what that deficiency on the one plant is but it's still there. Doesn't effect the flowers though. I watered everything a gallon today since it's "supposed to rain." I fed everything lightly with a powerase bottle.
TRIED UPLOADING A BUNCH OF PICTURES BUT WHEN IT GETS TO RESIZE IT DISAPPEARS.
I smoked my tester 10th planet bud and WOW. Everything I could ask for in a cannabis strain. I'll wait to do a smoke report after I smoke the fully finished product and the other plants come down but I am super impressed! Looking at it through a scope is amazing as well. After i smoked that joint i had my dab ready but i didnt want to change how i was feeling so I held off. Granted tolerance is down due to all the hosputal visits but normally very high. Once this site is fixed I'll upload some points of things dry. I have more work to do
9/12 I've tried adding pictures and videos probably 50 times and as soon as they get uploaded they won't resize so I can't start a new week. I'll try uploading them here. Nope. I'll use another platform if you guys can't fix this. This is my best year and I can't upload shit! Raining like hell. Watered and fec yesterday. Everything got a piwerade bottle. Got a new electric Milwaukee leaf blower. Defoliated what needed it and came over to soaked buds. Purple punchvis the only one experiencing botrytis and i just cur the whole thing off. The other purple punches dont have any rot. Boy this is the strongest smelling cannabis ive grown and i cant even put up a picture. Washed 36 quart jars amd a few bigger one. Im looking into getting the bucket conversion fir storage. As soon as tge site is fixed ill put up my pictures and videos. Rain is expected for a few days. My other tenth planet looks ficking done too. Its not getting bud rot so im going to leave it. Its fucking huge. I had to tie up even the secondary or tertiary branches on some plants. Still no breaks though. Vertical trellis literally saved the day.
9/13 This site must be down. I can't upload any pictures or videos. I can't even start a new week. They upload but then they 'fail to load' or some message. This is the most important part. Anyway I shook everything then used the new electric leaf blower. I'm getting some bud rot on the purple punch in the 20. The biggest one. With this rain and the pillars I'm having to cut off more everyday. Rain today but after this rain lmore stuff will be coming down. That 10th planet is done done. I need to wait for the rain to stop and I'll chop the tops off that monster cropped plant. The blueberry cheese will be the last one done but the flowers are huge and covered in crystals. The BIG cheese is going to be a huge yield. I wish I coukd show you guys. Once they get this fixed ill update. Everything is going good though despite this rain. We have a hurricane coming but I could literally take everything NOW amd still have a BANGING harvest. All I've taken is the top of two 10th planet's and it's already the best I've ever done. Some of that plant is left to see if it improves but thats doubtful. I need to keep am eye on that one plant and I'm gonna ride this shit out. The electric leafblower works great. Of and I found some manners in a bud I removed from a purple punch due to bud rot. These plants are close though. Very close. STILL UNABLE TO POST PICTURES OR VIDEOS AS OF 2:30
9/14 Apparently this problem uploading pictures and videos is not just me. Its universal. I defol8at3d what needed it and checked in between the buds of cola for rot. I FOUND A bumblebee STUCK inside a big putmrple punch cola. He had broken a leg it looked like though amd he ended up falling. Those huge purple punch buds are rotting more everyday with this rain. It's only effecting one plant though. We are suppised to be getting a hurricane coming through. My tenth planet is DONE DONE but that purple punch plant needs to come down. No problems with the other purple punches or 10th planet which has nugs just as tight. Blue cheese has even BIGGER buds (had to stake THEM ALL) but since they aren't as dense I'm not getting any bud rot. Colas are tye size of a baseball batvor bigger and there is a lot of them. Best year ive ever had. I hope this site fixes soon. This is tge strongest smelling cannabis I have ever grown. Realistically i should take the other 10th planet's before the hurricane. As soon as shit dries out I'll be taking some more stiff before the hurricane. Those blue cheese have been through hell and are very resilient. I'm gonna let them ride the hurricane out I think. So sad I can't share my pictures or videos. Orrrrr my harvest report. COME ON GROW DIARIES

Likes
17
Share

@CannaArchive
Follow
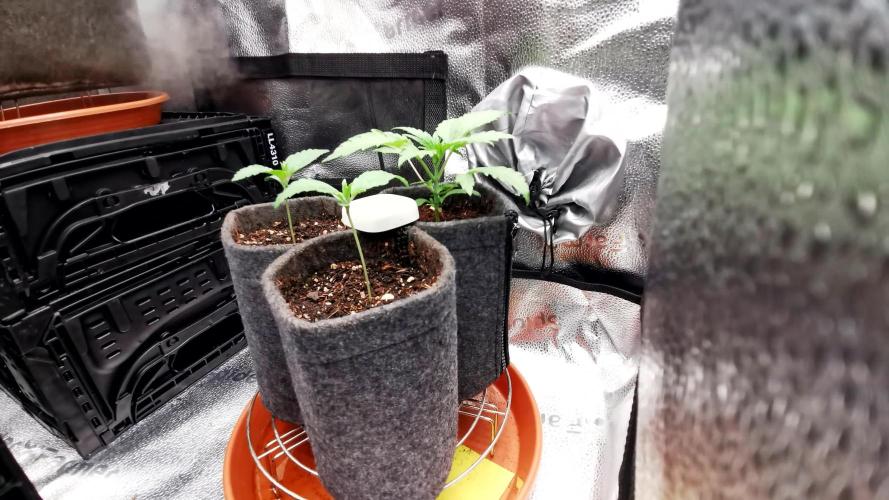
Growth Stage: Early Vegetative
Environment:
Temperature: ~23 °C
Humidity: ~65 % RH
Light cycle: 20/4
Light intensity: ~250–300 PPFD
Watering / Feeding:
The plant was grown in a 1 L pot and watered carefully with around 300 ml per watering, depending on pot weight.
Only water + CalMag (Advanced Nutrients) was used during this week. No base nutrients were added.
Observations:
During Week 2, the Jelly Donutz was moved into the grow tent, which helped the plant recover very well from the difficult seedling stage. Growth stabilized quickly, and the plant continued its development in a much more normal and healthy way.
Leaf color looks healthy, structure improved noticeably, and overall vigor increased throughout the week.
Even though temperatures were slightly cooler, the plant adapted well and showed no further signs of early stress.
Training / Work Done:
No training was applied. The focus was fully on recovery and establishing stable vegetative growth.
Notes:
Week 2 was an important recovery phase. With stable conditions and gentle feeding, the plant built a solid foundation for stronger vegetative growth in the following weeks.

Likes
36
Share


@MadeInGermany
Follow
Hey everyone 😀.
These weeks they have continued to develop very well 👍.
They have made a huge leap forward since they were repotted 😃.
They will be topped again this week, and will then move to the flower tent next week 😍.
I am very curious to see how it will develop until next week.
I wish you a lot of fun with the new update, stay healthy 🙏🏻 and let it grow 🌱🍀
You can buy this Strain at :
https://sweetseeds.es/de/sweet-skunk-f1-fast-version/
Type:
Sweet Skunk F1 Fast Version
☝️🏼
Genetics:
Sweet Skunk Auto (SWS34)
X
Early Skunk
👍
Vega lamp:
2 x Todogrow Led
Quantum Board 100 W
💡
Bloom Lamp :
2 x Todogrow Led
Cxb 3590 COB 3500 K 205W
💡💡☝️🏼
Soil :
Canna Coco Professional +
☝️🏼
Fertilizer:
Green House Powder Feeding
☝️🏼🌱
Water:
Osmosis water mixed with normal water (24 hours stale that the chlorine evaporates) to 0.2 EC. Add Cal / Mag to 0.4 Ec Ph with Organic Ph - to 5.5 - 5.8 .

Likes
4
Share


@Mrgrecoa
Follow
Flipped, start flowering, 02/04
Sour diesel
Somango
Super lemon haze
Harlequin


Likes
19
Share


@Coopmc
Follow
This Pheno from seeds from Supper Lemon Haze high CBD crossed with my FruitWalker!!
Decided to call this pheno SubLIMEinaL since she taste like key lime is supper chill, relaxing., and a bit psychedelic!!
Likes
21
Share


@Whitebelt
Follow
Week 8 - second week of flower
One plant is much smaller - still not confident on sex of any of them ... maybe that small one is a male - I’m guessing they’re all female tho. Either way i may need to slaughter that little guy - the other plants are just overtaking the tent - might not be worth keeping that little one in there.
Update 6/5/19 - I’ll take some updated pics tomorrow - I’m 95% sure I have FOUR out of four female plants.
Just picked up some yucca to try - and I got some more led hangers so maybe I’ll upgrade the lights today - the rapidLED far red flower initiator isn’t coming until Wednesday unfortunately but I have two more SolStix I could add.
Update 6/5/19 - far red flower initiator and the two (now 4) solstix are installed - I need to make a simple aluminum frame - maybe this weekend
Picked up some 29% H202 to clean the rez tank and pumps and filter etc (not to put in the nutes for the plants tho!)
Got a better air pump and airstone for the rez.
New Vivosun oscillating fan - wtf!? Made for grow tents but can’t turn without stopping on the sides of the tent!? - I emailed them maybe it’s defective.


Likes
96
Share


@MrCOCO
Follow
Everything is going fine...🍃🍃🍃
girls switched to 12/12 on the 40th day of vegetation... 🍃🍃🍃Good luck with the flowering stage girls🍃🍃🍃
Happy growing 🍃🍃🍃