
Likes
Comments
Share


@TheCannaProphet
Follow
~ FastBuds PAPAYA SHERBET Photoperiod~
Well here we go on another journey together through 'Canna-land' and this one's kinda special... forget that, it's VERY special because this is FastBuds newest surprise for the community, a FEMINIZED PHOTOPERIOD STRAIN!🤯
I was fortunate enough to score these seeds, of which only 1000 were available and can't wait to see what this strain can do! This Papaya Sherbet, according to FastBuds, is a hybrid with a 9-10 weeks flowering period. For a more detailed and accurate description of this strain the following from FastBuds says it best:
"Combining the massive stature of Papaya (Oni Selection) with the strength and resilience of one of our best keeper cuts (Sunset Sherbet), this strain develops into a big, expansive bush adorned with numerous bud sites that later transform into a generous harvest of medium-sized buds. Papaya Sherbet flowers deliver a signature flavor of premium cannabis with subtle citrus undertones that emerge upon inhaling. During growth, her aroma makes for a sweet yet pleasantly bitter fragrance, giving you an idea of what the smoke will taste like. Notably stress-resistant, Papaya Sherbet is a great choice for growers working in challenging environments. She is very forgiving and rebounds quickly from any adversity, allowing growers the freedom to experiment with confidence that she will take everything like a champion she is. This strain embodies resilience, flavor, and abundant yields in every grow cycle."
Sounds like an epic strain and I personally cannot wait for this lady to strut her stuff!😍
________________________________________________________________________________________________________________________________________________________________________________________________________________________________________________________________________________________________________________________
The Setup:
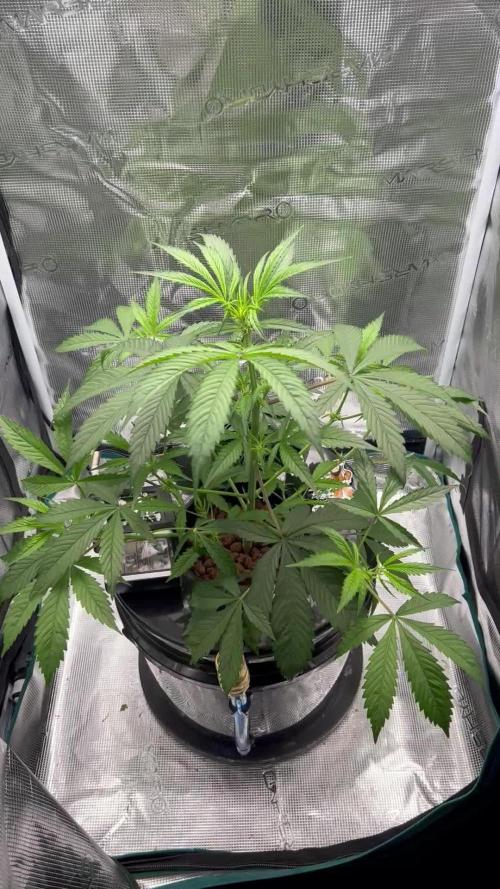
This is going to be an outdoor grow, but I have started the Papaya Sherbet photoperiod indoors as our weather is still a bit too chilly to put a newly sprouted seedling outside (nighttime temp's dipping regularly into the 40's℉).
The plan is simple... let her grow inside under a 19/5 light schedule until the nighttime temperatures are in the mid 50's℉, which shouldn't be long. After which, she'll be moved outside and transplanted into the soil which I have already setup and inoculated with beneficial microbes from BioTabs and slow release dry amendments from Gaia Green. Once she's established herself outside she'll be given periodic top dressings of Gaia Green 4-4-4 and 2-8-4 along with worm castings and Compost Tea's. Her grow area is approx. 5'x5' and I have posts and a trellis net set up already for when she gets bigger to aid in training her. Let the fun begin!🤪💚
________________________________________________________________________________________________________________________________________________________________________________________________________________________________________________________________________________________________________________________
Weekly Updates:
10/6- Well here it is, the 8th and final week for the Papaya Sherbet Fem Photoperiod from FastBuds!
10/8- I am checking the Papaya Sherbet's trichomes every day now and they are just about perfect. I anticipate that it will be harvest time any day now, weather permitting.
10/11- After doing a final check of the trichomes on the Papaya Sherbet this afternoon and checking out our weather forecast, I decided that I will be taking her down early tomorrow morning before the sun comes up.
10/12- Today is CHOP DAY for the Papaya Sherbet Fem Photo! After checking over the flowers yesterday I decided that today is the day as I wanted to avoid any further chances of Boytris ruining more flowers. I got up early, before sunrise and took her down branch by branch which were then hung in my 'drying room' to begin the drying/curing process!
This has been a interesting and educational journey for me and I hope that my experiences may help someone else in their garden... See you at the Harvest Report! 😎💚
Thank you for checking out my diary, your positive comments and support make it all worthwhile! 💚Growers Love!💚😎🙏

Likes
38
Share

@TheCannaProphet
Follow
--------------------------------------------
~DUTCH PASSION OUTLAW AMNESIA~
--------------------------------------------
Outlaw Amnesia is a top quality old-school Amnesia Haze dominant Sativa that will appeal to both beginners and connoisseur growers alike. She is 80/20 Sativa/Indica with around 20% THC and is a cross of our Super Haze with a very special clone of Amnesia. The high is powerful and fast with a clear uplifting sativa high and a strong Haze accent. The taste is fresh, sour, strong and old-school Hazy. Outlaw will stretch more than most, she can triple in height during bloom, and grows well with the SCROG method.
Although she can be harvested as early as 9 weeks, a full 12 week flower period may be required for best taste, yield and high. She grows well in all grow mediums with perhaps the best yields in hydro where yields of up to 500g/m2 are possible, classifying this as a high production variety.
*description credit to Dutch Passion
OUTLAW AMNESIA (DUTCH PASSION) FEMINIZED DATA SHEET
Breeder: Dutch Passion
Genetics: 20% Indica / 80% Sativa
Parents: Super Haze x Amnesia
Flowering Time: 11-12 weeks
THC: 20%
Yield (Indoor): 450-500 gr/m²
Height (Indoor): 50cm
Available as: Feminized seeds
Flowering Type: Photo-period
Sex: Feminized
*Specified by breeder when grown under ideal circumstances
--------------------------------------------------------------------------------------------------------------------------------------------------------------------------------------------------------------------------------------------------------------------------------------------------------------------------------------------------------------------------------------------------------------------------------------------------------------------
THE SETUP:
~Planted into Jiffy Peat Pellets that were hydrated with de-chlorinated water with SuperThrive added then ph'd to 6.0 @ 80℉
~Grown 100% organic in 10g fabric pots with Mother Earth 70/30 Coco/Perlite medium amended with 2tbs/g of Down To Earth 4-4-4 / 2 cups/g of Earthworm Castings / 1tbs/g of Dr. Earth Flower Girl 3-9-4, 1tbs/g of Dr. Earth Bat Guano, 3/4 cup of Down To Earth Azomite and 1 tsp/g Down To Earth Fish Bone Meal.
~24hr light cycle during Germination / 19/5 light cycle for Vegetation and 12/12 for Flower
~Straight water ph'd @ 6.2-6.8 when needed and weekly Compost Tea's.
__________________________________________________________________________________________________________________________________________________________________________________________________________________________________________________________________________________________________________________________________________________________________________________________________________________________________________________
WEEKLY UPDATES:
9/20- 💥BOOM!💥 Week Six of flower is here and my girl's in high gear, stacking her flowers and pumping out trichomes!
Today I watered her with 1.5g de-chlorinated water with 5ml/g of Botanicare CalMag+ added, then ph'd to 6.2 @ 72℉. I turned her pot and plucked a couple of yellow shade leaves...the basic daily maintenance.
9/22- I didn't water her yesterday as she looked great and was 'praying' hard. Today she was given 1.5g of de-chlorinated water which was ph'd to 6.2 @ 72℉ which I gave her through her drip pan (bottom chuggin) and I also gave her pot a turn.
I'm keeping an eye on what appears to be a few seeds developing. I'm hoping they're just fat calyx's that haven't matured yet however there's a strong possibility that, due to a temperature fluctuation that was excessive (20℉) may have caused her to stress and turn hermaphroditic... Fingers crossed! 🤔🤞
9/24- We're getting close to wrapping up Week Six of flower in a couple of days and she'll be past the half-way point with the most exciting weeks yet to come!
I didn't water yesterday and today I went ahead and Top Dressed her with 2 tbsp/g Dr. Earth Flower Girl 3-9-4, 1 tbsp/g Dr. Earth Gold Premium 4-4-4, 1/2 cup Down To Earth Bio-Fish, 1/3 cup Down To Earth High Phosphorus Bat Guano and 2 cups of Worm Castings.
I watered in the Top Dress with 1.5g of de-chlorinated water which was ph'd to 6.2 @ 72℉ and let her enjoy her meal! 😜
9/26- After her heavy watering on the 24th I didn't water yesterday and when I checked her today at 'lights on' and she still had some weight to her pot and her leaves were praying hard so I held off on watering today and will hit her tomorrow with her usual 1.5g watering.
~Thanks for stopping in! Things should be getting a lot more interesting in the coming weeks...Stay lifted and be Blessed! 😎🙏~

Likes
15
Share


@GYOweed
Follow
Did a little HST and filmed some Blurple Tent Action for my boy Ferenchy.

Processing
Likes
4
Share


Likes
13
Share


@Ciko420
Follow
Welcome to my week number 3.
In first, those ladies are pretty without any hint of deficit.
Cali genetic showing their dominance agains other brands. (Just my personal opinion)
Before few days we made a cut under sixth floor, now ladies makes some nice curves.
I can not wait till I switch to the 12/12
Happy growing guys✌️🏽
Processing
Likes
105
Share


@Green_Friends_Inc
Follow
Commencing week 5/Day 29: on Nov 21st
Day 29
All is doing well now and a few more plants have roots in water but tomorrow is going to be well below freezing as well as the humidity has dipped very low
Day 32
Still growing steady the cold temps and low humidity haven't hurt or slowed them down too much
Day 34
Happy to say 6 out of 8 girls have pretty massive root masses developed in past week into bucket.
I have been very lightly foliar feeding every day a slightly acidic low ppm solution.
Lights were put back on timer since the temp and humidity are going back up I don't need the lights for heat.
pH has remained steady for past two days in low to mid 5.8s.
Is this too steady I wonder 🤔
I put on fans today today as well as under lighting LED strip.
D35
Am check-in and all is going well.
All 3 Gorilla Zkittlez are absolutely killing it, way bigger than the rest of the bunch. Although the 818 Headbands and the Raspberry Diesel are not far behind. Unfortunately both the Boss Hoggs seems to be runt-ish. One especially is really funny looking. But I always cheer for the under dog in the fight so who knows 😎
Turned off under lighting. Raised overhead LED Panels up 3-6 inches and re-oriented (angled) towards girls.
*I've decided to break off the barely mentioned personal crosses into their own journal in the next few weeks in case anyone was watching or wondering, it's coming. I'll be editing this journal accordingly when the time comes to be more accurate and useful. Lastly I am adding a new journal today for "🍋🍰" aka Lemon Cake by Moxie. It's terpalicious 👅. super sugary and lemony on the nose. Does anyone from the US or elsewhere know what's "Country-Time" lemonade mix is?? It makes your mouth water and smells almost too much like the sugary lemonade mix. Stay tuned
💚🙏


Likes
23
Share


@adam_pawloski87
Follow
It has been another great week for these Fastbuds ~ Wedding Cheesecake Autos!! Today is day 22 from seed and this upcoming week all 5 will be getting Tied down for LST ! All are getting same veg feed just but make sure if you are using rapid start your gonna have to mix in PH up in your feeds! Light is at same height and is at full power just letting the plants grow into it! Well hope you all enjoy, and please let me know if y’all have any questions I’ll be glad to answer! Bless y’all and stay tuned for next week! Peace y’all
Likes
24
Share


@el_cultivito
Follow
Plants started getting real bushy a couple of days after topping.
Low Stress Trained all the plants at the end of the week by tying them down using rubber coated garden wire to spread out the newly grown tops.
Also spaced out each plant evenly on the tray and turned on the other 2 PB2000 LED lights I had ready to go.

Likes
49
Share


@masterofsmeagol
Follow
7/11 Got half in of rain last night. Glad I didn't water. Ph of rain water is very acidic. Added supports to the blueberry cheese in the 50. I just used string and went diagonal and attached to the cage. Wrote a ton but it disappeared. Anyway looking at previous diaries I was wrong about senescence. It wad the life cycle of those earwigs that did that to my plants (see other diaries). This soil mix is amazing. These plants gave only gotten like two small feeds of big bloom. I showed my commercial buddy and I'll keep it between us what was said but it made me feel really good. I'm considering either expanding the cage in one direction with some lumber I already have or moving a couple outside tge cage. That way I have more room. He said he's seen plants structurally similar reach huge heights (14f) so I'm just trying to avoid future problems. I at least need to get the trellis on. I hope poor that's food enough. Did a real nice video this morning but nothing wanted to upload and it just uploaded the same one twice. I'll try again and hopfully it will go up. If not I'll put it up tomorrow.
7/12 Dad has surgery this morning. I did a quick video and took some pictures. I need to do some rearranging with the plants and cut a pallet to fit in the back. Then I can put a vertical trellis up. Haven't decided if I'll add on to the cage, remove a couple plants or just rearrange things but I'm leaning towards the later. They will need water again and I'm wondering if I should start nutrients but everything looks so good. By this time on past diaries I'd be losing all my leaves bu now. MI think it wad part ear wigs and part to many nutes. This soil mix is taking these plants through veg. I'll probably do a feeding soon but it will be organic and it will he small like a big bloom or ancient amber. Im leaning towards not using growbig this year as my plants seem to be doing great without it. We'll see. I'll keep this updated.
UPDATE: Went back over and gave plants a full watering. Some were slightly drooping. I was going to add nutes but decided against it as I didn't see any deficiency. So far NO Earwigs! I comed through the plants and I did find a jpn beetle which I happily killed. I mixed up 8 gallons of water and gave it to the 11 plants so it wasn't quite a gallon a plant. I need to rearrange the plants so I have room to move around. I also need to cut another pallet and use the spaces I'm not. Trellis needs to go up.
7/13 I think I've got the watering amount down. Now just to find how often which will depend on weather. I've watered very little this year. They loved that gallon. I was going to use big bloom and kelp me/you but looking at my garden I decided not too. My buddy asked what i was addingvthings for and to wait fir what i added to do what I wanted it to do. I see no nutrient deficiencies so why add anything? I think this soil mixture will get me all tgexway through veg. I dont plan on using much in fliwer either. Definitely good genetics. I really need to cut that palley and move the 1 10gallon to the far back coener. It will open thibgs up so much better. The garden looked so beautiful this morning. Getting very aromatic. I started untangling trellis netting but had to leave. I'll update what I do. Happy growing folks
UPDATE: Went back over as I had a slight intuition that I needed to check the garden. I found and killed at least 7 jpn beetles. That's what's been making holes. They tried to escape and bounced off a tarp but I got it. I went through the interiors and found two pillars. If these beetles are gonna be around I'm ordering a net. I'm also close to positive I'm going to extend my cage in the back a few feet. Things are getting unmanageable in here. My buddy said I'll be having problems soon if I don't do something. I'll document what I decide to do.
7/14 Found ONE jpn beetle in the garden this morning. I can manage those well enough. The birds help too. I check my garden multiple times a day so I manually remove many pests. However I've noticed some thrip damage on a leaf and a leafhopper damage on "A" leaf so there are "some" pests around but not enough to spray shit. A couple wasps were doing there job while I was there. Supposed to get thunder storms after three and tonight. Supposed to get over a half inch of rain tonight. I lifted the bags and decided to hold off and let mother nature take care of it as the bags weren't totally dry. Only problem I really have is space. I AM moving that 10gallon (that's the same size as some 20's) in the back. There's 27in not being used and a few feet the other way. My buddy cautioned me that I'm going to have problems since my plants are so crowded. I agree with him. I spoke with me father and we have most materials to extend my cage four feet in the back. I think that's my plan. I'll extend the structure before the stretch then I can put up the supports. We'll see how this goes.
UPDATE: Went back over to check the girls as I had a feeling I ought to. When I got there I saw that a couple of the blueberry cheese were pretty light (liftng the smart pot) but the others seemed to be fine. ONE 10th planet was light like that and the purple punch in the 10 gallon was as well. Each plant thar needed it got at least a half gallon of water. I'm waiting to see if we get the thunderstorms and the half inch of rain. I watered the MASSIVE blueberry cheese in the 50 but I only gave it 1 pitcher which is like 1/4 gallon or so. Don't know why I even gave it that. Looked fine but the soil WAS pretty dry. Next year I'm giving myself way more room. I was running trying to chase these jpn beetles. This time I have the dawn and water and a measuring cup to knock them in. This ain't my first rodeo. I did notice some bright yellow streaks on a leaf edge and I'm hoping it's not septoria. I doubt it but I have an anxiety disorder and I worry. I hope I can get the cage extended sooner rather than later. It's getting hard to move in there and more importantly I can't take any more plant pathogen problems. I'm considering starting a plant doctor regimen just to be safe.
7/15 Got a bunch of rain last night. No jpn beetles in the garden and not really much damage. I did notice this (I think it's leaf hoppers) that leave those dots close together on a leaf so it appears I've got a variety of pests. I'm considering how to approach this. I mean the damage is very minimal but I don't want it to get out of hand. Another thing I need to look out for is leaf septoria or any other fungal pathogens. I believe that has been part of my problems in the past. I think that's what caused my earlier grows to drop all their leaves so quick. I think I'm being overly cautious but its very crowded in there. With my father just getting out of surgery the girls will need to wait a little bit before before I can extend the cage. I could still cut the pallet and move the 1 10gallon and that would give more room. I rearranged a LITTLE BIT so they have a little more room but I've really got to get this cage extended.
UPDATE: IT Rained so hard I had to pull the car over. We hydroplanned the whole way home. After working ob my house I went to see what the damage would be like. NOT A SINGLE BREAK THAT I COULD SEE. I took a video but since the wifi here sucks I'll have to upload it tomorrow. Walking around in the cage even if I cant get it extended I think I'll be OK. It obviously will open me up to lots more issues but at the very least I can reorganize before I build on. The 10 gal purple punch would fit perfectly in the back and I have a pallet I can cut to fit it in place. Putting that one back and pulling the others forward will be much better than what I've got going on now. I'm also thinking about running an extension cord and putting fans under the canopy or at an angle to keep the wind moving. Just thinking outloud. However after that storm the girls looked as happy as I've ever seen them. All happy praying to the sun, thankful for the much needed rain. Mother nature does a pretty good job with out me messing with it. I've noticed a couple interior lowest leaves turn yellow and die like a nitrogen deficiency but everything else is fine. Also noticed a leaf that looked like a p deficiency but again, it was the VERY bottom leaf on ONE plant. Again the rest of everything looks fantastic. I'll keep an eye out for anymore nutrient deficiencies and if anyone that reads this sees some please let me know. I should've taken stills since they looked so good but I got it on video.
7/16 It POURED last night and throughout the day. TORRENTIAL rain. The branch breaking sheet rain that us outdoor growers learned to fear. My plants aren't trellised currently. I know what I need to do now. I have a pallet to put in the back corner and I'm moving the purple punch in the 10 there. And pulling others forward where there's more room. Then when I extend it (it's gotta be done this week) everything g will be in their proper place and I can just throw on a vertical trellis. I also noticed more (leafhopper) damage on a leaf. Different leaf of the same plant so I'm considering spraying something. I have a number of products but I was trying not to use them. Luckily I have these diaries so I can look back and see certain plants reactions to certain nutes or fungacide/insecticide/nutes and the doses used. I haven't been using much but if my plants will remain cramped I'm going to start the plant doctor. I'm seeing more pillar damage too but BT is super narrow so I'm thinking when I fo spray for pests I might use cap jack and be done with it. Then I can apply the BT in flower if it's necessary. I took a video but I have to wait until tomorrow to upload. I took a quick snapshot though.
7/17 Despite the torrential rain I don't have any breaks. I'm noticing more pest damage though. Another leaf on the same plant had those closely shaped round circles. I forget what pest it is but it's there. Caterpillars are there I'm sure so I may do a preclcentative spray. Just unsure what I'm going to use. I lost a COUPLE very bottom interior leaves that look like they just got used up. After this rain I think think the plants might benefit from a feeding. Probably next water after they dry out. I REALLY need that cage extended. I expressed that today and it should be done this week. I'm looking for pallets today. I have the little one that I can put in the back which will allow me to move the 10 gallon and move the other forward. That will help some but I need more room. I'll update as I go.
UPDATE: GOT A SMALL PALLET AND IT FIT PERFECT IN THE BACK ROW. I MOVED THE PURPLE PUNCH IN THE 10 GALLON ONTO IT. I SHIFTED A BUNCHVIF THINGS AROUND. I ROTATED ON BLUEBERRY CHEESE 180 DEGREES SO IT WOULD FIR BETTER. CROP ROTATION IS GOOD ANYWAY. I TOOK VIDEOS AND YOU CAN NOW SEE THE ROWS MUCH BETTER. 2 WITH 3 and 1 WITH 4. IT'S SIGNIFICANTLY BETTER THAN IT WAS. I CAN GET AROUND ALL SIDES OF EVERY PLANT NOW. GRANTED THE LARGE 50 IN THE BACK IS GOING TO HAVE SOME TROUBLE BUT ILL JUST STAKE IT TO THE CAGE. IT WILL GROW TOWARDS THE SUN ANYWAY. IM SUPRISED I DIDN'T LOSE A BUNCH OF LEAVES AFTER THIS RAIN. MOVING THINGS AROUND AND LOOKING ON THE INTERIOR OF PLANTS I FOUND A COUPLE LEAVES THAT HAD BEEN USED UP. I REMOVED A COUPKE LEAVES THAT HAD DONE THEIR JOB. I'LL UPDATE AS I GO ALONG.

Likes
19
Share

@Still_Smoq
Follow
Week 5, 5-11 September 2025
5-11 Sept - Observed and let the plant grow.
At last a fast week of growth. Whatever the issue was worked itself out and the plant is now thriving. I believe the main problem was the roots did not grow with the speed usually associated with an auto. This could have been my fault because the clay pebbles were rather shallow at the beginning of the grow, and the added expanded clay pebbles a couple of weeks back finally expanded the root system. In any case it is on track now and doing fine.
The end of this week I increased the light power 60%, DLI 37 canopy coverage at 18 hrs.
- 2 Sept changed nutrient solution
- 2 Sept updated feeding schedule
- Using reverse osmosis water with EC/TDS at 0
- Adjusting PH to 6.1 daily using GH up/down
- Nutrient solution EC 1.7 at 69 degrees F
- Light power at 60%, DLI 37 canopy coverage at 18hrs
- Using PYPABL, Air Pump, 400GPH
That is it for this week. Thanks for the look, read and stopping by.


Likes
4
Share


Likes
35
Share


@valiotoro
Follow
A wonderful genetic thank you Fast Buds ❤️🔥🤩
The trim was super easy the buds are FAT & FROSTY full of resin 🤤
I’m very happy with the harvest 103g !!
For the light i’ve used the Spider Farmer SE-7000💡
Likes
56
Share


@simps
Follow
Ok so She is so close to going into flower lot’s of stretching going on I just ordered more nets because she is already like 3 ft over the last netting I put up so I’m hoping this next set of nets will be the last but with the most I don’t no lol I went ahead and stopped topping because I think she is right on the verge of going into flower stage a lot of branching going on up top everything is multiplying on its own really getting thick and full up top this should be an amazing yield I’m hoping for 5 lbs I think I might get it we will see how big and heavy the buds are I’m taking every Necessary precaution for up coming bud Weight Which I have a problem with every year Breaking my branches from weight I learned my lesson so far so good had a wicked ass storm blow in twice this week no breaks no stress Hopefully this will be the last week of veg this plant is awesome If the bud quality is good this is going to be my greatest plant of all time LOL

Likes
101
Share


@Mrs_Larimar
Follow
March, 20th
If i open the Floweringtent, it smells like Hops,
Iam not sure wich Plant it is
Thr purple Queen has asoft smell delicious
Flowers are stacking and The Girls look happy and green
The branches are filled with Flowers... wonderful
one one Plant in the Tent i discovered Spidermites,,,,,,,,,aaargh
I ordered predators
But the purple Queens are clean no insects on them.
As i discoverd very early,,, iamsure i can fight the Pest in the tent
Likes
12
Share

Likes
4
Share


@t0m420
Follow
Since now the plants are ok...zero deficiencies or problems
Hopefully next week the plants will start flowering stage.
Likes
41
Share


@GermanGrow182
Follow
Sehr schlechtes Wetter. Viel Regen, kalte Nächte, kaum Sonne. Es ist voll Herbst. Hoffe, das bessert sich nochmal und frost kommt nicht so schnell...3 fat banana sind geerntet. Eine steht noch. Die mit wasserschaden wachsen kaum noch. Mehr als ein paar gramm werden das nicht mehr..noch läuft es. Bis nächste Woche ✌️
Likes
9
Share


@wheedtobeus420
Follow
Day 69. She’s is coming along amazing. Got her ph under control she is in her bulking phase the pistols are just now turning amber. She’s beautiful. I’m very pleased with her. Can’t wait to grow the others. Really excited to she her progress.

Likes
Comments
Share

@Bir7822
Follow
12 septembre 2025
il ya 1 semaine,des fortes raffales de vents ont endomagé 2 ou 3 branches sur chaque plante. j'ai du mettre des tuteurs et les fixateurs...

Likes
145
Share


@Salokin
Follow
Hello Growmies,
I'm excited to report that the main plant is flourishing! She looks incredibly lush and healthy. I'm delighted with her progress so far. The lower shoots, especially since the topping, have started to catch up nicely. I'm confident they'll reach the scrog by the time I flip her into flower next week. Currently, she isn't stretching enough for further training, but I anticipate this will change with the upcoming flip.
I've also done some defoliation on the lower parts and removed a few less favorable side shoots to promote healthier growth.
The other two plants are coming along in their one-liter pots, although I suspect they're nearing the limit of their root space. It's going to be interesting to see how they adapt as they transition into the flowering stage.
Don't forget, here's a bonus for you: use the code ZAMMIGD2023 at Zamnesia's online store to get a 20% discount.
Thanks for checking in, and stay tuned for more updates next week!
