
Likes
Comments
Share


@CannaBossBizz
Follow
The Moby Dick ist gettin bigger every day. Lovely plant.
Did top her and some LST so every branch's gettin enough light. Stay tuned for more 🤙🏽

Likes
18
Share


@Jays_Not_Here_Man
Follow
Week 8 (Day 56) Flower- Sooo close! Another week done, and just days away from harvest. I’m going to do one more day of light, and then 48-60 hours of dark, then girls get chopped 🤗 They are smelling strong 👃, like OG skunk, sandalwood/cedar and cherry wine. I can’t wait!
I’m looking online for some new Autoflower’s to fill in between getting some new photos going in the new year. New grow starting soon!
Likes
28
Share


@Trickybis82
Follow
Lovely to smoke. With a great weight given the set back with nute lock. Which Is the downfall to this run. Because this happened In last 3weeks which certainly resulted in small buds. However I am totally pleased with final weight and smoke from.this girl. Xx


Likes
24
Share


@CanarianGrow92
Follow
Good week as we had some nice weather, also provided a small amount of iguana grow and she's looking good, still 1 or 2 weeks to go before flowering, I've also started some LST to see if i can keep her small but with some more side branches, hopefully it works 😅 i never trained auto's so lets see 🙈
Likes
3
Share

@GroloCup
Follow
A second Zamnesia selection for this run rounds out a very promising winter cycle! She's swimming in my 60/40 Peroxide and Purified water bath for 24 hours to wake her up then into the Grodan cube to begin rooting up in preparation for the glow up! MegaCrop 1 part, CalMag and Bud Explosion will round out the inputs to the magic grow elixir! Pop some popcorn, find a comfortable seat, and watch this unfold with me !

Likes
22
Share

@CannaArchive
Follow
This week marked the transition from stretch into true flower development 🌸 The plant is nearing the end of the stretch phase, with vertical growth slowing down but not completely finished yet.
• Height approx. ~100 cm
• Stretch almost completed
• Canopy remains mostly even after topping
Light intensity was increased to ~1000 PPFD ☀️ and the fixture had to be raised slightly again to maintain proper distance as the plant continued to grow.
Water demand increased further:
• ~4L every 2 days based on pot weight 💧
Feeding this week:
• 1x BioTabs Bio PK
• Otherwise water + BioBizz CalMag
Environment remained stable:
• ~25°C temperature
• ~50% RH 🌡️
Bud development is now clearly visible across the plant 🌿 Small bud sites are forming and beginning to develop further. Trichome production has started, with visible resin appearing on both the sugar leaves and bud surfaces ✨
Leaf color remains healthy green, though slightly lighter compared to the Chicken n’ Wafflez plants.
Aroma is still relatively mild at this stage.
Despite being the smallest plant in the tent, the Jelly Donutz shows very strong bud development across the canopy, confirming that the earlier topping paid off 💪🍩
Overall this week marks the end of stretch and the beginning of real bud formation and resin production 🔥

Likes
Comments
Share

@PCZECHGROW
Follow
🌱 Day 22 – Vegetative Stage
Plants are 22 days old from sprout. Overall growth is stable and healthy, with no visible deficiencies or stress. Leaf color is good and new growth is developing normally.
One plant was topped on day 22. So far no negative reaction, and growth is starting to redirect into side branches. The remaining plants were left untouched and will be used as a comparison to observe differences in structure and development.
The substrate is holding moisture well, watering is on point, and the plants are responding positively. No training yet on the others, LST planned soon once the stems thicken a bit more.
Goal is a calm, stress-free veg and controlled plant structure going forward.

Likes
295
Share


@Polygus
Follow
Good day to all my friends and visitors here on GD.
Decided to finally finish this diary, I took my time with his one ;)
Now we cut the second POGP auto plant, the first cut you can find in week 17. The plant from week 17 weighted 660g. wet, this one finished at 1,85kg. wet.
The girls where autoflower but thanks to me starting this grow in cold day temps (14 degree Celsius) the started flower really late, maybe that's also the reason for all my problems with this strain during the grow?!
The two plants where different phenotypes, the smaller one (from Week 17)though small had nice hard flowers, the bigger one as the only plant from four I grew during the growop started foxtailing.
Both of them branched nicely the smell was quite strong and awoul xD like gasoline and something rotten, it smelled so bad i checked a couple times under microscope for any signs of mold in the flower and to my suprise I found nothing.
Thank God later during drying the smell would subdue to a more generic "hazediesel" smell
--------------------------------------------------------------------------------------------------
SE7000 done it's magic with this grow as with all my other grow ops.
For anyone who is interested in obtaining this efficient and affordable light fixture ($ to gram) here's the link:
https://spider-farmer.com/products/spider-farmer-upgraded-se7000-730w-commercial-led-grow-light/
A shout out to SSSC for the gift of genetics: supersativaseedclub.com/
Thank you all for your companionship on this voyage, I hope you enjoyed it at least as much as I did.
Also thank you for this awesome year together here.

Likes
39
Share


@G4NJAG4NG
Follow
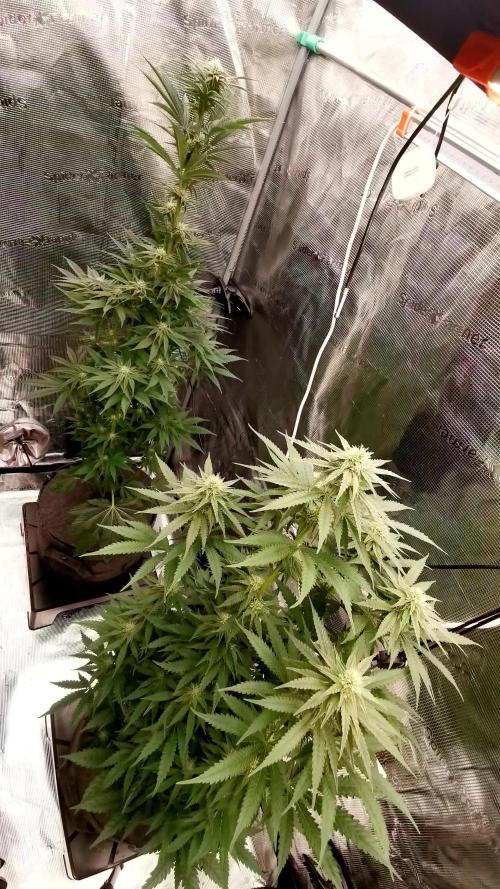
Week 7 - day 43
Well what can I say these girls have made it to week 7 and are now on 12/12 for flowering, yes that also includes the zkittlez OG auto and my little babies at the front, I wanna see how they do on 12/12 for the rest of there growth 😁 overall each of them look amazingly healthy, nice thick stem, pistils already showing on a few and the auto has blown up with pistils!
I can already tell these genetics are set to high standards! There now starting the stretch phase and hopefully in the next couple of weeks we will start noticing some beautiful buds 😍 I have started feeding 2litres every 2-4 days depending, I'm really starting to connect with my girls and know exactly when they need feeding, I have tried to nurture them as best I can! And hopefully this will all pay off 😃
Humidity has been a little high lately, will try my best to lower this over the weekend, added a dehumidifier into the tent which really helps, the humidity seems to only rise when lights off, lights on it sites between 50-60%
Going to book in some free time at the weekend to really do a nice defoliation on these, don't want to do too much though but definitely removing some of the fan leaves and popcorn sites on the lower parts of the plant 😎 the jungle has really taken shape now, I will try to keep you all updated! Thanks for tuning in and as always happy growing!!
180319 - well I did a little defoliation at the bottom of the plants to allow for better air circulation below and to get rid of popcorn branches and shaded fan leaves. I have also added the scrog net back and I am now arranging flower sites. Laughing buddhas took several days before showing any pistils but they are now coming through nicely which means it knows to flower!!! 😂
The humidity is still an issue when lights are off, the reason being is because the tent is getting too cold and therefore the humidity raises - for payday I will purchase a small portable heater and hopefully make room for it in the tent!
I also left my girls unwatered for 4 days on purpose, this is the longest I have waited without watering but there were some springtail pests in the soil, although these don't do much harm to the plants I wanted to rid them as soon as possible and the easiest way is to dry out the environment as water and moisture is what they are attracted to.
Looking forward to the next 2 months of flower!!!
Likes
7
Share


@Krissci
Follow
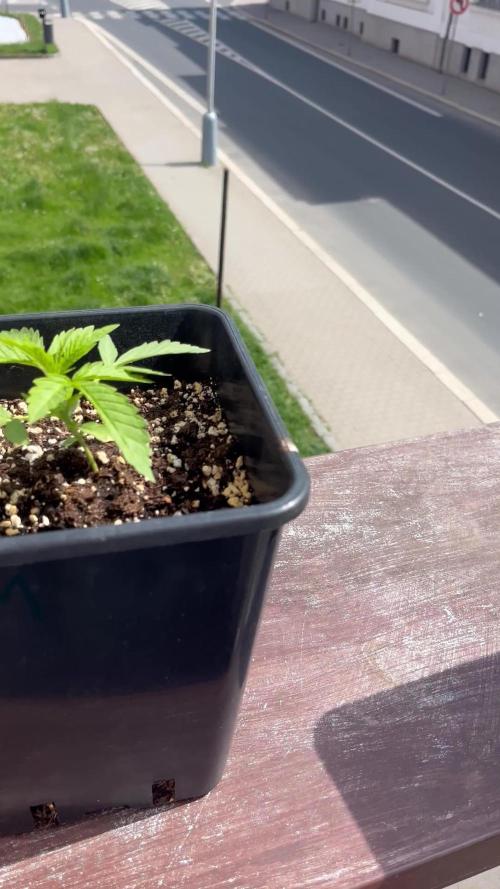
Day 3
1st bit of training this week.
Looking healthy.
My aim is to allow lowest bud sites to keep up with the main heads..
LST LST LST LST LST
During this stage is most important to train Ur plant into the shape u want.
Processing
Likes
31
Share


@Sider79
Follow
Some Faded bottom leaves . Temps are lower . Not sure if my questions are seen but moving forward with my first Auto Blow Dream grow.

Likes
17
Share


@OrganicChronic
Follow
GMO (Garlic mushroom onion) was slow to flower but came on strong weeks 8 and 9 to produce some dense heavy sticky buds. The dry weight of the plant material is unsure, but I’ll report the weight of various bubble microns when dry. Pictures of the dry bubble and maybe a melt shot impending! To dry, I decided to microplane into pizza boxes lined with parchment. It’s been fun growing along with everyone on grow diaries. Awesome
Likes
14
Share


@reirrac1
Follow
Training was hugely successful, and all colas are spaced nicely and pointing at the sky. Starting her out on early flower nutes this week. Feed pH 6.3, EC 1.4.


Processing
Likes
5
Share


@PETEROG
Follow
Hey guys everything is going great with these ladies all 6 germinated and popped up in 3 days after planting 1 of the six shooters is a lot smaller than its sisters so I've order LEMON PIE from FASTBUDS should be here tomorrow to take its place and I'm going to move the six shooter outside so if you would like to see its journey comment and like bellow ⤵️
The only thing I wish I did differently would of been starting these girls under a cfl or a cheap led to stop stretching but lesson learned if anyone has any question's please comment and thank-you all for your support ✌️


Processing
Likes
5
Share


@Organic_LarF
Follow
Hello,
Durban Prison, she's growing very very vigoreous as well. As the entering date is still a long way to go(15 july), and she will be joined by the Green gelato, there is like a lot of space to fill one's they get in the tent(150×120). Now she's bended, and allready into the final container(No soil, just to have a bending that suits the final pot) and I continue doing LST until they enter the tent.
Looking forward to see some progress here. Its the 4th grow of this strain. Last grow was same in out in technique I applied and it made 150 gr dry bud of good quality buds. The only difference is, last year I didnt plan to do this, it just came as an idea, and the preparation of the plant itself was minimal. Only last 2 weeks was used to set some shape.
So I really hope this year will be a succes. Biggest difference will be the lights. From 400w hps to 800w full spectrum Leds, it will, sorry, it has to be dubbled in numbers.
Enough jabbering for NOW! 🤣🙌🤪
Thats it for this week
Grow safe
🍀🍀🍀