
Likes
Comments
Share


@Bread_n_Buds
Follow
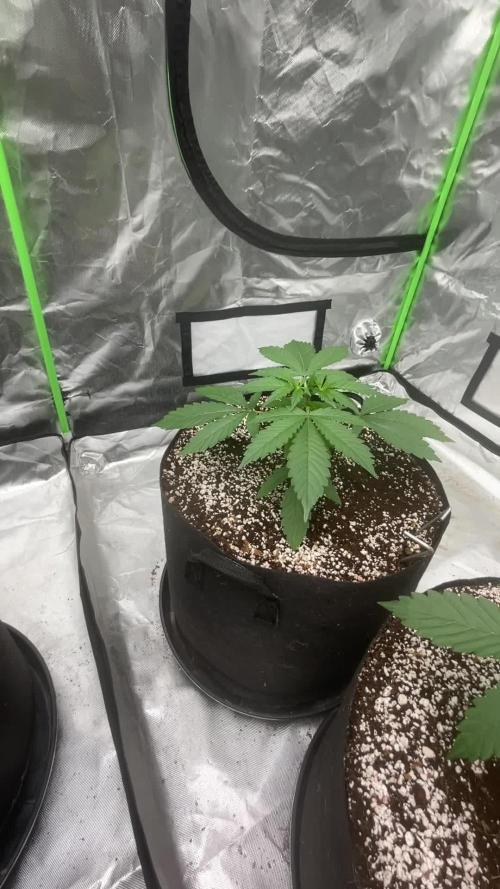
Going into flowering is always a special moment and we prepare to do it at our best to make the plant understand that it is time to become a woman and speed up the start of the formation of buds.
We start with 24 hours of darkness this to give a strong break and sign of change to the plant that understands the change of time and prepares to go into flowering.
Our Black Runtz was worked with a topping x16 buds but unfortunately I got stupid one day and after having vaporized something strong while doing a defoliation, I also cut a branch, our x16 buds became like this x14, story of a bullshit done. I hate doing bullshit and I expose them to public shame to remind myself not to do it again any normal human being would have hidden the fact. But we are not here to comb the dolls so we always tell the truth. It happens and the plant will be super beautiful anyway.
Another thing that gives the plant the signal to start flowering are flowering stimulators, we friends at Plagron use Power Buds.
The start of the flowering program includes the same additives as the vegetative phase Power Roots, Sugar Royal, Pure Zym and adds the flowering stimulant Power Buds. Now the basic fertilizer is Alga Bloom specific for flowering.
Green Sensation will arrive as the hero of the end of flowering and at the same time it will be time to remove Power Roots and a week later the Pure Zym enzymes. It is recommended from the 4th week, if the plants flower quickly I start at the 3rd, it depends on the size of the bud.
---- Decide on the right soil and calculate your fertilizer card based on the soil on the official website. -- www.plagron.com
Try a seed of this strain that drives us crazy..
-------- https://www.zamnesia.io/en/11159-zamnesia-seeds-black-runtz.html
Zamnesia Description // Black Runtz comes from a truly legendary gene pool. Our breeders used three modern classics from the US to create this strain: Zkittlez, Gelato, and Runtz. With 20% THC and flavors of grapes and berries, Zkittlez brought her delicious flavors and relaxing effects. Gelato contributed to Black Runtz's immense flavor profile by bringing high concentrations of the terpenes limonene and humulene. Finally, Black Runtz inherited the high potency of the original Runtz, a strain with a respectable 21% THC. The end result of this 3-way cross is a strain with 55% indica genetics and 45% sativa. Black Runtz boasts fast flowering times, high potency, and contrasting yet balanced terpenes that support her delicious flavor profile.
All the best that mother nature has to offer is at ---- www.zamnesia.com

Likes
10
Share


@asstonmartian
Follow
Fifth week of flower and it was time to defoliate the indoor units as they were starting to get bushy and block exposure to the lower bud sites. Quick work with the bonsai shears and they were ready to soak in the sun. I left the rooftop plants alone as I believe having additional leaf mass enables them to withstand temp and environmental fluctuations better. Whether or not this is the case, it was an experiment.
Likes
21
Share


@Staffedition
Follow
Привет друзья. Моей растихе сегодня 28 дней.
Начал применять LST технику на 19 дне и продалжаю применять её через день, а 18 августа добавил ДЕФОЛИЗАЦИЮ
С 20.08 ДЕФОЛИЗАЦИЮ делаю каждые 3,4 дня
С 20.08 применяю технику LST каждые 3,4 дня
На сегодняшний день влажность 63%
Растение растёт хорошо. генетика радует.
Всем мира и добра!
#Smail_Seeds


Likes
22
Share


@MasterKush714
Follow
11/07/2023...-------======👹YOOOO GANG UPDATE!!!! GOING INTO WEEK 9!!!!! LETS GET IT!!!!!!!👹======----------..........
---------------------------------------------------------------------------------------------------------------------------------------------------
===========================================================================================
👽SOoOOooO WHATS POPPIN GANG!!! LETS GET AFTER IT!!! WEEK 9 BEGINS!!!!!!!!👽
AS WE ARE ENTERING WEEK 9 FOR THIS GROW, IVE NOTICED HOW THIS GIRL JUST CAN KEEP TAKING A BEATING AND KEEP GOING BY THAT
I MEAN LOL DEFOIL AND THE LST/HST, SHE IS REALLY RESILIENT AND JUST KEEPS COMING BACK, VERY INSPIRING REALLY. OTHERWISE, SHE
IS HEALTHY, IM TAKING ADVICE FROM FELLOW GROWERS HERE AND IM GOING TO WAIT UNTILMAYBE THIS WEEKEND TO DO ANOTHER DEFOIL
ORRRR I MIGHT DO ONE ON WED/THURS THIS WEEK WHEN I DO ANOTHER FEEDING, SO YEA JUST KEEPING HER HAPPY AND HEALTHY, THE
BLUELAB PEN IS PHENOMENAL, HONESTLY I SHOULD HAVE TOOK THE LEAP WAY WAY EARLIER IN THE GROW. BUT ALL GOOD WE'RE HERE NOW
LOL, SO LETS KEEP IT GOIN!!!!!!!!!!!!!!!!!!!!!! THANKS AGAIN GUYS WILL KEEEP YOU ALL UPDATED AS THE DAYS AND WEEKS GO ON HAVE A GREAT
DAY AND WEEK GUYS!!!!!!!!!!! LESSSSSSSSSSSGOOOOOOOOOOO!!!!!!!!!!!!!!!!!!!!!!!!!!!!!!!!!!!!!!!!!!!!!!!!!!!!!!!!!!!!!!!!!!!!!!!!!!!!!!!!!!!!!!!!!!!!!!!!!!!!!!!!!!!!!!👽👽👽
--------------------------------------------------------------------------------------------------------------------------------------------------------------------==================================================================================================
.............................................................................................................................................................................................................................................................................................................................
11/08/2023 9:38AM....-------======👹YOOOO GANG UPDATE!!!! WEEK 9!!!!! LETS GET IT!!!!!!!👹=====----------..........
-------------------------------------------------------------------------------------------------------------------------------------------
=======================================================================================
HEYYYY GANG UPDATE!!!!!! DID A HUGE DEFOIL LAST DEFOIL BEFORE MAJOR FLOWERING WILL KEEP YOU POSTED SHE IS COMING IN
SUPER NICE!!!! TONITE WILL BE A FEEDING AFTER I CHECK MOISTURE!!!! THANKS GUYS LETS KEEP IT GOING!!!!
___________________________________________________________________________________________________________________________________________________________
---------------------------------------------------------------------------------------------------------------------------------------------------------------------
===================================================================================================
11/13/2023 9:38AM....-------======👹YOOOO GANG LAST UPDATE FOR WEEK 9!!!!! LETS GET IT!!!!!!!👹=====----------....................
___________________________________________________________________________________________________________________________________________________
😅😷😴
SOOOOO I HAD MISSED A COUPLE DAYS BETWEEN PICTURES I APOLOGISE FOR THAT GANG MY BAD, WAS NOT FEELING WELL AT ALL, CURRENTLY IM
FEELING MUCH BETTER, BUT WE SHALL SEE HOW THAT GOES, ANYWAYS IM KEEPING UP WITH FEEDINGS AND KEEPING A CLOSE EYE ON HER, GOT THE
CAM SETUP AS WELL IN A BETTER POSITION, IT WAS ACTUALLY TAKING ON ALOT OF DIRECT LIGHT FROM THE ARAY 2 LED LIGHT THATS OVER HEAR FOR
THE GIRL, SO MOVED THE CAMERA REPOSITIONED IT, MUCH BETTER YOU WILL SEE IN PHOTOS. SHE IS COMING ALONG NICELY THO NO MAJOR SCARES
YET SO YEA GLAD TO KEEP HER GOING THANKS AS ALWAYS GUYS FOR STOPPING BY AND ALL THE ADVICE AND KIND WORDS LOVE YALL HAVE A GREAT
WEEK AND BETTER DAY!!!! LFGG!!!!!!!!!!!!!👹👽😎

Likes
3
Share

@Greybeardbud
Follow
The girls are just running on autopilot the past week. Have done nothing but give them a feed every 2 days, now increased to 5L ~1.81 ec 10-20% runoff, lights 24/0 50% veg channel only. lights fixed 1.5m from top of pot so still plenty of room to grow. They all look really healthy. 2 typical phenos here, 2 @ 16cm, 1 @ 14cm, then the other 3 are 20, 21, 22cm. Expecting to see 3 tall stretchy plants and 3 compact at the end will be introducing 15% bloom channel today to start the full spectrum and preparing them for bloom when it happens. I am not expecting to see pistils for another 1-2 weeks because of the pot size it will take a bit longer for the roots to hit the edges
Week 3 day 2 update: well I was wrong. Noticed tonite we have pre flowers forming, I guess in a few days we will have pistils. Have kept veg at 55% and increased bloom to 25%. Once pistils have started to emerge will transition canna bloom into the mix


Likes
16
Share


@DeepRootsGrowTrees
Follow
GORILLA MELON / 420FASTBUDS
Week #8 OVERALL
Week #7 VEG
This week she's still under heavy training as I'm trying to manulipate her and maximize her buds sites she's definitely responding well to training as she's also being grown in a bud cup!!
Stay Growing!!!
Thank you for stopping by and taking a look it's much appreciated!!
THANK YOU 420FASTBUDS!!
BUDTRAINER.COM
BUD CUPS / BUD CLIPS
GORILLA MELON / 420FASTBUDS

Likes
4
Share


@Kronen
Follow
Mohawk Meds: Banana Flambe (BF): Week 4 (28 Days from seed) looking healthy and growing like triplets. Received results from Genetic gender testing and BF #1, #2, #3 are all Females, #5 Male and was culled. All were transplanted to 1-Gal Pots in Sohum Living soil for Cannabis with Wollastonite mineral (Silica/Cal) & Mycorrhizae fungi additive. Slightly light green from a bit of overwatering otherwise healthy. Environment: 78F, 52% RH, 600ppm CO2, & 750-850ppfd. 👌
Likes
92
Share


@DogDoctorOfficial
Follow
🌱 Week 2 Report: The Journey Evolves 🌱
Grow Fam, the adventure is in full swing! 🌟 The Gorilla Melon from Fast Buds is out and shining its light, and the Papaya Zoap has made its debut in the Cannakan, bringing with it a story that adds even more depth to this incredible run.
When the universe speaks, we listen. 🍈✨ I didn’t plan on popping Papaya Zoap from Sweet Seeds just yet, but sometimes things just have a way of aligning. After a few other seeds didn’t germinate, I felt an inner pull toward this special strain. As it turns out, the universe had something beautiful in mind! Just days later, my brother @daggadna also began germinating the same genetics—gifted to us during Spannabis. Was it a coincidence? I don’t think so. 🌱 This is more than just a grow now—it’s a journey with purpose, guided by synchronicity and connection. I can already feel the magic building up with this one, and I can’t wait to see where this road takes us!
Now, onto the Papaya Zoap… something tells me this plant is going to take us on a ride we didn’t expect but absolutely needed. 💚 Let’s make something incredible, Brother Dagga—this one’s going to be legendary.
Gear Updates: All Systems Go 🚀
This week, everything’s dialed in perfectly with the TrolMaster system. Shout out to the incredible DSH-2U Humidity Station! 🌬️ This tool is giving me precision control over the RH (relative humidity) ranges in the room, keeping the environment just right for my babies. Having that accurate readout and control allows me to maintain optimal levels for each stage of growth. It’s like magic—you plug it in, set the desired ranges, and let it do its thing! 🌡️
By monitoring and adjusting humidity levels on-the-fly through the TrolMaster app, I can ensure the environment remains stable, and that means happier plants and healthier growth! No more guessing games. From anywhere—whether I’m working in the garden or chilling out—I can track and tweak it all. Heck, I could be on the toilet and still have complete control over my room! 😂
The AMP-3 Precision Meter has been running 24/7 in my water solution, giving me real-time updates so I can make any corrections when needed, right from my phone. This tech has taken my grow to another level. ✨
Nutrition Update: Keeping It Balanced 🍃
As for feeding, we’re sticking with the basics to give the plants what they need, without overloading. Right now, I’m running:
• Regulator: 0.15ml/l
• Startbooster: 0.25ml/l
For now, I feel like this is the sweet spot—just enough to encourage root development and early growth without overloading them. I’ll be adjusting the feed as we go deeper into the grow, keeping an eye on how they respond. You know me, always tweaking and improving along the way!
Shoutouts & Gratitude 🙌💚
Huge love to everyone following along—whether you’re here on Grow Diaries, over on YouTube, or on IG. Your support keeps this journey alive, and I am so grateful for every comment, like, and message! Special shoutout to my sponsors for fueling this project:
• Nutrition: @aptusholland @aptus_world @aptus_es @aptusbrasil @aptus_thailand @aptus_portugal @aptususa_official @aptusplanttechnz @aptusplanttechaus
• Controls: @trolmaster.eu @trolmaster.eu.support @trolmaster.support @trolmaster.agro
• Soil: @promix_growers_eur @promix_cannabis @promixmitch
More to come soon, and you won’t want to miss it! 📺 I’m also documenting everything on my YouTube channel, and I’ll be sharing behind-the-scenes content on IG, so hit that subscribe button and follow along. Let’s grow together, fam!
Growers Love to All 💚
The love and support from the grow community is something I never take for granted. This journey wouldn’t be the same without all of you! I’m so honored to be part of this amazing community, and I can’t wait to share more updates and insights along the way. Remember, this isn’t just about growing plants—it’s about growing together. 🌱
Until next time, stay positive, stay inspired, and keep pushing forward!
This week’s shoutout is dedicated to the synchronicity of life, my growing community, and of course, Papaya Zoap and Gorilla Melon. Let’s see what magic we can create together!
#HighFrequency #PositiveVibesOnly #PapayaZoap #GorillaMelon #TrolMaster #InBalanceWithNature #GrowLife #AptusTruePlantScience #GrowersLove


Likes
8
Share


@Kitties_and_Colas
Follow
I believe last week's flush may have fixed my PH issue, the yellowing (mag deficiency)
seems to have stopped spreading..

Likes
90
Share


@DreamIT
Follow
🍊🏵️ Red Mandarine x9 SoG X ViparSpectra XS1000🍊🏵️
🏵️8.6 ...
🏵️9.6 Last day before harvest, yeah !!!!! It is really gorgeous !!!
🏵️10.6 ...
🏵️11.6 ...
🏵️12.6 ...
🏵️13.6 ...
🏵️14.6 Latest photos of the plants still in pots, they are already hanging ready to be cleaned
_________________________________________________________________________________________
❓ Are you new to the world of the cultivation and don't know where to safely buy your seeds?
😮From SweetSeeds you can find award-winning, sweet, fast, fragrant, beautiful, and delicious genetics !!!
✅http: //bit.ly/SweetSeeds_
______________________________________________
👀 Are you looking for a good lamp to start with? 👀
🌞Viparspectra has something more than the others, take a look at their site.
⏩ Use "GDVIP" for an extra discount or "ViparDreamIT" for an extra 5 %% discount
👀 Search for it on Amazon
✅Amazon US: https://amzn.to/30xSTVq
✅Amazon Canada: https://amzn.to/38udUVe
✅Viparspectra UE: bit.ly/ViparspectraUE
👀 Watch my ViparSpectra XS1000 unboxing on YouTube, leave a like and write to the channel 🦄
✅http://bit.ly/UnboxingViparSpectraDreamIT
______________________________________________
📷🥇 Follow the best photos on Instagram 🥇📷
https://www.instagram.com/dreamit420/
🔻🔻Leave a comment with your opinion if you pass by here🔻🔻
🤟🦄💚 Thank you and enjoy the growth 💚🦄🤟
Likes
252
Share


@Tropicannibis_Todd
Follow
💩Alrighty then Growmies We Are Back At it 💩
Well folks we just finished up the last run and so we are back to do it all over again 😁
So what do you say we have some fun 👈And what we got here folks is a Strawberry Blast 🍓 🍓 🍓 🍓
Strawberry 🍓 Gorilla , Strawberry 🍓 Banana 🍌 and there new release 🍓 Ztrawberriez 🍓 from FastBuds
And we also got Strawberry 🍓 Cola from Exotic Seeds
👉 Well we are now around day 63 growmies and its been a good week 👈
So we are finally getting close to the final stretch and things are going great 👍
So all 4 are preforming really well even the Strawberry Banana shes really moving now finally😉 The TinyPot is doing exceptional 👏 maybe first to chop 😀 soon 😀 😉
They all smell awsome , each is very different , sweet , berry 😋 Really happy with them .... 😌
FC4800 from MarsHydro Lights being readjusted and chart updated .........👍I've added a RU45 to the mix 👍
www.marshydro.ca
👉I am using Agrogardens for nutrients for my grows and welcome anyone to give them a try .👈
👉 www.agrogardens.com 👈
Agrogardens Cal MAG
Agrogardens Grow A+B
Agrogardens Bloom A+B
Agrogardens Bud Booster
Agrogardens PK13/14
I GOT MULTIPLE DIARIES ON THE GO 😱 please check them out 😎
👉THANKS FOR TAKING THE TIME TO GO OVER MY DIARIES 👈
Would you like to hang with the growdiary community 👉 https://discord.gg/gr4cHGDpdb 👈

Likes
1
Share

@LokalGrenz
Follow
7/28 some light lead pulling removing bottom area and sites that I fill be waste of time taking energy from the tops still RO water and tea every other week

Likes
18
Share


@Pokan187
Follow
This week went by well, I will start checking the trichomes on the Runtz at the end of this week. It should be ready for harvest in the next 2 to 3 weeks
The G13 is still smelling like magic, looking majestic.
The GDP buds are starting to put on weight
Likes
45
Share


@BodyByVio
Follow
Beautiful flower full of trichomes. Smell and test fantastic. Very fast flowering. She was done on day 49 but I cut her down few days later.
I love the strain, the only thing that I will like this strain to have is a better yield. Beast quality buds I ever grew.


Likes
5
Share


@Pureleelove
Follow
So this week she has started to really put on some chub. She's frosty like a frosty flake. I also just love her light green. Super super light green. But strong dark green healthy leaves still no sign of stress (although I can't really know deeper than what I can see- she might be mashing for some KNF shit-which I rate all plants probably are). I wanted to use supplements like OHN ( Oriental Herbal Nutrient), FPJ (Fermented plant Juice) and trying to create more living soil but I was just very busy with work at this point and did not get to making the pro-biotic supplements. Next grow I have already made some ferments and intend on making more to aid nutrition during the next ladies that get laid.
But Maria's got about 11-12 Big colas, but looking back I would maybe have continued to try to keep the heads a little further apart so more light could break through to the lower nodes. I also think an investment in a proper HPS bulb-reflector would do wonders, I was using a homemade foil device to reflect light back down to the plants (NOT EFFICIENT, or sexy, but ay.)

Likes
5
Share


@JardineiroBr
Follow
Chegando ao fim mais um ciclo , gostei das sementes e o resultado final ainda que não seja muito em quantidade pode ser favorável em qualidade .
