
Likes
Comments
Share


@Bread_n_Buds
Follow
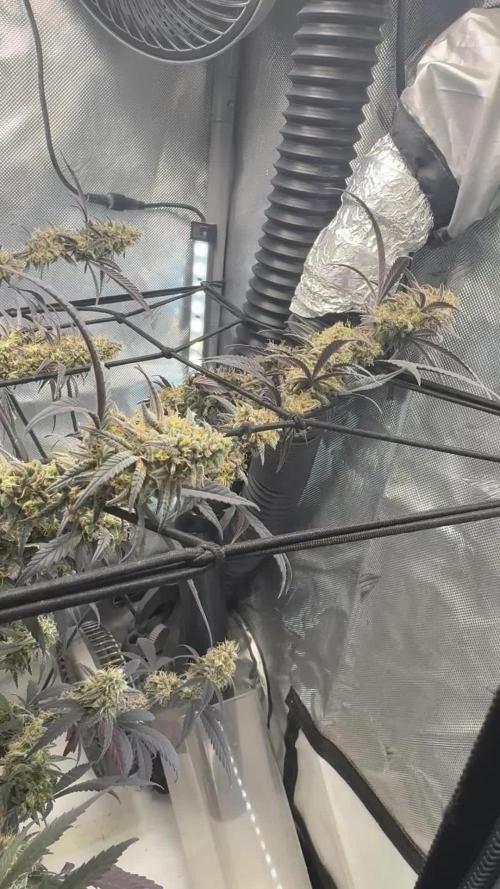
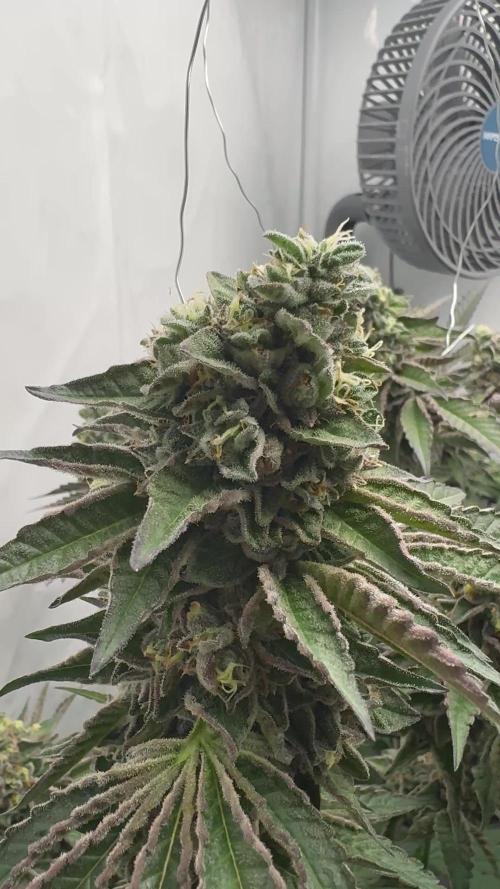
Here we are at the harvest of one of the masterpieces of the season, Rainbow Sherbet Automatic by Zamnesia.
** We remind everyone that we have grown two plants per strain, one without the aid of any technique and the other instead worked with the techniques described below.
Technique used // The plant was worked with the MAINLINING technique, particularly successful in this case because I managed to create the main stem parallel to the soil in a truly elegant way. We waited for the second internode and did the TOPPING (at the second to lengthen the vegetative phase in autoflowering plants, it is also better to keep the stem low); from this topping a MAINFOLDING was done cleaning everything that was underneath in the underlying internodes and leaving only the two mini branches to grow as a result of the first topping, the Mainfold precisely (** IF YOU LEAVE OTHER BRANCHES YOU CAN'T TALK ABOUT MAIN LINING THE NAME ITSELF SAYS IT). We lowered the two branches with the arches in LST up to the third internode of each respective branch and we did the TOPPING once again, from here the plant was left to grow directing it with LST as best we could. I probably left a little too much stuff underneath, I could have cleaned a little more.
Better with the techniques or normal? It is a plant with a medium-high distance between internodes, the Mainling was truly perfect. This time I am inclined towards the plant worked with the techniques.
This is another confirmation that MAINLINING on AUTOFLOWERING in my opinion is only indicated in plants with medium-high internodal distance. If the plant is a declared tall plant, in short, this work can be done, if it is short it can be done too but keep in mind that it remains small.
Flower quality // The buds resinified very well, in fact probably something more than very well. I love the resins that are produced in winter. You can see it in the macros at different distances, there is a lot of resin well distributed. The buds are also nice and hard and look much better than the plant left to grow straight which was super resinous anyway. We washed the buds, it is essential, try following the Zamnesia guide and you will see how your buds will taste!
Check the article in your language // https://www.zamnesia.io/it/guida-growing-cannabis/333-lavaggio-delle-ceme
Trichomes // Here we have an absolute majority of milky and cloudy trichomes, still some transparent and some amber, it is not super ripe but for me it is fine.
Fertilizers // I am very happy with how I managed to unload the plant which at a certain point before going to flush was fed for a few days only with additives and then went to flush and we are discolored enough. This is a yellow that satisfies me to go to crop and vaporize a delicious plant with no residue of nutrients inside.
All Plagron fertilizers and additives in the green / 100% organic version have fully satisfied me. Choose your soil according to your style and calculate the sheet on the website www.plagron.com
The fertilizers instead are found in convenient all-inclusive packages on the Zamnesia website.
Try a seed of this variety belive in Zammi i superlove this strain..
---- https://www.zamnesia.io/en/11230-zamnesia-seeds-rainbow-sherbet-automatic.html
Zamnesia Description //A cross between Pink Guava, Sunset Sherbet and a hint of ruderalis, Rainbow Sherbet Auto offers a wide range of flavors, effects and more. This 70% indica-dominant strain reaches considerable THC levels (24%) and is suitable for both experienced growers and those taking their first steps in the world of cannabis cultivation..
Music and frequencies // For about 4/6 hours a day my plants listen to 432 Hz frequencies made especially for their well-being and sometimes a bit of black music to give them those vibrations that only music can give. www.radionula.com
All the best that mother nature has to offer is on ---- www.zamnesia.com

Likes
101
Share


@DevilsBud
Follow
Week 2 of veg Afghani Gold
Start of new week everything going as planned i will be bumping up the nutrients and by end of the week will be transplanting to 8 L fabric pots.
Posting pic of progress Tru the week see you next week
23/9/21 transplant complete mix some Easy Boost Organic Nutrition with my Plagron batmix work great last time also made video
Happy growings Growmies thanks for popping by 🤘🏻
visit www.marshydro.eu
for your best gear and use the PROMO CODE: DEVILSBUD
Fully marshydro supported Setup:
Marshydro GT100X100X180
Marshydro Ts 1000 LED lamp
soil :Plagron batmix
Nutrients :Advanced Nutrients
Advanced Nutrients pH Perfect Bloom
Advanced Nutrients pH Perfect grow
Advanced Nutrients pH Perfect micro
Advanced Nutrients B-52
Advanced Nutrients Voodoo Juice
Advanced Nutrients Rhino Skin
Advanced Nutrients Big bud
Advanced Nutrients Bud candy
Advanced Nutrients Overdrive
Advanced Nutrients flawless finish
Advanced Nutrients Sensizym
BioBizz - Calmag
Mars Hydro tent handy info
Lock All Light Inside: MARS HYDRO Grow Tent Interior is made of diamond mylar. Non-toxic to the environment, no harm to plants. High-quality 1680D canvas being double stitched, (ALL OTHERS BRAND grow tent is 601D canvas) which is tear-proof for perfect light locking, No light leaks or rips at all.
Durability Grow Tent :Stable Metal corner adapters and poles are the trustful supporters of the tent. No rusting nor paint-falling. Quick easy tool-free installation. Carries strong heavy-duty SBS zippers, double layer lining to create a light-proof seal.
Easy Observation of your Plants: Special peek👀 window made by double layers of cloths. Observe the growing conditions of your plants without opening the tent and avoid disturbing plants. The peek window also serves to dissipate heat and ventilate air.
Removable Tray Keep Clean: The package includes a removable waterproof floor tray to hold soil and fallen leaves. The tray can be taken out easily to wash. Removable and water-proof cleaning easy.
Good Ventilation&Fast Assembly: Circular double-sleeved vent holes with adjustable nylon strap for air circulation by exhaust fan, ducting, carbon filter, or reflector. Better allows proper light, heat, and airflow. Quick tool-free installation. Reinforced by a sturdy metal frame to ensure security and stability, supports up to 140lb. Perfectly safeguard your plants to thrive even in winter.

Processing
Likes
16
Share


@Andres
Follow
I still have to wait for about 8 weeks, I believe in the open air ... they already have a smell of fruit and forest ... with one of them has nutrients from the biobizz tripack ... because it had a lack of nutrients ... a measure 40 cm and the ptra is around 1.70 ... waiting for the fattening of buds

Likes
9
Share

@MotoXfarmer
Follow
This is the Cherry Slimeade! I know it’s been a minute, but I’m back and the Corleon Kush harvested perfectly.
This is the CherrySlimeade from a bag seed. Got about 20 days left maybe! Since I stretched her out and have been fee Her every 2 watering now and keeps asking for more, I’m giving a bloom booster added as well. But all in all a beautiful specimen of a plant and the smell is a cherry gassyness if that makes any sense it kinda lingers in your nostrils for a minute.. definitely need a carbon fil For this stanky lady!!! Purple hues coming in nicely here in late flower! My next grow will be femanized seed for sure so I can feel a lil better about taking a lot of the small stuff off with out stressing it to herm!! Love this plant
Likes
8
Share


@STAYINGONMYMAINCBATORUNTWO
Follow
I’ll be most definitely harvesting these next week! I will continue with water from now until they are ripe and ready! They are absolutely smelling like a cake and candy like a lime doughnuts with marshmallow toppings like a whole sweet shop! Like I dipped my head in a pic and mix bucket, like Im wreck it Ralph and I’ve crashed into candyland! Makes my mouth dribble! The buds are starting to swell too so thinking next 7 days I’ll be ready!
Next upload will be harvest hope you like buddies! I’ll be hang drying this time! As I’ll have space and a tent to do it in as before I didn’t and used the brown bag method! But I can maintain between 14c - 18c with a humidity of 42 percent! So I’ll hang dry this time!
Any suggestions?? Let me know! I’ll be putting 2 fans on them for air circulation and a air vent only sucking out as it will draw air in on its own and keep the humidity lower in the tent while drying!

Likes
10
Share

@PrinceOfHerbs
Follow
The plant is now becoming more and more mature, I have started to discontinue the fertilizer and only water with CalMag fertilizer, and very little at that.
The color of the leaves now clearly changes to purple. The smell is sweet but still slightly citrusy.
The plant will now be harvested in about 10 days.
Ph value, Dli and ppfd still the same
Flowering day: 56

Likes
62
Share


@Santica_Garden
Follow
So apart from the really low yields.... Which I expected from 80% Indica dominant strains just not that low considering how dense the Budz were. But I can say my growing skills have been consistently improving and it is showing with each grow.
With these ladies I should have definitely put them in a 12Litre pot or smaller and still would have gotten the same results if not better. So I lesson learnt for future grows..... To take into consideration the size pots I'm using on the strains I'm running! 👍🏾
But in all very great smoke, even more excited for the next rows that I have coming with the improvements I will be making. 👍🏾🌱💚
Another thing I will say is that I will be putting more effort into how I document my harvest for you guys.... More pictures, better videos showing off the Budz.... Not many pictures because I done smoked it all 😅😅🔥🔥🔥 but still I want to do better for you guys, I want to give people the best view/review of the strains that I run... The information will help someone that decides they might want to run this strain in the future!
Any questions guys just ask away 👊🏾😎

Likes
17
Share


@420DeepGrow
Follow
Gracias al equipo de Seedsman Marshydro XpertNutrients y Trolmaster sin ellos esto no sería posible.
💐🍁 Tangerine Snow F1 Fast:
Esta gran cepa es un cruce de cuatro vías 75% sativa de (Boost x Tangelo) con (Lavender x Power Plant). Este híbrido Fast F1 proviene de la genética Cali y cuenta con excelentes terpenos cítricos, alta producción de resina para extractos, altos niveles de THC, muy buenos rendimientos y excelente resistencia al moho. Tangerine Snow F1 Fast se puede cultivar tanto en interior como en exterior. Los tiempos de floración en interiores son de entre 8 y 10 semanas, mientras que el tiempo de cosecha en las latitudes del norte es en septiembre, mientras que en el hemisferio sur los productores cosecharán durante marzo. Las regiones climáticas recomendadas son cálidas, secas, húmedas y cálidas. Se trata de plantas altas, semiramificadas, que superan los 200cm y que presentan un alto vigor con muy buena uniformidad. Al igual que muchas otras variedades con fuerte dominancia sativa, Tangerine Snow F1 Fast ofrece una excelente resistencia al moho, así como a las plagas y enfermedades de las plantas. La combinación de terpenos cítricos y mucha resina la convierten en una cepa de muy buen extracto, cuyo método de "lavado" produce muy buenos rendimientos de hachís. El perfil de terpenos cítricos recuerda a las mandarinas y mandarinas y también tiene notas dulces. La producción de THC ha sido verificada en laboratorio en un fuerte 24%, mientras que el CBD es bajo. El efecto es edificante y energizante, perfecto para usar durante el día y las primeras horas de la noche.
🌻🚀 Consigue aqui tus semillas:
💡TS-3000 + TS-1000: se usaran dos de las lámparas de la serie TS de Marshydro, para cubrir todas las necesidades de las plantas durante el ciclo de cultivo, uso las dos lámparas en floracion para llegar a toda la carpa de 1.50 x 1.50 x 1.80.
https://marshydro.eu/products/mars-hydro-ts-3000-led-grow-light/
🏠 : Marshydro 1.50 x 1.50 x 1.80, carpa 100% estanca con ventanas laterales para llegar a todos los lugares durante el grow
https://marshydro.eu/products/diy-150x150x200cm-grow-tent-kit
🌬️💨 Marshydro 6inch + filtro carbon para evitar olores indeseables.
https://marshydro.eu/products/ifresh-smart-6inch-filter-kits/
💻 Trolmaster Tent-X TCS-1 como controlador de luz, optimiza tu cultivo con la última tecnología del mercado, desde donde puedes controlar todos los parametros.
https://www.trolmaster.com/Products/Details/TCS-1
🍣🍦🌴 Xpert Nutrients es una empresa especializada en la producción y comercialización de fertilizantes líquidos y tierras, que garantizan excelentes cosechas y un crecimiento activo para sus plantas durante todas las fases de cultivo.
Consigue aqui tus Nutrientes:
https://xpertnutrients.com/es/shop/
📆Semana 12:
Definitivamente ella está en fase de floración, cambio el abono de crecimiento por abono de floración, está cargadisima de resina.

Likes
42
Share


@DrLaggis
Follow
🌱 Day 50 - First Day of Week 8 🌱
Hello, Grow Friends!
My plant is doing well, and it’s amazing to see visible progress every few hours. 🌱✨ The buds are in full throttle, and I feel like the plant is now needing more water as the pots are drying out faster. 💧
Watering:
I’m still watering with 1L every two days. 💦 The dosage of BioBizz Grow and BioBizz Bloom has been increased according to the BioBizz feeding schedule. The pH of the water remains constant at 6.0. ⚖️💧
Temperature & Humidity:
Luckily, the weather in Germany is cooling down, so I no longer have to deal with temperatures of up to 30°C in the tent. 🌡️🍂 I’m expecting temperatures to settle between 18-23°C now that we’re in September, and humidity should stabilize around 50-55%. This will create perfect conditions for the upcoming drying process. 🍃✨
Plant Health:
The plant is looking good overall. 🌿 I did have some calcium and magnesium deficiency symptoms recently, but I’ve managed to get that under control with CalMag. 💪 I’m continuing to carefully remove any leaves that are noticeably blocking light to the buds and hindering photosynthesis. 🍃✂️
Vibes:
Every day, my plant still enjoys an hour of Lo-fi Jazz music. 🎶🌱 I think it helps set the perfect growing atmosphere. 🎷
I’ll keep you all posted, and remember, I upload new pictures to the diary every day! 📸🌿 Stay tuned!

Likes
16
Share


Likes
11
Share


@Glen1818
Follow
Led runs on 74watt, grow very fast
Removed some large leaf,
On day 28 removed again larger leafes , think i will send them in the flower in a few days


Likes
Comments
Share


@andzzz
Follow
elongated stems made me worry, but they only needed little support
at day 3 I started spraying them every 2.5h with filtered water

Likes
Comments
Share


@Cmccart
Follow
Can’t get the humidity down but it’s within vpd so hope that’s okay

Likes
4
Share


@thefrozenking
Follow
great week! they are really getting dence. had to tie up the wedding glue and put up a trellis to keep it upright.
down to base nutrients. will flush next week.
Likes
11
Share


@sweetkaya
Follow
Harvested at day 116, had some problems of high inflow pH at week 11 that has a little decreased the final harvest, in my opinion. But I'm proud of my job cause that was the ONLY little problem in the entire grow. Keep Growing and learning everyday 🙏🏻💚🤞🏼🕉️


Likes
6
Share


@Flex1
Follow
Day 68: top dressed a few days ago with some castings and build a flower and did a good watering. Definitely have been underwatering as i can finally see the lady perk up and start praying. I was doing 1 heavy watering / week but i think that should change to a 5% watering every 3 days or so. Flipping to flower this coming week. Another compost tea will be done this weekend as well in preparation for the 3 week stretch.
Outdoors has reached 14 hrs of daylight so im thinking of replanting the small potted one outdoors (in the ground) after i take some cloans.


