
Likes
Comments
Share


Likes
17
Share


@RakonGrow
Follow
**** HAARVEST ZOE ****
Nice Strain ,
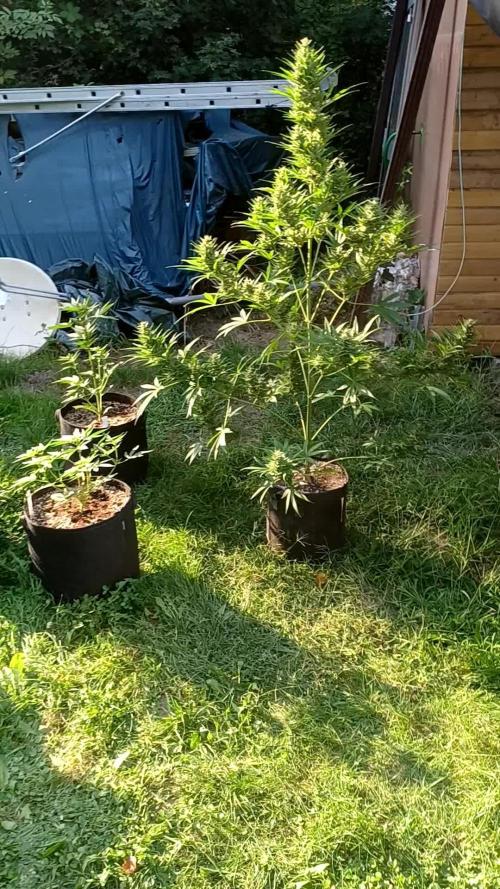
My little Zoe really made all the mistakes you could possibly make. No matter when I give light or want water or fertilizer. It grows and grows and grows, the main thing is that there is light. It was one of my free seeds from Zamnesia. So far all seeds have germinated. I store my seeds in a dark, airtight container at 6°C. Tastes kind of sweet after curing.
Greenhouse Feeding is a really easy fertilizer to use. I used the BioEnhancer again and again. My little Zoe thanked me. The BioGrow was used as topdressing and is doing its job. The BioBloom also does its job at the right time.
And that's really great and easy if you don't have an autoflower. Of course there is a corresponding product. But I was happy to get anything here at all. Legalization has wiped out the market. But for next time I have an appropriate soluble fertilizer for fast-flowering plants. It doesn't work for 8 weeks :))
I use a Sanlight Evo 3-60 1.5 with Bluetooth dimmer. There's nothing to complain about there. Set daily cycle via app. Helpful if the weather or environment is so bad that you have to regulate the light intensity.
33g after 5 days dry . 24.5 °C to 22°C with 50%-60% .
curing in a vaccum box at 18°C .
It looks like I'm drying too long. // It tastes a bit crunchy.
Day 79:
trim , slow vacuum box to cure 22°C and 61%rH .
Day 76:
videostuff: been drying for 4 days (res 640x480) ( optical zoom x200 - x250 )
Day 72:
DLI usage total this Plant : 2236.6 DLI in 70 Days .
wet trimmed, cut off, hung upside down. see you after 14 days
Day 71:
preparing for harvest . 24h long night session .
DLI : 0
Day 70:
- Sanlight DaylightCycle
- + ON 200PPFD (00:00) - 800PPFD (03:30) - 800PPFD (16:30) - 200PPFD (18:00) OFF
video and photo tryouts with the digimicro mobil x300 optical zoom , mostly freehand
Day 69:
- Sanlight DaylightCycle
- + ON 200PPFD (00:00) - 1000PPFD (03:30) - 1000PPFD (14:30) - 200PPFD (18:00) OFF
incredibly hot and rain. lost some terpene :)) Well, summer is coming,
Day 68:
- Sanlight DaylightCycle
- + ON 200PPFD (00:00) - 600PPFD (00:30) - 800PPFD (03:30) - 800PPFD (14:30) - 600PPFD (17:30) - 200PPFD (18:00) OFF
- Added 1L bottle of water
It's hot, hot, hot, Zoe would like more water.
changed daylight cycle so it match the weather problems. tent is open until my real night comes.
103 flowers (including popcorn) counted, due to an accident about 15 flowers are missing.
Day 67:
- Sanlight DaylightCycle
- + ON 200PPFD (00:00) - 600PPFD (00:30) - 900PPFD (03:30) - 900PPFD (14:30) - 600PPFD (17:30) - 200PPFD (18:00) OFF
- watering bottle water 1.75L
weather to hot , changed daylight start time and daylight cycle so it match the weather problems.
I'm lucky, buds are still growing :)))
Day 66 (we are on the road with maximum sanlight )
- analyse some trichome .
- make some Zoom Pics and Video stuff .
- Sanlight DaylightCycle :
- + ON 200PPFD (00:00) - 1000PPFD (00:30) - 1000PPFD (13:30) - 800PPFD (17:30) - 200PPFD (18:00) OFF
- DLI will stress alot ...
Anyway, it's too hot in my room... I open the tent and now everything is fine with the temperatures and I increase the Sanlight to 100% for the first time. May Zoe love it or leave it :)) We'll see what happens
Day 65 :
Sanlight DaylightCycle : ON 200PPFD (00:00) - 800PPFD (00:30) - 850PPFD (13:30) - 800PPFD (17:30) - 200PPFD (18:00) OFF
It will soon be ready for harvest.

Likes
56
Share


@nonick123
Follow
Día 50 (09/12) Busy time
Solo riego!
Día 51 (10/12) CBD Auto 20:1 #1 no para de crecer! ¿Parará el stretch? 💥
OG Kush Auto avanzan las manchas en las hojas... ¿Será deficiencia o carencia?
Día 52 (11/12) CBD Auto 20:1 #1 está demandado más agua. Subo a 1500 ml / día de H2O RO
CBD Auto #2 está ralentizando el consumo de agua (el top se muestra húmedo). ¿Estará entrando en la fase final de floración?. Según FastBuds le quedan 11 a 18 días!
OG Kush Auto también demanda más agua! Subo a 1250 ml / día de H2O RO
Día 53 (12/12) CBD Auto 20:1 #1 es increíble como no para de estirarse y de formar nudos y hojas! Parece una Sativa pura que nunca para de crecer en floración!
CBD Auto #2 empieza a mostrar algunas hojas con senescencia. Se acerca la cosecha!
LSD-25 Auto está haciendo unos cogollos densos y duros como rocas 😍💥 No está tampoco lejos de la cosecha! 💥💨😁
OG Kush Auto produciendo una resina brutal en las hojas de azúcar! 😍
Día 54 (13/12) CBD Auto 20:1 #1 no para el stretch. Le hago una poda de bajos y ligera defoliación
OG Kush Auto está generando una cantidad de tricomas increíble. Además huele a Kush deliciosamente 😍😍😍
Día 55 (14/12) CBD Auto 20:1 #1 para un poco el consumo de agua en ¿Fin del stretch? Casi toca la lámpara de nuevo!
CBD Auto 20:1 #2 empieza a mostrar la senescencia.
Reviso los tricomas con muchos turbios y alguno transparente. ¿Estará en una semana más aproximadamente? 🤔
Día 56 (15/12) OG Kush Auto ha bajado un poco el consumo de agua
La cantidad de tricomas que está haciendo es insana e increíble. Y como huele! 😍
LSD-25 Auto muestra los tricomas trasparentes y algunos turbios. ¿Quizás dos semanas para la cosecha?
💦Nutrients by Bio Tabs - www.biotabs.nl/en/
🌱Substrate PRO-MIX HP BACILLUS + MYCORRHIZAE - www.pthorticulture.com/en-us/products/pro-mix-hp-biofungicide-plus-mycorrhizae
"GDBT420" 15% DISCOUNT code for the BIOTABS Webshop https://biotabs.nl/en/shop/
Likes
12
Share


@VaruSmokings13
Follow
Comenzando la tercera semanita, con estas niñas, que tienen buen aroma y aspecto, ya aplicamos fert. Por primera vez.
"Crema de caramelo" sweet seeds.

Processing
Likes
5
Share


@Andres
Follow
hope ... it's not too late to change to a 20-liter pot ... she grows healthy ... the days are cloudy ... let's hope it's abudant...

Likes
10
Share


@MedicinalGrower
Follow
1st Week went very smooth without any problems.
2nd Week feeding only water until transplant day.
Transplant Day 14
Likes
8
Share

@UnitedStrainsGermany
Follow
Sie legte soviel zu das gibt es nicht so durstig sie wird doch noch ein Biest!!!!!!!dachte das wird jetzt gar nichts aber sie will so arg Growmies!!

Likes
141
Share


@Anonymous_2022
Follow
Thanks for stopping by.. Please hit the like button if you like what you see and ill be sure to check you out too Growmies 🌱
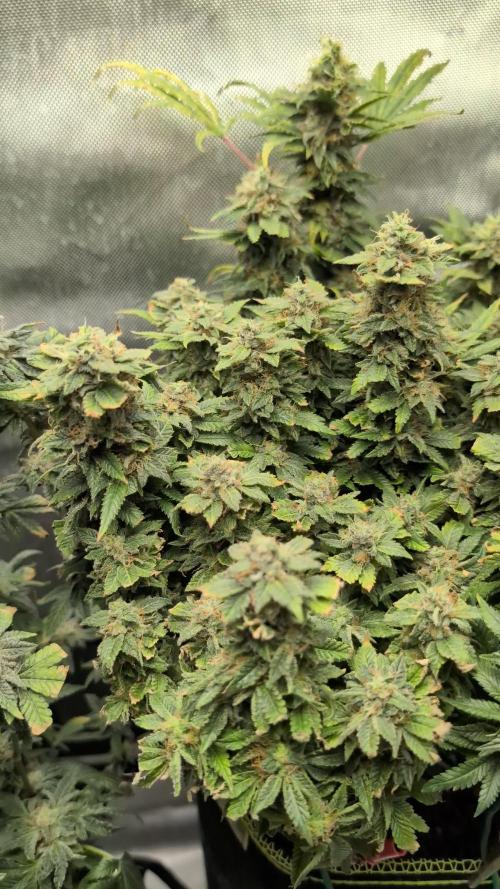
Its been a fun ride 😎 What a stinky, sticky, frosty harvest..
Light are only on for pictures, these babies will be in well ventilated darkness for the next 7-10 days..
I’ve taken off 90% of the fan leaves and left smaller matter to deal with when doing dry trim ✂️
Temps around 16-20 ✅
Humidity Around 40-50 ✅
overall really happy with how things have gone will update yield once dried 💯
Again Thanks you all for all the Comments, Likes and Support Guys and Girls 🙏💚🙏
Likes
11
Share


@RFarm21
Follow
Week 9 november - 15 november
11 november - i did a little defoliation on the first 2 Nodes in branches.
I also gave the first bloom nutrients because in the next week it will be flowering and it looks like it was asking for more phosphorus
14 november - One more soft session of defoliation/lollipoping
Led power: 240W (80%)
Likes
5
Share


@SkunkyDog420
Follow
Keine Probleme gehabt mit der Pflanze.
Kann ich nur empfehlen 🤙.
Bis dann.
Ende
Likes
12
Share


@StarfishSmallBatch
Follow
I'm back for another update this week! It hasn't been a very busy week this week, the veg area is vegging and the flower area is on its last week before harvest. I've been taking very small cuttings (about .1 gram) and scoping the trikes using a 45x desktop microscope.
Ethos: Lilac Diesel #22 (x) Grandpa's Cookies #7- This seedling is still doing well and branching out keeping a "v" shaped branch formation, thinner long leaves and decently far spaced nodes. It is still the tallest plant in the whole garden now standing at 19 inches tall. It's top four branches are beginning to develop smaller branches from them.
HSO/ Giest Grow: Tow Truck- Unfortunately the Tow Truck showed signs of being a male. Last week I had assumed it was a male. But this week I was able to call it for certain. I don't have the space to keep any males, so I went ahead and cut it down. This diary will now be for the Ethos Seedling! It is feminized so it will surely go to the flower room with the Raspberry Ripple plants it shares a tent with.
Raspberry Ripple Clones (#1 and #2)- These veg clones are still spreading out with branching decently. The #2 Phenos hit 12 inches in height and received their topping. So now all plants in the clone tent have been topped once.
Flower Tent (Raspberry Ripple #1 and #2)- It is currently day 67 Flower, Under the HLG Blackbird. I went ahead and dimmed it down one level. I let my buddy use my PAR meter for a few days. But I'd assume it's probably about 450-700 PPFD on most top sites. I've assessed the trichomes today and last week. Most are getting cloudy but I'm gonna wait just a few more days, to push into some amber coverage. A lot of the #2 pheno top sites are now leaning over and being fully supported by the trellis. The little branches just couldn't support the massive flowers it grew. One of the #2 plants is still holding strong and standing tall. But 2/3 are pretty much fully supported by the trellis. The number one phenos are once again super thick stalked, with thick branches. One of the #1 plants, looks like it completely bottomed out this week. Most of its leaves are completely faded. The other plant of the #1 Phenos is much more bright and vibrant. There are still some straggling white pistil hairs left on the #1s but they are still changing color by the day. Pushing into day 70 or 71 will probably be perfect harvest time!
Thank you for checking in on my grow diary! Until next week! Happy growing and Happy Living!
-Starfish


Likes
8
Share


@CanarianGrow92
Follow
Already, this is going to be the last week, next week im switching to 12/12 lets see what this marshydro TS1000 can do, i want to see if i get the same results as my LEC, if thats the case its a real winner as its half of electricity costs, and electricity starts to get expensive as every indoor grower knows 😁😝
As expected some clones are bigger than others but thats normal, some clones came out like 4 or 5 days before others, but i dont care, i also have some other bigger plants around the clones, i have some older biscotti mintz clones also in there and some other plants

Likes
29
Share


@eldruida_lamota
Follow
Venga familia que ya viene la cosecha, que ganas que tenia ya de darles machetazo.
No veas que pinta que tienen estas plantas.
No son grandes pero si están bien gordas.
No soy de plantar autoflorecientes pero e de comentar que con este cultivo e hasta disfrutado. Pronto la cataremos 💨💨💨.
Agrobeta:
https://www.agrobeta.com/agrobetatiendaonline/36-abonos-canamo
Mars hydro:
Code discount: EL420
https://www.mars-hydro.com/
Hasta aquí es todo , espero que lo disfrutéis, buenos humos 💨💨.
Likes
12
Share


@MH_RDWC
Follow
Pics from Christmas Day are actually last day of week 6 but video is week 7 so grouped them together. They’re in the big tent now and very happy.


Likes
121
Share


@Tropicannibis_Todd
Follow
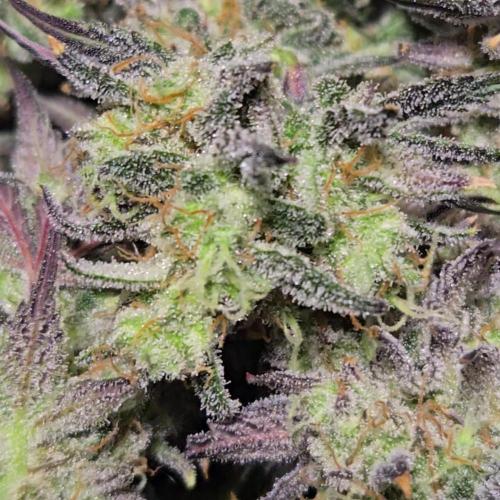
Well growmies ive been looking forward to the FastBud Tester 2307 , the more she went into flower the more the frost would build up , and that's when the terps came out 👉 Sweet , fruity 👈 Buds are tight and full of frost 👈 Couldn't of asked for better Genetics 😉
The smell coming from this girl during the entire grow was just dreamy 👈. Of course I have no clue to what she is but I like it...... Maybe FASTBUDS attempt at a Watermelon 🍉 Strain????
Amazing Job FASTBUDS 👏 I would definitely recommend once they release this one 👍
👉 Big thanks to all my Growmies out there in GD land 👈 Much appreciated 🙏
Thanks To MarsHydro for the TS1000
👉I used NutriNPK for nutrients for my grows and welcome anyone to give them a try .👈
👉 www.nutrinpk.com 👈
NutriNPK Cal MAG 14-0-14👉 All Weeks
NutriNPK Grow 28-14-14👉 Weeks 2 & 3
NutriNPK Bloom 8-20-30👉 Weeks 4 to 8
NutriNPK Bloom Booster 0-52-34👉 Weeks 4 & 9 👌👌
Likes
23
Share

@Chubbs
Follow
This strain is as always a joy to grow. This time dropping the temps in flower really felt like it boosted the trich production. The colors are stunning with the smell going from a sweet fruit to a dessert. I chopped and harvested two for some fresh frozen live rosin. Looking forward to washing and pressing it in the upcoming weeks.
Likes
49
Share


@AsNoriu
Follow
Day 119. Will update later. This grow is almost finished ....
Jar day - all is done, now cure left.
Happy Growing !!!
P.S. if you are searching for Killer Kush, she got separate diary, my favourite of all 3 strains.
Processing
Likes
25
Share


@SybDarret
Follow
I'm kinda late on the update, week 11 finished on sunday 4, now is feb 9th.
Last time i gave them nutrients was on sunday jan 28th and i'm flushing them since that date.
My intention was to take them down this sunday (11) but I will not be at home that day, maybe I'll cut them on monday 12th.
Maybe on monday i will add week 12 and then when the drying is done I'll update the harvest.
So far it seems like taller plant needs more time, as far as you guys have told me, seems like smaller is ready, but because of time I think I will cut them together.
Also my intention es to create a video to participate on 2F4B contest, i forgot to record the harvesting of LSD25 so this strain is my chance.😀


Processing
Likes
36
Share


@Yayayatoure
Follow
She started popping pistils. She just got into preflowering let's see how she does.
Day 40 flushed her with ph balanced water to remove the salt build up
Day 42: Had an accident today tho she recovering and she's totally droopy.
Day 44: Thank God She has started stretching again