The Grow Awards 2026 🏆 


Likes
Comments
Share
@Bread_n_Buds
Follow
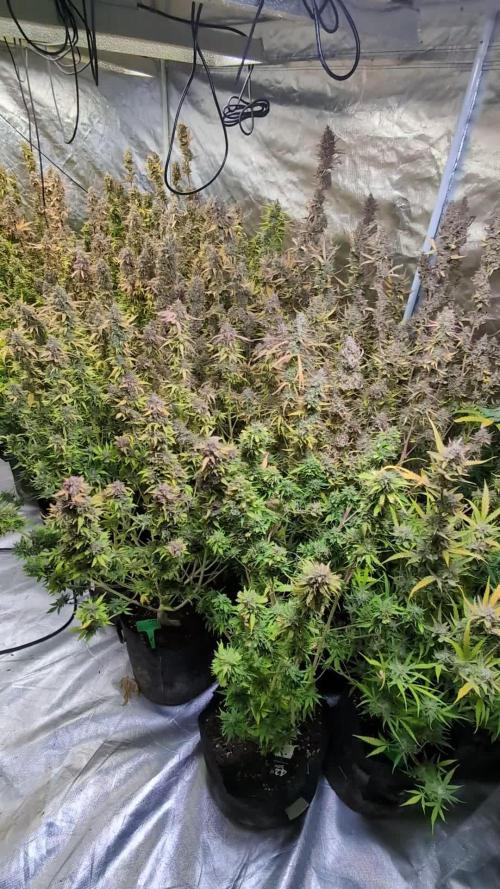
When I talk about Zamnesia's Power Plant, my chest swells a little. You know, I'm a super-Italian working in Spain, but my cannabis background is completely Dutch.
I experienced the early years of Skunk, and it couldn't be otherwise. It's a classic Dutch Passion strain. Our version at Zamnesia is doing very well. This is a clone that flowered very small, but very good.
Flowering started well. The plant was trained very well in the vegetative stage, in my opinion, and it started flowering slowly.
We're in a 20-liter square plastic pot.
Techniques chosen: the plant was topped with 16 buds, mainfolded, and then I trimmed the weak buds that didn't seem to grow high enough to see the light properly.
We're 100% organic and 1000% Plagron, as always.
The soil we've chosen is the recently launched Plagron Bio LightMix, which will allow us to get started growing more smoothly and reliably, without the sudden changes that liquid fertilizers can cause. A week is more than enough, so let's not overdo it.
We're in the middle stages of flowering, but we're well-equipped with fertilizers and additives. We've added:
- Pure Zym 1 ml/l
- Silic Rock 1 ml/l
- CalMag Pro 1 ml/l
- Sugar Royal 1 ml/l
- Alga Bloom 4 ml/l
- Power Buds 1 ml/l
Choose your favorite style and calculate your results on the website:
www.plagron.com
Our new 720W Spider King lamp from Vanguard Hydroponics is now at its peak.
Z - https://www.zamnesia.io/en/531-growshop
Our Power Plant is small and cute, a true classic from our Dutch brothers, whose open-mindedness paved the way for the modern world of cannabis.
Z - https://www.zamnesia.io/en/11064-zamnesia-seeds-power-plant.html
Z - Power Plant is a '90s classic, still beloved by modern smokers for its traditional sativa flavors and effects. Descended from the finest South African landraces, Power Plant offers a stimulating cerebral high and delicious spicy, earthy, and sweet flavors. With Zamnesia feminized seeds, you won't need a time machine or a trip to Africa to experience this timeless classic.
Sativa strains are naturally difficult to grow, as they are more vulnerable to nutritional issues and stress. However, with Zamnesia's Power Plant, years of sativa growing experience are unnecessary. Indoors, Power Plant simply requires good soil and a powerful grow light to grow properly and develop a compact, aesthetically pleasing structure. Outdoors, Power Plant thrives in warm areas with plenty of space but requires no special treatment. On average, a mature plant grown indoors can reach 130 cm, while outdoors it can easily reach 220 cm. Once flowering, Power Plant will be ready for harvest in just 9-10 weeks indoors, while outdoors it can be harvested in October. Thanks to its excellent genetics, Power Plant yields up to 500 g/m² indoors and 700 g/plant outdoors.
You already know this, but I recommend it: here you will find many wonderful things, essentially "all the best that nature has to offer."
Z - www.zamnesia.com
Music //
www.radionula.com
+ Feng Shui Music
+ 432 Hz Frequencies

Likes
42
Share
@MrJoint
Follow
🧟♀️ My little monster looks very happy with tent only for her. On next week I'll to make scrog and switch to 12/12☀️✌️🎃 Thank you for checking my cultivation.

Likes
4
Share
@smoking_hills9
Follow
Some beautiful plants especially 1 and 2. Sweet skittles smell. Happy with outcome.

Likes
233
Share
@Tropicannibis_Todd
Follow
🐶🐶🐶🐶🐶 👉Alrighty Then👈🐶🐶🐶🐶🐶🐶
We're 35 days in and we be moving along great 👍 really surprised at the bud development thus far 👈
👉The SweetDream Rose is the tallest and biggest mover growing another 6 inches in just one week 😲 gotta love that purple hues coming in 👈
We've also got some double tops on some branches as well as some triple internode branching 👈
All plants are blooming like crazy 🤪 🙀
We got some great growth right across the board on all plants 👈 All plants receiving at least a min of 850 PPFD
🐶 🐕 🐶 🐕 🐶 🐕 🐶
So we are back for another round 😛 But this grow is special because my big boy needs some love too , he's been getting on the old side of things and his hips have been giving him trouble so I've been buying CBD treats for him and it works great so 😉 👍
I've decided to grow this for my little buddy 🐶 so I can make him some Doggy 🐕 Treats and plus I've never tryed it myself and I really wanna give it a go👈 😊 so let's see what it's all about 👈
I will post the recipes at the end of harvest 👏
So Let's Do This👈
👉Soil Provided by ProMix.ca
👉Nutrients Provided by Agrogardens
👉Lighting Provided by MarsHydro.ca
👉Seeds Provided by Kannabia Seeds

Likes
46
Share
@Smokwiri
Follow
Welcome to week 2 of my Bubblegum XL diary, genetics by Royal Queen seeds.
Looks beautifull, no starting problems. Grows fast since day 1.
Small full spectrum burple cob light is doing its job very good, and as you can see the plant is growing as we like it to.
GHE changed its name to Terra Aquatica, so its terra aquatica nutrients
-- update day 3 wk2
Repotted into 15l rqs smartpot
-- update day 4 wk2
Topped/fimmed plant, lets see how it comes out in the future
Added small after-transplant video

Likes
12
Share
@Visions
Follow
If you don't follow my Instagram then you will have to read this portion.
Lineage Breakdown:
Pink Sugar Breath F1 created by UFO Genetics.
Pink Sugar Breath: Platinum Kush Breath(IHG) X Pink Sugar Cookies(UFO)
Pink Sugar Cookies: Sugar Cane(IHG) X Gsc Twister
Pink Sugar Breath F2: Pink Sugar Breath Male(Funk/Purple Stems/Dumper) X Pink Sugar Breath Female(Pink Sugar Cookie Pheno) Bred by Me.
I originally popped a good amount of these testers I created using a funk sugar breath male and a baker dough sugar breath with more of the pink sugar cookie lineage. This resulted in a pheno hunters dream. Each pheno develops massive amounts of resin. Green phenos imo are the best smokes SO far. They range from chemical og funk to og funk and dough. The purple pheno has more of a kush breath with sugary dough to it. Lastly is the pink pheno. The pink pheno develops amazing trichome production with all terps within the mom and pop.
I originally popped these in x3 ran soil. They were broken in half. Overwatered. You fucking name it. I was stress testing this already herm vulnerable gsc twisted/ogkb hybrid. That being said the average grower should have minimum to none herm issues. 3 broke out batch but it was just a small trait from the vigorous stress I gave them. They developed high bract to leaf ratio with an intense sativa high. Growing these require 63 to 72 for a full expressions and an added body buzz with that kush breath high. 9/10.
Flowering expect these to stretch 3x as big. They will need boosters/ extra feeding withing 17 days from flip. These are limited tested F2s. Only available @ [email protected]
Likes
97
Share
@mcflow
Follow
I don’t know why I took so long to grow a lemon haze strain, I wanted to do it forever, and it turns out to be a great decision! I love everything about it, the lovely smell, the intense green, the awesomely pleasant feeling of inhaling and the high overall! Great strain!
Likes
10
Share
@Agrocann
Follow
It is looks like a harvest time is close- I would a assume in a week or two.
The buds are so heavy, if not supporting them, they will break
End of week 13- looks like lady is almost ready. Will start to flash for a week and then harvest

Likes
13
Share
@masterofsmeagol
Follow
7/13 It's maine-ing out. Overcast and misting. I guess it rained last night but not much. Today is my watering day although I think they could've made it until tomorrow. These drastic temp changes makes it hard to get a STEADY routine in place. I watered everything in the 20's a gallon the 10's 1/2 gallon. The 10th planet in the front was still heavy so I didn't water it. I'll keep an eye on it. Temps are much milder. I noticed a few more septoria leaves on the 10th planet which I promptly defoliated. This pheno is flowering. I could've put this week as flowering as several plants have started. I also saw ONE leaf on my chem dog that had septoria on it. ONE f-ing leaf! I was planning on treating this early anyway so I mixed one gallon of plant doctor 3 tsp gallon/gallon which was the recommendation. I'll monitor this plant and continue treating it the next two weeks. I may do foliar too but the mixture is different. It's a systemic so I don't think that matters as much. Considering getting mulch to protect from spores on the soil. My plants look GORGEOUS. I Hate to use such a nice plant as a guennie pig but I'm not going to sit here and watch it progress. I'm lucky it's really not that bad and that it's on a reveg. There's so many leaves that I would be forced to prune anyway. I'm seeing two MAYBE three leaves a morning but I want to get this under control. Last year u let a plant with septoria go and it finished but went to extracts. I've got a pretty good feeling about this plant doctor. I've used it before with good results. Only time will tell though.🤞
EDIT: WENT OVER AT ABOUT 1PM. ITS 2 NOW AND BLUE SKIES AND SUNNY. IM SUPER GLAD I WATERED AND EVEN MORE SO THAT I APPLIED THE PLANT DOCTOR HOW I DID. THE GIRLS ALL LOOKED AMAZING. THE TENTH PLANET I TREATED WITH PLANT DOCTOR LOOKS THE BEST IVE EVER SEEN IT. I FOUND ON LEAVE DEEP ON THE INTERIOR WITJ A SMALL SPOT BUT ITS SOMETHING IM SURE I MISSED THIS MORNING. IF THIS WORKS THIS GOOD ILL BE APPLYING IT TO EVERYTHING EVEN IF ITS JUST PREVENTATIVE.
7/14 Rained last night andcwas still sprinkling when I went over. Amazingly the 10th planet that I treated with the plant doctorcmix had ZERO visible signs of septoria. I did find one leaf on Mt chem dog and two on my mk ultra with the big leaves. It could've been calcium deficiency but I really doubt it because I think I saw THAT as well. I'm going to wait a day or two and if there are still no negative results and the plant is still looking good I'm going to treat AT LEAST the two others that MAY be infected. It's a systemic and can be used proactively and supposably breaks down into p and k after stimulating immune response. I'll monitor a little longer but as it stands I think I'm going to treat the other two just in case. I also need to start feeding. I've watered a lot more than I normally do so obviously the soil won't last as long. This has been some tricky weather but I'm happy with how things are progressing. I probably should've changed this to the first week of flower as several plants are popping pistols everywhere.
EDIT: WENT OVER AROUND NOON AND MIXED UP TEO GALLONS OF PLANT DOCTOR PLANNING TO TREAT THE TWO PLANTS BESIDE THE 10TH PLANET. EVERYTHING LOOKED SO PERFECT AND TOMORROW IS MY WATER DAY SO I DECIDED TO HOLD OFF AND APPLY IT WHEN IT NEEDS WATER ANYWAY. I DID NOTICE THAT PLANTS SEEM TO BE FLOWERING MORE AGGREWWIVELY THAN BEFORE. THINGS ARE GETTING INTERESTING.
7/15 It was water day. The girls looked great this morning. I watered everything at least a gallon and 1.5 for the thirstier plants. I treated my big fan leaf mk ultra and my chem dog #4 with the same Plant Doctor mix as i did tge 10th planet beside it. I havent seen ANY septoria on that plant since application and it looks better than ever. I watered them with a half gallon of phed water before doing a soul drench with the gallon of Plant Doctor @ 3tsp/gal. I'm not seeing much septoria but plants are starting flower and I want to nip it in the bud. This product can be used preventatively and I went by the guidelines for medical marijuana. It was 70 earlier this morning. I'll update as I go forward.
EDIT: WENT BACK OVER AT 3 AS THE TENPS WERE PIST 90 AND HAD BEEN ALL DAY. I POSTED A SHORT VIDEO BUT EVERYTHING IS LOOKING GREAT. THE PLANT DOCTOR SEEMS TO HAVE HELPED SUBSTANTIALLY. DIDNT FIND ONE SEPTORIA LEAF. STILL IT WILL TAKE A WHILE TO WORK FULLY BUT IM GLAD I DIDNT CHICKEN OUT AND I APPLIED THE RIGHT AMOUNT. IM GOING TO KEEP AN EYE ON THINGS BUT I MIGHT JUST TREAT EVERYTHING PREVENTATIVELY WHICH IS JUST HALF A TSP A GALLON I THINK. IT DEF TRIGGERS A RESPONSE IN THE PLANT. I LOVE IT WHEN SHIT JUST WORKS OYT AND YOU END UP PLEASANTLY SURPRISED. NEXT WATERING ILL PROBABLY DO NUTES. IM DEBATING WHETBER TO TRELLUS OR JUST USE STAKES AND STRINGS ACROSS THE CAGE AS NEEDED. OH WELL. OVER 90 IS TO MUCH FOR ME TO BE OUTSIDE FOR TOO LONG.
7/16 Plant Doctor is doimg its job. I saw a couple septoria leaves on chem dog but it was interior amd I could've missed it. It takes a little bit to get going. I think I'm going to treat the rest of the garden with at least the preventative dose of 1tsp per gallon. I'll wait and see if this keeps it from popping back up. It almost got to 100 yesterday. It was 80 early this morning. I mixed up two gallons of water and gave the thistiest/lightest a half gallon. I'm hoping that will hold everything over until tomorrow which is water day. I'll have to check but I think it might be time to feed too. I def should make sure to treat tjis septoria before focusing on nutes. It says you can mix it with nutes but I'm leary of doing so. I'd rather apply them at seperate times. I'll watch the garden and of I NEED to water I will. I'm hoping what I did will be enough.
EDIT: WENT OVER AROUND ONE. IT WAS 93° WITH SUPER HIGH HUMIDITY. IM GLAD I SPLIT THAT TWO GALLONS WITH THOSE FOUR PLANTS THATS FOR SURE! THEY'D PROBABLY BE DROOPED IF I DIDNT. EVERYTHING WAD PRAYING TO THE SUN GODS. WELL, EVERYTHING EXCEPT THE MK ULTRA IN THE 30 AND THE 10TH PLANET. THEY ARENT DROOPING THEY JUST LOOK NORMAL. THEY ARENT "PRAYING" LIKE THE OTHERS. THEY ARE DEFINATELY A LITTLE LIGHT AND ARE LOOKING FORWARD TO THEIR WATERING. AND THEIR FEEDING. THATS FOR SURE. I WAS SUPER HAPPY WITH WHAT I SAW GOING OVER AND THE GIRLS WILL BE ABLE TO HOLD OUT UNTIL THE MORNING. ONE IN SPECIAL KUSH (WHICH GROW AMAZING AND LARGE HERE) IS IN A 10 AND I EVEN GAVE IT A LITTLE WATER THIS MORNING BUT ITS DROOPY. I COULD STILL FEEL A LITTLE BIT OF MOUSTURE EVEN THOUGH IT WAS LIGHT. IT CAN WAIT UNTIL THE MORNING WITH THE REST. IF IT WAS DROOPING BAD I WOULDA WATERED IT. I DONT GET WHY IM HAVING PROBLEMS FINISHING PLANTS IN 10GAL SMART POTS. YEARS AGO I COULD FINISH SOMETHING IN A 5GAL BUCKET! BUT NOW ITS LIKE THE PLANTS I GROW GET FAR TO BIG TO FINISH FLOWERING ON THESE TINY BAGS. ILL MONITER. HOPFULLY IT WILL BE FINE. IF I HAVE TO I SUPPOSE I COULD CUT THE BOTTOM OFF AND PUT THEM IN THE GROUND OR MORE SUBSTRATE BUT THATS NOT SOMETHING I REALLY WANT TO DO. I CANT WAIT TO SEE YOU THESE GIRLS TURN OUT.
7/17 I'm glad I gave those few plants that extra water. It hit 100 yesterday. Plants made it through it OK. It's 80 at 9am. I watered the garden even though it's supposed to rain with a chance of thunderstorms. Everything got at least a gallon. The mk ultra reveg in the 30 got 2gals as did the thirsty special kush on the end. I've figured out which plants use more water and I try to give them a little more. I also fed today. I was hesitant to feed the plants I treated with plant doctor, but I did anyway. 1tsp grow big 2tsp big bloom .5 tsp calmag. I've noticed pistles coming together on a few plants and forming buds. Next week will definitely be labeled flower. The plants treated with plant doctor LOOK great! I've found a few septoria leaves on a couple other plants. No big deal. I was going to treat the rest of the garden preventatively but if a couple more are infected I'll just add them to the rotation. I just need to make sure I follow-up with the next few treatments. Can't say enough good about this plant doctor.


Likes
12
Share
@prebiancagrower
Follow
Hello lads! How are you doing?
So, week 8 and the ladies are amazing, the buds are getting fat is this stage, and I am very happy with it.
Gonna start the harvesting in two weeks.
Thanks for following me!
Likes
2
Share
@ProlificGrowth410
Follow
Day 100 from seed by far the healthiest most stacked plant in the tent, very dense nugs, strong citrus and berry smells kinda like blueberry lemonade, I'm very impressed to say the least.
Likes
16
Share
@CheeRz
Follow
Day 51 of flowerin' and the ladies almost fin' 💚. Trichomes lookin' damn frosty ❄️❄️❄️ and buds gettin' really big.
Likes
7
Share
@Adam420
Follow
She has finally started some growth that I’m looking for.
Trimmed her up 2 weeks ago and her new leaves/shoots are filling the spots.
Lateral growth as well.
Slight Flowering on the very bottom of plant so next week is the start of week


Likes
16
Share
@Ensign420
Follow
Introduction - Week 14|07 Summary -
Ensign's log, stardate 9437.65,
Great week of growing! Wow what a good week!
Growth in the main tent has all around been incredible!
Submitted my first submission to the Global Grow Cup! Filmed a video of the solo cup container (marked with the ticket/order number) that will be used for the competition. Also had to fill and prove the solo cup holds 2 cups of soil. Now I need to root a clone (for the first time), transplant her into this cup, and submit my 2nd entry before the 30th of this month.
As far as my first attempt at cloning, have already begun the rooting process! Managed to take cuttings from 3 out of the 6 phenos in the main tent (the first cutting was also my first time topping). Soaked the cuttings for two days before planting them into Coco Coins. So far everything has gone surprisingly well! The clones are now rooting under the propagation dome with the vents fully closed. Will check for roots soon!
At the end of the week, growth was just raging! Was planning on flipping to flower in a week, but decided to begin the first week of flower next week! Thus this is the last week of veg. Plan to flip to 12/12 next Monday!
Onwards to next week!
[START OF WEEK 14|07]
==========================================================
Garlic Budder #1 - WEEK 14|07 - Full Veg Wk5
Garlic Budder #2 - WEEK 14|07 - Full Veg Wk2
Garlic Budder #3 - WEEK 07 - Full Veg Wk5
Garlic Budder #4 - WEEK 06 - Full Veg Wk4
06/03/24 → 06/09/24
This Week's Estimated Goals
----------------------------------------------------------------------------------------------
DLI: ~26 mol/m²/d
PPFD: ~400 μmol/m²/s
VPD: ~1.0 kPa
This Week's Meter Readings & Averages [Lights On: 16:00 - 10:00]
----------------------------------------------------------------------------------------------
DLI: 24.56 mol/m²/d
PPFD: 379 μmol/m²/s
VPD: 0.91 kPa
Soil %: [32.7, 37.6, 37.9, 34.1]
==========================================================
Day 01 - Monday - 06/03/24 - Total Days: 098
-----------------------------------
Daily Averages [~23:00]
- Temps: 80.7°F [27.1°C]
- Humidity: 74.4%
- VPD: 0.90 kPa
- Soil %: [31, 34, 39, 35]
-----------------------------------
- [09:57]: Quick morning check!
--- #1 is looking a bit droopy, but almost lights off (at 10:00) so not concerned.
--- Nice! Mainly wanted to check on #4 and she is looking great! She’s perked back up and looking good!
- [23:08]: Evening check.
--- Wow! It’s a jungle in here!
--- #1 has gotten too big? Nah!? Keep on growing girl!
--- #2 is growing and definitely getting bigger! Growth just looking really weird.
--- #3 has continued to get larger and is looking quite uniform in growth!
--- #4 is growing and looking perky again!
--- Even the original #1 and #2 phenos (in the back) are looking good!
--- Wow! #4 is really getting close to the light.
- [23:14]: Checked down both fill tubes.
--- Both reservoirs were completely dry!
- [23:27]: Checked the Ecowitt soil moisture sensor data:
--- 30% - [CH01 EB1 - Garlic Budder #1]
--- 34% - [CH02 EB2 - Garlic Budder #2]
--- 39% - [CH03 GFP - Garlic Budder #3]
--- 32% - [CH04 FPT - Garlic Budder #4]
- [23:32]: Poured 4 cups of distilled water down EB1’s fill tube.
--- Poured 2 cups of distilled water down EB2’s fill tube.
- [23:38]: Checked the humidifiers.
--- Refilled the 4X4’s humidifier with distilled water.
--- Tomorrow, plan to defoliate and start cloning for the first time!
--- Going to take multiple cuttings from both #1 and #4 for sure, but still deciding on the rest.
--- Getting hyped!
Day 02 - Tuesday - 06/04/24 - Total Days: 099
-----------------------------------
Daily Averages [~23:00]
- Temps: 81.4°F [27.4°C]
- Humidity: 74.3%
- VPD: 0.93 kPa
- Soil %: [29, 35, 38, 32]
-----------------------------------
- [11:59]: Time to film the first entry for the Global Grow Cup!
--- Going to be using BuildASoil 3.0 potting soil.
--- Filming the video using a stand and my phone.
--- This video is mainly to establish the container that the plant will be grown in. Also to prove that the container is a 16oz container and that it can hold 2 cups of soil.
--- The ticket (order) number also had to be written on the cup.
- [12:36]: Done!
--- The video had to be done in one continuous shot with no edits (my original submission does not have the logo).
--- There was also a photo that needed to be shot which shows the cup filled with 2 cups of soil (just like the video, the original image submission did not have the logo).
--- I think I did everything correctly, but also sent an email for verification of submission and validation.
--- Getting hyped!
--- [*smokes a bowl]
--- Going to defoliate today along with for the first-time, going to take cuttings for clones!
--- After a bit of online research, decided to split the cloning process into two days.
--- Today going to take cuttings and will soak them in a solution of aloe for 24hrs. Afterwards will change the water out and use straight distilled water.
--- Then in a couple days, plan to transplant into coco plugs (Coco Coins) for rooting.
--- For optimal results, also be using a rooting hormone (Clonex).
--- Well.. Here goes nothing!
- [17:01]: Evening check.
--- Wow! #1 is looking huge! Her main top is stretching above the lower canopy which is continuing to bush out.
--- #2 is growing along. Growth is gnarly and a bit droopy, but she’s getting taller!
--- #3 is looking great! Still a bit small, but she is continuing to get larger.
--- #4 looks like she needs a watering.
--- Both plants in the back are also looking surprisingly great as well!
- [17:05]: Checked down both fill tubes.
--- Both reservoirs were completely dry!
--- As far as today's defoliation, going to leave #2 and #3 alone and will focus my defoliation and cloning on the rest of the plants.
--- This will be my first attempt at cloning, also going to try topping for the first time today.
--- No pressure Ensign. What can possibly go wrong right?
- [17:27]: Time to start the cloning and defoliation process!
--- Filled a measuring cup with 3 cups of distilled water.
------ Added 3/4tsp of Horticultural Aloe
------ Added 1 more cup of distilled water
--- Mixed the solution and poured an even amount into three separate solo cups.
--- Made sure to mark two of the cups (#1 and #4). The unmarked one will be for any other clones from amongst the 6 phenos (if any at all).
- [17:43]: Time to top and defoliate #1!
--- Using a pair of brand new trimmers (AC Infinity),
--- Gently cut the main stalk to even out the canopy.
--- Then trimmed and cleaned most of the nodes leaving the top node or two.
--- Also trimmed the leaf fingers a bit before placing the top cutting into the cup of aloe solution.
--- Now for the rest of the cuttings!
--- [~45 minutes later]
- [18:32]: Managed to finish defoliating and cutting the rest of the clones.
--- Took two more lower cuttings from #1 (3 clones total).
--- Took 3 lower cuttings from #4
--- While defoliating, decided to try and clone the original #2 pheno as well. Took 4 small cuttings.
--- Similar to the top cutting, trimmed and cleaned each lower node for each cutting before placing them into the cups.
--- Before finishing up the 2nd cutting, I noticed the first cutting (the top cut that was also trimmed) was drooping.
--- So I did not trim and the leaf fingers for the other cuttings.
--- In total there were 10 cuttings taken for potential clones.
--- My main focus was to take cuttings and to clean up all the lower growth from both #1 and #4.
--- Defoliated and cleaned up the back original phenos as well (also trimmed back the cover crop).
- [18:35]: Temporarily placed the cuttings onto the floor of the 4x4 tent.
--- Took the trimmings (about 3 cups) and spread them onto the top mulch of #1 and #2.
--- Time to set the environmental controls for the 3x3 veg tent.
- [18:43]: Within the AC Infinity App,
--- For the Veg Tent [3x3] controller,
--- Adjusted the 'Vegetative [18/6]' Schedule for the grow light.
------ Set the Mode to ‘On Mode’
------ Set the START/END times to 04:00PM/10:00AM
------ Set the MAX to 1
--- The IonBoard S33 is now utilizing around 60.8W (at intensity 1 out of 10).
--- Adjusted the 'Vegetative [18/6]' Schedule for the exhaust fan.
------ Increased the Humidity’s HIGH trigger value from 81% to 87%
--- Adjusted the 'Vegetative [18/6]' Schedule for the humidifier.
------ Decreased the VPD target value from 1.5kPa to 0.8kPa
- [18:52]: Moved the cuttings into the 3x3 veg tent.
--- It begins! I think.
--- Going to let these cutting drink some aloe for a day before switching to straight distilled water.
--- Hmm. Could be the white floor of the 3x3 veg tent, but have noticed the S33 has a whiter spectrum whereas the FC-6500 seems to be warmer in color.
--- Anyways,
- [18:58]: Poured 4 cups of distilled water down EB1’s fill tube.
--- Poured 2 cups of distilled water down EB2’s fill tube.
- [19:06]: Filled a pump sprayer with 5 cups of distilled water.
--- Focused mainly on the straw mulch of #4.
--- But also misted the straw mulch for the rest of the plants a bit.
- [19:12]: Checked the humidifiers.
--- Refilled the humidifiers with distilled water.
- [19:44]: Going to be using Clonex rooting gel before planting the cuttings into Coco Coins (pre-soaked with microbes and aloe). But before that begins, going to transfer the Clonex gel into a squeeze bottle.
--- Gently peeled back the seal on the original Clonex bottle. Just enough make a tiny opening,
--- Then slowly and carefully poured the gel into an empty squeeze bottle.
--- Also removed the sticker from the original bottle and placed it onto the new one.
- [19:54]: Perfect!
--- Instead of applying the gel to the cutting, going to be applying the gel to the Coco Coin.
--- This squeeze bottle will make applying the gel a lot easier.
--- Will take PPFD readings tomorrow.
--- Also will change out the aloe solution to distilled water.
--- I really hope I didn’t screw things up before they could even begin.
--- Don’t die on me ladies!
--- Please.
Day 03 - Wednesday - 06/05/24 - Total Days: 100
-----------------------------------
Daily Averages [~23:00]
- Temps: 81.9°F [27.7°C]
- Humidity: 75.5%
- VPD: 0.90 kPa
- Soil %: [29, 36, 38, 36]
-----------------------------------
- [09:40]: Quick morning check!
--- #1 is looking a bit droopy, but looking okay. Topping is a high stress technique so going to take some time to recover. Don’t plan on flipping the main 4x4 tent to flower for a good week or so which should be enough time.
--- #4 looks great! The defoliation seems to have no effect on growth. Nice!
- [09:41]: Also quickly checked on the 3x3 veg tent,
--- Nice! The cuttings are looking great!
--- No yellowing and they all seemed to have turned up towards the light.
--- So far so good!
- [22:53]: Evening check.
--- #1 is continuing to dominate this grow! She has spread wide and looking incredible!
--- #2 is looking gnarly, but getting there.
--- #3 is getting larger! But still a runt. By far, her leaves are the darkest of the bunch, but she is still growing!
--- #4 looks happy and growing along beautifully! Wow!
- [22:55]: Checked down both fill tubes.
--- Both reservoirs were completely dry!
- [22:59]: Poured 5 cups of distilled water down EB1’s fill tube.
--- Poured 2 cups of distilled water down EB2’s fill tube.
- [23:05]: Checked on the 3x3 veg tent.
--- Ooo yea! The cuttings are still green! Nice!
- [23:07]: Took PPFD readings.
--- The cuttings were around 121 μmol/m²/s which gives a DLI of 7.84 mol/m²/d
--- Nice! These levels are on the lower range for seedlings (~100-300), perfect! I think.
- [23:14]: Swapped the aloe water out to straight distilled water.
--- Going to let these cuttings soak for one more day before planting.
--- Please don’t die girls!
- [23:15]: Checked the humidifiers.
--- Refilled the humidifiers with distilled water.
--- Ooo yea!
--- Tomorrow is the big rooting day!
Day 04 - Thursday - 06/06/24 - Total Days: 101
-----------------------------------
Daily Averages [~23:00]
- Temps: 81.9°F [27.7°C]
- Humidity: 75.2%
- VPD: 0.91 kPa
- Soil %: [32, 38, 38, 34]
-----------------------------------
- [16:20]: Evening check.
--- #1 is a bit droopy, but growth is looking green and healthy.
--- #2 is looking bigger! She’s also looking sort of droopy.
--- #3 is growing along nicely! Looking good girl!
--- #4 is looking great! A bit droopy but plan to water today.
- [16:23]: Checked down both fill tubes.
--- EB1's reservoir still has some water.
--- EB2's reservoir was completely dry!
- [16:23]: Checked the Ecowitt soil moisture sensor data:
--- 28% - [CH01 EB1 - Garlic Budder #1]
--- 36% - [CH02 EB2 - Garlic Budder #2]
--- 37% - [CH03 GFP - Garlic Budder #3]
--- 30% - [CH04 FPT - Garlic Budder #4]
- [16:30]: Using a pump sprayer,
--- Misted the straw mulch of #4 with 6 cups of distilled water.
--- Focused mainly on the straw mulch.
--- Also misted the straw mulch of #3 (in the grassroots fabric pot) a bit.
- [16:43]: Poured 5 cups of distilled water down EB1’s fill tube.
--- Poured 3 cups of distilled water down EB2’s fill tube.
- [16:52]: Checked the Ecowitt soil moisture sensor data:
--- 56% - [CH01 EB1 - Garlic Budder #1]
--- 44% - [CH02 EB2 - Garlic Budder #2]
--- 40% - [CH03 GFP - Garlic Budder #3]
--- 45% - [CH04 FPT - Garlic Budder #4]
- [17:01]: Took general PPFD readings.
--- #1 was around 379 μmol/m²/s which gives a DLI of 24.56 mol/m²/d
--- #2 was around 333 μmol/m²/s which gives a DLI of 21.58 mol/m²/d
--- #3 was around 293 μmol/m²/s which gives a DLI of 18.99 mol/m²/d
--- #4 was around 378 μmol/m²/s which gives a DLI of 24.49 mol/m²/d
- [17:09]: Took the weekly height and light distance measurements.
--- #1 was about 21" tall.
--- #2 was about 13.5" tall.
--- #3 was about 9.5" tall.
--- #4 was about 19.25" tall.
--- Hmm..
- [17:19]: Adjusted the right oscillating fan a bit.
--- Re-angled the CloudRay S6 oscillating fan upwards. Been noticing that the air has been hitting the tops of the plants so easing off a bit (#1 is still getting hit, but she’s huge so not too worried).
- [17:23]: Back to the measurements!
--- #1 was about 9.5" away from the grow light.
--- #2 was about 17" away from the grow light.
--- #3 was about 17.5" away from the grow light.
--- #4 was about 11.5" away from the grow light.
- [17:46]: Checked on the 3x3 veg tent.
--- Cuttings are still green! They do look a bit droopy but no signs of yellowing.
--- Okay!
- [17:55]: Time to begin the rooting process!
--- For my first attempt at rooting, going to be using Coco Coins pre-soaked in saponins, microbes and aloe.
--- To further help with rooting, going to also be using Clonex rooting gel.
--- Filled a measuring cup with 4 cups of distilled water.
------ Added half of 1/64tsp of Quillaja Saponaria Extract [60]
------ Added 1/16tsp of Horticultural Aloe
------ Added 1/8tsp of Mycrobe Complete
--- Mixed the solution thoroughly.
--- Time for the Coco Coins!
--- 10 cuttings means 10 Coco Coins.
- [18:09]: Dropped 10 Coco Coins into the measuring cup.
--- The coins immediately started to expand.
--- A bit too much.. Oops!
--- Poured the solution and Coco Coins into a pitcher.
--- Added 2 cups of distilled water to the solution (now at 6 cups).
--- Great! The coins are pretty much fully expanded, but going to wait a bit longer to fully saturate each coin.
--- [~20-30 minutes later]
- [18:42]: Great!
--- Took the seedling and flood tray from the AC Infinity propagation dome and placed all 10 Coco Coins into the slots.
--- Gave each Coco Coin a quick shake to remove excess solution. The coins were not dripping with solution but still pretty saturated.
--- Arranged them into 3 groups with the cuttings in mind.
--- Also tried to keep the pre-made holes intact.
--- Time to inoculate the Coco Coins!
- [18:54]: Using a squeeze bottle,
--- While keeping the nozzle from making contact with the coco, gently filled each pre-made hole with Clonex rooting gel. Just enough gel to fully cover the hole of each coco coin.
- [19:00]: Time to plant the cuttings!
--- Gave each cup a misting of distilled water. Focused on wetting the top growth with water.
--- Okay!
--- To avoid mixing cuttings up.
- [19:01]: Starting with the original #2 pheno cup,
--- For each cutting,
--- Using a pair of clean trimmers, made a final 45° cut about 1/2" from a bottom node.
--- Then stripped away and scared the protective membrane below the node before planting.
--- Made sure the node was about 1/2" below the surface of the coco.
--- To help with planting, while inserting each cutting, gave the Coco Coin a gentle squeeze to loosen the coco. This also helped to ensure the coco and gel was in good contact with the cutting.
--- Once the cutting was planted into the Coco Coin, made sure to place back in the same spot (made sure to keep the cuttings in their groupings).
--- Once a cup was complete, made sure to keep the label with the group.
--- Re-misted the top growth as needed to keep it wet.
--- Also wiped the trimmers with isopropyl alcohol in between cuttings (plan to use 10% bleach solution for next time).
--- Repeated this process until all 10 cuttings were cut, planted, and in the tray.
--- The coco coins fit perfectly into the tray and don’t reach the bottom. Nice!
--- The bottom air gap is important.
--- Poured a bit of distilled water through one of the empty slots into the bottom of the tray. Just enough to fill the bottom of the tray, but not enough to reach any of the Coco Coins (~1/4cup).
- [19:35]: Placed the propagation tray with cuttings into the 3x3 veg tent.
--- Placed the first layer of the propagation dome on before giving the sides a misting of distilled water.
--- Also sprayed the top of the propagation dome before covering the cuttings.
--- Vents are all fully closed.
- [19:40]: Placed the bar lights onto the top of the dome before configuring the controller.
------ Set the START/END times to 04:00PM/10:00AM
------ Set the bar light’s intensity to 2 (out of 10).
--- Also made sure the propagation light controller’s time was in sync with the Controller 69 Pro.
- [19:47]: Took PPFD readings.
--- The cuttings were around 136 μmol/m²/s which gives a DLI of 8.81 mol/m²/d
--- The PPFD levels are similar to the floor.
--- Perfect!
--- Going leave the IonBoard S33 on during this rooting process.
--- Will check back tomorrow to cycle the air under the dome.
- [19:56]: Checked the humidifiers.
--- Refilled the humidifiers with distilled water.
- [20:17]: Quick night check!
--- Ooo yea! Growth is raging and looking perky!
--- Mainly checked on #1 and #4 which were looking incredible!
--- Keep on growing ladies!
Day 05 - Friday - 06/07/24 - Total Days: 102
-----------------------------------
Daily Averages [~23:00]
- Temps: 82.7°F [28.2°C]
- Humidity: 76.2%
- VPD: 0.89 kPa
- Soil %: [37, 40, 38, 35]
-----------------------------------
- [10:03]: Decided to increase the ambient temp in the 3x3 veg tent.
--- Within the AC Infinity App,
--- For the Veg Tent [3x3] controller,
--- Adjusted the 'Vegetative [18/6]' Schedule for the heater.
------ Increased the Temp target value from 78°F to 82°F
--- Hopefully this will help to keep the veg tent at a more consistent temp.
- [22:26]: Evening check.
--- Ooo yea! The garden is looking incredible!
--- #1 is looking perky and just bushing out! Wow!
--- #2 is getting big! Growth is weird and leaf fingers are huge! Just going to let her grow.
--- #4 is looking happy and growing along like a champ! Nodes are starting branch out and she is turning into a bush!
- [10:28]: Checked down both fill tubes.
--- Both reservoirs were completely dry!
- [22:33]: Poured 5 cups of distilled water down EB1’s fill tube.
--- Poured 3 cups of distilled water down EB2’s fill tube.
- [22:40]: Checked on the propagation dome (inside the 3x3).
--- Ah yea! Looking great ladies!
--- Lifted the top of the dome to let some fresh air in for a bit.
--- Wow!
--- Leaves still look nice and green!
--- So far everything looks great!
--- Just going to continue on!
- [22:53]: Checked the humidifiers.
--- Refilled the humidifiers with distilled water.
- [11:01]: Decided to adjust the humidifier for the 3x3.
--- Within the AC Infinity App,
--- For the Veg Tent [3x3] controller,
--- Adjusted the 'Vegetative [18/6]' Schedule for the humidifier.
------ Increased the VPD target value from 0.8kPa to 1.5kPa
--- The higher VPD level will essentially turn the humidifier off.
--- I won’t be needing the humidifier for a good week so might as well save the water.
Day 06 - Saturday - 06/08/24 - Total Days: 103
-----------------------------------
Daily Averages [~23:00]
- Temps: 81.6°F [27.6°C]
- Humidity: 74.9%
- VPD: 0.91 kPa
- Soil %: [35, 40, 37, 31]
-----------------------------------
- [07:40]: Quick morning check!
--- #1 and #4 are looking perky and happy!
--- Also checked on the propagation dome,
--- All cutting still look green! Hyped!
- [20:02]: Evening check.
--- Wow the garden is raging with growth!
--- #1 has blown up! She has clearly recovered and growth is ramping up again!
--- #2 is stretching upwards!
--- #3 is now the smallest of the 4, but still getting larger!
--- #4 is looking incredible! Wow! Growth looks perky and happy!
- [20:05]: Checked down both fill tubes.
--- Both reservoirs were completely dry!
- [20:10]: Poured 6 cups of distilled water down EB1’s fill tube.
--- Poured 2 cups of distilled water down EB2’s fill tube.
- [20:16]: Checked the Ecowitt soil moisture sensor data:
--- 35% - [CH01 EB1 - Garlic Budder #1]
--- 40% - [CH02 EB2 - Garlic Budder #2]
--- 36% - [CH03 GFP - Garlic Budder #3]
--- 27% - [CH04 FPT - Garlic Budder #4]
- [20:19]: Using a pump sprayer,
--- Misted the straw mulch of #4 with 5 cups of distilled water.
--- Focused mainly on the straw mulch.
--- Also misted the mulch of #3 a bit (in the fabric pot).
- [20:27]: Checked propagation dome (in the 3x3),
--- To cycle the air under the dome, lifted the top off for a bit.
--- Ooo yea! Everything is still green and looking great!
--- Keep on rooting ladies!
--- Oops!
- [21:45]: Checked the humidifiers.
--- Refilled the humidifiers with distilled water.
Day 07 - Sunday - 06/09/24 - Total Days: 104
-----------------------------------
Daily Averages [~23:00]
- Temps: 81.5°F [27.5°C]
- Humidity: 74.8%
- VPD: 0.91 kPa
- Soil %: [36, 40, 37, 36]
-----------------------------------
- [08:18]: Quick morning check!
--- Nice! The main tent is looking great! #1 and #4 are both raging with growth!
--- Checked on the propagation dome (inside the 3x3) and the clones are still looking green!
--- Wow! Everything is going almost too well! Just keep on growing!
- [19:08]: Evening check.
--- Garden is just exploding with growth! Seems everyone has fully recovered from the defoliation and topping!
--- Wow #1 is bushed out and looking incredible!
--- #2 is growing really starting to get large! Growth still is funky, but stoked none-the-less.
--- #3 is starting to fill in the pot! Getting larger!
--- Wow! #4 is getting taller and looks healthy and green!
- [19:12]: Checked down both fill tubes.
--- Both reservoirs were completely dry!
--- Wow the canopy is really starting to get taller and closer to the light. May need to raise it up soon.
--- Absolutely surprised how low the light levels have been throughout this entire cycle. Barely moved the light and have not increased the intensity past 2 (out of 10). Less is really more.
--- Anyways!
- [19:18]: Checked the Ecowitt soil moisture sensor data:
--- 36% - [CH01 EB1 - Garlic Budder #1]
--- 41% - [CH02 EB2 - Garlic Budder #2]
--- 37% - [CH03 GFP - Garlic Budder #3]
--- 34% - [CH04 FPT - Garlic Budder #4]
- [19:19]: Poured 6 cups of distilled water down EB1’s fill tube.
--- Poured 3 cups of distilled water down EB2’s fill tube.
- [19:24]: Checked propagation dome (in the 3x3),
--- To refresh the air, lifted the top off for a bit.
--- Sweet! Still green! Wow!
--- Using a spray bottle, misted the top growth with distilled water.
- [20:35]: Checked the humidifiers.
--- Refilled the humidifiers with distilled water.
--- Wow what a week!
--- Growth has been just insane in the 4x4 tent! All plants have fully recovered and have just exploded with growth.
--- I think it’s time to flip to flower!
--- Also, I’m absolutely baffled about how well the cloning process has been going.
--- So far no issues!
--- Not complaining, but just surprised. Keep on growing ladies!
--- If all goes well, should have fully rooted clones soon ready for transplanting (into solo cups of course).
--- Absolutely hyped for next week!
--- Maximum warp Ensign, Engage!
[END OF WEEK 14|07]

Likes
86
Share
@Hydro_Hiebs
Follow
I have made it 45 days of curing. Before that she dried for 14 days in a environment controled room and I have to say now this shit is fire. Made it to the top 3 photo periods that I have grown for effect, aroma, flavor and looks. Very potant cerebral euphoric high that settles down into a very relaxing body stone. After opening or even smoking, it leaves the room smelling of baked sugar cookies

Likes
4
Share
@PatriciaGant
Follow
Celebrate Mike Tyson's comeback with the exclusive RQS & Tyson collaboration: The Jawbreaker. Limited to just 2,000 units, this special edition blends Gelato #41 and Kosher Kush, delivering 27% THC with pine and earthy aromas. Housed in a bold black and red box, it’s a cannabis collector’s dream, capturing Tyson's strength and vigour.
The Jawbreaker Limited Edition
Gelato #41 x Kosher Kush.
All Nutrients and adding Information in Ger-Section.
Finaly start of her Life, see Ya soon.
One day i wil have my one strain:-)


Likes
Comments
Share


Likes
2
Share
@cr0baron
Follow
Sorry I was away for a bit. Spilt a pint of beer and then a pint of water on my laptop and had to get it repaired. Lost everything on my SSD so tryna build back.
We're now in the penultimate week, i'm using Dragon Force from Shogun for a final boost before I flush next week.
I have added a dehumidifier into the mix. Had some issues initially with the reservoir filling up to quick and emptying it being a pain so I attached the pipe to drain water back into the oxypot. Unfortunately I connected it badly and it leaked into the tent creating a spicy situation. I managed to mop up the water and reconnect it so it now drains correctly into the oxypot. It seems to be working. I had it set to 50% these last few days and it reduced the RH from 70% to 51%. I've now set it to 40% to try and boost that last minute resin production.
Got 4 clip on fans and the airflow relatively high to keep the air as fresh and dry as possible. Had some rot on the last crop, determined to not let that happen this time.
I removed the second OHS plant because it was stunted and the 2nd Morpheus plant was so large she could use the space and has done nicely. The morpheus 2 is dominating the space but has absolute monster colas so I forgive her.
There's this mutant bud pictured. Wasn;t sure what was going on so after doing some research it seems it's either polyploidism or fasciation. I'm not exactly sure how to tell the difference but it looks cool as hell and I've excited to harvest, trim and smoke that badboi.

Likes
57
Share
@BudBoutique
Follow
! this is my current status, gonna upload my last veg weeks within the next week - got a bit busy around Spannabis - thank you for your understanding! 💚
Welcome to Bud Boutique Grow Diary - really appreciate all your love and support :)
Dont forget to check out my other current grows!
🗓️ This Week:
after 48 hours of complete darkness (important for seedlings to make sure all plants switch into flower same time), I finally switched my lights to the 12/12 schedule and sent my ladies into the flower.
- both Phenos super strong and praying up,
- more than healthy and going well
- Day 3: Foliar spray with APTUS Regulator and APTUS Nutrispray to give them extra micronutrients and give them a little shell for protection.
! always use APTUS Regulator first and mix well with your water before adding any other nutrients for Feeding or Foliar!
Thank you for still staying with me 💚
___________________________________________
--- 🌱 Strain (Sponsor) 🌱 ---
🏷️ PEACH GIRL by Art Genetix
https://www.artgenetix.world/product-page/peach-girl
--- 🥗 Nutrients and Feeding (sponsored by APTUS: APTUS Ambassador) ---
🍸 APTUS: full nutrient schedule extreme
-- Regulator, N-Boost, P-Boost, CaMg-Boost, K-Boost, Allin1 Liquid, Startbooster, Topbooster, Enzym+ every feeding
-- Fulvic-Blast, NutriSpray as Foliar each once a week
🔗 https://aptus-holland.com/
--- ♻️ Grow Control (Sponsor) ---
TROLMASTER: TENT-X + LM14 Light Adapter to dim/sunrise/sunset lights + Temp & rH Sensor all remote on App
🔗 https://www.trolmaster.eu/
--- 🏭 Grow Setup ---
💡LUMATEK Zeus Pro 600
* 🏠🌿 Indoor: Homebox 120x120x200cm (4x4)
* 📐🌀 PrimaKlima exhausting Fan 1180m3/h (running on 60-80%)
* 🌀 Can Light Filter 800m3/h & 1x Fanbox 1x Dyson fan for Air circulation
🔗 https://lumatek-lighting.com/zeus-600w-pro-29/
🔗 https://primaklima.com/de/shop/ventilatoren-de/ec-ventilatoren/pk160ec-tc/
🔗 https://canfilters.com/products/filters/
All Likes and comments are highly appreciated!!!
👨🌾 don't forget to check out my Instagram for daily educational content: budboutiquee
- Bud Boutique
