
Likes
Comments
Share

@DogDoctorOfficial
Follow
# Chem Brulee by Zamnesia | Pheno A 🌱🔥🍮
## Germination Week | The First Chapter
Hello GrowDiaries family! 👋🌱
Welcome to another new journey.
As mentioned in the previous diaries, I've recently adjusted the way I document my grows. Due to the current photo limitations on GrowDiaries, each phenotype now receives its own dedicated diary rather than grouping multiple plants together in a single journal.
This allows me to continue documenting every stage of development in as much detail as possible while selecting the best photographs from each week.
The objective remains exactly the same as always:
To create a complete educational record from seed to harvest, sharing observations, lessons learned, successes, mistakes, and everything in between.
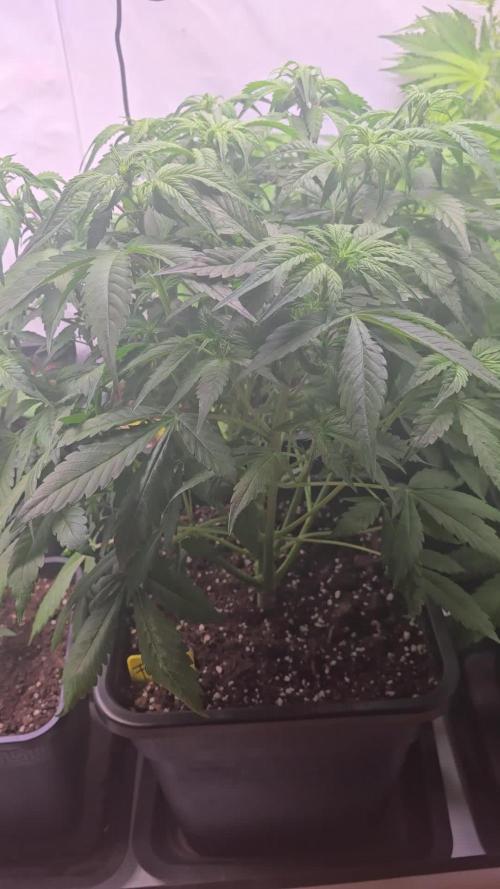
Today, we begin following Chem Brulee Pheno A.
---
## Every Seed Carries a Story
One of the things I love most about growing is that every run starts the same way.
A tiny seed.
A hidden genetic blueprint.
And an entire journey waiting to unfold.
For this run, we're following Chem Brulee from Zamnesia Seeds, cultivated under a 12/12 from seed schedule from the very first day of life.
A method that is a little different from what most growers choose, but one that has become part of my own cultivation style over time.
Throughout this diary, I'll do my best to explain not only what I'm doing, but also why I'm doing it, allowing anyone interested to follow the process from beginning to end.
Every phenotype is unique.
Every plant teaches something.
And every run helps us become better growers.
---
## Germination Using the Cannakan System
To begin this run, I used the Cannakan germination system.
For those unfamiliar with it, the Cannakan is a compartmentalized germination container that allows multiple cultivars to be organized separately while maintaining a stable environment.
Each section can be individually labeled, making it extremely practical when working with several genetics simultaneously.
The seeds were placed inside using only plain water.
No nutrients.
No additives.
No stimulants.
Just water.
Within approximately 24 hours healthy taproots had already emerged, and the seeds were ready for the next stage.
Fast.
Simple.
Clean.
Exactly what we hope to see during germination.
---
## Why Only Water?
A question that often appears during germination is:
"Why not feed the seedlings immediately?"
The answer is simple.
The seed already contains everything required for its first days of life.
Nature packed all the energy reserves necessary for the plant to establish itself and begin developing roots.
At this stage, I personally prefer allowing the seed to do exactly what it was designed to do.
The objective is not to feed the plant.
The objective is simply to wake it up.
Water is enough.
---
## First Experience With Coco Starter Plugs
This run also marks my first experience using coco starter plugs.
The plugs were fully saturated with water and then gently squeezed to remove excess moisture while maintaining a healthy balance between water retention and oxygen availability.
The germinated seeds were carefully inserted into the plugs and placed inside a humidity dome.
The dome remained useful for only a short period.
In less than 24 hours the seedlings had already emerged and were ready to continue their journey.
At that point, they were transplanted directly into small containers filled with Plagron Lightmix.
---
## Environment
Environmental conditions were intentionally kept simple.
Temperatures remained around 26–27°C.
Humidity was maintained between approximately 65–70% using a Spider Farmer humidifier.
While many growers prefer keeping seedlings inside a dome for longer periods, I personally like introducing them relatively early to the environment they will actually experience during growth.
The idea is adaptation rather than dependence.
Airflow remains extremely gentle at this stage.
Just enough movement to keep fresh air circulating without creating unnecessary stress for young seedlings.
---
## Heat Mat Temperatures
The propagation mat was running around 40°C.
Although this number may initially appear high, the heat source itself must operate above the desired root-zone temperature in order to compensate for environmental losses and maintain stable conditions where the roots are actually developing.
The goal is not to expose the seedlings directly to excessive heat.
The goal is to create a warm, stable rooting environment that encourages fast and healthy germination.
---
## Lighting
Lighting during germination is intentionally soft.
Young seedlings simply do not require intense light levels yet.
The goal is healthy establishment rather than aggressive growth.
Once properly settled, these girls will move under the Future Of Grow Black Series 600W full-spectrum LED system where the real adventure begins.
We'll begin discussing PPFD and light intensity in more detail during the coming weeks as the plants become capable of utilizing stronger light levels effectively.
---
## First Observations
So far, everything is progressing exactly as hoped.
Fast germination.
Healthy taproots.
Strong emergence.
Good vigor.
Healthy color.
And perhaps most importantly:
A strong beginning.
At this stage, every plant remains a mystery waiting to reveal itself.
And honestly, that mystery is part of what makes growing so rewarding.
No matter how many seeds we start, each one still carries the potential to surprise us.
---
## Looking Ahead
Over the next weeks we will begin following Chem Brulee Pheno A through the first stages of development.
We'll explore:
- Root establishment
- Early structure
- Environmental management
- Watering strategies
- Light intensity
- Growth observations
- And whatever unique characteristics this phenotype decides to reveal
Because every grow starts with a seed, but no two journeys are ever exactly the same.
This is only the first chapter.
Huge thanks to Zamnesia Seeds for the genetics, Plagron for the substrate and nutrition, Future Of Grow for the lighting, and everyone following along on another new adventure.
Grower's Love everyone. 🌱💚

Processing
Likes
7
Share


@Damonkey
Follow
This girl is so ready god flowering, she’s responding well to all training and continues to move out as wide as she can but now show does start to get taller.


Likes
18
Share


@MisterAeroponics
Follow
Ran into sulfur and phosphorus deficiency week 7. Added the small scoop beastie blooms and like an 1/8 tsp of silver bullet sulfur terp enhancer. Still running about 9ml per gallon at 5.8 possible hydrogen.. AC motor went out on one of the ac’s, will have it fixed by Wednesday been cooler temps and storms lately so been okay.


Likes
9
Share


@RunWithIt
Follow
Loving this new camera quality! Really brings out the green shine. Anyways they've all been loving the feeding regimen. Two feedings a week with 2 molasses feedings in between seems to do the trick at this stage.
Also wanted to mention the height is in reference to the tallest of the three BanDad's. Which is the one I topped surprisingly. For future reference, anybody following a similar formula to my grow will definitely want to top just once around week 2/3. She didn't even take a recovery period, really. Just chugged right back through, 3 days after. Now she dwarfs the other two BanDads quite immensely. Definitely been destroying my initial notion of not topping autos with this one.
Cheers everyone!

Likes
Comments
Share


@Danger_Mouse
Follow
There are two clearly differentiated phenotypes, but they are all beautiful plants.
Likes
12
Share


@Italianganya88
Follow
Alles läuft super buds fangen langsam an anzuschwellen hab eine 2 Lampe mit reingebracht um mehr lichteinwirkung in der Blüte zu haben. Die einzige Frage die bleibt sollte ich langsam anfangen zu entlauben. Bin mir bei autoflower unsicher.


Likes
40
Share


@BLAZED
Follow
Week 16 (Harvest)
1-2 Drying day 1
Temperature: 24.5 to 19.5 degrees
Humidity: 65% to 50%
The girls are ready to be harvested!
Before chopping them down, i took a lot of pictures.
I was able to remove most of the soil from the Biscotti #2 to see the rootball.
I hang the plants as a whole to have a slow dry.
The exhaust fan is on setting 4.
2-2 Drying day 2
Temperature: 19.1 to 17.5 degrees
Humidity: 62% to 57%
I changed the exhaust fan to setting 2 because setting 4 was a bit high in my opinion.
3-2 Drying day 3
Temperature: 19.9 to 18 degrees
Humidity: 62% to 59%
Today i checked up on the drying plants, and i see there are some buds touching other buds, so i chopped the plants in half.
The buds are still to the main stem for a slow dry, but are hanging more spreaded out to prevent any budrot issues.
I changed the exhaust fan to setting 1, as someone told me that it was enough air movement for drying.
4-2 Drying day 4
Temperature: 19.8 to 18.5 degrees
Humidity: 62% to 59%
5-2 Drying day 5
Temperature: 19.9 to 18.8 degrees
Humidity: 62% to 59%
Today i checked on the drying plants and the buds are shrinking a bit, they are getting a little bit crispy on the outside aswell,
I hope they wont dry as fast, and i aim for a 12/14 day dry.
For the next grow i already germinated 2x Chemdog (GreenHouseSeeds) 2x Gorilla Kush (GanjaFarmerSeeds) and 1x Deep Candy CBD (GreenHouseSeeds)
And I have some upgrades planned aswell!
I bought a autopot kit with 4 15L pots, this way the plants will have water and air 24/7 whenever they need it. I have seen alot of great results using autopots so i am very exited to try it out!
And I bought a small camera so i can shoot some weekly timelapses!
Feel free to Follow me if you like to get notified for the upcoming diaries!
Thanks for checking out this diary, peace!
(More harvest updates coming in the next couple of days!)
Huge thank you to Zamnesia for the seeds, and Plagron for the collection of nutrients, and the opportunity to participate in the POWERBUDS contest!
It was a fun and learningful adventure!
Processing
Likes
12
Share


@w33dhawk
Follow
Bin soweit zufrieden werde die Tage mal die Äste leicht an schrägen durch anbinden am scrog netz mehr licht und luftstrom für die buds einrichten die erste Sapphire scout wächst echt dicht die brauch das unbedingt bin aber sonnst ganz zufrieden mit meinem Ergebnis bis jetzt falls einer von den Profis Anregungen oder Verbesserungs vorschläge hat würde ich mich freuen eure Meinung und Rat zu hören bilder und videos folgen jetzt in regelmäßigen Abständen ab jetzt wird ja erst interessant bis die Tage ihr grow Götter

Likes
13
Share


@Oyziphar
Follow
The end of last week and the beginning of this week we had very good weather (Indian summer) 😊, but the temperatures started to drop at the second half of this week with lots of rain and humidity. 😡
First signs of budrot accured and I had to install 2 ventilators to move the air. 👿👿👿 With small scissors I cut away the entire top that has bud rot 👻
Now that I have harvested the last pepper plants, I have been able to give the cannabis plants more space. This will also hopefully result in a lower humidity level.
Temperatures in the greenhouse this week : min temp 11.1°C - max temp 35.9°C
Heighest plant (Cookies Gelato) = 155cm
Smallest plant (Liberty Haze) = 135cm


Processing
Likes
18
Share


@eldruida_lamota
Follow
La primera semana de floración les sentó bien la echaron su sexo, hembras, ahora ya queda ir viendo cómo se forman las flores.
La temperatura no pasa a los 30 nunca.

Likes
3
Share


@BossHogg6
Follow
I started flushing (RO water) a little earlier than I wanted. My concern is around the limbs/branches holding up during too many more water changes. The plant yoyos work fine, but I have to remove them to change the water, then they fall over (some hard) with the branch close to snapping.

Likes
47
Share


@Belverde
Follow
Welcome guys
Last few things to say about this nice strain, the SOMANGO 🌱
Originally was breded by Soma sacred seeds, but this is the @supersiberia version
And it's a good choise 💯
Anyway, back to the harwest time 👇
The whole plant is placed in a cupboard upside down, after the cut, with the leaves still attached..
After about seven / ten days, when the leaves were pretty dry, the flowers crunchy, but before the branches break cleanly...I cleaned all the buds thoroughly, I cut them off the branches and put them back inside of a brown bag..for about a day / two
Later I placed everything in a classic glass jar
For 24h I left it closed ⏳
Then I started opening it several times a day
More or less, after about three weeks, I usually close the jar permanently and wait a few more weeks to start using the flowers 🔥
About taste and effects 👇
The flavours in smoking are exactly the same you can smell before burning the buds, tropical woody with sweets notes back
The effect is more about staying chill an watching or listening something.
In the beginning more mind stone, then it goes trought the body and makes you relax.
Is not my first choise but in the end is enjoyable !
The plant in growing is also great to see, especially if you do some technique 👌
I have growed her in a 3,5l airpot (not the original) with organic liquids nutrients, added in to a soil/cocco/humus and perlite base
But if you want to learn more about, check out all my previous weeks 📆 📆
And that's all..
I want to thanks @supersiberia for the seeds 👍👍👍
And to @growdiaries for make this possible 🙏
FC ✌️
🇮🇹

Likes
8
Share


@sellem
Follow
24/03 watered AGAIN after 2 days with 1.5L 5.9 PH 1.5 EC, 5ml/L of Terra Bloom.
So far im really happy with plagron. Just one bottle for grow and one for bloom and the plants look healthy and show no signs of deficencies. really happy with the product. Moreso than biobizz, where i used Grow, bloom, calmag, activera and topmax and still fought deficencies here and there.
I also am conflicted about the trellis net. I like what it does but i think my tent is too full with plants or too small to really enjoy it growing-wise. I cant move the plants and its hard to reach them during watering. So i removed it again. its an on/off relationship with us :D
I also did some more defoliation, PROMISE ITS THE LAST TIME. i took out the plants of the tent for it to better reach the insides of them and made some nice videos of their progress so far.
ALSO: Tent smells really good and overwhelming when i open it! sadly, it escapes pretty fast so ill put "normal" smell on here. but its decent!
Watered again on
27/03, 1.5l 5ml/L Terra Bloom 1ml/L Green Sensation, 5.8 PH 1.7 EC
29/03, 1.5l 5ml/L Terra Bloom 1ml/L Green Sensation, 5.7 PH 1.7 EC
Likes
37
Share


@RFarm21
Follow
Boas growmies! Esta semana apareceram mais folhas amarelas mas penso que seja normal, penso eu, visto que já estão caminho da 10ª semana.
O cheiro delas é fantástico!
17 Agosto - O gráfico representa a nutrição misturada em 2,5L de água da Royal Gorilla 1. EC = 1,55; pH 6,4
17 Agosto - Alimentaçao da Royal Cheese (2L): CE = 1,5mS; pH 6,3
-BioGrow - 3ml; BioBloom - 4ml; TopMax - 2ml; BioHeaven - 5ml; Activera - 5ml; Calmag - 1ml
17 Agosto - Alimentação Royal Gorilla2 e royal cheese 2 = Só água . ph 6.3)
-----------------------------------------------------------------------------------------------------------------------------------------------------------
21/08 - Alimentação Royal Gorilla #1 (2,5L): CE = 1,64; pH = 6,3
-BioGrow - 4ml; BioBloom - 6ml; TopMax - 2,5ml; BioHeaven - 7ml; Activera - 6ml; Calmag - 1,5ml
21/08 - Alimentação Royal Gorilla #2 (2,5L): CE = 1,33; pH = 6,1
-BioGrow - 3ml; BioBloom - 5,5ml; TopMax - 2ml; BioHeaven - 5ml; Activera - 5ml; Calmag - 1,5ml
21/08 - Alimentação Royal Cheese #1 (2L): CE = 1,36; pH = 6,1
-BioGrow - 3ml; BioBloom - 5ml; TopMax - 2ml; BioHeaven - 6ml; Activera - 5ml; Calmag - 1ml
21/08 - Alimentação Royal Cheese #2 (2L) - EC = 1,38; pH = 6,3
-BioGrow - 3ml; BioBloom - 4ml; TopMax - 2ml; BioHeaven - 5ml; Activera - 5ml; Calmag - 1ml
Likes
10
Share


@Rabidreject
Follow
Nothing has realy happened since I cropped the royal cream....It is just hanging. Decided to do a dry trim so that it takes longer to dry due to the fact I am having to just use my cupboard so the humidity is pretty low. Leaving the leaves on just means It takes longer to dry.
I am going to crop the Easy Bud in the next few days when the mood takes me.
I had 4 left over R. Cream seeds left over because I informed them that. bought 2x 3 packs and only 2 seeds germinated so they sent me another packet which is REALLY good of them and the sort of thing that means I would definitely use Royal Queen Seeds again, for sure!
The trich's are basically all cloudy with a few clear. I cant see any amber but my loupe is a ridiculously cheap Chinese piece of crap. I will invest in a microscope camera so I can hook it up to my phone or MacBook. It is way too hard to keep everything steady In order to see what is popping with my sexy trichomes.
Obviously feeding has stopped for about a week now. I forgot to change it In the diary last week so will try and correct that now..
I know it is not strictly relevant but I had to go somewhere earlier and took a video because I was able o walk in the middle of a main road in my town which Is usually packed full of cars, especially at the time I was walking on it. It is a time that makes me even more glad I grow my own. I really need to buy the bigger tent, lights and re-locate to the bigger, more subtle cupboard (not the one i am using to dry my weed in the video I posted) and then I will be able to effectively ScrOG the 2 or 3 plants I have, in order to maximise yield so I can be totally self sufficient with regards to my cannabis medicine.
UPDATE - MONDAY
I just realised I have made a proper idiots mistake an missed out on some much tastier buds because of it. OK, so I got paid today, so I though I would treat myself to some of them cheap COB chips I used for my last grow because hey were super cheap and actually really effective considering the price. I ordered 2x 100w 6000k veg spectrum chips with a solderless connection for my power. I also ordered one of these heatsink + reflector. https://www.amazon.co.uk/gp/product/B01MT824NP/ref=ppx_yo_dt_b_asin_title_o01_s00?ie=UTF8&psc=1
My thinking was that I have a spare heatsink here that the old citizen CLU-048 is attached to so I was going to fit one of the chips into that and the other into the heatsink and fan I bought. This hought process lead me to go ad retrieve the old citizen LED and I thought I would try it. Still didn't work, then suddenly I thought it could be a simple blown fuse so I changed it aaaannnnd.....still doesn't work. doh!
I started to remove the COB holder and COB from the heatsink (it was just glued to it using thermal compound) and when I laid it on the table I decided to test the driver without the COB holder on the tiny off chance it might work...nope
I then realised maybe I got the + and - the wrong way round, tried again and boom works perfectly. The connection from the holder to the cob had bent slightly off contact.
Really annoying that this whole time I could have doubled my photons to the plant, however, really nice that I don't have to spend a load more money on lighting in order to upgrade into the new room.
So all I have to do now is spend money on a pre-drilled heatsink and a new metal COB holder for the citizen.
Likes
5
Share


@RookGrow
Follow
Smells beyond good and definitely got me high before it cured so it is good with me. I let it dry for 10 days then chopped. The Total weight after was 2.5 ounces, this plant took some beatings I will let all the stems grow out next round, I want everything lol.


Likes
118
Share


@Grow3rPT
Follow
👉 ( Vegetação ) 👈
📅 Total de Dias 15 - 17/08/2021 / Inicio da 3º semana
📅 Total de Dias 16 - 18/08/2021
📅 Total de Dias 17 - 19/08/2021 / 💦 Rega
📅 Total de Dias 18 - 20/08/2021
📅 Total de Dias 19 - 21/08/2021 / 💦 Rega com 2ml de calmag apenas por prevenção
📅 Total de Dias 20 - 22/08/2021
📅 Total de Dias 21 - 23/08/2021 / 💦 Rega
👉 MARSHYDRO
👉 CODIGO PORMOCIONAL : Grow3rPT
👉 Em marshydro.eu 3% de desconto em qualquer produto
