Likes
Comments
Share

@postpluves
Follow
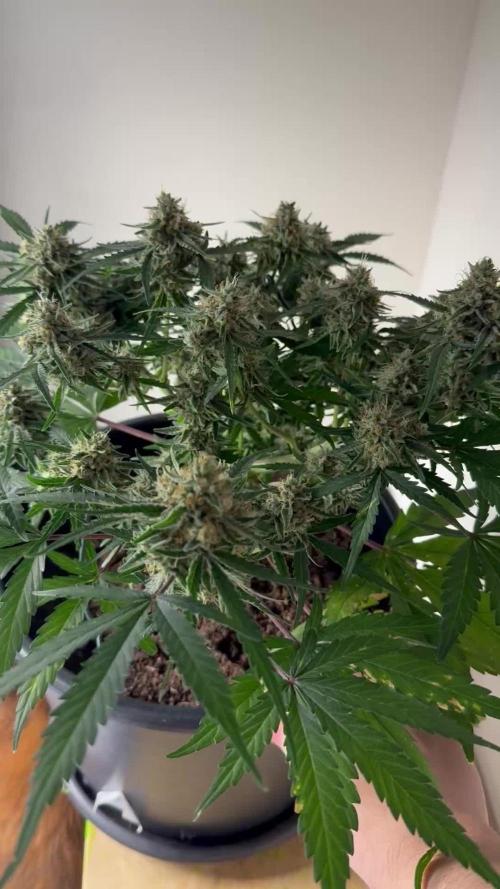
On the fourth day of Pride, my true love gave to me… one fully harvested plant! Oh Medusa, Medusa, my snakehaired beauty. I know men are awful, but have you considered a woman might treat you right? 🏳️🌈
Never let anyone tell you you can’t top autoflowers, because it seems like they actually like getting topped! (You and I both, queen.) Buds are quite thick, and all over the plant, in fairly even sizes.
Having pH dialed in from the start probably helped quite a but, and the fact that she got maximum nutrients for most of her time in the tent definitely can’t have hurted.
Harvest blows anything else so far out of the water, and I’m curious how she dries up. Just in time for Mary Jane :3


Likes
57
Share


@ThrashedTV_BakedByGlaze
Follow
Week 1 - 01/01 to 01/08 2021
HUGE THANKS TO @MARSHYDROLED and @VIPARSPECTRALED!
New surge protectors/heavy duty timers/the good cords.
The Dark Devil by @Sweet_Seeds is right on track with the Red Poison and Purple Lemonade from my other diaries. The LSD is a little behind but the genetics seems to keep it small if you get the wrong pheno. Will give it a week or so for it to really settle in with a root base before cleaning out my 5gal RootPouch pots from the last grow and getting them transferred into their final homes.
I have all my seedlings under the P1500 from Vipar as my veg light for the first few weeks to a month. It's SO nice to not have a blurple anymore, the light is way better in my room and on the eyes. The new diodes had every single seedling grow more in 6 hours than it did in the first 7 days under the blurp LED. The Dark Devil perked right up and threw another set of leaves in the first 6 hours under the new light.
I noticed a bit of spotting on the Dark Devil in my other diary so I added some Hydrogen Peroxide to the spray bottle and it cleared up. All four have been getting constant spritzing from the spray bottle to keep humidity up.
Excited to see how big i can get the autos under the new lights, will switch over from the Vipar to the Mars by end of week 2/mid week 3 once I transfer them and give them a day or so settle in.
Thanks for stopping in! Throw down a like and/or follow so i can return the favour 🙌
--
Check out my Diary of the Year 2020 entry 🙏
https://growdiaries.com/diaries/54258-fastbuds-original-auto-sour-diesel-grow-journal-by-glazedgrow
IG: @GlazedGrow
CannaBuzz: @GlazedGrow

Processing
Likes
16
Share


@GRow_M8s
Follow
* Progressing the LST every day, working the canopy with defoliation where needed.
* No food until day 28.
* 25gr/plant organic dry NPK ( 6 - 3 - 18 + 3Mg0) mix 6 from DCM. ~》3 weeks after Transplanting... Will feed the plants one week after the first watering.
~Week 4~
* Drying period before waterings.
* temps : 20 - 29c°.🔅
*HR : 55% - 70%. 💦
* Lights 20/24h/day.
off --> (12:00-14:00) &
(00:00-02:00)
*No defficients or problems this week, even the stunted Stomper starting to develop.

Processing
Likes
10
Share


@Barcelona_Farmers710
Follow
Entramos en semana 4 de flora con un calor extremo con el Lec... a la espera de renovar equipo a led pero tendremos que acabar con Lec está tirada farmers, a pesar de todo tiene bastante resina y huele bastante bien sobre todo la Sweet Skitllez!🍁


Likes
57
Share


@TheBudWhisperer
Follow
Week 8 of flower is in the books and this show is quickly coming to an end. I said last week we had about 7-10 days and I was spot on at the 10 day mark. I was only wrong about the order. The cheese is ready to chop before the rest and the gorilla cookies, cherry Bomb and lemon haze will follow in due course. The cheese is a beast and it’ll take a little time to get it all run through the bowl trimmer. At least the big one goes first. Her tallest colas have foxtailed like mar, despite the late supercrop. You can tell where the sweet spot for the light is at about 10” distance from the canopy. Any closer than that and the tails begin to show prominently. It’s a good example of just how close you can get to these fixtures with a little bit of prior experience. It’s been noted for the next run😎👍😎. The res. is on an h2o2 only flush for the remainder until the rest are ready to come down. Not a moment too soon either - the pollen chucking project has stalled out waiting for these girls to finish and now that we’ll have a little extra room, we can start running our cuts in the aerocloner🤟. Not long at all now folks. Thanks for tagging along through all this. Learned a bunch about this system and we’re back to hardware mode to make some serious improvements for the next run🤙😎. I love hardware mode😉.
Background/Repetitive Nonsense
The strain line up on this grow is look’n quite saucy 😈. We’ve got 2 FB strains this time around - Gorilla Cookies (seems we always have some GSC cross in the works). Mainly because the colours look stellar and remind me of a sugar breathe we did last year that was 🔥. The other FB is their original Cheese strain... because we already smoked all our cheese... and we really like our cheese...😉. Emerald triangle was kind enough to include a freebie of Lemon Haze. Wasn’t really big on the list but we haven’t done a haze strain to write home about yet so worth a go👍. The last is a Cherry auto from Bomb seeds that we’ve been trying to get to for months. Let’s just hope that she’s not a dud like the last bean.
The new digs for this run are courtesy MarsHydro👊. Their 2x4 single grow tent, paired with a shiny new 240w QB courtesy ViparSpectra.
These folks were kind enough to discuss a collaboration and as a result, here we are to test out the gear with an inaugural run of autos. Each week, we’ll try to expand on some of the benefits of each, as well as any limiting factors or considerations that need attention when pondering purchase.
Already I can say that both are high quality products in terms of overall craftsmanship.
MarsHydro 2x4 Grow Tent:
Excellent construction in terms of durability. Reinforced stitching on the zippers and corners ensures zero tearing. Conveniently placed screen vents and intake/exhaust ports. The ceiling exhaust port only exists on the right side. Perfect for me but not great if you’re running exhaust from the top on the left side (left side wall port makes up for this however). The aluminum frame is rigid enough to support the weight of the lights and accessories. Once you have some weight in the tent, she’s go’n nowhere and you can assemble and break it down in record time if moving or stashing the grow op.
Only limiting factors I’ve noticed is that temp. Control will be an issue for a tent. It just doesn’t have the same insulating ability as a wood cabinet or other permanent enclosed space. No worries, this is offset by a small desktop heater and keeps the environment exactly where desired. The other issue was a production problem - the ceiling vent was accidentally stitched into the corner seams on the assembly line. Again, no real issue - just pulled it out with no damage or fraying to the tent or port👍.
Website link here:
https://www.mars-hydro.com/grow-tent/buy-mars-hydro-grow-tent-24x48x70-2-x-4-cabinet-closet-grow-box-upgraded-diamond-1680d-mylar-for-sale
ViparSpectra 240w Quantum Board:
This thing is sleek and slick in terms of design. Closest comparable to it that I’ve seen would be spiderfarmers line of qbs. They feature the same top-o-the-line components and roughly similar spectrums. Where VS takes the advantage is in the convenience of the dimmer nob which is easily accessible and works great at 50% with no strobing👍. The heat sink is also larger which contributes to lower temps. That’s not a good thing in my case but beneficial for most folks.
I can already say that this will be a great fixture through all stages of growth. Where I know this light will excel will be in the veg. Stage for sure. Dimming function gives seedlings a much better chance of success with the ability to use lower lighting levels early on and the coverage area on a 240w is great. The average grower will find this panel suitable and fitting to their needs in a 2x4 grow space although I’d suggest 2 units if going any larger than that. The total output in this space equates to about 30w/sq.ft. Which is a decent amount of coverage based on power vs. Growprint. Ideal for veg. Certainly but, in flower - I tend to run closer to 50-60w/sq.ft to achieve higher yields. Again, similar fixtures have performed admirably in the past and while this wouldn’t be considered an “entry-level” fixture, I’d recommend that any grower new to the game not skimp on lighting and start with one of these. The price points are a great value for quality LED tech. These days, so there’s little reason to even consider a lesser fixture👍.
I have no detail on limiting factors for this light as yet but have heard that stock branded fixtures don’t necessarily incorporate enough red diodes. I’ve seen no issue myself but confess - I’m no lighting guru.
Website link:
https://www.viparspectra.com/collections/xs-series/products/xs-series-xs2000
***8% discount when using code: “ItBudWhisper”***
Happy to have you along for the ride if you made it this far through my opening rant!!😎🤟😎🤟😎


Likes
4
Share


@Lucidite
Follow
I started the week by flushing the plants. It was time. The oldest two plants have two weeks max. The run off started at 1900ppm and went down to 400ppm. By that time I had pumped about 60 litres through the four of them. The tap water is already 300ppm, so this is a good level I think. The leaves are responding. I can see the nutrients being drawn out of them. They are withdrawing.
I am also looking at trichomes daily now. The mature plants are 1/3 clear, 2/3 cloudy, with a few amber. The younger plants are 2/3 clear, 1/3 cloudy, with no amber.
I couldn’t wait any longer. I cropped and chopped 3 buds from under the canopy and dried them slowly on a metal plate over boiling water. It took 1/2 hour, but it produced a nicely dried pile of smelly weed. If I lost any potency in the process we didn’t notice. We got really really stoned. If this sample is any indication, I think it will easily be my best grow yet in terms of potency. Now I’m curious about the weight.


Likes
5
Share

@Borberad
Follow
Sensi Seeds Research – „Cherry Strudel“
Willkommen zu einem weiteren Kapitel unserer botanischen Analyse! In diesem Projekt untersuchen wir die Sorte Cherry Strudel aus der Research-Linie von Sensi Seeds. Ein besonderer Dank gilt Sensi Seeds für die Bereitstellung der feminisierten Samen im Rahmen dieser Dokumentation.
Sortenprofil – Cherry Strudel (Sensi Seeds)
Genetik: Diese zu 65 % Indica-dominante Hybride ist eine komplexe Kreuzung aus Ed Rosenthal Super Bud und einer Mischung aus Red Velvet sowie Lemon Cherry Gelato. In Kooperation mit Sherbinskis entwickelt, fließen hier Einflüsse von Sunset Sherbert und Girl Scout Cookies ein.
Wuchs & Morphologie: Die Pflanzen wachsen zu relativ niedrigen (70 bis 100 cm indoor), aber sehr produktiven Einheiten heran. Charakteristisch ist die klassische Weihnachtsbaumform mit einer dominanten zentralen Cola und starken Seitenzweigen, die sich hervorragend für Techniken wie SCROG oder Lollipopping eignen.
Blühdauer: Mit 65 bis 70 Tagen weist der Cherry Strudel eine relativ lange Blütezeit auf, die wir in unserem Protokoll genauestens überwachen werden.
Terpenprofil & Aroma: Wir erwarten ein dekadentes Bouquet aus Kirschsorbet, Zitronenschale und cremiger Vanille, ergänzt durch subtile erdige Untertöne.
Wirkung: Die Sorte verspricht eine vielseitige Erfahrung – beginnend mit einem euphorischen Energieschub, der allmählich in eine tiefe, körperliche Entspannung übergeht, ohne einen vollständigen „Couchlock“ zu verursachen.
⚙️ Experimentelles Setup
Unser bewährtes Stufensystem:
Start: Spiderfarmer Pflanzständer (54W LED) bei ca. 140 PPFD / 9DLI und 18h Beleuchtung.
Substrat-Zyklus: Easyplug (30ml) ➔ Easy Cube (400ml) ➔ 3L Stofftopf
Mikroklima: 25°C und 65-70% RLF.
Cherry Strudel (Sensi Seeds Research)
Status: Keimung im Rekordtempo
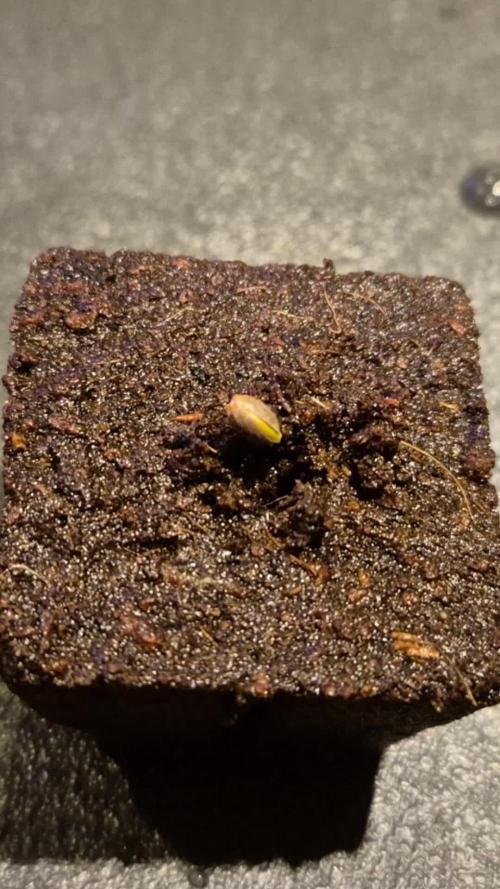
Tag 0.1: Das Paket von Sensi Seeds wurde in Empfang genommen und der Samen ging direkt für 10h ins 1% H202 Bad, anschließend in den Easyplug.
Tag 0.2: Geduldsphase? Von wegen. Die Sensi-Genetik zeigt enorme Vitalität.
Tag 0.3: Rekordzeit! Die Cherry Strudel hat die Oberfläche bereits voll durchbrochen. Die Keimblätter sind geöffnet und das erste echte Blattpaar lässt sich im Zentrum schon erahnen. Aufgrund dieses Tempos wurde sie direkt mit in den 400 ml Easy Cube umgesetzt. Das DLI wurde auf 16 erhöht.
Tag 0.4: Alles unter Kontrolle. Die Pflanze zeigt extrem vitales Wachstum und gewöhnt sich an die „Elektro-Sonne“.
Tag 0.5: Die ersten echten Blätter entfalten sich sehr schnell. Die Pflanze wirkt sehr kräftig.
Tag 0.6: Die relative Luftfeuchtigkeit wird auf 60–65 % gehalten. Die Oberfläche des Cubes wird zur Algenprävention gezielt abgetrocknet.
Tag 0.7: Abschluss der Keimwoche. Die Cherry Strudel zeigt eine beeindruckende Blattentwicklung und hat die Hossegor in der Blattspannweite bereits leicht überholt.
Düngung & Messwerte: Kein Dünger oder Wasser notwendig, da der Cube noch ausreichend feucht ist und Nährstoffe bereithält.
Messwerte: Temp: 25°C | RLF: 65-70% | Licht: Erhöht auf 245 PPFD (18h).
⚖️ Rechtshinweis & Compliance
Dieses Tagebuch dient ausschließlich der wissenschaftlichen Dokumentation. Wir garantieren die strikte Einhaltung des CanG.
Likes
6
Share


@w4tch2gr0w
Follow
D1
Looking good! Let’s start into week 6 of flowering. She could be done in two weeks as the description says 7-8 weeks in total, but i guess she will rather need 3 more from now.
D5
It’s going alright 👍
She is more than pretty 😍 buds could be a bit bigger by now but i guess she will just grow longer than the 7-8 weeks of flowering and will be fine. The smell is so insane already. Also added my fertilizer into the whole plan started at week 7
D7
End of week 12, 6 weeks of flowering behind 2 to go so happy with those buds already. Counted 10 which are quite equally in size so LST was worse it

Likes
10
Share


@Bread_n_Buds
Follow
Here we are at the halfway point, after the first month our photoperiodic plants are multiplying their florets and then going into flowering.
Slurricane is a lady with low internodal distance. This characteristic greatly influences the application of growing techniques. In this case it is a plant that responds to topping a little slower than the others and it is best to wait for the branches to grow to avoid damaging the little ones. However, we are at 4 florets and between tomorrow and the day after tomorrow we will cut 8. My plan for photoperiodic plants is to get to 16, wait a few days and go into flowering. 16 florets as I see it is the perfect size for the 11 liter pot.
Topping is an extremely delicate moment as regards cutting the tops to split them, we always pay attention not to damage the new growing branches.
Topping is also a delicate moment as regards fertilization because the plant slows down and absolutely does not need all that nitrogen that it would normally need and that the producers recommend in their sheets. So you should arrive with the plant green and perfectly in shape at this moment and dose the fertilizer very well for growth.
Mine came from a slightly deficient veg because I kept it low fearing this over effect during the topping that I know well and now I am a bit over. Nothing to worry about, of course, but if you do repeated topping, my advice is to use preferred soil or prepare the soil with Monster Bud Mix by Zamnesia or Plagron Super Mix, in short, enrich the soil at the start and only add nitrogen if necessary, especially during repeated topping.
In any case, everything is under control and I will demonstrate it to you during the flowering phase. Wait for the Uncle BreadandBuds and see what it does to you.
Remember that cold temperatures make the girls absorb food much more slowly than in summer, so be careful to give the right amount and let the plant dry in maximum 2 days or you risk imbalances.
We are always using soil, feeding and all the recommended additives from Plagron 100& organic, we have only lowered the amount of grow in this topping phase for the reasons mentioned above.
---- Decide on the right soil and calculate your fertilizer sheet based on the soil on the official website.
-- www.plagron.com
Try a seed of this strain that drives us crazy...It's a super News!
---- https://www.zamnesia.io/it/11177-zamnesia-seeds-slurricane.html
Zamnesia Description // Do you want to add a prestigious genetics to your grow room? Slurricane is a premium US strain created by In House Genetics and now available to growers thanks to the breeding processes implemented by Zamnesia. Born from the fusion of Purple Punch and Do-Si-Dos, Slurricane is 60% indica and incredibly vigorous. Whether grown indoors, outdoors or in a greenhouse, this strain can produce large quantities of dense and aromatic buds. Add Slurricane to your assortment and enjoy growing one of the most beloved hybrids in the United States.
All the best that mother nature can offer is on ---- www.zamnesia.com
Likes
4
Share


Likes
168
Share


@BudBoutique
Follow
Welcome to Bud Boutique Grow Diary - really appreciate all your love and support :)
Dont forget to check out my other current grows!
🗓️ This Week:
- buds getting to their final formation
- water uptake really slow now - extended feeding each 4th day instead of each 3rd
slowly coming to an end ✂️
___________________________________________
--- 🌱 Strain ---
🏷️ OG KUSH by Barney's Farm
https://www.barneysfarm.com/og-kush-646
---💡 Lighting ---
💡LUMATEK ZEUS PRO 600
https://lumatek-lighting.com/zeus-600w-pro-29/
--- 🥗 Nutrients and Feeding
* 🍸 PLAGRON Algae Baseline grow/bloom + Additives: Power Roots, Sugar Royal, Pure Enzym, Silic Rock, Power Buds, Green Sensation
* 📅💪 baseline grow/bloow: 4ml/l & additives: 1ml/l each
https://plagron.com/de/hobby/produkte
--- 🏭 Grow Setup ---
* 🏠🌿 Indoor: Homebox 120x120x200cm (4x4)
* 📐🌀 PrimaKlima exhausting Fan 1180m3/h (running on 60-80%) & Can Light Filter 800m3/h & 1x Fanbox 1x Dyson fan for Air circulation
https://primaklima.com/de/shop/ventilatoren-de/ec-ventilatoren/pk160ec-tc/
https://canfilters.com/products/filters/
All Likes and comments are highly appreciated!!!
don't forget to check out my Instagram: budboutiquee <3
- Bud Boutique

Processing
Likes
Comments
Share


@Greenfingers666
Follow
the buds are swelling nicely now starting to reduce the amount of feed i give it and increase the {Rain water} ,we use water from the sky all times we find its the best source of water for plants.
This project is to show you can have an idea in mind and for fill it T shape {top shelf}
This is all down to the spacers and remember this was a cutting straight into flower as are most of my grows,if anyone is into this and would like to learn then drop me a text.
we can send you some free spacers.

Likes
6
Share


@Comfrey
Follow
I missed to take some fotos ore a video. So I chooses to show where the soil is made: in Comfreys garden. Unfortunately I‘m not allowed to grow there my weed. It‘s a community garden with privat owned ground but with a lot of neighbors. The German law allows to grow cannabis in your own garden for private use but not in a private garden situated in a community garden club (Kleingartenverein). But anyway I’m lucky because we have a very sunny balcony, too. Next week more fotos…
Likes
11
Share


@OleGrow
Follow
Monday May 10th: Didn't wake the plants up this morning with the light! Time for 36 hours of darkness and then harvest tomorrow morning😊

Likes
6
Share


@XanHalen
Follow
Dec 12:
Growth has been good, leafs started yellowing as I tried a regular watering as opposed to a feed, and they did not take well to it. I’ve read that it’s good to incorporate waterings between feeds, but 24hr later noticed a bit of yellowing on the lower section, 48hr post watering even more yellowing.
Dec 18:
Going with feed only and yellowing has halted, stretching has officially begun. No adverse effects from the short term nitrogen deficiency (that’s what I narrowed it down to). Playing with budsites to maintain an even canopy, and as soon as I see stretching halt, and fattening begin, I will up the bloom nutes.
Dec 20:

Likes
18
Share


@growbville
Follow
Last week I fought some yellowing of the leaves. Did some small adjustments on PH to keep it in the 5.6 range. Seemed to stop it from progressing.
For Week 3 Veg I topped the plants. I plan to flip the lights at the end of week 3 and move into flower.
Lights are still at 25% power
Day 17
Leaves are getting darker. Everything is looking good.
Day 18
Turned room temp down to 73F from 76F. Fearing it is warming up my res tank too much.
Day 19
Starting to get yellowing again. checked everything and can't find a good reason for it. Did notice some cloudiness in my res tank. Added 2 ML/Gal of peroxide. have Hydroguard on the way to help. I'll be adding more fans this weekend. I have light air movement currently.
Also found a few spider mites and sprayed Greencleaner to all plants.
Current environment settings:
Room Temp 72.74 F
Room Humidity 63.63% (After spraying, Trending down).
Room CO2 589PPM
Tank PH 5.718
Tank PPM (500 Scale) 813
Tank Temp 74.5 F
Day 20
Recalibrated my EC probe just to be sure it was also accurate. wasn't off by much.
Dialed back my flooding to every 5 hours to encourage Rooting. <-- Strong roots = strong Plants
Sprayed for mites again.
Likes
7
Share


@Naujas
Follow
it's a pity, but the weather is not spoiling us, this week the girl has seen very little sun :( despite everything, she is growing a little bit, from next week she promises better weather :) well, this is just a test, so I don't expect a harvest of more than 10 gr :D so everything is fine :).

Likes
55
Share