
Likes
Comments
Share


@GuerrillaNo_4
Follow
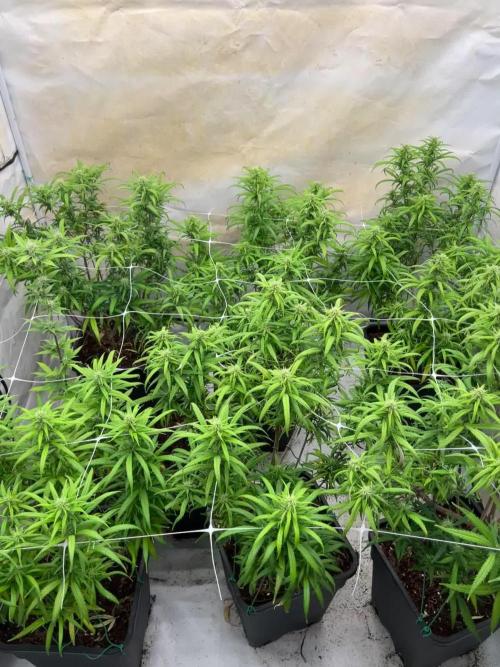
UPDATE
-Leaves showing signs of stress coming up to harvest.
-Trichomes cloudy, just waiting on more ambers.
GENETICS:
-MSNL - Gorilla Glue Auto ~ my favorite strain, as you can tell by my username!
WATER:
-Condensed (Starting at 40ppm)
-Disinfected prior to adding nutrients etc. (Using COOSPIDER UVC - 253nm & 187nm bulb)
CLIMATE:
- Ambient Air Temp = 29'C ~ 28'C LST ~ Leaf to air temp variance of between 1'C
- Night Temp = 22/23'C ~ Day/Night temp differential 6-7'C
- Under Canopy Temp: 26'C (Day) ~ 21'C (Night)
- Relative Humidity = 50-60%RH (Avg. 55%RH)
- VPD = 1.45kPa (Avg.)
- Co2 ranges from 900ppm to 1500ppm (Avg. 1200ppm)
AIR PRESSURE:
- Ambient Air Pressure (outside tent) = Mean Avg. 1010 mbars (101 Kilopascals)
- Actual Air Pressure (inside tent) = Mean Avg. 1005 mbars (100.5 Kilopascals)
- Air Pressure Differential = up to 0.5 kPa range between inside & outside
LIGHT:
- UVB~ 2 hours daily mid light cycle.
- Warm White 3000K/White 5000k/Far Red (660nm)
- At plant canopy = PPFD 900-1000umols/s/m2 ~ Lux 45,000-55,000 ~ Daily Light Integral 55-65
- Under canopy lighting ~ Blue (460nm)/ Red (630nm)
NUTRIENTS:
- Mostly Advanced Nutrients (For base nutrients and most additives, as only company I could find scientific data on)
- Canna (For Calmag Agent and Cannazym)
- Plant Success (Great White Mycorrhizae)
ADDITIONAL GROW TECHNIQUES:
- Mostly getting out of the plants way and letting nature take its course.
- Some LST. (i.e. tying down branches and tucking large leaves away)
- No HST or Defoliation.
INFECTION PREVENTION & CONTROL:
Infection control practices i.e
-PPE, Alcohol Hand wash
-Gray room outside tent,
-Carbon filter
-HEPA filter
-Plasma Ionizer
-Inline UV-C germicidal bulb
- Also using an additional higher powered COOSPIDER (UVC) 253nm & 187nm bulb, to disinfect the gray room outside of the tent once a week for 30 mins.
- Ozone (o3) gas that is produced using the COOSPIDER, is then directed into the tent to further control any unwanted pathogens.
- Ed Rosenthal (Zero Tolerance organic pesticide), sprayed once a week as preventative measure. On hand for heavier use (Once every 3 days before lights out for 15 days) in the case of an outbreak
(No outbreaks yet, due to aforementioned preventative measures)

Likes
15
Share


@Ronin716
Follow
(I’m starting to try timelapsed videos of growth so lmk what you think)
So I’ve added a little lst to #1(the one I topped) just to capitalize on it I guess. But they’re all doing really well at the end of week 4. I’m trying to get better with photos and documenting so bare with me but as for #3, I’m really impressed with how fast she’s gotten bushy and with how she’s taken to lst. I’m doing different things to different plants to see what I like and what works for me. #4 is my control and I’ve done nothing but water and feed and honestly, she’s still doing just fine 💪🏻


Likes
20
Share


@GrowinHome
Follow
They get a 100 ml every 5 days. I'm going to keep giving 100ml per plant untill they need it every other day.
Day 26 I removed the first 2 nodes so the plants can focus on the top growth.

Processing
Likes
13
Share


@Andres
Follow
cloudy days with 14 c min and 19 c max. Its flowering has been slow compared to other newspapers. The smell is already strong and continues to feed organically. She is flowering in 2 parts. I made an apical cut. at the same time there was also a light that gave only the upper part of it. the lower part is already in the last part and the upper part is just in flowering

Likes
140
Share


@MrJones
Follow
mrjones - Slurricane #7 S1
🌱Slurricane #7 S1
@inhousegenetics_official
👨🌾🏽GD Grower: MrJones
🔹🔹🔹🔹🔹🔹GOALS🔹🔹🔹🔹🔹🔹
🌞Environment - 75/80℉ and 55% Humidity
💧 Feeding - Advanced Nutrients Organic
⚗️Soil - 50% Ocean Forest / 20% Tupur Royal Gold / 10% Earth Worm castings / 10% lobster Compost / 10% Additional Perlite
🍃Training / HST, Will be topping, Cloning, and creating larger plants, and placing to flower under a trellis
🕷️ IPM - Will be using Green Cleaner" 1 OZ per Gallon, and CannControl from Mammoth alternating between product each month for Integrated Pest Management.
💡Mars Hydro LED / Veg Geeklight Monster Board 480W V4 / Flower 480W FC 4800
🔹🔹🔹🔹🔹🔹🔹🔹🔹🔹🔹🔹🔹🔹🔹
📜 Rambling - Week 14 / After pushing the veg stage on these ladies, I am going into damage control this week, I have not quite set up my goals but will double back today with my path and results, along with updated pictures.
🔹🔹🔹🔹🔹🔹🔹🔹🔹🔹🔹🔹🔹🔹🔹
▶️ Sunday - 05.09.21 / Fed with 30 ounces of H20 PH @ 6.2, going to be working the plants later, lots of pruning and cloning ahead. I was able to get the plants under a SCROG just to redirect the cola's - one plant the stems are just way too mature to manipulate.
▶️ Monday - 05.10.21 / Slowing transitioning soil and feed over together, feeding about .5 gallons per day in the larger pots, once I get the soil set, should only have to water/feed every other day.
▶️ Tuesday - 05.11.21 / The plants are looking great, they are starting to push new branching up so I decided to flip the timers to flower and shifter over to the bloom nutrients.
▶️ Wednesday - 05.12.21 / Fed .5 gallons of Bloom Nutrients. Going to stick with the AN product line, just going to reduce the amounts I have 1 awesome clone so far, and about 60 in various stages, going to put one outside alongside its sister.,.
▶️ Thursday - 05.13.21 / Fed .5 gallons of Bloom Nutrients.
▶️ Friday - 05.14.21 / Fed .5 gallons of Bloom Nutrients, I will be shifting to every other day, with the feedings. The clone was transplanted over to a 1-gallon pot, I have 3 more clones rooted that need to be placed into soil.
▶️ Saturday - 05.15.21 / I have about 4 total active clones, this strain is just very hard to clone!
🔹🔹🔹🔹🔹🔹🔹🔹🔹🔹🔹🔹🔹🔹🔹
📜 Cultivar Information - In House Genetics - Slurricane #7 S1
🔹🔹🔹🔹🔹🔹🔹🔹🔹🔹🔹🔹🔹🔹🔹

Likes
4
Share


@Blazin69
Follow
Hard not to play with them but i did anyway. These girls look ready being all golden. Close inspection of tri shows a couple of golden tips (not many). Top of heads look good but down low are still white hairs and no cloudy tri. I will wait another week. Having pulled a small cola I plan to try in a week after drying to see how it tastes.

Likes
21
Share


@420DeepGrow
Follow
Este sueño es posible gracias a Royal Queen Seeds, Marshydro, XpertNutrients y Trolmaster, sin ellos esto no se podria cumplir .
💐🍁 Dynamite Diesel:
Royal Queen Seeds se ha asociado con Tyson 2.0 para ofrecer la genética desarrollada por este campeón en forma de semillas.
La Dynamite Diesel recibe su nombre en honor al apodo de Mike Tyson al inicio de su carrera, Kid Dynamite. Es un cruce entre dos variedades míticas, la Sour Diesel y la Skywalker OG, que son conocidas por sus intensos sabores y sus efectos estimulantes,tiene un 22% de THC, lo que la sitúa en la categoría de peso crucero.
En interior, esta variedad crece a alturas de 100-150cm y produce hasta 550g/m² tras una fase de floración de unas 9 semanas. Al aire libre, puede alcanzar hasta 2m de altura y produce una cosecha máxima de 675g por planta.
🚀 Consigue aqui tus semillas:
https://www.royalqueenseeds.es/rqs-semillas-cannabis-tyson/664-dynamite-diesel.html
💡TS-3000 + TS-1000: se usaran dos de las lámparas de la serie TS de Marshydro, para cubrir todas las necesidades de las plantas durante el ciclo de cultivo, uso las dos lámparas en floracion para llegar a toda la carpa de 1.50 x 1.50 x 1.80.
https://marshydro.eu/products/mars-hydro-ts-3000-led-grow-light/
🏠 : Marshydro 1.50 x 1.50 x 1.80, carpa 100% estanca con ventanas laterales para llegar a todos los lugares durante el grow
https://marshydro.eu/products/diy-150x150x200cm-grow-tent-kit
🌬️💨 Marshydro 6inch + filtro carbon para evitar olores indeseables.
https://marshydro.eu/products/ifresh-smart-6inch-filter-kits/
💻 Trolmaster Tent-X TCS-1 como controlador de luz, optimiza tu cultivo con la última tecnología del mercado, desde donde puedes controlar todos los parametros.
https://www.trolmaster.com/Products/Details/TCS-1
🍣🍦🌴 Xpert Nutrients es una empresa especializada en la producción y comercialización de fertilizantes líquidos y tierras, que garantizan excelentes cosechas y un crecimiento activo para sus plantas durante todas las fases de cultivo.
Consigue aqui tus Nutrientes:
https://xpertnutrients.com/es/shop/
📆 Semana 9:
El engorde de los cogollos está prácticamente terminado y solo falta que maduren un poco antes de ser cosechada.
Gran trabajo por parte de mis colaboradores, estoy bastante contento con este grow, el próximo tendré más atención en la etapa de crecimiento, la cual es muy importante si quiero obtener una cosecha de calidad.
A partir de ahora agua hasta el fin.
Processing
Likes
4
Share


@Green_Thumb
Follow
Plants look,smell, and feel amazing. I think they've put on most of their weight now and the buds are starting to get really cloudy! I started the slightly older plant in the front on her flush at the end of this week. I believe the one in the back seems to be a week or 2 behind.


Likes
41
Share


@Fatnastyz
Follow
Week 2 of flower
12-5
She is growing nicely. She got a good dose of microbes yesterday.
2k ml she got cal/mag 5ml per gal, Drops 1ml, dusting of yucca, Kelp 1/16th tsp, EM 1 1 ounce per gallon and 1/2 tsp recharge.
Top dress is soon. She will only get water x2 waterings.
12-7
2.5 liters plain water ph 6.2 removed any leaf pointing inwards. Fully watered love it. Doing great.
Hope not to touch a leaf for a week. Fat chance, but heres for hoping 🤞
12-10
Removed some leafs
12-11
Looks like water tomorrow.
Likes
Comments
Share


Likes
129
Share


@GuavaBoy
Follow
Day 30 and this is the day after using Recharge. Only a day later and I notice some changes. Supposedly after 2-3 days you notice a big difference. We’ll see. I watered about 6-7 cups of water in each pot until run off. Looking forward to the new growth.
Day 31: The first two to the left are autoflowers. They seem to have less branches below compared to the photos on the right. Will they continue to grow branches over the next few weeks? I love how they look for my first grow. Just curious


Likes
5
Share


@GODAXE
Follow
here we are for the SSSC contest grow update.
14.06.2024
the two murphys sister grow well in their new soil. the litlle flowering one slowly get chunkier and the stunt one finally wake up and stretch nicelly ( she could be a chalenger)
18.06.2024
3 day of canicule have been annonce
at 9h00 am the outside temp have reach 29°C, the room temp is at 33° and the grow tent is at 36°.
to avoid any over heat stress to the sister they have been set outdoor for the heat wave.
20.06.2024
the outside temp hit 38°c today can t imagine how high it may have reach in the grow tent.
The murphy sister really like the sun light the stunt one just grow 2 inch per day, she is now 3 time bigger then is sister...
unfortunatelly she have been snap , almost unroot, by my neighbor dog. try to fix her best as i can.
21.06.2024
thunder storm alert today so the sun therappy is finish anyone return back to the growtent,
the snaped sister look okay. maybe i will rescue her an other time.
22.06.2024
the injured sister look really bad this morning. and passed out by the end of the day. she haved been set to dried, the terps is so amazing, kind of a woody sun ripped cherry crumble.
04.07.2024
the RIP murphys sister is dry, she gave me 1g of tinny fluffy bud sticky like hell and smelling like heavent

Likes
8
Share


@The_Good_Twin
Follow
7/3/22
I was a little rushed today, and didn’t have the chance to take any new pics for todays log entry. 🤷 It’s not like I’m not going to add a bunch more photos later in the week.
This week we’re starting with the Mid-Bloom, step 3 nutrients on our feed chart. I mixed two separate gallons to feed my 4 girls as usual.
Each plant received half a gallon of water with the following:
CALiMAGic - 2 ml
FloraMicro - 4.7 ml
FloraGro - 3.8 ml
FloraBloom - 8.5 ml
Floralicious Plus - 2 ml
Liquid KoolBloom - 2 ml
Each of the 2 gallons had a pH of 6.4, and wasn’t adjusted. My tap water has been exceptional lately!
Each of the plants had plenty of runoff with the following pH level:
#1 & #3 - 5.9.
#2 - 6.1.
#4 - 5.8
My girls are super tall, and have bodes all over the place. They are all developing nice pistils everywhere, and should each yield quite a bit. I’m looking forward to watching them mature!
Happy 4th of July to all of you in the USA 🇺🇸! Independence Day!!
Happy growing everyone!
7/5/22
These 4 Ladies are going to be the death of me, I swear!
I know you all HAVE to be sick of reading about their growth, but damn! These bitches could be super models!
I last measured them on 6/29/22, and was astounded then by their growth. Now, I’m just blown away. Since 6/29/22:
#1 has grown 12 inches, and is now 55 inches tall.
#2 has grown 11.5 inches, and is now 54 inches tall.
#3 - 12.5 inches, now 49 inches tall.
#4 - 14.5 inches, now 51.5 inches tall.
I had to do some mild LST today. I tied a bunch of the branches on #1 & #2 today. Loosely, but closer in in order to improve stability, and open up space in my tent.
Some of their branches have become so long that they are being pulled apart by gravity. I used some rubber coated, malleable metal poles to tie loose circles around branches, and then wrap the other end around the other branches on the opposite side. I also defoliated #1 & #2.
It’s not pretty, but it seemed to work. I need to do the same to the other two, but time, and supplies didn’t cooperate.
Enough about the maintenance. Let’s get to the feeding.
We’re keeping with the mid-bloom nutrients mixed into a pair of gallons full of water.
The pH of both gallons measured at 6.4. #1&2 share 1 gallon, and #3&4 share the other.
Each gave back plenty of runoff with the following pH levels.
#1 - 5.9
#2 - 6.1
#3 - 6.0
#4 - 5.8
The tent was 83F, with humidity at 65%. I’m hoping the adjusted fan helps with the humidity, and I also hope my girls react well to being tied up.
Happy growing everyone!
7/7/22
Today, Stella’s Cuatro ended up getting the same treatment as their mother. Each of them were the recipient of some serious High Stress Training (HST). All of them have super long branches that were making them almost unmanageable, so I got to taping and bending branches today until nearly all of their branches had been bent over 90*. Sorry for the asterisk, but I didn’t have a degree icon to use.
Bending their branches made space in the tent to some degree as well. They don’t look so crowded anymore, but later on I’m going to have the same issues that I’m having with their mother now. Branch weight!
It seems silly to complain about all the time, but damn they are all huge plants!
I know that some of you may be thinking that you’d probably rather stay away from this cultivar, but that would be a mistake.
I bitch, and moan a lot about these plants, but regardless of the headaches they give me, they are still absolutely wonderful plants. They grow strong and healthy regardless of what I do to them. They develop ginormous buds, and the effects of this cultivar are still my all time favorite.
They are resilient giants that produce a lot of bud! The first cultivar I ever grew was this one, DarkStar, and 1 plant produced almost half a pound of top shelf bud after everything was dried and jarred up. I’m looking forward to another wonderful haul from these 4, their mother, and another 2 younger siblings.”
Each plant received 1/2 gallon of solution with a pH of 6.5. Each has sufficient runoff except #3. She didn’t have any runoff. The others were as follows:
#1 & 4 - 5.8
#2 - 6.0.
The tent was 83.3F, and humidity was 56%.
Life is good. Happy growing everyone!

Likes
2
Share


@Wazowskid
Follow
Las plantas van creciendo estupendamente, de momento no les he dado ningún tipo de fertilizante. He aplicado LST.
Likes
30
Share


Likes
2
Share

@ukojesita
Follow
Zdar tak holky konečně v kukuřičce a teď děj se vůle boží. Na víkend hlásí ty vedra tak se tam budu muset zastavit s řádnou zálivkou aby se z toho šoku neposrali. Jinak to bych nebyl já aby všechno proběhlo v pohodě. Zasadil sem první pole, durch spocenej, chcalo že mě jak z vola, valim na druhé pole ať to stihnu do úplné tmy a najednou za mnou blikající stopka a stavějí mě švestky. Vzadu v caddy ještě čtyři kytky, daly mi fouknout, no problemo a jak mě viděli celiho spoceného i liznout. Čekám deset minut na výsledek, švestka očumuje auto, říkám si vidí je tam nebo ne? Za chvíli přišel že všechno je vpoho a nashle. No ty voleeee...
Likes
33
Share


@Zengrower
Follow
The Gorilla Cookies is turning into an impressive young lady. Even though she has an 11L pot, the growth rate is amazing. The bloom is setting in slowly, there are some white pistils visible but no buds just yet.
At the second half of week 5 I'm seeing the first few buds appearing. The plant is really impressive to watch. I'm easing up on the bloom nutrients as the top leafs have yellow tips which could be nutrient burn. Just water and Bio Tabs for the next couple of days and I hope she'll be fine 😇


