
Likes
Comments
Share


@Afterglow
Follow
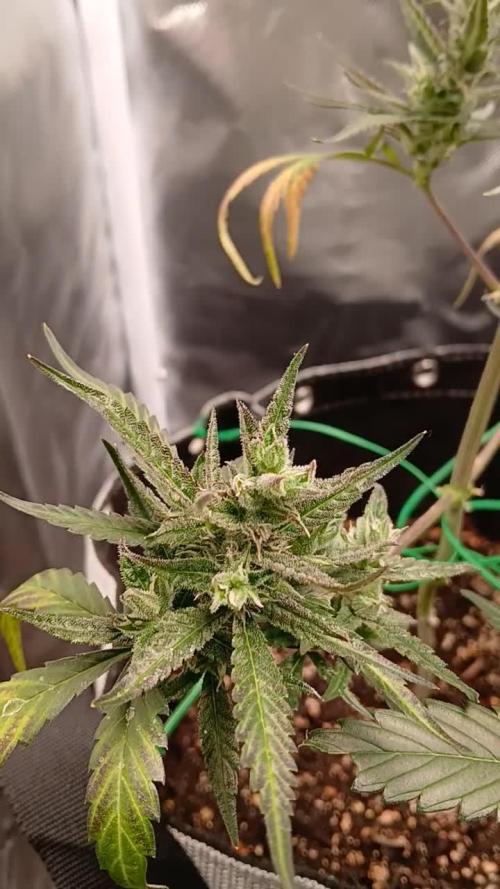
Вначале недели пришлось 8 основных колл согнуть вбок, чтобы они не убежали сильно вверх. Это привело к тому, что этажи ниже вырвались вперед и теперь у меня получился какой-то огромный забор из колл. По сути у меня получился SoG без использования сетки, а только лишь с помощью подвязок. Мало того, растишка стала наращивать зеленую массу и заняла все свободное пространство бокса. Если честно, я сам в небольшом ахуе. Я знал что у меня будет супер-скоростной гров, но чтобы еще и такой массивный - даже не представлял. Мало того, шишки начали расти прямо из листьев. 😂
Мы абсолютно здоровы. Специально сфотографировал кончик старого листика. Ни единого намека на дефицит или профицит веществ.
Увеличил дозу до 850 PPM, в дренаже такой же. Перешел на чистое Bloom питание с добавкой Bud Ignitor. Вообще я прям очень рад этим удобрениями. Растет на нах прям отлично, за PH не смотрю. Одни из причин - лень пойти купить батарейки. С другой стороны TDS показывает постоянный PPM, поэтому уверен, что PH нормальный. Ну и сами листья об этом говорят.
Как станет теплее на улице, вытащю бокс на балкон, потому что чувствую, что с таким большим урожаем не справится ни один фильтр, хотя у меня их два. Недавно отключился свет и буквально за пару часов вся квартира наполнилась ароматом.
Вот такие вот дела...
Спасибо что заглянули!

Processing
Likes
13
Share


@MG2009
Follow
Looking good can't wait to see mystery cookie offspring
06/04/2018
She is sparkling with trichomes frosty as .... Well frost. Growing for seed but will use weed for concentrates ( hashish)😁
06/06/2018
Begin 11.5 - 12.5 light schedule, try to get buds fattened up looking for heavy crop of seeds. Also looking at trichomes for maturity, get as many ripe seeds as possible.
Ps.found first fully ripe seed today!👍
Likes
39
Share


@AestheticGenetics
Follow
4/15/25 Things are progressing nicely. Some plants dont seem to be doing too much but 3 of them or so that are really standing out.
Im curious if some of these are going to be longer flowering time than anticipated with the very obvious sativa dominant plants.

Likes
2
Share


@ryanthegrower
Follow
week 6 officially started, leaves are starting to get a little yellow on the right plant which is a lil worrying, trichomes on the left plant look insane so far, smell is pungent at this point, other than the yellow leaves the grow is growing really easy
Likes
Comments
Share

@Bobbo94
Follow
10th week, the smaller Strawberry G was already harvested. 5 grams dry weight. Twig snap two days ago I was out smoked it. Head buzz, Strawberry taste was light and delicious. High lasted about 4 hours. I have a habit of harvesting with hardly any amber so the potency is at its peak.


Processing
Likes
10
Share


@yaron
Follow
starting week 6,the wedding cheesecakes are in flower for a couple of days now and the gg are starting to flower.
alot of wind and clouds and rain these past two weeks but the girls are looking good in my opinion.
update:after 4 or 5 days of rain and low temperatures finally the re is sunlight so the girls have to recover a bit.
but things are looking better wheatherwise.
cheers!
Likes
58
Share


@AsNoriu
Follow
Day 74. One more victim of war against bud rot. Prevention needs sacrifices sometimes...
Day 78. Second was sacrificed for more space too ;)))
Day 84. First girl is Jared . Fantastic bud quality !!!
Day 88. I said fantastic quality about first one ??? ;))) That's till I touched second !!!
Purple phenotype is pure joy for eyes !!!
Happy Growing !!!
Likes
142
Share


@MadeInGermany
Follow
Hi everyone :-)
This week a lot of nice things happened in the flower tent :-)
Everyone looks super nice, and is growing stronger and more beautiful week by week 😍👌.
The blue cheese smells like a dream ;-) As usual from this variety 👍.
The kosher tangie is also very, very tasty 👏🏻.
Both got Pk 13/14 this week for the last time :-)
Everyone else is developing very well 👍, That will be the last diary with several strains together :-)
In future everyone will come individually 👌.
I wish you a lot of fun with the videos, have a nice weekend, stay healthy 🙏🏻 and let it grow 😎👌


Likes
12
Share


@LockDownGrow
Follow
Omfg what can I say,
Just look at the size of this auto plant,
She looks over watered but I can sure you she is not,
But just too be sure she had a flush feed this week and sucked that pot dry in just 3 days the same as the feed bucket before that rich of nutrients,
Absolutely no signs of defentcies on any of the plants leaves at any stage this grow,
Just the mutations in the first weeks that have only seemed too make them all very special plants indeed,
Now comes the exiting part,
The bud development,
I really pumped the nutrients this week as you can see,
At the end of this week a stopped giving the plant these addavitves
More roots,
Humic acid,
Growzyime,
Fast bud folar spray,
And big buds,
And have now started too raise the house & Garden A&B soil feed and also there budXL
I also started off early but as a trace amount of there top shooter,
By the end of week I intend on giving them the full recommended of each and only be giving them the house and garden range at full streingh,
I will then wait for the first Amber tricomb then instant flush feeds,
Hopefully I get two weeks from that stage but it is often genetic so as long as I get at least one week and at least 3 feeds of water only then I'm happy
Update I've been told from my photos I need too flush and they over fertililsed so my plans too increase is an
Abort Misson lol
Will not turn back the dial on feeds
Processing
Likes
10
Share


@eltiiocultiveta
Follow
27/07/20 se podaron y se hizo lst. Mañana riego con ferti bien cargado porque están mostrando falta de potacio y fósforo ya. Últimas dos semanas de vege y a florar
28/07/20 se fertilizó foerte

Likes
2
Share

@DogDoctorOfficial
Follow
Cash Express – Pheno A | Week 3
A Picture of Vigor
Welcome back to another week of the 8×8 Adventure, where twelve cultivars are being documented individually under a 12/12-from-seed schedule. Each phenotype receives its own dedicated diary, allowing us to observe not only cultivar differences but also the subtle variations that appear between sister plants sharing the same genetic foundation.
Week 3 has been a week of acceleration.
The entire room received a substantial increase in light intensity, moving from approximately 370 µmol/m²/s PPFD to 700 µmol/m²/s PPFD at canopy level. Nutrient strength increased alongside the lighting, and the plants have responded with enthusiasm.
Growth rates are increasing, branching is becoming more apparent, and the room is beginning to transition from seedlings into young plants with real structure and personality.
Among them, Cash Express Pheno A is making a very strong first impression.
⸻
Week 3 Environment
🌡️ Temperature: 27.4°C
💧 Relative Humidity: 55%
💡 PPFD: ~700 µmol/m²/s
🌱 Medium: Plagron Lightmix
? Growing Method: 12/12 From Seed
💦 Water Consumption: ~0.9–1.2L per day
Feeding Schedule
Days 18
* EC 1.0
* pH 5.99–6.0
* Approximately 1L
Days 21–
* EC 1.3
* pH 6.0
* Approximately 1.2L
The environment remains stable, which allows each cultivar to express its genetic potential without external stress factors influencing development.
⸻
Cash Express Pheno A
Some plants attract attention because they are unusual.
Others attract attention because they are simply doing everything right.
Cash Express Pheno A belongs firmly in the second category.
Looking through this week’s photographs, the first word that comes to mind is:
Vigor.
Everything about this plant communicates health.
The leaves are broad and evenly developed.
The coloration is rich and consistent.
The stem is sturdy.
The internodal spacing remains compact.
And perhaps most importantly, the overall symmetry is excellent.
From above, the plant displays a clean, balanced structure that many growers hope to see at this stage of development. Each new node seems to emerge with confidence, stacking neatly above the previous one while maintaining a very organized architecture.
The increased PPFD appears to have been welcomed rather than merely tolerated.
Instead of stretching toward the light, the plant is building mass.
The canopy is widening.
The stem is thickening.
The branching is becoming more defined.
This is exactly the kind of response growers hope to see when increasing light intensity.
One of my favorite observations this week is the contrast between the mature fan leaves and the fresh emerging growth.
The older leaves provide a strong foundation while the new growth pushes upward with remarkable energy, creating that vibrant layered look that healthy plants often display during rapid vegetative development.
There is a confidence to this phenotype.
No strange leaf shapes.
No unusual growth patterns.
No hesitation.
Just steady, healthy progression.
Sometimes perfection can be boring.
But in the garden, perfection is still beautiful.
And this plant is undeniably beautiful.
⸻
Reading the Plant
One of the most important lessons in cultivation is learning to observe rather than assume.
This week offered a perfect example.
When PPFD was increased to approximately 700 µmol/m²/s, the goal was not simply to provide more light.
The goal was to see how the plants would respond.
Cash Express Pheno A answered quickly.
The leaves remained comfortable and relaxed.
The plant maintained healthy posture.
New growth accelerated.
Color remained strong.
These signals tell us that the plant is utilizing the additional photons effectively rather than becoming stressed by them.
This is why environmental monitoring is so valuable.
Plants communicate continuously.
The challenge is learning how to listen.
⸻
Structure and Development
At this stage, Pheno A is developing into a plant that could potentially become a very balanced individual later in flower.
Several characteristics stand out:
* Excellent symmetry
* Strong central growth
* Healthy branching development
* Compact internodal spacing
* Consistent leaf morphology
* Strong response to increased PPFD
The architecture currently suggests a phenotype capable of building a dense, productive canopy while maintaining a manageable structure.
Of course, the real story is still ahead.
Week 3 only gives us the first hints of what this plant may become.
But those hints are promising.
Very promising.
⸻
Looking Ahead
Over the next week, I will be watching closely for:
* Continued branch development
* Response to the higher EC feeding schedule
* Growth rate compared to neighboring cultivars
* Structural changes as additional nodes form
* Early indicators of flowering transition under the 12/12 schedule
If the current pace continues, this plant could quickly establish itself as one of the stronger performers in the room.
For now, she remains one of the cleanest examples of healthy development in the entire project.
⸻
Thank You
A huge thank you to everyone following along with this journey.
Thank you to the entire GrowDiaries community for providing a place where growers can document, learn, share experiences, and support one another.
Thank you to Plagron for the nutrition and cultivation support powering this project.
Thank you to Zamnesia for the genetics, equipment, and opportunity to document these cultivars from seed to harvest.
And thank you to every grower, reader, supporter, and curious visitor who takes time out of their day to follow these updates.
The plants grow because of biology.
The project grows because of community.
🌱💚
Growers Love and see you next week.
Likes
12
Share


@SolitudeCorners
Follow
She almost dies once but came back after switch nutrients to advanced nutrients and recover her by reviving and great results! The best dense and snowy buds I ever grow.

Likes
18
Share


@Pokan187
Follow
Was on a 2 weeks vacation, just got back, found a lot of yellow leaves on the Runtz which is normal at this stage I think, te Sour Diesel is looking light green and the G13 is looking great and smelling marvelous.
I will be adding some natural flowering mix


Likes
2
Share


@NocturnalGardner44
Follow
Flipping now, light training trying to maximize horizontal space

Likes
4
Share


@00110001001001111O
Follow
-
Total days above ground: 35
Lazy update this week. Procrastination mode is on. No individual plant photos this week. I don't even have a plant map, So, I'm not sure what each plant is by location at this moment. I need to do some canopy management tonight, but fuck it. I'll put it off until tomorrow because I like to self-sabotage. They'll get a little less time to recover than normal heading into flower. They are healthy and happy, so I doubt there will be any repercussions.
Second humidifier is still tied up in the drying area, so VPD continues to be less-than-ideal. By the time I flip to flower, the climate will be in a much better place. I'll have to cut some corners and get a little creative to mitigate the effects of a suboptimal vege phase.
Things will turn out fine, but inevitably fall a bit short of expectations. I'll selectively prune lower axilla and top tomorrow but leave a couple opportunities for cuttings. Hopefully, there's enough growth for a proper clone by flip to flower (day 40). A second breeding cycle may or may not happen.
Likes
7
Share


@Nacholicious
Follow
She is a beast at the end of week 5 (day 35).
LST Goal:
Create an even FLAT Canopy with out the use of Scrog nets or stakes.
This is achieved by tying down all the branches evenly, so that every top gets the same amount of exposure to light, air and nutrients.
Likes
21
Share


@Hydronaut
Follow
A step back recently:
Started a final flush (2 days in), and decided to start feeding her again - thanks to some great GD input!
250 ppm at re-start and will work my way to 500ppm? She's still rockin' along - like nothing happened.
She topped out at 350 ppm without tanking PH, so she is stable here.
PH is now swinging down fairly quickly last 12 hours. Drained off 1/3 of reservoir and get reservoir down to 250PPM.
5 days later, major PH swings down again. Mixed another fresh reservoir. I am using Zero Water 5 gallon system, and just realized the PPM coming out was 100, and PH at 3! If I am at 100 today, that means these filters have been shot for a while, maybe since start of my PH issue. There is also interesting information about when zero water filters reach their expectancy. They put out fishy smell and otherwise. I will be watching my filters more often and taking more notes since this ZeroWater 5 gal system is really the way to go if you are only growing a plant or two. Filters are a bit spendy but when you take time, gas, convenience etc. its a no brainer (if the water coming out is zero:) - I get about 15 gallons per filter (175ppm from tap).
Day 70. It’s been about a day since new res change. Steady Eddie at 250 ppm and 6.2. I’ll let her drink the bucket down a good ways if things remain stable with a drift down. I doubt it though, 5 gallon is fine for 12” autos but at 2’ she really needed 8 gal. Time to up the R&D on the cabinet! Also checked Zero Water again and filter is now putting out 200ppm of 3.0 water. New filters installed!
Hope she finishes soon, the top of her canopy slowly getting cooked over the last 10 days. 8" of light distance is too little. PPFD 2000+ at the top, but leaf temps are in the upper 70's. Gotta hit a decent DLI on these lower buds - without nuking the top nugs, right?!
As the week concludes, she’s in a fresh bath, at 250ppm @ 6.0 and running stable again. New water filters installed so zero water variable removed. Last serving of half+ teaspoon of GH dry KB ripening, and will reduce ppm by 25/day until I reach 10-15%. 1-2 day flush, if at all.

Likes
6
Share

@smoking_hills9
Follow
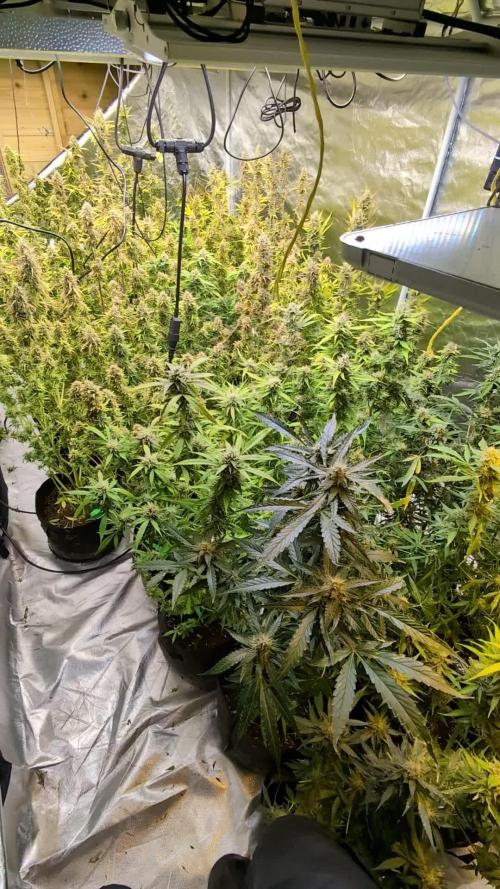
Last final defoliation done, now buds are fully exposed to the lights and the best part, harvest trim will be easier. Still it took me around 8 h altogether to defoliate all of them. Tones of buds and frost , amazing smells. Won't rush will give it a bit more to swell.
