
Likes
Comments
Share


@pureblaze420
Follow
I'm a bit disappointed with the yield but overall its a great strain, smells great!
My yield could have increased if all the plants were the same size. Heisenhound tastes like Master Kush, Def a good auto kush


Likes
3
Share


@Nookandplant42o
Follow
visual, coming nice visible granules great smell, resistant plant size small stature and probably will arrive soon I intend to go further with it.

Likes
17
Share


@Buddyhighs
Follow
Day42: 20 degrees 77% humidity 1l water
Day 43 : 19 degrees 69% humidity 500 ml water and feed
Day 44: 20 degrees 72 % humidity 1l water
Day 45 : no readings no water heavy defo added heat after advice on coments
Day 46 : 21 degrees 57% humidity 300ml water
Day 47: day of pics 22 degrees 64% humidity 2l water
Week avg : 20 degrees 67% humidity 800ml water
Purple colours showing
Advice from comments seem to work


Likes
8
Share

@eldruida_lamota
Follow
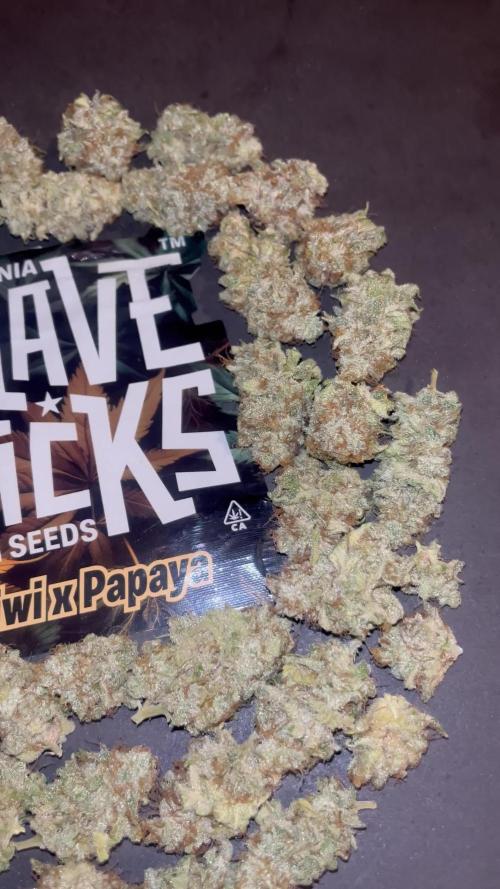
Venga familia que ya viene la cosecha de estas Kiwi x Papaya de Maverickseeds, que ganas que tenia ya de pasarles la tijera.
Que locura de variedad , me encantó cultivarla, que aromas y que flores aparte de piedras, se ven resinosas y muy apetecibles.
a sido una genética con la que disfruté bastante todo el proceso, crece bastante vigorosa y al final saca unos tonos llamativos.
No supuso ningún problema todo el ciclo fue perfecto.
Agrobeta:
https://www.agrobeta.com/agrobetatiendaonline/36-abonos-canamo
Mars hydro:
Code discount: Eldruida
https://www.mars-hydro.com/
Hasta aquí es todo , espero que lo disfrutéis, buenos humos 💨💨.

Likes
37
Share


@Roberts
Follow
Mandarin XL auto is growing great. She had a solution change early week. She has been growing steady, but is not showing any pistils yet. Which is fine. I seen plants get really big when they take a long time to start flowing. Everything is looking good. Thank you Gen1:11, Medic Grow, and Ganja Farmer. 🤜🏻🤛🏻🌱🌱🌱
Thank you grow diaries community for the 👇likes👇, follows, comments, and subscriptions on my YouTube channel👇. ❄️🌱🍻
Happy Growing 🌱🌱🌱
https://youtube.com/channel/UCAhN7yRzWLpcaRHhMIQ7X4g


Likes
37
Share


@RFarm21
Follow
Boas growmies! Esta semana apareceram mais folhas amarelas mas penso que seja normal, penso eu, visto que já estão caminho da 10ª semana.
O cheiro delas é fantástico!
17 Agosto - O gráfico representa a nutrição misturada em 2,5L de água da Royal Gorilla 1. EC = 1,55; pH 6,4
17 Agosto - Alimentaçao da Royal Cheese (2L): CE = 1,5mS; pH 6,3
-BioGrow - 3ml; BioBloom - 4ml; TopMax - 2ml; BioHeaven - 5ml; Activera - 5ml; Calmag - 1ml
17 Agosto - Alimentação Royal Gorilla2 e royal cheese 2 = Só água . ph 6.3)
-----------------------------------------------------------------------------------------------------------------------------------------------------------
21/08 - Alimentação Royal Gorilla #1 (2,5L): CE = 1,64; pH = 6,3
-BioGrow - 4ml; BioBloom - 6ml; TopMax - 2,5ml; BioHeaven - 7ml; Activera - 6ml; Calmag - 1,5ml
21/08 - Alimentação Royal Gorilla #2 (2,5L): CE = 1,33; pH = 6,1
-BioGrow - 3ml; BioBloom - 5,5ml; TopMax - 2ml; BioHeaven - 5ml; Activera - 5ml; Calmag - 1,5ml
21/08 - Alimentação Royal Cheese #1 (2L): CE = 1,36; pH = 6,1
-BioGrow - 3ml; BioBloom - 5ml; TopMax - 2ml; BioHeaven - 6ml; Activera - 5ml; Calmag - 1ml
21/08 - Alimentação Royal Cheese #2 (2L) - EC = 1,38; pH = 6,3
-BioGrow - 3ml; BioBloom - 4ml; TopMax - 2ml; BioHeaven - 5ml; Activera - 5ml; Calmag - 1ml

Likes
1
Share


@GnomeMoe
Follow
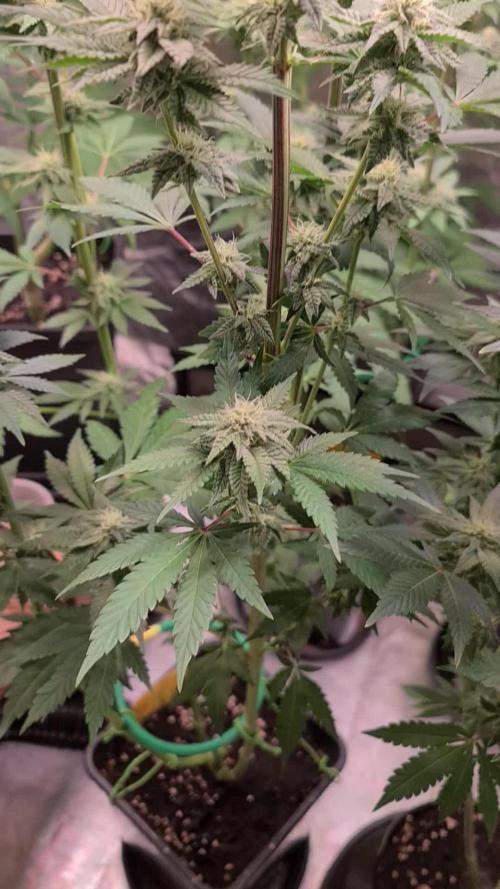
Starting into Week 5 Flower, week 11 total
Mandarin Cookies definitely has an extremely strong orange citrus smell!
Trichomes are coming in very nicely!
MC’s are still ahead of the SK’s... however the SK on the left is catching up, with the one on the right having some budlets starting to form.
3 - Madarin Cookies are two in back and one in center;
2 - Silver Kush are two up front;
2 gallons water/nutes per 5 plants, alternating with plain water (just calmag, malassis, Ph. 6.4) every other day.
Ph.6.4
(1.5 C.F.) Fox Farm Ocean Forest, mixed with (1.5 C.F.) garden soil, fills (5) 5 galllon fabric pots perfectly. (50/50 mix.)
The new version of Spider Farmer SF-4000 is an awesome light, for anyone wondering.
Can’t say enough good things about this light! Way less heat that any HPS/MH I’ve used.
My big curiosity is about the final weight per watts used at finish for the Spider Farmer...
UPDATE Week 5, Day 6:
I did notice some heat stress on only a few of the taller branches (they were about 6” from the light).
I did move the light a little further up about 4” to get some distance, and added an extra fan. Hope this helps the leaf curling!
Question: have you ever driven past a house and can instantly tell they just harvested?? Ha! I just did that on my way home, and thought I was smelling my house from a long distance away.


Likes
4
Share


@Forrbiddenterpz
Follow
Switched the autoflowers to another tent to give them 300 watts of led everything is growing fine


Likes
6
Share


@LoganatorDude
Follow
I’m a couple days behind on my posting of this girl. But here she is! Growing strong and healthy. I am getting ready to transplant her into a bigger pot soon enough. Then hopefully I will be able to get a picture of a stellar root system.
On another note, the field peas in the “400” are coming along, slowly but surely! I plan to transplant into the “400” in approximately 2 months (8weeks).
Day 26, I’ve got a larger pot (2.7 L) with my fancy soil, lots of greensand, I checked the pH and it seems stable at 6. I did add a lot of lime. Maybe the lime takes time to raise the pH too? Anyhow, I have potassium silicate to help raise pH if needed. I hope this isn’t a mistake putting her into that. In fact I’m going to add more lime to the top half and then the potassium silicate to water in.
Fingers crossed for stable, beautiful, warm and sunny weather!!
Happy Growing 💪🌳

Likes
30
Share


@gottagrowsometime
Follow
Welcome to my sponsored Runtz X Layer Cake from BarneysFarm.
Was only in the ground 12hrs and she was up. As you'll see in the germination week she had a 1 - 1.5cm tap root and. I mixed 3g of powder for every 1L of light mix substrate. I filled the pot 3/4 full and wet with 300ml of bioenhancer, sprayed the rest that was going in on top, soil needs to be ready, (don't water after you put the substrate in, the seed can move, drown, the soil that was lightly packed in falls in on itself and you'll have collapse later on as she starts to grow. Don't compact the soil In yourself, the liquid should do it. Fill the rest of the 1/4 of the pot with your damp substrate and make a little mound, (pic above) make sure the tap root is facing down, (now some tap roots might curl up, don't try bending it down into the substrate, what you need to do is place it on an angle, / like that tap root on bottom and the root will take hold and the seed will push itself up, if you try force the tap root down you risk breaking the tap and seed might die.
Trying to keep the RH as High as I can without compromising my late flowering plants in my big tent. The seedling tent is inside the big one on a negative seal. I have a damp towl in the small tent why you see a 10% dif in RH when my plants finish up next week I'll up the RH to 70+%.
Seedling Day 3. She's doing great. Settling in well in her new digs. Hopefully soon we'll start seeing a lot of fungus, (mycelium), seeing some already so it's great. Just water and Bioenhancer every 2 weeks, so far, so good. Now that we are in optimal growing range for seedlings I'm expecting things to take off in the next 2 weeks.
Seedling Day 7, she's moved quickly the last 2 days. Barneys strains are so strong and quick. You can tell they are hybrids.
(Hybrids are when you have a mix between indica & sativa) and this girl is 50/50..

Likes
29
Share


@Smokwiri
Follow
Welcome to week 5 of my Runtz gum diary by Original sensible seeds.
Switching to 12/12 today, cant wait to see the first signs of flowering...
Viparspectra discount:
Amazon: http://url-9.cn/0y9i
Amazon US: https://amzn.to/3e0P2bk
Amazon CA: https://amzn.to/3bTnEJC
Amazon discount Code:
it10smokwiri XS1000 10%
XSsmokwiri XS1500 8%
it20smokwiri XS2000 5%
it40smokwiri XS4000 5%
ViparSpectra 8% DISCOUNT CODE on the viparspectra websites (.com/.eu)
RUFFSELEKTAH

Likes
5
Share


@Whitoutduty
Follow
Hi Gro!😀
Week five,
She's looks better now
Still upload stay tune
If you like Hemp "Click" Hemp Symbol below 👇👽😎 Hooray!
Likes
8
Share

@Oims_Finest
Follow
Welcome!
5th week of flower and the ladies doing absolutely fine.
Very rich odor when u open the tent. Pretty curious how every plant will turn out in the end.
There is nothing much I could report, no pests, no diseases. So, I am pretty confident that this run will finish perfectly.
If you want to have a look in those genetics, hit me up. I've several half packs left and I cannot grow all of them.... sadly😭😅
Have a good one!
Oim.
Likes
177
Share


@DreamIT
Follow
Strong genetics, resistant, fast enough, easy to grow and never pretentious. I will try further training techniques on this strain, while waiting to make more room in the box to plant the Red hot cookie as well. If you like sweet flavors and fragrant plants this is definitely for you! Soon new updates for a cycle of only plants in "monstercropping", to continue my eternal red garden 😁🦄 thanks for following me up to here and leave a comment and suggestions 🦄👍🤘

Likes
29
Share

@pifflestikkz
Follow
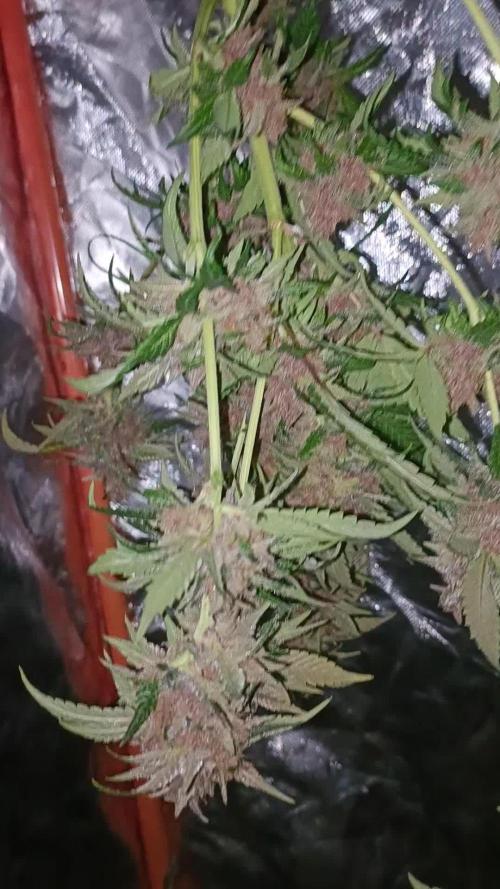
Day 133
23/08/25 Saturday
Allowing 24-48 hrs of dark to encourage more amber trichomes. Time depends on soil dryness.
Day 135
25/08/25 Monday
Harvest day has finally arrived ,
Trichomes are 50-70% amber.
The smell is intoxicating, aromas of sweet candy, and a pungent deep blueberry

Likes
27
Share


@OldDabKing
Follow
Started the week with a plastic dome to help with humidity, and after six days the dome was not needed anymore. The seedling outgrew the dome. I keep the watering very light during the seedling stage to make sure there isn’t any overwatering. I take my photos about 24 hours apart
Likes
15
Share


@Rinna
Follow
Ladies are doing great, finally fixed the pH problem, so the lockout should be fixed. Great growth, amazingly icy buds, especially pheno #1 is looking incredible. Smells of sour cherry candy with some hints of that gelato too.
