
Likes
Comments
Share


@TheBudWhisperer
Follow
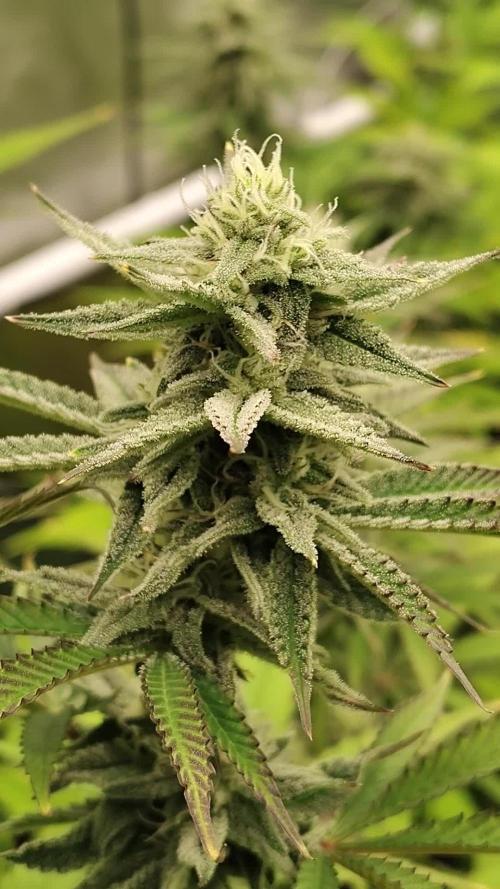
Week 8 of flower is in the books and this show is quickly coming to an end. I said last week we had about 7-10 days and I was spot on at the 10 day mark. I was only wrong about the order. The cheese is ready to chop before the rest and the gorilla cookies, cherry Bomb and lemon haze will follow in due course. The cheese is a beast and it’ll take a little time to get it all run through the bowl trimmer. At least the big one goes first. Her tallest colas have foxtailed like mar, despite the late supercrop. You can tell where the sweet spot for the light is at about 10” distance from the canopy. Any closer than that and the tails begin to show prominently. It’s a good example of just how close you can get to these fixtures with a little bit of prior experience. It’s been noted for the next run😎👍😎. The res. is on an h2o2 only flush for the remainder until the rest are ready to come down. Not a moment too soon either - the pollen chucking project has stalled out waiting for these girls to finish and now that we’ll have a little extra room, we can start running our cuts in the aerocloner🤟. Not long at all now folks. Thanks for tagging along through all this. Learned a bunch about this system and we’re back to hardware mode to make some serious improvements for the next run🤙😎. I love hardware mode😉.
Background/Repetitive Nonsense
The strain line up on this grow is look’n quite saucy 😈. We’ve got 2 FB strains this time around - Gorilla Cookies (seems we always have some GSC cross in the works). Mainly because the colours look stellar and remind me of a sugar breathe we did last year that was 🔥. The other FB is their original Cheese strain... because we already smoked all our cheese... and we really like our cheese...😉. Emerald triangle was kind enough to include a freebie of Lemon Haze. Wasn’t really big on the list but we haven’t done a haze strain to write home about yet so worth a go👍. The last is a Cherry auto from Bomb seeds that we’ve been trying to get to for months. Let’s just hope that she’s not a dud like the last bean.
The new digs for this run are courtesy MarsHydro👊. Their 2x4 single grow tent, paired with a shiny new 240w QB courtesy ViparSpectra.
These folks were kind enough to discuss a collaboration and as a result, here we are to test out the gear with an inaugural run of autos. Each week, we’ll try to expand on some of the benefits of each, as well as any limiting factors or considerations that need attention when pondering purchase.
Already I can say that both are high quality products in terms of overall craftsmanship.
MarsHydro 2x4 Grow Tent:
Excellent construction in terms of durability. Reinforced stitching on the zippers and corners ensures zero tearing. Conveniently placed screen vents and intake/exhaust ports. The ceiling exhaust port only exists on the right side. Perfect for me but not great if you’re running exhaust from the top on the left side (left side wall port makes up for this however). The aluminum frame is rigid enough to support the weight of the lights and accessories. Once you have some weight in the tent, she’s go’n nowhere and you can assemble and break it down in record time if moving or stashing the grow op.
Only limiting factors I’ve noticed is that temp. Control will be an issue for a tent. It just doesn’t have the same insulating ability as a wood cabinet or other permanent enclosed space. No worries, this is offset by a small desktop heater and keeps the environment exactly where desired. The other issue was a production problem - the ceiling vent was accidentally stitched into the corner seams on the assembly line. Again, no real issue - just pulled it out with no damage or fraying to the tent or port👍.
Website link here:
https://www.mars-hydro.com/grow-tent/buy-mars-hydro-grow-tent-24x48x70-2-x-4-cabinet-closet-grow-box-upgraded-diamond-1680d-mylar-for-sale
ViparSpectra 240w Quantum Board:
This thing is sleek and slick in terms of design. Closest comparable to it that I’ve seen would be spiderfarmers line of qbs. They feature the same top-o-the-line components and roughly similar spectrums. Where VS takes the advantage is in the convenience of the dimmer nob which is easily accessible and works great at 50% with no strobing👍. The heat sink is also larger which contributes to lower temps. That’s not a good thing in my case but beneficial for most folks.
I can already say that this will be a great fixture through all stages of growth. Where I know this light will excel will be in the veg. Stage for sure. Dimming function gives seedlings a much better chance of success with the ability to use lower lighting levels early on and the coverage area on a 240w is great. The average grower will find this panel suitable and fitting to their needs in a 2x4 grow space although I’d suggest 2 units if going any larger than that. The total output in this space equates to about 30w/sq.ft. Which is a decent amount of coverage based on power vs. Growprint. Ideal for veg. Certainly but, in flower - I tend to run closer to 50-60w/sq.ft to achieve higher yields. Again, similar fixtures have performed admirably in the past and while this wouldn’t be considered an “entry-level” fixture, I’d recommend that any grower new to the game not skimp on lighting and start with one of these. The price points are a great value for quality LED tech. These days, so there’s little reason to even consider a lesser fixture👍.
I have no detail on limiting factors for this light as yet but have heard that stock branded fixtures don’t necessarily incorporate enough red diodes. I’ve seen no issue myself but confess - I’m no lighting guru.
Website link:
https://www.viparspectra.com/collections/xs-series/products/xs-series-xs2000
***8% discount when using code: “ItBudWhisper”***
Happy to have you along for the ride if you made it this far through my opening rant!!😎🤟😎🤟😎


Likes
31
Share


@Dunk_Junk
Follow
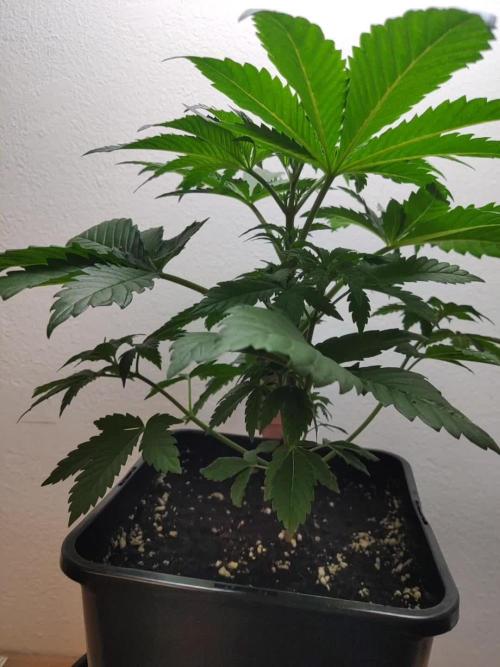
Nice growth this week. Making roots. Making leaves. She will shoot up in a couple of weeks.

Likes
8
Share


@Geili_Seili_fireinfireout
Follow
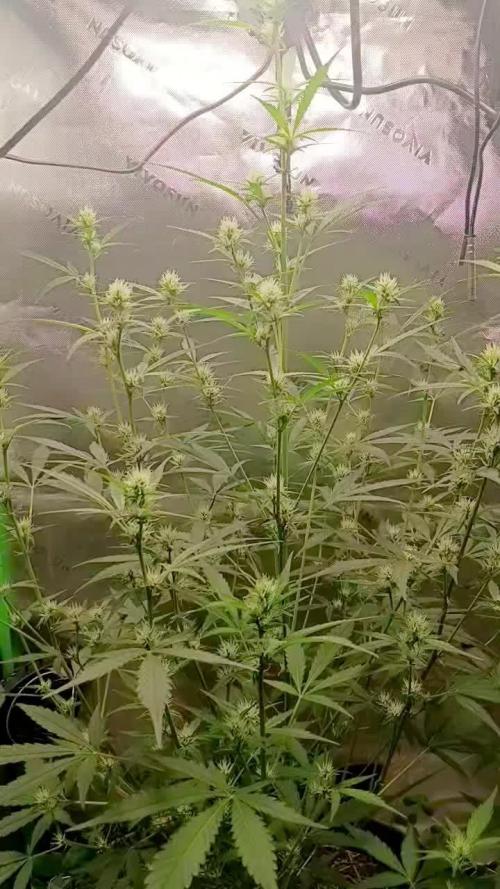
Tag 26 in flow
Bin bis jetzt echt stark begeistert von den ladys.
Suuuper robust und vital.😋👌
Diese sauberen stecklinge gibts wie immer hier bei ROOTS-FARMS. Getestet und von tumi für sauber befunden🌱

Likes
9
Share


@Rock_n_Roll_Randy
Follow
THERE IS 4 PHOTOPERIODS LEFT IN THE 5X5 TENT. I WILL BE MOVING ALL OF THE PHOTOPERIODS INTO THE 8X8 TENT ONCE ALL THE AUTOFLOWERS ARE DONE, THEN I WILL SWITH THE LIGHTS TO 12/12
FOR EVERYTHING MARS HYDRO VISIT:
www.mars-hydro.com
www.marshydroled.ca
PROMO CODE: rocknroll
VISIT THE ALIEXPRESS STORE:
@marshydro_aliexpress
Instagram: @marshydropenny
Thanks for taking the time to read and check out my diary🤜🤛
TS3000 FEATURES:
WIDEBAND SUNLIGHT FULL SPECTRUM LED GROW, Infinite close to natural sun light, suit for all plants whole stages indoor growing, rapid plant response from seed to flower, achieve maximum quality and quantity, much better than traditional HPS grow systems.
HIGH REFLECTIVE & NOISE FREE-Fanless LIGHT BOARDS design will make your growing life easy and quiet, quickly heat dispersing material aluminum reducing light lost to aisles and walls, increase the light intensity up to 20%, allowing your plants receive more energy and without burning your plants for maximum headroom.
HIGH EFFICIENCY ENERGY SAVING PLANT LIGHT, high-power NEW LED grow, Compares to traditional 3000 watt HPS lamp and other brand led grow light while only 450 watts true output with 1016 LEDs, more scientifically and energy-efficient! Perfect for 5' x 5' veg stage, 4' x 4' bloom stage, higher intensity in a MARS HYDRO grow tent, reflective area, or by crossing over using multiple TS3000.
BOOM YIELD LARGE GROW LIGHT, NEWEST SMD LED technology provide highest PAR/LUMEN output(1095.6umol/), makes you get 30% higher yield compare OLD led lights, can get max yield at 2.5g/watt, less pay but get more yield, bring a amazing grow trip to any home grower as it beams huge amounts of light energy to plants below.
COMMERCIAL LED GROW LIGHT, Updated easy dimming & daisy chain function, main light controlled, especially come with two waterproof and dimmable Mean Well Drivers, auto sensing power supply works on both 120VAC and 240VAC and 277VAC, suit for Large Rooms and Commercial Setups.
Low Energy-Consuming LED Grow Light: Consuming 300w and also mounted with 1016 chips, TS3000 has the ability to replace a 450w HPS light while reducing 40% power intake.
High Efficiency LED Grow Light: With overall light output PPF 343umol/S as well as amazing PPE 2.3 umol/j, it's 50% even more photon efficient and can assure a 30% more return than the old HPS/MH lights.
Patent Highly-Reflective Hood Shape: The reflector design on TS3000 is patented, which can effectively gather the light dispersed in all directions to enhance its light intensity as well as assist plants in absorbing more light.
Full Spectrum Plants Favorite Spectra: By the unique mix of spectra that makes most light in the 400-700nm waveband, incredibly conducive to plant photosynthesis. Adequate IR(730-740nm) is additionally consisted of in the range to generate larger buds.
Dimming And Daisy Chain Feature Available: Upon an independent dimming button on the external driver, backing 0-100% settings adaptation and up to 30 LEDs daisy-chained in a group, it supplies different light levels for various plant stages meanwhile saving energy.
Safety Certifications And Service Warranty: CE, ETL, RoHS, UKCA security certifications accepted, 50,000 hours durability, 5-year service warranty, and local after-sales repair
5x5 GROW TENT:
LOCK ALL LIGHT INSIDE MARS HYDRO Indoor Grow Tent interior is made of diamond mylar which is highly reflective. (Other brand's mylar and reflective rate is as low as 50%, won't provide efficient light. )MARS HYDRO 1680D canvas, being double stitched, it is tear proof and has perfect light locking. Mars Hydro's grow tent keeps 100% lighting beams inside and helps your plant absorb more lights. EXTRA-THICK --No light leaks or rips at all
DURABILITY GROW TENT Stable metal corner adapters and poles are the trustful supporters of the tent, standing sturdy, neither rusting nor paint-falling, quick easy tool-free installation. Mars Hydro's heavy-duty metal zippers, with double layer black lining, are the best on the market which create a light-proof seal
EASY OBSERVATION FOR YOUR PLANTS. Special observation windows are made by double layers of cloth. Observe the growing conditions of your plants without opening the tent and avoid disturbing plants. The observation window also serves to dissipate heat and ventilate air
AUTOMATIC 6 INCH EXHAUST FAN KIT W/ CONTROLLER:
Mars Hydro 6'' Inline Fan uses a mixed-flow design to maintain peak performance in a high static pressure environment.
GROW TENT FAN: MARS HYDRO inline fans are designed to ventilate hydroponic grow rooms, transfer heating/cooling, cool AV closets, and exhaust odors.
EFFECTIVE VENTILATION: Variable speed controller for easy fan speed adjustment. Optimal ventilation for your planting.
LOW NOISE LEVEL: Durable plastic fan housing and blades for extremely low noise(32dB-A); create a truly quiet growth environment.
EASY INSTALLATION: Removable duct ends with locking tabs for quick removal and easy maintenance and a cord length of 4.9 feet for hassle-free setup. This grows tent fan with a controller for easy fan speed adjustment.
BASIC PARAMETERS: Ventilation exhaust fan size: 6” | Dimensions: 315mm*225mm*210mm. | Weight: 2.7. | Airflow: 402CFM | Noise: 32dB-A | Bearings: Dual Ball.
Likes
2
Share

@GorkedOut
Follow
Week 10. I am still trying to get the ladies back on track, as my Ph meter was off a bit. I re calibrated and they should be good to go from here on out. The toads are starting to pack on weight and when I open up the tent it smells very tropical. Super frosty christmas tree structure. RH is around 50-52%. Temps around 73-78 F. Lights cranked up to 70-75% (500ish true watts)
They're hungry and I'll feed them good.
Likes
2
Share


@Greenbean420
Follow
One of the plants grew massive! However the smoke wasn’t the best until a good 4 weeks cure. Very hairy buds too which was interesting 😂 Still a nice smoke
Likes
4
Share

@CWolcott1991
Follow
11/12 start of week 3 of flower hoping she is done stretching cus I'm out of room when it comes to height. Gave all the goodies plus added Fulpower and molasses
11/14 stretching seems to have stopped. Dropped humidity and raised vpd to stay around 1.5 and raised light intensity so it's 1000 ppfd at top of plant

Likes
2
Share


@Ensign420
Follow
|»» LOG DISCLAIMER: Not intended as a grow guide. Grow log entries are usually posted 3-4 weeks later and are for my learning reference. ««|
Introduction - Week 20 Summary -
Ensign's log, stardate 17741.4,
Another grow week.
In the main tent, nothing but general checkups with a few leaf defoliations. Added more mulch to the top of each pot.
In the veg tent, topped all mothers and took more clone cuttings. Now have the cuttings rooting in Coco Coins.
Anyways, onwards to next week Ensign.
[START OF WEEK 20]
==========================================================
---------- [ 3x3 VEG TENT - GR3 ] ----------
Heady OG BX1 #1 - WEEK 12 - Full Veg
TKO #2 - WEEK 02 - Full Veg
Chill Out OG #3 - WEEK 09 - Full Veg
Chill Out OG #2 - WEEK 05 - Full Veg
---------- [ 4x4 MAIN TENT - GR30 ] ----------
Chill Out OG #2 - WEEK 20 - Full Bloom Wk6
TKO #2-2 - WEEK 14 - Full Bloom Wk6
Heady OG BX1 #1 - WEEK 16 - Full Bloom Wk6
03/16/26 → 03/22/26 [WEEK 20]
This Week's Estimated Goals
----------------------------------------------------------------------------------------------
DLI: ~22 mol/m²/d
PPFD: ~500 μmol/m²/s
VPD: ~1.2 kPa
This Week's Meter Readings & Averages
----------------------------------------------------------------------------------------------
Light On/Off: 16:00 - 10:00 | Wattage: ~386.3W [LV05]
Distance From Canopy: ~[21”, 3.5”, 9”]
Plant Height: ~[31”, 48.5”, 43”]
Max Plant Height: ~52” [Lamp-to-Soil Distance]
DLI: ~53.31 mol/m²/d
PPFD: ~520 μmol/m²/s
VPD: ~0.64 kPa
Soil %: ~[51.4, 41.6, 47.3, 41.9, 54.7, 64.6, 48.0, 63.9, 50.9, 70.7]
==========================================================
Day 01 - Monday - 03/16/26 - Total Days: 131
-----------------------------------
Daily Averages ~[+01:00]
- Temps: 78.9°F [26.1°C]
- Humidity: 83.6%
- VPD: 0.55 kPa
- Soil %: [52, 41, 46, 43, 53, 63, 49, 63, 51, 69]
-----------------------------------
- [21:26]: Night check on the 4x4 tent.
--- The garden is looking great.
--- All phenos are in full bloom and terpenes are getting louder.
--- The under canopy is looking clean and pots look good.
- [21:40]: Checked the Ecowitt soil moisture sensor data:
------------------ [ 3x3 VEG TENT – GR3 ] ----------------
------ 51% - [CH01 » M1 » VBL – Heady OG BX1 #1]
------ 41% - [CH02 » M2 » VBR – TKO #2]
------ 46% - [CH03 » M3 » VFL – Chill Out OG #3]
------ 43% - [CH04 » M4 » VFR – Chill Out OG #2]
----------------- [ 4x4 MAIN TENT – GR30 ] ---------------
------ 53% - [CH05 » P1 » FLT – Chill Out OG #2]
------ 62% - [CH06 » P1 » FLB – Chill Out OG #2]
------ 49% - [CH07 » P2 » BLT – TKO #2-2]
------ 62% - [CH08 » P2 » BLB – TKO #2-2]
------ 51% - [CH09 » P3 » FRT – Heady OG BX1 #1]
------ 69% - [CH10 » P3 » FRB – Heady OG BX1 #1]
--------- Veg: ~38%-45% | Flower: ~45%-55%
--------- General: ~30% [Dry] «| ~45-60% [Moist] |» ~70% [Wet]
- [21:43]: Checked the 3x3 veg tent.
--- Veg garden is looking great.
--- Mothers and clones look good.
--- Two solo cups need watering..
- [21:59]: Here are the starting initial watering ranges:
------ Heady OG BX1 #1-1 » 256.9g → 353.3g
------ Gorilla Goat #1-1 » 287.0g → 325.2g
--------- General Weight Range: [Dry] ~275g «| [Dryback] ~300g |» ~325g-400g [Wet]
--- Both cups were last watered 3-4 days ago.
--- Took the starting weight of both clones before watering,
------ Heady OG BX1 #1-1 » 295.7g
------ Gorilla Goat #1-1 » 276.9g
--- While on a scale,
--- Evenly misted the top of both cups with RO water.
--- Did not spray the top growth.
--- Misted 10-20 sprays. Waited a moment, then misted again.
--- Repeated this process until both cups weighted at least 300g.
--- There was no runoff.
- [22:35]: Took the saturated weight of both cups after watering,
------ Heady OG BX1 #1-1 » 355.9g
------ Gorilla Goat #1-1 » 370.1g
--- Updated the wet weight and watering dates for both cups.
--- Placed both cups back into the tent.
- [22:59]: Checked the humidifiers.
--- Tanks are still full and no leaks found.
Day 02 - Tuesday - 03/17/26 - Total Days: 132
-----------------------------------
Daily Averages ~[+01:00]
- Temps: 81.5°F [27.5°C]
- Humidity: 82.2%
- VPD: 0.65 kPa
- Soil %: [52, 41, 45, 42, 52, 62, 48, 62, 51, 68]
-----------------------------------
- [16:06]: Evening check on the 3x3 veg tent.
--- Veg garden looks healthy.
--- Two solo cups need watering..
- [16:12]: Here are the starting initial watering ranges:
------ TKO #2 » 252.5g → 335.5g
------ Gorilla Goat #1-1 » 287.0g → 325.2g
--------- General Weight Range: [Dry] ~275g «| [Dryback] ~300g |» ~325g-400g [Wet]
--- Both cups were last watered 2-5 days ago.
--- Took the starting weight of both clones before watering,
------ TKO #2 » 294.3g
------ Gorilla Goat #1-1 » 297.2g
--- While on a scale,
--- Evenly misted the top of both cups with RO water.
--- Did not spray the top growth.
--- Misted 10-20 sprays. Waited a moment, then misted again.
--- Repeated this process until both cups weighted at least 300g.
--- There was no runoff.
- [16:24]: Took the saturated weight of both cups after watering,
------ TKO #2 » 355.4g
------ Gorilla Goat #1-1 » 375.1g
--- Updated the wet weight and watering dates for both cups.
--- Placed both cups back into the tent.
- [16:34]: Checked the Ecowitt soil moisture sensor data:
------------------ [ 3x3 VEG TENT – GR3 ] ----------------
------ 52% - [CH01 » M1 » VBL – Heady OG BX1 #1]
------ 41% - [CH02 » M2 » VBR – TKO #2]
------ 46% - [CH03 » M3 » VFL – Chill Out OG #3]
------ 42% - [CH04 » M4 » VFR – Chill Out OG #2]
----------------- [ 4x4 MAIN TENT – GR30 ] ---------------
------ 52% - [CH05 » P1 » FLT – Chill Out OG #2]
------ 62% - [CH06 » P1 » FLB – Chill Out OG #2]
------ 49% - [CH07 » P2 » BLT – TKO #2-2]
------ 62% - [CH08 » P2 » BLB – TKO #2-2]
------ 53% - [CH09 » P3 » FRT – Heady OG BX1 #1]
------ 68% - [CH10 » P3 » FRB – Heady OG BX1 #1]
--------- Veg: ~38%-45% | Flower: ~45%-55%
--------- General: ~30% [Dry] «| ~45-60% [Moist] |» ~70% [Wet]
- [22:12]: Checked the 4x4 tent.
--- The garden is looking and smelling incredible.
--- Bud growth is coated in trichomes and water leaves are resin-railed out. Nice.
--- The under canopy is looking clean.
- [22:20]: Checked the humidifiers.
--- Tanks are still full and no leaks found.
Day 03 - Wednesday - 03/18/26 - Total Days: 133
-----------------------------------
Daily Averages ~[+01:00]
- Temps: 82.7°F [28.2°C]
- Humidity: 81.3%
- VPD: 0.71 kPa
- Soil %: [52, 41, 47, 42, 53, 62, 49, 62, 52, 67]
-----------------------------------
- [16:02]: Evening check on the 3x3 veg tent.
--- Veg garden is looking good.
--- With the exception of Chill Out OG #2, going to top all mothers.
--- Will also be taking several clone cuttings of Chill Out OG #3 and Garlic Budder OG#1
- [16:13]: Filled a measuring cup with 1.5 cups of RO water.
------ Added 1/8tsp of Horticultural Aloe
--- Mixed the solution and poured it straight into a clear solo cup.
--- Placed the PVC rig into the cup just above the aloe water.
--- Using a pair of clean trimmers,
--- Topped and defoliated each mother plant.
--- Removed a decent amount of growth which lowered the canopy by a good 12-13 inches.
--- Mulched the trimmings into a 5-gallon bucket.
- [16:59]: Also cut several clonal cuttings from each mother plant.
--- Only need one cutting to root, but to ensure successful rooting, took multiple cuttings of each cultivar.
--- Made sure to trim most of the branches leaving a top node or two.
--- Did not cut any leaf fingers and made sure to cut the tip of the stalk (about 45-degree) before placing each cutting into the cup of aloe solution.
--- Made sure each tube on the PVC rig had the correct names labeled.
--- Wow the canopy looks a lot cleaner and lower.
- [17:09]: Placed the cup into the veg tent.
--- Have the cup resting in the propagation tray.
- [17:11]: Decided to cull the Garlic Budder OG#1-1 clone.
--- Mulched the trimmings and soil. Placed everything into the 5-gallon mulch bucket.
- [19:14]: Checked the 4x4 tent.
--- The garden is looking good and terpenes are smelling great.
--- Wow the canopy looks stacked with Heady OG’s top buds swelling up and looking uniform.
--- The under canopy looks clean.
- [19:24]: Checked on the BluMat soil moisture sensors:
------ Chill Out OG #2 » 58mbars
------ Heady OG BX1 #1 » 48mbars
------ TKO #2 » 55mbars
--------- Watering Range: [Too Wet] ~25mbars «| [Ideal Target] ~40-80mbars |» ~125mbars [Too Dry]
--------- BluMat Max Values: [10mbars «||» 750mbars]
- [19:26]: Took the 5-gallon mulch bucket with clippings from earlier.
--- Evenly spread the trimmings on top of all 3 pots in the tent.
--- Tried to keep everything within the BluMat drip-tape watering loop.
- [19:35]: Decided to make a slight adjustment to Chill Out OG #2’s watering carrot.
--- Using the BluMat key, increased the water moisture by rotating the tension cap slightly counter-clockwise.
- [19:44]: Quickly checked on the RO reservoir and auto-watering system.
--- Everything looked good and no leaks detected.
--- The gravity feed was holding steady at ~2.1 psi of pressure at ~22” from the floor.
- [19:47]: Checked the humidifiers.
--- Tanks are still full and no leaks found.
Day 04 - Thursday - 03/19/26 - Total Days: 134
-----------------------------------
Daily Averages ~[+01:00]
- Temps: 83.0°F [28.3°C]
- Humidity: 81.6%
- VPD: 0.70 kPa
- Soil %: [52, 42, 49, 42, 60, 69, 49, 65, 52, 73]
-----------------------------------
- [16:03]: Evening check on the 3x3 veg tent.
--- Veg garden is looking good.
--- Two solo clones need watering..
- [16:12]: Here are the starting initial watering ranges:
------ Heady OG BX1 #1-2 » 255.4g → 335.4g
------ Gorilla Goat #1-2 » 294.4g → 325.4g
--------- General Weight Range: [Dry] ~275g «| [Dryback] ~300g |» ~325g-400g [Wet]
--- Both cups were last watered 5-6 days ago.
--- Took the starting weight of both clones before watering,
------ Heady OG BX1 #1-2 » 299.0g
------ Gorilla Goat #1-2 » 283.1g
--- While on a scale,
--- Evenly misted the top of both cups with RO water.
--- Did not spray the top growth.
--- Misted 10-20 sprays. Waited a moment, then misted again.
--- Repeated this process until both cups weighted at least 300g.
--- There was no runoff.
- [16:31]: Took the saturated weight of both cups after watering,
------ Heady OG BX1 #1-2 » 355.2g
------ Gorilla Goat #1-2 » 370.1g
--- Updated the wet weight and watering dates for both cups.
--- Placed both cups back into the tent.
- [16:41]: Time to swap the aloe water out.
--- Filled a clear cup with fresh RO water (1.5cups).
--- Gently lifted the PVC rig out of the cup of aloe water and set it gently into the RO cup.
--- Going to let these soak for another day before transplanting into Coco Coins for rooting.
- [16:44]: Checked the Ecowitt soil moisture sensor data:
------------------ [ 3x3 VEG TENT – GR3 ] ----------------
------ 52% - [CH01 » M1 » VBL – Heady OG BX1 #1]
------ 45% - [CH02 » M2 » VBR – TKO #2]
------ 67% - [CH03 » M3 » VFL – Chill Out OG #3]
------ 42% - [CH04 » M4 » VFR – Chill Out OG #2]
----------------- [ 4x4 MAIN TENT – GR30 ] ---------------
------ 58% - [CH05 » P1 » FLT – Chill Out OG #2]
------ 68% - [CH06 » P1 » FLB – Chill Out OG #2]
------ 49% - [CH07 » P2 » BLT – TKO #2-2]
------ 67% - [CH08 » P2 » BLB – TKO #2-2]
------ 53% - [CH09 » P3 » FRT – Heady OG BX1 #1]
------ 73% - [CH10 » P3 » FRB – Heady OG BX1 #1]
--------- Veg: ~38%-45% | Flower: ~45%-55%
--------- General: ~30% [Dry] «| ~45-60% [Moist] |» ~70% [Wet]
- [20:14]: Checked the 4x4 tent.
--- The garden is looking and smelling great.
--- The under canopy is looking clean and pots look good.
- [20:20]: Checked on the BluMat soil moisture sensors:
------ Chill Out OG #2 » 35mbars
------ Heady OG BX1 #1 » 42mbars
------ TKO #2 » 44mbars
--------- Watering Range: [Too Wet] ~25mbars «| [Ideal Target] ~40-80mbars |» ~125mbars [Too Dry]
--------- BluMat Max Values: [10mbars «||» 750mbars]
Day 05 - Friday - 03/20/26 - Total Days: 135
-----------------------------------
Daily Averages ~[+01:00]
- Temps: 82.3°F [27.9°C]
- Humidity: 82.9%
- VPD: 0.64 kPa
- Soil %: [51, 42, 48, 42, 56, 67, 47, 66, 50, 73]
-----------------------------------
- [22:35]: Night check on the 4x4 tent.
--- The garden is looking healthy and terpenes are getting louder and smelling gassy.
--- Bud growth is stacking up and the canopy is continuing to gain weight. Nice.
--- The under canopy is still clean and pots look good.
- [22:41]: Checked the Ecowitt soil moisture sensor data:
------------------ [ 3x3 VEG TENT – GR3 ] ----------------
------ 51% - [CH01 » M1 » VBL – Heady OG BX1 #1]
------ 41% - [CH02 » M2 » VBR – TKO #2]
------ 49% - [CH03 » M3 » VFL – Chill Out OG #3]
------ 42% - [CH04 » M4 » VFR – Chill Out OG #2]
----------------- [ 4x4 MAIN TENT – GR30 ] ---------------
------ 55% - [CH05 » P1 » FLT – Chill Out OG #2]
------ 66% - [CH06 » P1 » FLB – Chill Out OG #2]
------ 47% - [CH07 » P2 » BLT – TKO #2-2]
------ 66% - [CH08 » P2 » BLB – TKO #2-2]
------ 50% - [CH09 » P3 » FRT – Heady OG BX1 #1]
------ 74% - [CH10 » P3 » FRB – Heady OG BX1 #1]
--------- Veg: ~38%-45% | Flower: ~45%-55%
--------- General: ~30% [Dry] «| ~45-60% [Moist] |» ~70% [Wet]
- [22:44]: Checked the 3x3 veg tent.
--- Veg garden is looking great.
--- Growth seems to be recovering well from the topping.
--- Two solo cups need watering..
- [22:49]: Here are the starting initial watering ranges:
------ Heady OG BX1 #1-1 » 256.9g → 353.3g
------ Gorilla Goat #1-1 » 287.0g → 325.2g
--------- General Weight Range: [Dry] ~275g «| [Dryback] ~300g |» ~325g-400g [Wet]
--- Both cups were last watered 3-4 days ago.
--- Took the starting weight of both clones before watering,
------ Heady OG BX1 #1-1 » 287.6g
------ Gorilla Goat #1-1 » 265.6g
--- While on a scale,
--- Evenly misted the top of both cups with RO water.
--- Did not spray the top growth.
--- Misted 10-20 sprays. Waited a moment, then misted again.
--- Repeated this process until both cups weighted at least 300g.
--- There was no runoff.
- [23:19]: Took the saturated weight of both cups after watering,
------ Heady OG BX1 #1-1 » 360.7g
------ Gorilla Goat #1-1 » 375.1g
--- Updated the wet weight and watering dates for both cups.
--- Placed both cups back into the tent.
--- Time to start the veg cutting’s rooting process.
- [23:43]: Filled a measuring cup with 1.5 cups of RO water.
------ Added a pinch of Quillaja Saponaria Extract [60]
------ Added 1/64tsp of Horticultural Aloe
------ Added 1/32tsp of Mycrobe Complete
--- Mixed the solution thoroughly.
--- Dropped 4 Coco Coins into the measuring cup.
--- The coins immediately started to expand.
------ [» ~5 MINUTES LATER «]
--- Placed each fully saturated Coco Coin into half-cut solo cups.
--- Using a squeeze bottle filled with Clonex,
- [23:55]: Gently filled each pre-made hole with Clonex rooting gel.
--- Using a pair of clean trimmers, made a final 45° cut.
--- Also stripped and scrapped some of the stem’s outer membrane.
--- To help with planting, gave each Coco Coin a squeeze to loosen the coco.
--- Made sure to insert each stem straight and snug with the tip about a 1/4 inch from the bottom of the Coco Coin.
--- Also secured the stem by pinching and pressing in the top of the Coco Coin.
--- Once each cutting was planted,
- [+00:16]: Placed each Coco Coin into the propagation dome’s tray.
--- Made sure to keep each cutting properly tagged.
--- Did not spray the top growth with any water.
--- As far as PPFD,
--- At the lowest light intensity (and raised ~14 above the tray), the PPFD is around 42 μmol/m²/s which gives a DLI of 2.72 mol/m²/d under an 18/6 light cycle
--- Mulched the extra veg cuttings.
- [+00:22]: Checked the humidifiers.
--- Tanks are still full and no leaks found.
Day 06 - Saturday - 03/21/26 - Total Days: 136
-----------------------------------
Daily Averages ~[+01:00]
- Temps: 81.0°F [27.2°C]
- Humidity: 82.9%
- VPD: 0.62 kPa
- Soil %: [51, 43, 48, 41, 55, 65, 47, 65, 50, 73]
-----------------------------------
- [19:08]: Night check on the 4x4 tent.
--- The garden is smelling great.
--- Terpenes are getting louder and bud growth is continuing to swell and stack. Nice.
--- The under canopy also looks good.
- [19:15]: Checked the Ecowitt soil moisture sensor data:
------------------ [ 3x3 VEG TENT – GR3 ] ----------------
------ 51% - [CH01 » M1 » VBL – Heady OG BX1 #1]
------ 42% - [CH02 » M2 » VBR – TKO #2]
------ 50% - [CH03 » M3 » VFL – Chill Out OG #3]
------ 41% - [CH04 » M4 » VFR – Chill Out OG #2]
----------------- [ 4x4 MAIN TENT – GR30 ] ---------------
------ 54% - [CH05 » P1 » FLT – Chill Out OG #2]
------ 65% - [CH06 » P1 » FLB – Chill Out OG #2]
------ 47% - [CH07 » P2 » BLT – TKO #2-2]
------ 65% - [CH08 » P2 » BLB – TKO #2-2]
------ 52% - [CH09 » P3 » FRT – Heady OG BX1 #1]
------ 73% - [CH10 » P3 » FRB – Heady OG BX1 #1]
--------- Veg: ~38%-45% | Flower: ~45%-55%
--------- General: ~30% [Dry] «| ~45-60% [Moist] |» ~70% [Wet]
- [19:21]: Checked the 3x3 veg tent.
--- Veg garden is looking good.
--- Misted the veg cuttings in the propagation tray with RO water.
--- Oops. The TKO #2 solo clone needs watering.
- [19:34]: Here is the starting initial watering range:
------ TKO #2 » 252.5g → 335.5g
--------- General Weight Range: [Dry] ~275g «| [Dryback] ~300g |» ~325g-400g [Wet]
--- Been 4 days since the last watering.
--- Took the starting weight before watering,
------ TKO #2 » 288.6g
--- While on a scale,
--- Evenly misted the top of the cup with RO water.
--- Did not spray the top growth.
--- Misted 10-20 sprays. Waited a moment, then misted again.
--- Repeated this process until the cup weighted at least 300g.
--- There was no runoff.
- [19:47]: Took the saturated weight after watering,
------ TKO #2 » 365.5g
--- Updated the wet weight and watering date.
--- Placed the cup back into the tent.
- [19:55]: Checked the humidifiers.
--- Tanks are still full and no leaks found.
Day 07 - Sunday - 03/22/26 - Total Days: 137
-----------------------------------
Daily Averages ~[+01:00]
- Temps: 81.2°F [27.3°C]
- Humidity: 83.1%
- VPD: 0.62 kPa
- Soil %: [50, 41, 48, 41, 54, 64, 47, 64, 50, 72]
-----------------------------------
- [19:02]: Night check on the 4x4 tent.
--- Flowering day 56 and the garden is looking and smelling great.
--- The under canopy is also looking clean and pots look good.
- [19:07]: Checked on the BluMat soil moisture sensors:
------ Chill Out OG #2 » 48mbars
------ Heady OG BX1 #1 » 51mbars
------ TKO #2 » 57mbars
--------- Watering Range: [Too Wet] ~25mbars «| [Ideal Target] ~40-80mbars |» ~125mbars [Too Dry]
--------- BluMat Max Values: [10mbars «||» 750mbars]
- [19:12]: Checked the Ecowitt soil moisture sensor data:
------------------ [ 3x3 VEG TENT – GR3 ] ----------------
------ 50% - [CH01 » M1 » VBL – Heady OG BX1 #1]
------ 41% - [CH02 » M2 » VBR – TKO #2]
------ 49% - [CH03 » M3 » VFL – Chill Out OG #3]
------ 41% - [CH04 » M4 » VFR – Chill Out OG #2]
----------------- [ 4x4 MAIN TENT – GR30 ] ---------------
------ 53% - [CH05 » P1 » FLT – Chill Out OG #2]
------ 64% - [CH06 » P1 » FLB – Chill Out OG #2]
------ 47% - [CH07 » P2 » BLT – TKO #2-2]
------ 64% - [CH08 » P2 » BLB – TKO #2-2]
------ 51% - [CH09 » P3 » FRT – Heady OG BX1 #1]
------ 72% - [CH10 » P3 » FRB – Heady OG BX1 #1]
--------- Veg: ~38%-45% | Flower: ~45%-55%
--------- General: ~30% [Dry] «| ~45-60% [Moist] |» ~70% [Wet]
- [19:22]: Checked the 3x3 veg tent.
--- Veg garden is looking great.
--- Both Gorilla Goat solo clones need watering..
- [19:30]: Here are the starting initial watering ranges:
------ Gorilla Goat #1-1 » 287.0g → 325.2g
------ Gorilla Goat #1-2 » 294.4g → 325.4g
--------- General Weight Range: [Dry] ~275g «| [Dryback] ~300g |» ~325g-400g [Wet]
--- Both cups were last watered 2-3 days ago.
--- Took the starting weight of both clones before watering,
------ Gorilla Goat #1-1 » 289.1g
------ Gorilla Goat #1-2 » 278.4g
--- While on a scale,
--- Evenly misted the top of both cups with RO water.
--- Did not spray the top growth.
--- Misted 10-20 sprays. Waited a moment, then misted again.
--- Repeated this process until both cups weighted at least 300g.
--- There was no runoff.
- [19:55]: Took the saturated weight of both cups after watering,
------ Gorilla Goat #1-1 » 375.6g
------ Gorilla Goat #1-2 » 375.3g
--- Updated the wet weight and watering dates for both cups.
--- Placed both cups back into the tent.
--- Propagation tray cuttings look good.
--- Misted the top growth with RO water.
- [22:34]: Back in the main tent,
--- Did a bit of defoliation focusing on the front buds.
--- Wow the terpenes are becoming more distinct and have a more greasier feel with a strong gas and fuel from both Heady OG BX1 #1 and TKO #2.
--- Both have their differences with Heady OG leaning more towards a lemon-pine profile whereas TKO has a more citrus-rubber but both are definitely in the fuel category (Earthy, Fuel, Floral, and Fruity).
--- As for Chill Out OG #2, on the nose, she’s more in the earthy category with refined mix of grape and citrus-vitamin.
--- Planning to check trichomes soon.
--- Anyways.
- [22:41]: Checked the humidifiers.
--- Tanks are still full and no leaks found.
--- Another grow week done.
--- Hmm.
--- Been neglecting both PPFD and plant height checkups but oh well..
--- Onwards to next week.
[END OF WEEK 20]


Likes
27
Share


@w33dhawk
Follow
Moin moin aus dem hohen Norden Deutschlands........
Den Ladys geht es ganz gut denke ich bin auf jeden Fall zufriedener als bei Meinen anderen grows.
Am Montag den 23. 01.23 habe ich die ersten 3 Ladys aus ihren 1Liter Töpfen befreit und sie in ihr endgültiges Zuhause umgetopft (15L Stoff Töpfe) die Erde (Bio bizz) wurde mit 75 gramm startrex gut vermengt und ein pflanz Loch mit 5 gramm mycotrex vorbereitet, pflanze aus dem alten Topf raus in neues Zuhause rein und das ganze dann mit einer Lösung aus 1g/L bactrex und 5m/L orgatrex angegossen (jede Lady bekam 500ml).
Am Mittwoch den 25.01.23 habe ich das ganze auch mit der 7 Tage jüngeren Pflanze gemacht damit ich mit den Tabletten von Bio tabs relativ gleich auf bin was den Verbrauch betrifft da ich jetzt 4 Wochen warte und Dann umstelle auf 12/12.
Plan von mir ist in der nächsten Woche das erste topping zu vollziehen Dann 14 Tage Erholung noch mal toppen dadurch Hat sie ca 1 1/2 wochen Zeit sich zu erholen und dann geht es in die blüte. bis dahin (also die nächsten 4 Wochen) gibt es jetzt erstmal nur Wasser.....
Dann wieder mal eine Lösung aus 5ml/L orgatrex und 1g/L bactrex und ab der 4. Blüte Woche fängt erst das wirkliche Arbeiten an mit dem Dünger (Tee brauen) boha freue ich mich darauf 😁👍 das war es auch für diese Woche......
Edit: die oben gezeigten Angaben zu den Dünger Mitteln
Mycotrex= gramm angabe
Bactrex= gramm angabe
Startrex= gramm angabe
Bio tabs = Stückzahl pro topf
Orgatrrex= ml/L

Likes
5
Share


@Drtomb
Follow
Changed out the nutes. Dropped the calmag and the Silica. Using just the Plant Prod MJ bloom.
Saskatoon Berry plants are very surprising. One of the plants is a cola top, the other has lots of latteral branching. It may form into a giant arm.
Likes
6
Share


@JackSkellington
Follow
le vedo lente oggi e una settimana buona di fioritura e non vedo ancora quasi niente...volevo dargli qualche stimolatore...ma ho paura di mandarle in overfert perche presentano sempre un verde abbastanza scuro solo su altri esemplari sono più chiare...una sembra aver sviluppato una carenza da come si vede in foto...
l esemplare a cui avevo dato il bio grow a reagito bene ora vedro se darglielo ancora +bio bloom vedremo

Likes
25
Share


@Densko
Follow
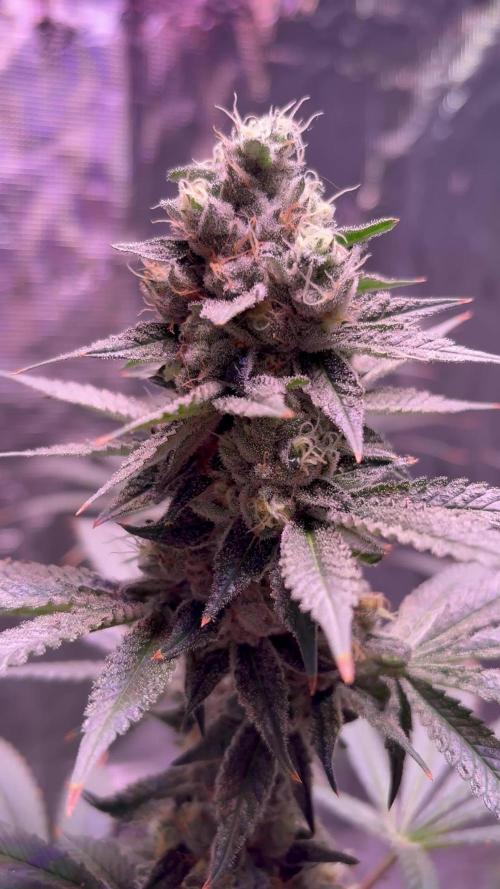
The final day of week 10 already!
The buds are still getting fatter, the trichome development is still on it's way. I will check the trichomes twice a week and im waiting for around 10% amber.
Nutrients and EC is lowered again this week, harvest is around the corner im sure of it!
Hot summers are rough here, airconditioning is trying to keep the temps down.
I quite like the phenotype. It has quite some node space making for an easier trim. Also the amount of calyxes is huge and the density to it is super compact as well.
Fade is really starting to show and leaves are starting to fade.

Likes
17
Share


@ButterfliesLittleFarm
Follow
Hello Diary.
In the end, I have my own praise for this strain. Although they did not both emerge at the same time, they eventually had a harvest together.
The outcome is in the end almost 140 g which is a great average.
The dried flowers are hard and compact, reminiscent of velvet to the touch, really beautiful.
They dried in a growbox for a total of 14 days along with their roommate Watermelon.
My wife, although not a consumer, enjoys trimming which suits me great because I can take photos during that time.
After trimming, we put the dry tops in jars where they matured for another 20 days.
And now as I write this report, I’m enjoying the smoke of Purple Punch, drinking coffee, and trying to remember if I left something out in the report. If so, feel free to write and ask.
I apologize for the delay with the reports, but a lot of photos and videos and other commitments have slowed me down in that.
And hope those who visited the diary got useful information, thank you to everyone who supported this trip, thank you for all the compliments and comments.
See you soon with new diaries.
Likes
20
Share


@MeaCulpa
Follow
Day 51.
2 ladies are a little too yellow for me. Otherwise I like everything quite well.
"Iris' had another defoliation today. It was just a mess of leaves.
Have a nice weekend @all.
Likes
13
Share


@SgtDoofy
Follow
Feb 27
I changed the light cycle to 18/6 a few days ago and surprisingly have seen the plants perking during sleep.
Orange Sherbet is growing really quickly, I'm going to start Low Stress Training here soon to get these other stems some light.
Likes
4
Share

@BioGrowBayer
Follow
Diese Woche verlief größtenteils planmäßig und ohne größere Zwischenfälle. Leider habe ich ein paar Thripse entdeckt, was mich dazu veranlasst hat, sofort zu handeln. Ich habe die betroffenen Pflanzen mit Neemöl behandelt, um einem größeren Befall vorzubeugen.
Die Pflanzen zeigen weiterhin ein gesundes Wachstum, reagieren gut auf die Pflege und entwickeln sich wie erwartet.
Maßnahmen der Woche:
Sichtkontrolle auf Schädlinge (Thripse entdeckt)
Behandlung mit Neemöl
Reguläre Pflege und Gießen wie gehabt
Ausblick:
Ich werde die Pflanzen in den kommenden Tagen weiter genau beobachten, insbesondere im Hinblick auf die Wirkung der Neemölbehandlung. Falls nötig, folgt eine Nachbehandlung. Ansonsten läuft alles weiterhin nach Plan.

Likes
32
Share


@BudBoutique
Follow
! this is my current status, gonna upload my last veg weeks within the next week - got a bit busy around Spannabis - thank you for your understanding! 💚
Welcome to Bud Boutique Grow Diary - really appreciate all your love and support :)
Dont forget to check out my other current grows!
🗓️ This Week:
after 48 hours of complete darkness (important for seedlings to make sure all plants switch into flower same time), I finally switched my lights to the 12/12 schedule and sent my ladies into the flower.
- more than healthy and going well
- Day 5: super strong and praying upas u can
- Day 3: Foliar spray with APTUS Regulator and APTUS Nutrispray to give them extra micronutrients and give them a little shell for protection.
! always use APTUS Regulator first and mix well with your water before adding any other nutrients for Feeding or Foliar!
Thank you for still staying with me 💚
___________________________________________
--- 🌱 Strain (Sponsor) ---
🏷️ Stardawg by MSNL
https://www.marijuana-seeds.nl/stardawg-feminized-seeds
--- 🥗 Nutrients and Feeding (sponsored by APTUS: APTUS Ambassador) ---
🍸 APTUS: full nutrient schedule extreme
-- Regulator, N-Boost, P-Boost, CaMg-Boost, K-Boost, Allin1 Liquid, Startbooster, Topbooster, Enzym+ every feeding
-- Fulvic-Blast, NutriSpray as Foliar each once a week
🔗 https://aptus-holland.com/
--- ♻️ Grow Control (Sponsor) ---
TROLMASTER: TENT-X + LM14 Light Adapter to dim/sunrise/sunset lights + Temp & rH Sensor all remote on App
🔗 https://www.trolmaster.eu/
--- 🏭 Grow Setup ---
💡LUMATEK Zeus Pro 600
* 🏠🌿 Indoor: Homebox 120x120x200cm (4x4)
* 📐🌀 PrimaKlima exhausting Fan 1180m3/h (running on 60-80%)
* 🌀 Can Light Filter 800m3/h & 1x Fanbox 1x Dyson fan for Air circulation
🔗 https://lumatek-lighting.com/zeus-600w-pro-29/
🔗 https://primaklima.com/de/shop/ventilatoren-de/ec-ventilatoren/pk160ec-tc/
🔗 https://canfilters.com/products/filters/
All Likes and comments are highly appreciated!!!
👨🌾 don't forget to check out my Instagram for daily educational content: budboutiquee
- Bud Boutique

Likes
2
Share

@Ninjabuds
Follow
Getting closer and closer to the final days it’s the last plant and I have it under my new phovivis opticgrow x240 I felt it was a decent test to throw a plant under the light for the last week just to make sure plant do like the specific spec it puts off. All in all this plant is some gas and still looks healthy
Likes
33
Share


@burnerac
Follow
Day 106: removed some yellowed leaves. Decided to wait one more day on water. Not adding any more nutrients. Assuming harvest in 14 days.
Day 107: Added one gallon of pH6.5 water with 2tablespoons of Herculean Harvest
Day 108: Removed yellow or brown leaves. Added no water. Trichomes clear. The urge to harvest is huge but will go 2 more weeks. Removed a box elder bug that sneaked into the tent.
Day 109: nothing new to report. Added no water. Tempted to add nutrients once more. After taking photos, removed several yellowing or browned leaves.
Day 110: did not add water. Removed some more leaves.
Day 111: did not add water. She is starting to look frosty. Read some mixed messages about the last two week flush and am feeling the urge to feed again.
Day 112: Replaced Viparspectra 600W with a Horticulture Lighting Group Quantum Board 288 V2 and Slate 2 heatsink. Very pleased although my temperature jumped to 81°F.

Likes
8
Share


@Kenn0rphan
Follow
Five ounces is estimate of final dry amount because current measurement is semi dry
I should update this later...
