
Likes
Comments
Share


@thonhash
Follow
Sorprendido gratamente del resultado final tanto de producción como de sabor/efecto.

Likes
11
Share

@Gram_Solo
Follow
Last weeeeek for the Zillions! 💵💵💵💵
Heat is horrendous atm so everything is on low
Going to be giving a 2 week flush with plain water then flawless finish.
Update again in 3 weeks! Stay tuned

Likes
33
Share


@All_our_small_plants
Follow
5000 ml jeden 3 Tag in der Zehnten Woche
pH-Wert: 6,3
EC-Wert: 1.4 mS/cm
Temperatur: 30ºC
Luftfeuchtigkeit: 50%
Schädlingsbekämpfung: im Moment haben wir keine Anzeichen das es was zu bekämpfen wir haben aber Raubmilben ins spiel gebracht zur vorsorge gegen Spinnmilben und andere Schädlinge 😉💪
Düngemittel: Brenneseljauche self made hat einen EC wert von ca 1.6 und etwas PH up von Biobizz
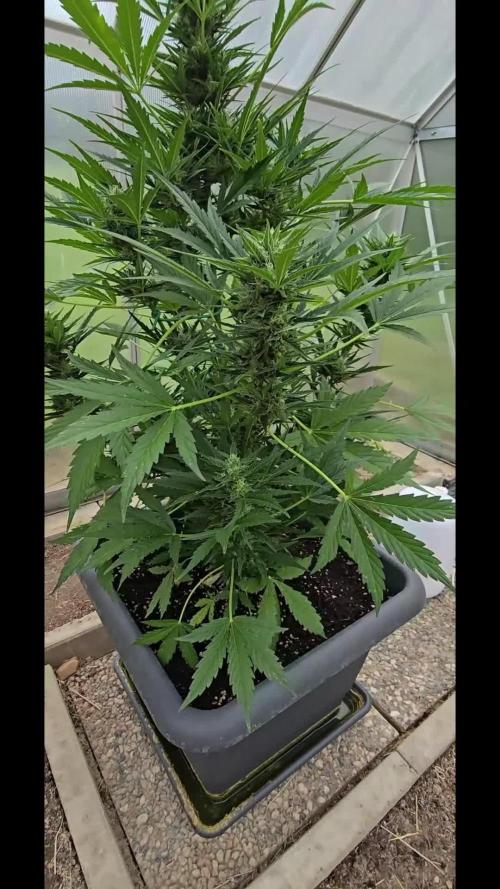
Besonderheiten: Sie wurde nun in den Outdoor Bereich gesetzt und wartet auf das umtopfen.
-Tag 64 heute haben wir ihr wieder Wasser mit Jauche gegeben und wir haben den PH wert etwas nach oben verschoben in dem wir PH-Up von Biobizz dazu gegeben haben. sie bildet immer schönere und dichtere Buds. Sieht sehr gut aus und so langsam steigt auch ihr Duft in die Nase 😍
-Tag 66 nicht viel mehr zu sagen heute, sie legt schön an dichte zu und Geruch.
-Tag 68 heute haben wir ihr wieder Wasser gegeben 👍
-Tag 70 heute wieder Wasser gegeben und Blüten Kontrolliert, ob sich irgendwo Pollensäcke bilden. Man weiß ja nie was da kommt 😜

Likes
42
Share


@Gabarram
Follow
155 days from seed and still harvesting the last big colas, and flushing for the parts still receiving light during 12 hours and processing more residual materials intracellularly, while hopefully ripening a little bit more. Like I told before, there are three or four colas like that in the video that were not completely exposed to light and they might not as ripe as they should be. I'll check that while smoking later after these colas are properly dried and cured.

Likes
36
Share


@KrautFabrik
Follow
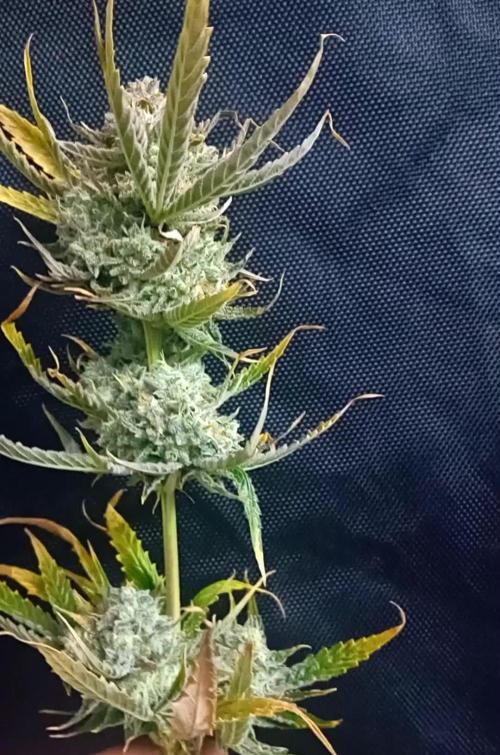
Pictures are taken on day 105 / flower day 49 📸
**********************************************
They getting super frosty and gaining weight, I hope the buds getting bigger in size. 🌹
The nematodes already killed all fungus gnades. 🐛
Happy growing🌱

Likes
1
Share


@CannaBreeze
Follow
Unfortunately, one of the two seedlings succumbed to the intense sunlight exposure of a single day and exhibited classic signs of stress and stem damage, succumbing within the first week. With only one seedling remaining, I decided to proceed by faithfully following the established nutrient schedule.
Here are the nutrients administered:
May 8th:
250ml of water
0.5ml of RootJuice
0.5ml of BioHeaven
0.5ml of Activera
EC: 450 nS
pH: 6.5
May 10th:
350ml of water
1ml of RootJuice
1ml of FishMix
1ml of BioHeaven
1ml of Activera
EC: 850 nS
pH: 6.5

Likes
42
Share


@MadeInGermany
Follow
Info:
Unfortunately, I had to find out that my account is used for fake pages in social media.
I am only active here on growdiaries.
I am not on facebook instagram twitter etc All accounts except this one are fake.
Have fun with the update.
Hey everyone :-)
quick update today.
She was further trimmed with topping.
It was poured twice with 1 l each time.
Everything was cleaned and checked.
Stay healthy 🙏🏻
You can buy This Strain at :
www.Zamnesia.com
☝️🏼☝️🏼☝️🏼☝️🏼☝️🏼☝️🏼
Strain
Gelato clone from mother (Zamnesia )
☝️
Genetics: Wedding Cake x Gelato x Gelato 33
Vega lamp:
2 x Todogrow Led
Quantum Board 100 W
💡
Bloom Lamp :
2 x Todogrow Led
Cxb 3590 COB 3500 K 205W
💡💡☝️🏼
Soil :
Canna Coco Professional +
☝️🏼
Fertilizer:
Green House Powder Feeding
☝️🏼🌱
Water:
Osmosis water mixed with normal water (24 hours stale that the chlorine evaporates) to 0.2 EC. Add Cal / Mag to 0.4 Ec Ph with Organic Ph - to 5.5 - 5.8 .
Likes
1
Share


@growbola24
Follow
Floracion marcha bien, empezamos a añadir nutrientes y esperemos un buen engorde de los cogollos.

Likes
35
Share


@eldruida_lamota
Follow
Bueno familia ya finalizamos, estas red hot cookies son una cepa bestial.
La verdad que el secado muy bien 7 días en Malla y a los botes, 45% humedad y 23 grados es la temperatura ambiental que han tenido en el secado.
4 plantas que se cultivaron en un armario de 1.20 pero estos ejemplares solo ocuparon 80x80.
Así que ya está cultivada esta gran variedad que es novedad este 2020, americana de la familia Cookies, la Tropicanna Cookies (Girl Scout Cookies x Tangie) con un porcentaje de thc entre los 17/25%, una bomba.
Que decir de Agrobeta, lo peta 💪 en cuanto a nutrientes. Un saludo y buenos humos.

Likes
5
Share


@LockDownGrow
Follow
Been a tuff week as my ph pen failed so had signs of defiantly
But that’s now corrected so hope it didn’t set them all back too much

Likes
11
Share


@FrostbiteFlowers
Follow
I was really wishing for the pheno on the seedsman website but I guess I would have to just hunt through many more blueberry seeds to find that one. Overall I enjoyed the grow.

Likes
1
Share

@NoProbation4Weed
Follow
I put the seed into glass of water for 18hrs, after that directly into potting soil.
after 3-4 days they usually show the head. Lets hope she gets as good as the first one :D

Likes
13
Share

@NSABND
Follow
Day57 hot summer day 😎👍🙏
Day58 cloudy and normal temp 😳😵
Day59 cloudy and cold temp 😵😵😕
Likes
50
Share


@crimsonecho
Follow
well everything is going alright.
nothing to complain about.
destroyers are getting a lighter shade in the new growth but still pretty much healthy, just a more natural sativa color.
maybe around this time i could have thought about topdressing but i’m more inclined to let them go on with straight water just to see how this mix runs till finish with just water and no extra inputs. though who knows i may just decide to topdress tomorrow haha
others seem happy and healthy as well. watered the dinachem pot yesterday with about 4l of distilled water and destroyers got 4l each 2 days before that. caribe and cannalope pot is still pretty heavy.
see y’all next week
edit; yesterday we had a blackout so timers were set back an hour so i guess when i opened the tent today light had just turned on because they were holding a less intense praying pose so just checked back 3 hrs later now and looks fine now. added those photos as well.


Likes
Comments
Share


Likes
7
Share


@GrownyStark
Follow
I should be putting up my scrog net now I guess...maybe next tie down if she allows. Dropping temps to 18 at night is the biggest challenge: it makes her more nice n frosty looking. I still can't select my nute line so no point in shown m off.

Likes
20
Share


@Inhomerhizome
Follow
Pretty happy with the grow and the harvest, the drying went well also!
Each grow highlights changes for the next and this has been no different! I'll be making more training adjustments in the next runs to try and refine the vertical scrog and get to the point where it's a wall 1 bud thick! I know it will get there in the end it's just like relearning how to do a horizontal scrog! I just need to predict the way the plant will respond when the light is from the sides! Bravery and brutality during pruning I think is the key! 😂✌️💚


Likes
3
Share

@MaltaHerbman
Follow
Finally harvest time 😘
Was a very nice to grow this seeds.Was happy with her from day 1 she keep growing every day and even done one time topping on this autoflower.
Now after harvest buds are really nice so 100 % Happy from grow to bloom.Now time to dry and taste 😃

Likes
97
Share


@Zurban_Poison
Follow
Hi people!
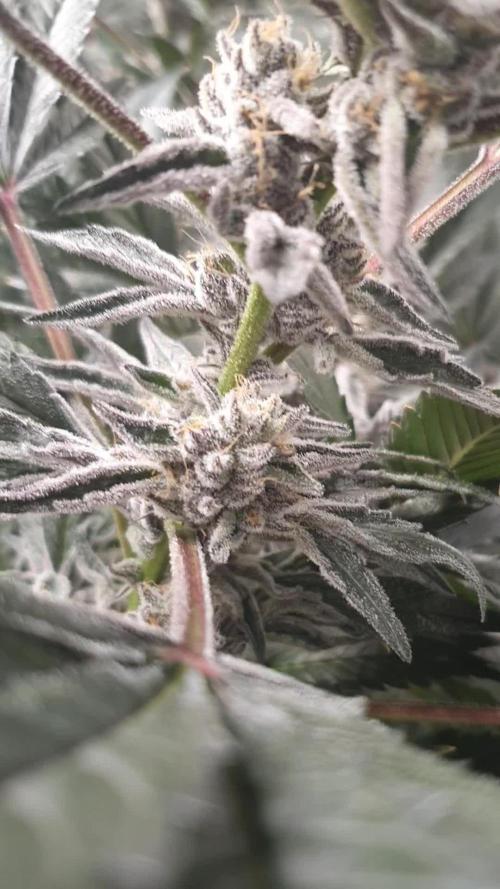
I have nothing special to say. you can see everything in the photo! and all this can be summed up in one word! Perfect!
it begins to show dark colors in buds, as well as on large leaves from the stem. in the photo this is not yet noticeable, but the eye already sees the manifestations of genetics! and I think that further it will only become more beautiful and more colorful!
