
Likes
Comments
Share


@SonomaSungrown
Follow
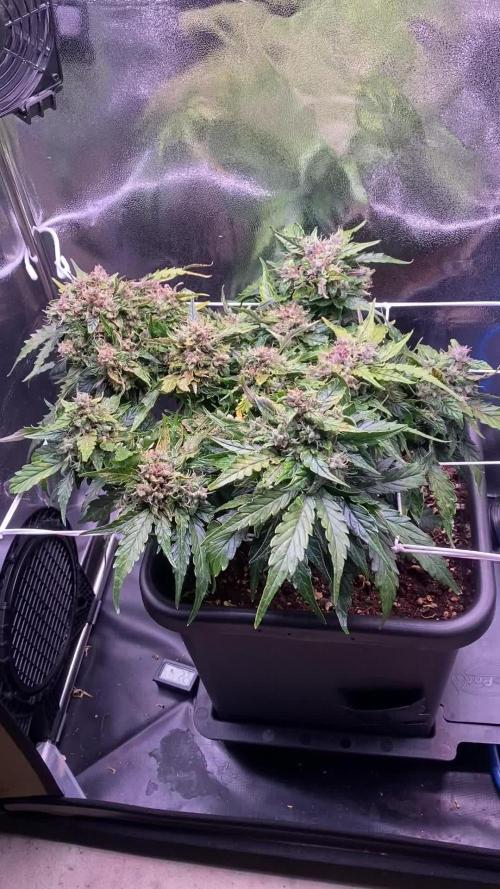
BOOMING.
Have had an unusual amount of thrips and noticed a few Katydid nymphs on Tuesday (7/22), so I hit everything with 1.5tsp Neem Oil and 1 tsp of Dr Brommers soap in a 1 qt sprayer.
I also decided to do my only planned dusting of Diatomaceous Earth.
Executed that on Wednesday, 7/23, and also top dressed with DE to attack larvae.
Thursday 7/24
Mixed up first batch of flowering top dressing.
I put it into a 55 gal garbage can and watered it to get the cooking process started.
Will only let it go for a week or so and then will top dress the girls.


Likes
24
Share


@m0use
Follow
***Sponsored Grow*** = Medic || https://medicgrow.com || Grow = ***Sponsored Grow***
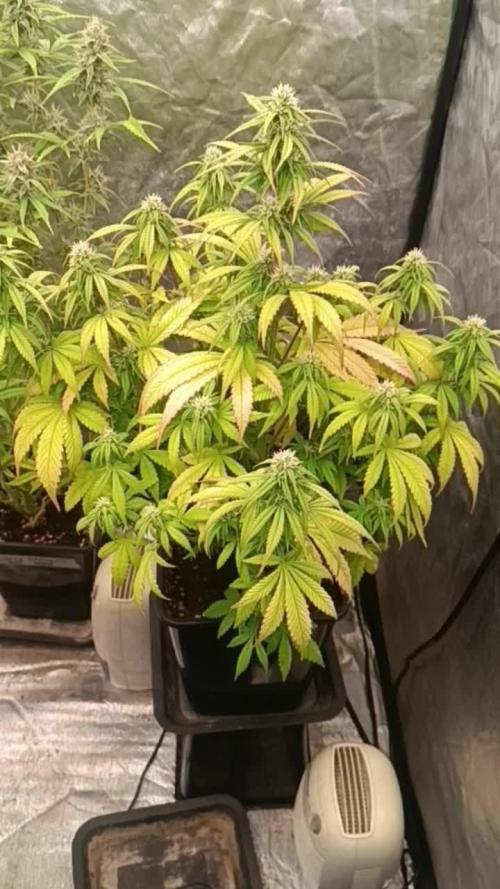
Ok, so bigger news this week, I got rid of one of the plants in the tent as it was an auto vs fast flower :/ and I performed a bunch of LST and some Defoliation to all the plants. This plant was not to bad in terms of lst needs and defoliating needs as much as the other ones. This will be the last week they are in Veg and switching to flower cycle next week with a 12/12 photoperiod. I was going to try a 13/11 but I wanted to test out the automatic light functions on the Medic Grows Minisun-2, So this will be relieved next week.
Been having issues with PH in the medium again and some nutrient uptake. I am thinking I will switch to another brand I have to use up, trip tonic from my last grow on the balcony. Its a bit more complex and not as easy as mix into water and feed but I think its going to help me solve a lot of the issues I am getting. Given this update is a few days late some of these pics are not from today. the clones in the photos above are from the beginning of the week when I potted them up. They have not done well at all and may not make it. can only hope for the next few weeks they pull through.
Till next week.
***Sponsored Grow***
Official Website:
https://medicgrow.com/
+
https://www.emeraldtriangleseeds.co.uk/
Facebook:
https://www.facebook.com/medicgrowled
+
https://www.facebook.com/OriginalETS/
Twitter:
https://twitter.com/medicgrow
+
https://twitter.com/emeraldseeds
Instagram:
https://www.instagram.com/medicgrow420/
+
https://www.instagram.com/emeraldtriangleseeds/
YouTube:
https://www.youtube.com/channel/UCNmiY4F9z94u-8eGj7R1CSQ
Growdiaries:
https://growdiaries.com/grower/medicgrowled
https://growdiaries.com/grow-lights/medic-grow
+
https://growdiaries.com/grower/emeraldtriangleseeds
https://growdiaries.com/seedbank/emerald-triangle-seeds

Likes
7
Share

@Fireproof
Follow
Alles gut. Die Blüten werden immer kräftiger. Riecht inzwischen sehr stark, wenn ich das Zelt das im Keller steht öffne riecht es danach gerade noch stundenlang nach Gras im Hausflur 😇


Processing
Likes
2
Share


@PlantGod
Follow
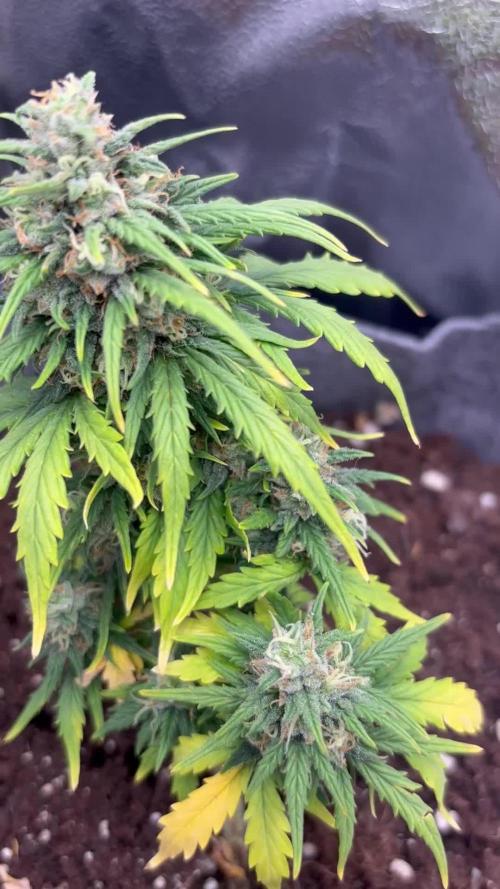
This thing is insane!
Rapidly growing everyday. I need to keep it under control for another for about 30 more days before I can fit it in my other tent.

Likes
19
Share


@GuerillaSweed
Follow
De really took flight from last week, should be starting flowering theese days coming.
Just watering them with normal water and some tomatonutrition every now and then.
Im happy they look so well in this type of scandinavian climate.

Likes
1
Share

@gamberro
Follow
This week has been all about maturation. I’ve been watering only with plain water, starting the flush to clean the roots before harvest. The buds are looking dense and compact, covered in a nice layer of trichomes that keep getting frostier day by day.
The lower leaves are yellowing, which is normal at this stage since the plant is using up the remaining nutrients stored in the foliage. Trichomes are mostly clear with some turning milky, so I think she will be ready for harvest in about a week.
Overall, the plant looks healthy and stable, with tight bud formation and a great aroma coming out. Even though she stayed quite small, she’s packing some nice, solid flowers.
Watering: only water (about 600 ml)Environment: stable and controlled
Stage: late flowering / flushing phase
Next: monitor trichomes daily and prepare for harvest

Processing
Likes
8
Share


@BigBaby420
Follow
Started with 2 Sour Chelumbians and 2 Lemon Haze Autos. Neither of the LH autos wanted to live so I started a bubba kush and a white widow to be in the same tent. They will be about a week apart in life

Likes
15
Share


@CanadianFillmore
Follow
Week 8 for the OG Kush and blueberry. Week 6 on the feed schedule for the Super Lemon haze. Last week of feed for the OG's and blueberry. The OG's are super thick, sticky and stank so nice! The blueberry is very sticky, smell's nice but the buds are not as big as I expected them to be.

Likes
1
Share


@Rudy_Ralis
Follow
Week 7 with 3 plants... all three show different characteristics 1 is full n bushy, 2 is short and bushy, 3 is a bit stretched and showing burned tips
Likes
48
Share


@Focus420
Follow
Vše podle plánu na první výpěstek se musim pochválit. Až na tu kombinaci fem/auto do jednoho growboxu 🙂😝
Potřeboval jsem rychlou úrodu🌱🤗
Příště jenom celoroční odrůdy


Likes
3
Share


@Little_Pot
Follow
There were problems with the grow. First I burned the leaves with self made insecticide. Then she got nitrogen poisoning. She grew rather small, but the smell was beautiful: fruity and exotic, pineapple 😊. I am very happy that she still managed to grow such nice buds. I only trimmed the fan leaves and hung the stalks with buds in the basement. I hope that humidity will stay reasonable. ATM there is 75% RH
I will update the report after first smoke


Processing
Likes
5
Share


@MichaelMan
Follow
I took these clones from my first grow. I took clones for my “lemon lemon lemon” grow from these mother plants.

Likes
25
Share


@FriendlyNeighbor
Follow
Day 59
Finally Fruit Spirit is going into 48 of darkness after 6 days of flushing....
She smells and looks just tasty cant wait to chop those girls in 2 days!!!!! 😬😁🙌

Likes
7
Share

@JeyGanesha
Follow
Questa frostbanger sta ingiallendo un po' troppo presto gli do advanced nutrient vediamo sé gli torna in po' di clorofilla con la fotosintesi
Likes
31
Share


@Targona
Follow
17/10/2022 - 71 days since my little girl sprouted from seeds🌱
The sixth week of flowering of my BCN Power Plant 🌴🌴🌻
Nutrients:
Jungle Indabox - I will still be serving this week and I am adding Jungle Indabox Environ X - bud stimulator 🌼🌸🌼
Advanced Nutrients - Big Bud - I canceled the bud stimulator mix and stayed with Jungle Indabox because the other girls got a little burnt, the classic brown color appeared on the tips of the leaves 🍃🍂
I stuck with Bud Candy, all my girls need lots of carbs 🍭🍭
Atami - ATA Calmag - when growing under LED lights it is recommended to use Calmag and Atami is an excellent brand
Training:
I only defoliated again, not as much as last week, but I still see too many leaves in the buds 😩 🍃🍃
Light: Believe - the best light of sponsor Mars Hydro TS 1000 💡💡
In general:
The plant is strong, manages nutrients well, absorbs as needed. The leaves are still deep green, you can see that it is a sativa. So far, there is no indication that it is nearing its end.
As far as flowering is concerned, it is the slowest so far - compared to the other ladies in the box. It still only has white pistils, only occasionally some brown, and the flowers are not yet fully formed 🏵️💮 I think at least within a week.
It smells really beautiful, it revealed its spicy scent 🌶️🌍
Thanks for the likes and you can follow me on Twitter 🐦: @ Targona666
See you soon 😍


Likes
38
Share


@Wicked_Stix
Follow
We are at day 21 on this gorilla cookies. I think she would be quite a bit bigger if I didn't break one of the mains on week 2 but she is still chugging along and growing well. I upped the maxigro to .5 tsp per gallon and started them on a little armor si so they can build some strong branches. Still running them on 24 hour light and 24 hour irrigation. They are going to stay under the blurple lights for a few more weeks until I can get them in the big room under the quantum boards. I'm hoping they will flower around 4 weeks but my autos seem to enjoy staying in veg so we will see what happens.


Likes
12
Share


@Luv2Grow
Follow
Day 57 - Starting week 9 and thinking I might give her one more week or so. Might end up chopping the top colas and letting the bottom buds catch some light for a week and then harvest the rest.