
Dr. Grinspoon by TOTEM


VEG
Fission 300W Light Emitting Diodes/384W
Custom
FLO
Fission 300W Light Emitting Diodes/600W
Custom

Soil
Custom

Indoor
Room Type
LST
weeks Technique
ScrOG
weeks Technique
Topping
weeks Technique
Main-Lining
weeks Technique
Defoliation
weeks Technique
20 l
Pot Size
Start at Harvest
1
Week 1. Vegetation8y ago


21 °C
Day Air Temp
6.5
pH
50 %
Air Humidity
20 °C
Night Air Temp
5 l
Pot Size
70 cm
Lamp Distance
TOTEM Welcome back everybody!
This project will be a very fun one, because me and my bro @Magnetous_tryko have decided to start it together, on the same day. Techniques will be different, so I hope you won’t miss his future diary. This time, btw, I’ll create something pretty cool, which is like an upgrade of what I did with my Silver Haze.
What I’m thinking about:
- Mainlining
- ScrOG
- Soil + organic nutrients
- A big 20L Airpot
- More veg time before the switch, in order to get a little longer colas at the end
The reason why I’m not trying the strain before scrogging is simple: I’d spend almost a year on a strain only, when there are many other valuable strains available on the market I’d like to try. Plus, I got only one grow box!!!
As I wrote on my Silver Haze’s review, I’ll not be using Advanced Nutrients anymore because they don’t allow you properly manage EC/PPM and because this time I’ll go full organics. I’m switching back to my old and loyal brand, Biomagno!!! 100% organic and very high quality.
I’ll be using Canna Bio Terra Plus (which is basically a pre-fertilized soil, rich of organic and all natural elements inside that are released slowly over time) <thank you @Magnetous_tryko for the suggestion!>. This medium is so cool because of its “idiot proof”, as they call it: if you add much nutrients, this medium will release less of its own ferts, while if you do the opposite, it will feed the plant with more of its owns. I’m thrilled (like Tim Cook at Keynotes) to the idea of trying this “function”, though I’ll be always giving the lower dosage from the feed chart. No overfert allowed this time!
Growing schedule:
1. Mainlining, in order to create (at least) 8 colas
2. ScrOG grid placement
3. 60/70% of covered grid before switching to 12/12 (50% with my Silver Haze was too early in my opinion)
4. Heavy bending (I feel bad already for this phase)
All the other settings:
- Same usual LED panel, which is the Sonlight Hyperled Apollo Plus 8 (384W). 70cm from the plant in veg, gradually reduced to 40cm in bloom
- The grow box is 1x1x2m
- 2 Secret Jardin Monkey Fans (one is broken and doesn’t rotate anymore, the other one doesn’t rotate at all LOL)
- I’ll place carbon filter as soon as flowering starts
- The lower grid I’ll place will be used to allow run-off water to fall into the tank located just below. And to support heat lamps I’ll place as soon as winter comes (this will be a real problem to manage, because they usually create A LOT of heat, which can be harmful to roots and bacteria inside the pot)
I think I’m done here, so see you next week. LET’S GO!!!!
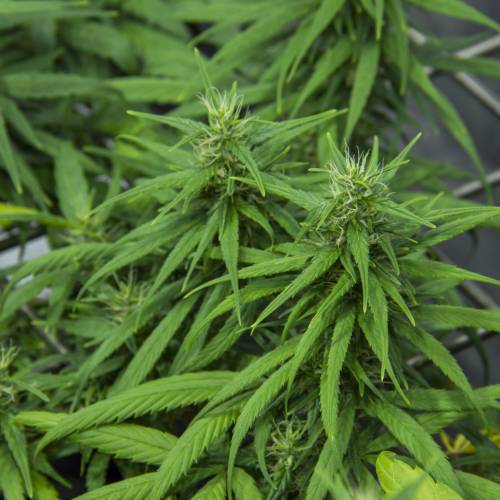
Day 3: Sprout! 3.5 days later. Yay. I immediately switched on the lights and put the panel 70cm above the seedling. I was thinking about starting with blue spectrum only, but since I want some space between internodes, I'll go with full spectrum since the very start.
28 likes
10 comments
Share
2
Week 2. Vegetation8y ago


5 cm
Height
18 hrs
Light Schedule
27 °C
Day Air Temp
6.5
pH
50 %
Air Humidity
20 °C
Night Air Temp
5 l
Pot Size
1 l
Watering Volume
70 cm
Lamp Distance
Nutrients 3

Crescita (Vegetative)
0.5 mll

Rizostimo
0.5 mll

Activator
0.5 mll
TOTEM Nice! She’s growing fast!
The huge temp difference between day and night is because I’ve been keeping the air extractor off the whole time.
This week I’m adding a humidifier inside the room. RH is 50%, but I want 70%!!! Then I’ll slowly turn on the air extractor, initially once a day for 15 minutes, to be increased as soon as she gets bigger.
Day 14: First feed @ 0.5ml/L.
21 likes
15 comments
Share
3
Week 3. Vegetation8y ago


15 cm
Height
18 hrs
Light Schedule
25 °C
Day Air Temp
6.5
pH
Weak
Smell
70 %
Air Humidity
20 °C
Night Air Temp
5 l
Pot Size
0.75 l
Watering Volume
70 cm
Lamp Distance
Nutrients 3
Crescita (Vegetative)
0.5 mll
Rizostimo
0.5 mll
Activator
0.5 mll
TOTEM This week I’m not doing anything special because I’m waiting for some more growth (5th node pop up) in order to start mainlining.
Update: I was thinking about mainlining the princess on week 4, but thanks to her fast growth, I‘ve been able to do it this week already.
Day 21: MAINLINING
I topped above the 3rd node and removed everything below. Then second feed @ 0.5ml/L (last week 1L was too much, so I reduced to 0.75L).
22 likes
12 comments
Share
4
Week 4. Vegetation8y ago


17 cm
Height
18 hrs
Light Schedule
25 °C
Day Air Temp
6.5
pH
Weak
Smell
70 %
Air Humidity
20 °C
Night Air Temp
5 l
Pot Size
0.75 l
Watering Volume
70 cm
Lamp Distance
Nutrients 3
Crescita (Vegetative)
0.5 mll
Rizostimo
0.5 mll
Activator
0.5 mll
TOTEM On last day of last week I mainlined the princess. This week I started bending down the two main branches, and I have to say I didn’t expect a so fast reaction to mainlining. 😧
Day 25: Started LST session, bending down the two main branches. No problem with this, but since last time I broke one of the two, what I understood is:
1. Always do the LST before the irrigation, because more water flowing inside your branches will make them break much more easily.
2. Always loosen the branch you’re going to bend before you start the process. So just move it up and down, left and right a little bit.
After the LST session, I fed her for the 3rd time, always @ 0.5ml/L (750ml of water in total). She’s really appreciating this amount of nutes!
Day 26: Due to the size of the plant, the air extractor is now working twice every hour (15 mins on, 15 mins off, 15 mins on, 15 mins off). Previously it was working 15 mins every hour only. I’m not keeping the extractor always on because otherwise the humidifier would never be able to keep the humidity constant.
Day 28: I figured out there are many leaves with tips curled down. I think there’s some EC lockout going on due to the fact I gave nutrients every time I watered (even in low dosages), and especially when I mainlined.
In fact, when you mainline, you actually remove a lot of leaves, and a plant with less leaves needs less nutrients overall. So, if you give them anyway, you could create a salt buildup and the plant could start showing some deficiencies or little problems like this one.
How I managed to fix this problem: I flushed her with 2.5L of PH6.5 tap water, and got a final PPM runoff of 340. It’s the first time I grow a landrace sativa, so I’m learning her food requirements directly on field. 😊 Therefore, from now, I’ll be giving 0.25ml/L of nutes every time I water, instead of 0.5ml/L. If I see this amount is not enough, I’ll increase it a bit a bit.
Today I also added my two LightHouse Ecoheat bars (80W and 135W) to the room because it’s getting cold. See you next week!
21 likes
7 comments
Share
5
Week 5. Vegetation8y ago


17 cm
Height
18 hrs
Light Schedule
26 °C
Day Air Temp
6.5
pH
Weak
Smell
70 %
Air Humidity
23 °C
Night Air Temp
5 l
Pot Size
1 l
Watering Volume
70 cm
Lamp Distance
Nutrients 3
Crescita (Vegetative)
0.25 mll
Rizostimo
0.5 mll
Activator
0.5 mll
TOTEM Many things happened last week. On day 25 I started bending down the two main branches after the mainline, but on day 28 I got a light EC lockout, that I managed to fix with a proper flush. Now she’s still recovering, but I can definitely see some improvements on the leaves. And she’s really liking her new tropical room (thanks to the heating bars I added last week)!
This week I’m still bending down branches and, as soon as she creates the 4th node on each side, I’ll top again. After that, I’ll wait until she creates other 4 nodes on each of the 8 branches, then top above every 3rd node, and finally get the scrOG structure I was thinking about.
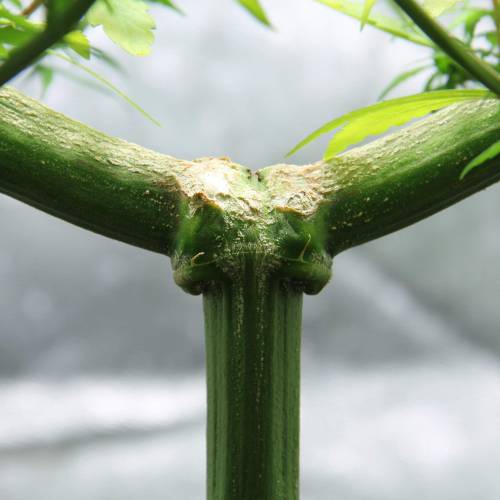
Day 30: Removed 2nd node on each side, then topped the 4th node. Why do I keep node 1 and 3 on each side? The odd numbered nodes all face the same way, and it’s easier if the 8 colas are all faced in the same direction. Thanks @Nebula420 for this advice 😉
Day 33: Watering (1L) + feeding @ 0.25ml/L for vegetative nutes (Crescita), and 0.5ml/L for roots nutes (Rizostimo and Activator). This was the first feed after the flush, and that’s why I started with a light dosage. I’m still not sure if I’ll increase this amount in the future!
Day 34: LST on the 4 branches coming out from the first nodes.
25 likes
16 comments
Share
6
Week 6. Vegetation8y ago


17 cm
Height
18 hrs
Light Schedule
25 °C
Day Air Temp
6.5
pH
Weak
Smell
70 %
Air Humidity
23 °C
Night Air Temp
20 l
Pot Size
1.5 l
Watering Volume
60 cm
Lamp Distance
Nutrients 3
Crescita (Vegetative)
0.5 mll
Rizostimo
0.5 mll
Activator
0.5 mll
TOTEM Last week I made some progress with the mainline structure: I removed the 2nd node and topped the 4th one on both sides. Then I did some new LST, and this week I should top her for the last time. ScrOG is coming, baby!
Day 36: I transplanted the princess to her final 20L AirPot, then re-did all the LST and decreased lamp distance to 60cm. Then I fed her @ 0.5ml/L (1.5L of tap water) because new leaves were fading to yellow. But since I didn’t get any runoff, I planned to give more water before next week.
Day 40: Well, I think 0.5ml/L of Crescita (Vegetative) is a little too much for her. Some leaves are curling down again (the same happened two weeks ago), so today I partially flushed with 4.5L of tap water (PH 6.5), and finally got that runoff out. PPM runoff was near 2200, but I think I flushed some of the nutrients coming with new soil too. I don’t think it’s a very reliable result.
But I think I finally found the right dosage. Since she’s very sensible to nutrients, PPM has to stay very low. With BioMagno, for veg time, at least, I think you should alternate:
1. 0.25ml/L dosage of Crescita (Vegetative) and 0.5ml/L of Rizostimo and Activator
2. Just water
This amount should give the plant enough food and the right time to absorb it.
Today I also topped the 4th node of the 4 branches attached to the first node of the main structure 🧐 Ok, well, it’s a little messy to explain, but I’m talking about the four ones near the middle of the plant! I uploaded a photo that clearly shows where I topped 😉
21 likes
21 comments
Share
7
Week 7. Vegetation8y ago


20 cm
Height
12 hrs
Light Schedule
26 °C
Day Air Temp
6.5
pH
Weak
Smell
55 %
Air Humidity
23 °C
Night Air Temp
20 l
Pot Size
4.5 l
Watering Volume
57 cm
Lamp Distance
Nutrients 3

Batmagno
20 mll

Alghe
50 mll

Farina di Neem
10 mll
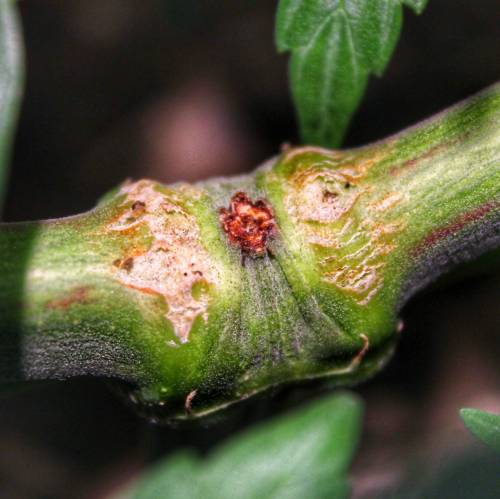
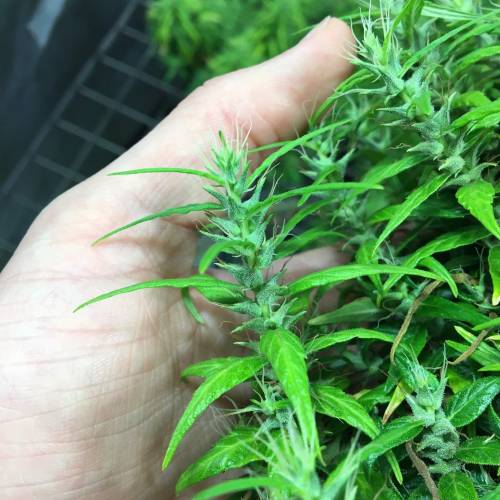
TOTEM Hello everybody! This week will be the hardest one. I’ll have to work a lot inside the room, and even on GD to document all the changes. Last week I topped for the last time (in reality this happened the first day of this week), and finally stopped with high stress training. From now on, our attention will fall totally on ScrOG.
Day 43: Topped the 4 colas at the extremities. Red blood came out from them (see the photos). Amazing! Sorry for the bad quality, but I got just the phone with me when I did the job. When I took the second photo (a few hours later), the plant had already sucked up all the lymph. You can still see the red blood by the way.
Day 44: Set the timer to start with 12/12 from midnight of day 45.
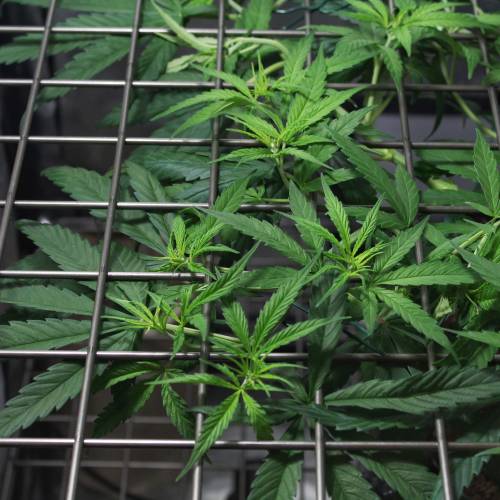
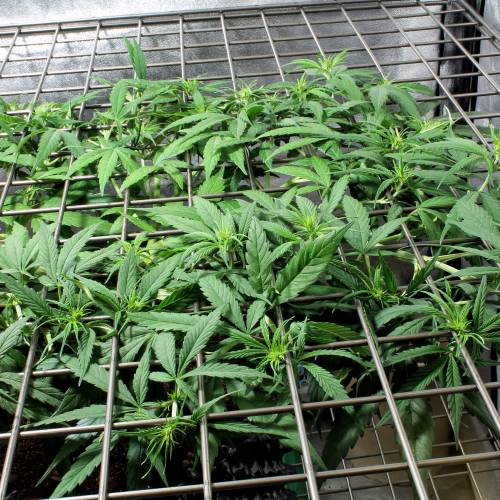
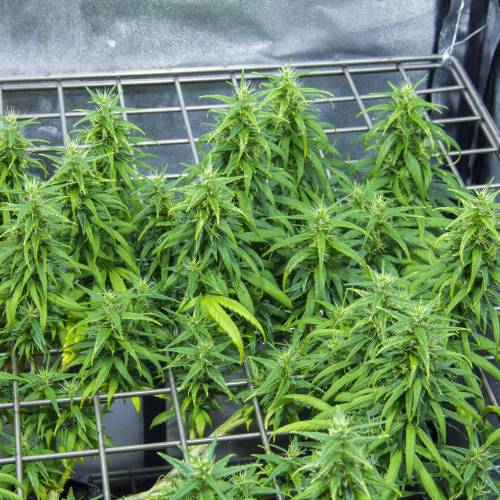
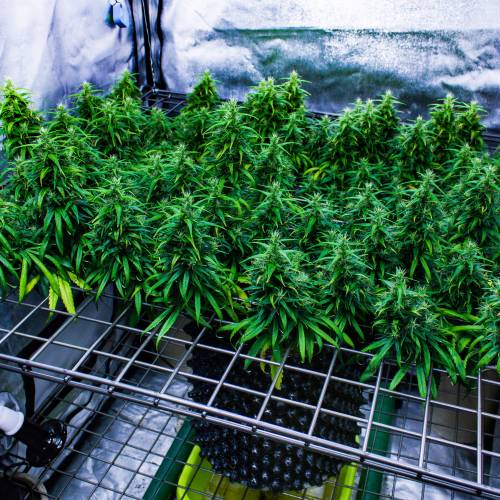
Day 45: SO MANY THINGS HAPPENED TODAY. Flowering started, baby! 🤩 Today, in the evening, I worked for about 4 hours to prepare the ScrOG environment.
- Improved the LST before placing the grid.
- Took some photos.
- Removed the humidifier.
- Since my LED panel has half of the blue lights broken (this happened three weeks ago), resulting in 100W less of total potency, I added 3 new lights pointing where the panel is broken (2x 36W led bulbs and 1x 30W COB led light). I uploaded a photo and a video to better understand what I’m talking about. I even tried changing the broken LED driver, but it didn’t work, so now I’ll have to wait until the end of this cycle to send it to maintenance.
- Put 20gr of BatMagno (which is bat guano), 10gr of “Farina di Neem” (Neem Flour), and 50gr of Alghe, all of them over the soil. I’ll write something about these fertilizers at the end of the comment.
- 4.5L of tap water (corrected to PH6.5), which gave zero runoff. Haha, she’s drinking like a camel.
- Placed the grid.
- Took a few photos.
- Little defoliation.
- Took all the other photos.
- There we go!
I preferred not to add the bloom fertilizer now because I’m a little worried about overfertilizing this baby. During veg, she showed me she doesn’t like nutrients, so I’m just listening to her requests. I’ll add the bloom one as soon as she seems hungry again. By the way she’s just 20cm tall (I’m so proud of this result) and the grid is located a few centimeters above her. Let’s see if I switched to 12/12 at the right time: I heard this strain usually stretches for about 6 weeks!!! 😱😱
Let’s talk about the ferts I placed on the surface of the soil.
- BatGuano: it’s a mixture of organic fertilizers of natural origin and suitable to produce a high amount of organic nitrogen and phosphorus that can be assimilated at 100%. It’s a natural slow-release fertilizer for flowering: the raw materials used (guano, dried borlanda with ammonium salts, kieserite of natural origin, flagpole, meat meal, bone meal and dried poultry) are the result of a careful selection which ensures a low salinity and a gradual transfer of the elements. The phosphorus content in BatMagno (being organic) does not undergo insolubilization.
- Alghe: they are a portentose substrate activator made of a mixture of algae of the species Ascophillum, Fucales and Laminariales, obtained through a process of dehydration and grinding without the use of any chemical substance. They can be used during the preparation of the soil, and increase and strengthen the formation of the root system, mobilize the nutrients in the soil, reinvigorate the plants, protecting them from adverse weather conditions, help plants to overcome stress conditions and improve the quantity and quality of production. All of this is possible thanks to the presence of betaine, cytokinins, vitamins, auxins and alginates polysaccharides.
- Farina di Neem (Neem Flour): it’s a vegetable product based on Neem seeds, obtained from the extraction of Neem Oil through a process of cold-squizzing out, which increases crops, improving both growth and flowering, as well as strengthening the roots of the plants. The Neem Flour is mixed with nitrogen fertilizers, that slow down the conversion and leaching of nitrogen. Repeated interventions improve the endogenous resistance of plants to pathogens, creating an unsuitable environment for the development of insects and cryptogams. Due to the presence of important trace elements for plant life, it prevents imbalances and nutritional disorders. It also protects plants from Nematodes, ants, insects and soil larvae.
Let’s say Alghe is the most smelly product. My room now smells like seaweed! I need to figure out how to give her water now that the grid is on. I think I’ll plug a 2m pipe at the end of my watering can. That’s the most easy and cheap way to fix this problem. I just need to find the right size of the pipe. I’ll show you my solution next week.
27 likes
18 comments
Share
8
Week 8. Flowering8y ago


20 cm
Height
12 hrs
Light Schedule
26 °C
Day Air Temp
6.5
pH
Weak
Smell
40 %
Air Humidity
21 °C
Night Air Temp
20 l
Pot Size
4.5 l
Watering Volume
55 cm
Lamp Distance
Nutrients 3
Crescita (Vegetative)
0.33 mll
Rizostimo
0.33 mll
Activator
0.33 mll
TOTEM Welcome back everybody!
This is the first complete week of 12/12, and I have to say the aggressive stretch took a while to start. My big problem with scrogging sativas I’ve never grown before is that I don’t know when they’ll stop growing.
Since she took a while to start stretching and I want to fill all the grid before she stops growing, I’ll feed her with light veg nutes until 2nd or 3rd week (it depends on how the stretch is going). More N should make her stretch more. Hope this is the right move! ☠️ But in the meantime I’ll keep tucking every branch day by day until (at least) 4th week.
Day 50: Feed @ 0.33ml/L, which is the same as 0.5ml/1.5L (4.5L of tap water in total). I got some runoff, but still not much. Sometimes I feel she needs 6L instead.
Day 54: Added a 150W ceramic heat lamp.
Day 55: First pre-flowers appeared! 🤩
Today I watered her with 6L of tap water (PH 6.5). Let’s talk about stretch: well, I don’t think she started stretching real hard until now. It looks like a normal vegetation, but my fingers are crossed.
31 likes
33 comments
Share
9
Week 9. Flowering8y ago


22 cm
Height
12 hrs
Light Schedule
26 °C
Day Air Temp
6.5
pH
Weak
Smell
50 %
Air Humidity
23 °C
Night Air Temp
20 l
Pot Size
6 l
Watering Volume
55 cm
Lamp Distance
Nutrients 3
Crescita (Vegetative)
0.5 mll
Rizostimo
0.5 mll
Activator
0.5 mll
TOTEM This week I’m still giving veg nutes because the stretch is not as powerful as I thought it to be. By adding nutes, she reacts with a hard stretch until the next day, then comes back to normality.
I also noticed she takes a lot of time (1-2 weeks) to develop new branches. I’m still worried about the possibility to not fill the entire grid before the end of stretching period, but let’s see what happens!
I added a photo of my (temporary) solution for watering under the ScrOG grid, and another one of my 150W ceramic heating bulb. About the watering can: it’s a very basic watering can linked to a simple irrigation tube with some aluminium scotch tape. But there’s another great and cheap solution for this (that I’m buying very soon): a manual hand syphon you can find on Amazon for 10 bucks. It’s usually used to suck fuel from tanks, but we can use it for our plants as well. Thanks @TheBudWhisperer for the precious advice! 💪
Day 58: Feed @ 0.5ml/L with veg nutes (in 6L of tap water).
Day 60: Heavy defoliation! 🌱✂️
Day 61: 6L of tap water (PH 6.5). She’s been sucking water like crazy lately!
27 likes
21 comments
Share
10
Week 10. Flowering8y ago


25 cm
Height
12 hrs
Light Schedule
24 °C
Day Air Temp
Normal
Smell
39 %
Air Humidity
20 °C
Night Air Temp
20 l
Pot Size
6 l
Watering Volume
55 cm
Lamp Distance
Nutrients 4

Fioritura (Bloom)
0.5 mll

Biomassa
0.5 mll
Activator
0.5 mll
TOTEM Hey everybody! Last week she slowed down her stretch rate a little bit. Maybe because of defoliation. Maybe the lower temperatures. Maybe it’s just the prolonged use of veg nutes. This week I’ll start feeding with bloom nutes, so let’s wait a little and fingers crossed for her. Now I tell you something important about Dr. Grinspoon. Well, she HATES high stress straining (tops, defoliations, etc). I mean, you can stress her and she will not gonna die, but then she will definitely take A LOT of time to recover. Even if she has to develop some simple leaves. So always remember this, and if you stress her before flipping the lights to 12/12, you should wait at least one week before flipping. 😉
Do you remember that “red blood” coming out from topped branches on week 7? Well, I did some research about it, and found out this interesting explanation: “You have a strain that is high in anthocyanin, a natural plant color that happens to also be an anti-inflammatory. It is the same stuff that makes blueberries blue. Eating edibles made from a strain like that can bring relief to folks with arthritis and other inflammatory conditions. Smoking it doesn't help inflammation as much as eating it.” Credits: Storm Crow from Grasscity.
So, how do anthocyanins work?
Well, some plants will turn red and purple as anthocyanins are produced using excess sugars in the leaves and spreading through cell fluids. The pH of the cell fluid determines the color variation, with an acidic fluid producing reddish hues, and an alkaline fluid producing blues. Each strain, with cellular pH being genetically regulated, has its own unique combination of chlorophyll and carotenoids, and potential for anthocyanins production, giving a great splash of colors to a diversified grow as nights get longer and temperatures cool down. By the way, many strains’ color range is usually limited exclusively to greens and yellows through their life cycle. 👇
A more detailed explanation here: https://www.leafly.com/news/cannabis-101/the-secrets-of-colorful-cannabis-revealed-heres-why-some-strains
And if you wanna go more in-depth on botanic aspects, here you can find two more interesting readings: https://www.420magazine.com/community/threads/my-jack-herer-is-bleeding.161929/page-3
Day 64: I finally switched to bloom nutes, but before doing that, I added 100g of Mykos by Xtreme Gardening inside the pot (just below the surface). I should have done that on transplant day, but unfortunately I forgot to. So I made some holes, put these mycorrhizae straight inside, covered with soil and watered with bloom nutes: Fioritura (bloom), BioMassa (an incredibile organic flowering booster with Ca-Mg 5.8-2.8) and the usual Activator, each @ 0.5ml/L (and 6L of tap water in total). I’ll be alternating BioMassa and Florastimo, one week each. I don’t know if Mykos will be effective when applied like this, but my hope is that mychorrizae will go deeper into the soil after some waterings. I decided to stop correcting PH levels because I think this soil will have no problems buffering them on its own.
Day 65: Since temps dropped down substantially, I added a second 150W ceramic heating lamp on the opposite side of the first one.
Day 67: Given 8L of tap water.
Day 68: She seemed really hungry, so I fed her @ 1ml/L, 6L of tap water in total. Two hours later all the colas were pointing up to the sky in a very vigorous way. Yay!
29 likes
31 comments
Share
11
Week 11. Flowering8y ago


35 cm
Height
12 hrs
Light Schedule
27 °C
Day Air Temp
Normal
Smell
50 %
Air Humidity
23 °C
Night Air Temp
20 l
Pot Size
6 l
Watering Volume
55 cm
Lamp Distance
Nutrients 3
Fioritura (Bloom)
1 mll

Florastimo
1 mll
Activator
1 mll
TOTEM Okay, she’s still stretching (and she loves techno music as you can see 👅), but she definitely slowed down. Of course she’s not gonna fill all the grid, as I expected. What a pity! Now I just want her to grow a little more, especially those colas at grid level. If they don’t grow a little, I’ll get the worst colas ever!
I’ve just bought a 600W COB panel with 6 Cree CXB3590 (3500K). It should be delivered next week! Can’t wait to try it, and finally give this princess the real power she deserves: DOUBLE SUN POWER!!!! 🤯
What do you think about this pheno? Do you think it will be that “strange” one? I love those stretching colas! 🤩
Day 70: Watering with 8L of tap water.
Day 72: Feed @ 1ml/L, 6L of tap water in total. It’s very strange I’m using full strenght nutes with Dr. Grinspoon. I’m still alternating one watering with nutes and one without. Leaves are ok and pointing up to the sky, tips are perfect and colors too, so she should be just very hungry. This week I switched Biomassa with Florastimo. Florastimo increases the synthesis of natural hormones of plants, the metabolism and assimilation of nutrients, the production of essential oils and resins, and maximizes the production of flowers and fruits.
Day 75: Watering with 8L of tap water. Runoff PPM is 700.
30 likes
11 comments
Share
12
Week 12. Flowering8y ago


35 cm
Height
12 hrs
Light Schedule
25 °C
Day Air Temp
Normal
Smell
750 PPM
TDS
30 %
Air Humidity
21 °C
Night Air Temp
20 l
Pot Size
6 l
Watering Volume
45 cm
Lamp Distance
Nutrients 3
Fioritura (Bloom)
1.5 mll
Biomassa
1.5 mll
Activator
1.5 mll
TOTEM Hey everyone!
So... basically I think I have a very hungry sativa over here! Want a proof? You can see some yellow leaves in the middle! Runoff PPM was...... 450 (with 150ppm of tap water)!!! But at week 5, the recommended value for a sativa should be something like 750/800! She definitely wanted food. But a localized yellowing could be also caused by Mg deficiency, which blocks the plant from absorbing N easily. Thanks to my bro @Mr_Di who helped me listing all the possible causes. By the way, ppm value was very low, so I thought she was just hungry, and fed her with full strenght nutes (1.5ml/L). Lately I’ve alternating nutes+tap water and just tap water, but since I discovered she’s insatiable, I think I’ll start fertilizing every time (possibly with half dosages in order to avoid salt buildups in the future).
The stretch is now almost over, so I don’t expect any significant change in the upcoming days. Because of this, I opted for stepping those colas I tucked last week (which were short) one block back. I moved some of them directly in the middle, since there was a lot of space available. It’s been hard because I was about to snap some of them. I partially cropped one, but it’ll be fine. If you do this, just be very cautious!!!
The new 600W cob panel is coming next Tuesday, so let’s get ready! I’m absolutely excited for this! It will be a total game changer. 🤩
Day 78: Feed @ 1.5ml/L, in 6L of tap water. This week BioMassa is back, and stopped with Florastimo for a week. BioMagno suggests to alternate them and never use together. Runoff ppms changed from 450 to 750. Next time, as I said before, I’ll water with nutes again, maybe @ 1ml/L, which is the minimum suggested dosage on feed chart for week 5.
Day 81: I’m not really sure that yellowing was caused by underfeeding. Yes, ppm levels were low, but it could have been overwatering as well. I say this because those leaves are slowly getting more yellow and crispy, and eventually falling off, as well as having red/purple veins on them (typical of overwatering). Unfortunately I can’t raise the pot and understand if it’s heavy or not.
Day 82: Welcome to my new 600W cob panel. 6x CREE CXB3590 (3500K). I switched my old 384W red/blue one with this. New height: 55cm. Those chinese suppliers sold me two 200w drivers instead of 300w ones, so I’m running cobs @ ~400w now. I’m opening a dispute and make them send me the right ones now. Stay tuned! 😏
Today I removed the first small layer of coco coir because it wasn’t a good indicator to understand when it’s time to water. At the time (transplant day) I used this layer of coco coir because I run out of Bio Terra Plus. After removing the coco, I had to add bat guano (this time just 150g instead of the suggested 200g for week 1 of flowering), algae and neem flour back to the surface of the soil. Will not water immediately because I want her to dry out a bit first.
Lastly, I added two CO2 smart bags to the top of the grow room. I don’t have a CO2 monitor, so this is just to add some more CO2 than usual, and hope she will appreciate it.
30 likes
29 comments
Share
13
Week 13. Flowering8y ago


35 cm
Height
12 hrs
Light Schedule
28 °C
Day Air Temp
Normal
Smell
40 %
Air Humidity
22 °C
Night Air Temp
20 l
Pot Size
6 l
Watering Volume
45 cm
Lamp Distance
Nutrients 3
Fioritura (Bloom)
1 mll
Biomassa
1 mll
Activator
1 mll
TOTEM Well, well, well. I need to say she’s a very complicated girl. Last week I had to deal with a light overwatering, which caused several leaves to yellow and die, and this week I had the opposite problem. It’s not easy to understand what she wants, when she wants it. But I think I’m almost there.
This week, as you can see from the photos, I added my 384w led panel back to the room, together with the 600w cobs panel. Unfortunately those blue lights are still not working, so the panel will output just 284w. CO2 bags are doing great, and now all the leaves are praying the sky. The only problem I notice is that all the leaves tips are fading to white/light yellow. I need to figure out what it is, but at the moment I think it could be zinc deficiency, light burn, or a first sign of overfeeding.
Day 85: Feed @ 1ml/L (lowest dosage), and 6L of tap water. Leaves started to point down, so I felt like the solution was too hot (even because there was a lot of new bat guano, algae and neem flour on the surface of the soil).
Day 87: Today many leaves were pointing down, but it wasn’t related to overfeeding. She was thirsty and just needed water. So I watered her (6 liters of tap water), and a few hours later she was feeling so good that all the leaves started pointing up to the sky again. I’m now pretty sure the best way to feed her is to alternate one time nutrients and one time just water.
29 likes
3 comments
Share
14
Week 14. Flowering8y ago


32 cm
Height
12 hrs
Light Schedule
28 °C
Day Air Temp
Normal
Smell
40 %
Air Humidity
21 °C
Night Air Temp
20 l
Pot Size
6 l
Watering Volume
45 cm
Lamp Distance
Nutrients 4
B’cuzz Silic Boost
0.5 mll
Fioritura (Bloom)
1 mll
Biomassa
1 mll
TOTEM Whoa! This week I didn’t have much to say, so I took a lot of photos!
Let’s start with the big step forward: I think I finally found her perfect feeding schedule, that is alternating feeding (at minimum dosage) and just water, waiting for some leaves to point a little down before giving water again. Of course it's always better to put a finger a few inches down into the soil and notice if it's still wet or not. If it's wet, don't give Dr. Grinspoon water, or her leaves will immediately start yellowing. Those yellow leaves you see in the middle are the result of the overwatering of two weeks ago!
As I said last week, I think I should give more micro nutrients because there are some lime green leaves on the top of some colas. It could be zinc deficiency or even a first sign of light burn. Next time I'll give more Activator (1,5ml/l), which contains many micro nutrients.
Day 91: Feed @ 1ml/L in 6L of tap water. I started using water settled for 24 hours (to make chlorine evaporate), because I think I was killing many beneficial fungi and bacteria! This time I added some Silic Boost by Atami in the mix too @ 0.5ml/L because I thought it could help with high temperatures and some lack of water, forcing the plant keep more moisture inside instead of letting it evaporate.
40 likes
19 comments
Share
15
Week 15. Flowering8y ago


32 cm
Height
12 hrs
Light Schedule
28 °C
Day Air Temp
7.0
pH
Normal
Smell
930 PPM
TDS
30 %
Air Humidity
20 °C
Night Air Temp
20 l
Pot Size
6 l
Watering Volume
55 cm
Lamp Distance
Nutrients 4
B’cuzz Silic Boost
1 mll
Fioritura (Bloom)
1 mll
Biomassa
1 mll
TOTEM Happy new year everybody!
Hope you’re all doing well. The Doc is loving these new lights, even because this week they’re finally working at (true) 600w. When I bought the panel, the supplier sent it to me with two 200w drivers instead of 300w ones. The output was 400w. Even if it’s true that Cree CXB3590s would work more efficiently at around 75w each, I don’t care about efficiency at all and opted to make them work at 100w each with two new 300w drivers (Meanwell HLG-320H-36).
Day 98: Feed @ 1ml/L (and 1.5ml/L of Activator) in 6L of tap water. And even if the Silic Boost dosage is 0.1ml/L, I made a mistake with the syringe and put 1ml/L 😅. Fortunately some more silicon will not hurt the plant. Today I also added 3 new CO2 bags in the room (now they’re 5 in total), and a 20w oscillating Secret Jardin Monkey Fan under the grid because I’d like more CO2 to be spread out.
Day 101: 6L of tap water. Leaves were starting to curl down. There are a lot of ventilation and warm temperatures inside the room, so water evaporates fast. I noticed some brown leaves tips in lower leaves (under the grid), while upper leaves tips are fading to a yellow/whiteish color. It could totally be a first sign of overfeeding, but runoff PPMs are 900. Next time I think I’ll keep giving just water with no nutes, and then see what happens.
Day 104: 6L of tap water. Runoff ppm is 930 and PH is between 7 and 7.1. Some leaves appear a little curled down, and many of them have tips fading to white/light yellow. Plus, a few of them have burned tips too. I think I had a little overfeeding over here, and the silicium I used in high dosage could be the main reason (because it increases the absorption rate of other elements, like P from bat guano). This is why I’m not giving nutes until she gets better and leaves start pointing up again. In reality it’s not true that I’m not giving any nutrients because there’s a lot of bat guano still left on the surface of the soil, that is still being slowly released with every watering. But if the plant absorbs too much P during flowering, she will maturate faster. If you see some flowers, there are some brown pistils already. Not good!
After some brainstorming, the most plausible cause for this light overfeeding could be an accelerated metabolism given by high silicium plus higher amounts of co2 in the room. About the yellow leaves I got some weeks ago, here’s how they probably got yellow: with the first overwatering, the plant has been stressed a lot. In that period I added both co2 and a more powerful panel, which added some more stress to the plant. Some leaves started to curl down because of less transpiration, so they got yellow, and died.
Day 105: Co2 works better when there are higher temperatures (29C or a little more), higher humidity and when it can stay around your plants without being extracted frequently. So I changed some settings on my extractor timer, so that it will now work 15 mins every hour at the lowest power possible. I’m aiming to not lose much co2 (which is heavier than air) with air extraction, while guaranteeing some new fresh air to the plant every hour. By far I’m getting temperatures between 29C and 31C, which is a good range. RH increased to 50-60%, which is also good, and to do so I put a watering can full of water inside the room, near the pot. Since plants don’t need co2 when lights are off, I made the extraction timer work (as before) 15 mins yes and 15 mins no for all the dark hours.
Someone asked me how I water my plants, so here it is my “solution”: I start pouring the first 2 liters slowly, before around the stem, waiting for the solution to be absorbed, then pouring again, enlarging the range more and more. When I poured the first two liters, I wait for like 10-20 minutes, then come back and pour the other 4 liters with the same technique, this time without waiting after the second two liters. This method is good because you let the soil become somewhat soaked before pouring any other water. Plus, the runoff readings (PPMs and PH) you’ll get will be more reliable because water will come out from many parts of the bottom, and not only from the sides. Cheers!
42 likes
29 comments
Share
16
Week 16. Flowering8y ago


32 cm
Height
12 hrs
Light Schedule
30 °C
Day Air Temp
7.0
pH
Normal
Smell
580 PPM
TDS
40 %
Air Humidity
23 °C
Night Air Temp
20 l
Pot Size
6 l
Watering Volume
50 cm
Lamp Distance
TOTEM WARNING: this will be a long read 😉
I think week 9 tells you many things about the trends of your grow. Especially with sativas, because you notice, for example, if there’s a salt buildup going on. This is my case. When I think about my last scrog with Silver Haze, I can’t forget the big overfeeding I had toward the end of flowering. My fault, because I used full strenght nutes!
This time I tried to improve, and forced myself to give 1/2 strenght nutes (except once in the entire cycle), alternating one time water+nutes and one time just water.
LET’S DO SOME BRAINSTORMING!
Everything Is good now, but I feel I need to discuss my thoughts about those deficiencies I had last week. I think I had 3 main problems altogether:
1. When I transplanted the princess in her 20L pot, I run out of Bio Terra Plus, so I topped the pot with coco coir, and added that mixture of bat guano, algae and neem flour on the surface of it. In the middle of flowering, when I had that big overwatering, I noticed that I couldn’t see when the soil below the coco was dry or wet, so I decided to remove that coco layer (together with bat guano and other supplements). At that point I felt like I had to recover that bat guano+algae+neem flour layer, and added 50% of what I put on day 1 of flowering (since I was exactly in the middle). Well, very bad move, because this bat guano dosage has been really too much for this landrace Sativa.
2. Two weeks ago I felt like some silica could help her reacting better to very dry conditions since, after the overwatering, I started waiting for some droopy leaves before watering again. But I gave the wrong dosage: 1ml/L instead of 0.1ml/L. That’s 10 times more than the right dosage!!! Silica, other than making plants stronger, improves and increases the absorption of nutrients from mediums, so just think about the possible damage!
3. Five CO2 bags, together with higher temperature (29-31C) and higher RH (50-60%), that made her metabolism accelerate and suck more nutrients, faster.
So, summing everything up:
- Too much P (phosphorus) given from bat guano (and some from normal nutrients)....
PLUS....
- Too much Si (silica), which increased nutrients absorption....
PLUS....
- Increased metabolism from CO2, higher temperature and higher RH....
GIVES............ P TOXICITY!!!! Nice one Totem 😂!!!!! You can see this by looking at those curled down leaves, plus some burned tips on the photos. (Some weeks ago I noticed some yellow tips, and even wrote something about it here. Well, that was the first sign of overfeeding. I spotted it, but didn’t do anything to fix it 😆!
This P toxicity, together with high amounts of silica (which increased PH level too), made PH go up, and eventually caused some other nutrients to lockout. Between day 106 and 107, before I reacted with a corrected PH 6.5 watering, all the upper leaves started showing some yellow/light brown spots on them (just on the side facing at the lights). I looked at every page I found on Google, but I haven’t been able to find the exact reason that caused these spots. To me, it seems like a Ca (calcium) deficiency, maybe because of some lockout, but definitely not a real deficiency. Just a lockout. Calcium deficiency usually shows these spots on both sides of leaves, not only one. The other possible cause could be wind burn, which causes these yellow/brown spots, even if it’s definitely not the case here. And to be clear, I got red veins on some of those curled leaves, which I think have been there since the time of overwatering.
As you can see, I did some mistakes altogether, which are now hard to recognize, separate and analyze singularly. I’ll tell you this: I’ll grow Dr. Grinspoon again, next time with more awareness and an even lighter feeding schedule (with no silica, less bat guano, and maybe no CO2, at least in flower). 🌲🌲🌲🌲🌲
And to sum up what happened day by day, here are the facts:
Day 106: Noticed yellow/brown spots on upper leaves.
Day 107: More spots on leaves! Watered with 6L of tap water with corrected PH (6.5). Runoff: PH 6.8, 835 ppm (remember this value, and compare it with the one before the big flush of day 110).
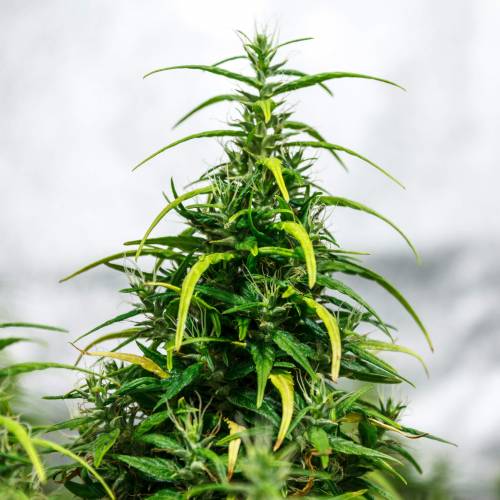
Day 109: Took some photos! I LOVE THIS STRANGE PHENO. Finally bigger and fatter colas! It finally seems like the one you see on stock photos, but it’s slightly different. Foxtails are there, and are taking their shape very slowly. Love the little gems you can see on flower shoots. Wow! Last photo shows you the yellow/light brown spots on the leaves.
Day 110: No new yellow spots, but leaves below are still very curled down, as you can see. Decided to flush with 26L of flush of PH 6.5 tap water (~23C, 150ppm). But before, I removed ALL the bat guano, algae and neem flour there was on the surface.
After the first 2L, runoff PPMs were 2000 (????), with PH 7.1. After the 26th liter, runoff PPMs were 580, and PH 6.8.
Day 111: Upper leaves (the ones with spots) are praying to the sky. They look very happy. Leaves below are still very curled down and a bit curled outwards too, but they’re not showing any other deficiency. It’s strange because, even if at the moment I’m not having overwatering problems, I still can’t classify these symptoms.
PS: Sorry if I take so long to reply to comments, but I don’t have much free time in this period! :-(
30 likes
30 comments
Share
17
Week 17. Flowering7y ago


34 cm
Height
12 hrs
Light Schedule
27 °C
Day Air Temp
7.0
pH
Normal
Smell
700 PPM
TDS
42 %
Air Humidity
20 °C
Night Air Temp
20 l
Pot Size
8 l
Watering Volume
45 cm
Lamp Distance
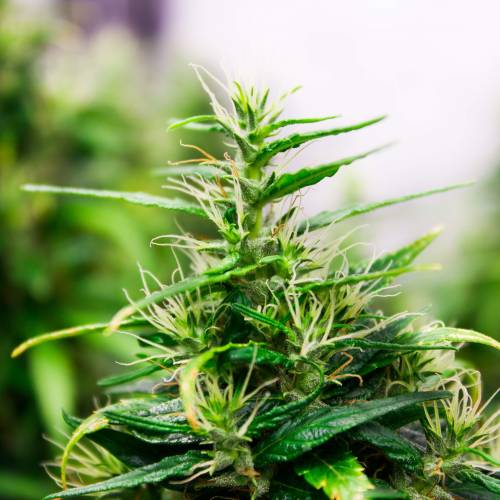
TOTEM You’ll love flower photos from this week! Zoom in and you’ll see the very first trichomes!! 😃
Everything good over here! Buds are now huge, and she’s developing many foxtails on them! I’m still giving only water, and she feels really good. I’ve never seen upper leaves so happy. The hypotetical calcium deficiency I was talking about last week is now a 100% calcium deficiency because it showed up under affected leaves too! Good to know, even if she’s not under deficiency anymore. 💪 Leaves below are still curled down, but never mind, maybe one day she’ll fix them haha!
Day 115 from seed = day 70 from the switch. I found one guy on IG who harvested his Dr. Grinspoon at day 110. That pheno looks like mine. I uploaded those photos at the end of the set. Check it out!
I’m totally in love with her flowers. Never seen something so strange and unique. Over the last week she started a hard foxtailing session. Like every big flower started stretching from every part, creating many new small but stretched flowers. When I touch them, my fingers start smelling like peach, sometimes like raspberry, sometimes like other red fruits. It’s the best cannabis scent I’ve ever smelled! 100% mouth watering!
Day 113: 8L of tap water (PH6.5). Runoff: 700PPMs, PH7.0.
Day 118: 9L of tap water (PH6.5). Runoff: 424PPMs, PH6.7. Runoff PH is finally slowly coming back to normal. 💪😎
41 likes
10 comments
Share
18
Week 18. Flowering7y ago


42 cm
Height
12 hrs
Light Schedule
27 °C
Day Air Temp
7.1
pH
Normal
Smell
672 PPM
TDS
40 %
Air Humidity
23 °C
Night Air Temp
20 l
Pot Size
9 l
Watering Volume
45 cm
Lamp Distance
Nutrients 4
Fioritura (Bloom)
0.33 mll
Activator
0.33 mll
Biomassa
0.33 mll
TOTEM Welcome back! Not much to say this week!
I’m suffering because I run out of my Silver Haze, and I don’t have any weed left. Plus this girl is taking forever!!!!! This is the drawback of growing only sativas in only one grow box. 😄 But let’s say I’m resetting my tolerance to weed, in order to get ready for the legendary Dr. Grinspoon.
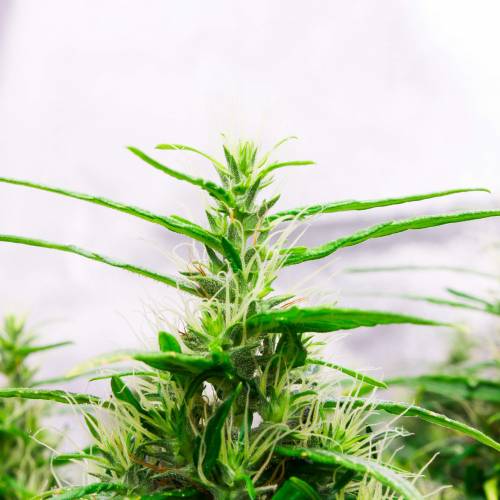
Well, she’s growing at a very slow pace, but I can see many foxtails coming out from the main flowers. Some flowers are still growing, and slowly reaching the highest in the middle. You can clearly see them in the photos. There’s also a night video where you can see the frosty trichomes really well at the end of the set. Yummy!
Day 122: Last feed @ 0.33ml/L for every product in 9L of tap water at PH6.5 (with Biomassa and Florastimo together, even though Biomagno suggests not to give them together in the same week). 0.33ml/L is 1/3 of suggested dosage. Runoff: 730PPMs, PH 7.0.
Day 125: 9L of tap water. Runoff: 672PPMs, PH 7.1.
36 likes
23 comments
Share
19
Week 19. Flowering7y ago


42 cm
Height
12 hrs
Light Schedule
28 °C
Day Air Temp
6.8
pH
Normal
Smell
264 PPM
TDS
45 %
Air Humidity
24 °C
Night Air Temp
20 l
Pot Size
9 l
Watering Volume
45 cm
Lamp Distance
TOTEM Okay okay! She seems to be in the exact same shape of last week, and the only thing that changed is the white balance of the photos!!! ;-)
I almost stopped counting weeks because I'm seriously getting bored: I just pour some pH corrected tap water every 3-4 days, which makes pH go down a little bit, and same happens with runoff PPMs. And of course I take photos and report nothing on GD!
This week: just 260PPMs of runoff, which is like there's no more food left inside the pot, but since she's a skinny b***ch who doesn't like food, I'm letting her do whatever she wants! The environment is perfect, except nights which could be slightly colder (21C instead of 23C). RH is around 45%, and day temp has constant peaks at 29C, which are (should be) good for the three CO2 bags I keep at the top of the grow box.
I'm wondering why those pistils at the top are still white, and why their small balls (can we really call them buds?) are still so small. Well, just saying, the other “balls" in the middle are def bigger, and some of their pistils are brown already. Is she really taking 17 or more weeks to ripen them? Seriously?
Maybe she will mimic the typical Haze, which doubles her flowers’ size in the final two weeks only. To me that’s ok, but then she should start now, and not by next month! Haha. Guys, if you love growing, I suggest you grow this strain only if you have 2 or more grow rooms. Watching a turtle marathon for 3+ months is the most boring thing ever! But fortunately, as many of you are saying in the comments, the end product will be AMAZING. Can't wait y'all! See you next week with hopefully some good news! Stay safe and happy growing. Yo
Day 129: 9L of tap water @ PH 6.5. Runoff: PH 6.8, 262 PPMs.
Day 132: 9L of tap water @ PH 6.5. Runoff: PH 6.8, 264 PPMs.
45 likes
8 comments
Share
20
Week 20. Flowering7y ago


42 cm
Height
12 hrs
Light Schedule
29 °C
Day Air Temp
6.7
pH
Normal
Smell
245 PPM
TDS
45 %
Air Humidity
23 °C
Night Air Temp
20 l
Pot Size
9 l
Watering Volume
45 cm
Lamp Distance
TOTEM Quick update just to upload some photos, but unfortunately I don't have many relevant news to report.
Leaves are yellowing, but I can't understand if it's senescence or lack of nutrients. Since she's not gonna finish within the next 2 weeks, next week I'll add some nutrients in low dosage, which shouldn't be a problem since the runoff is more or less 250 PPMs.
This week there are some videos too! 🎥
Day 136: 9L of tap water (PH 6.5). Runoff: PH 6.8, 256 PPMs.
Day 139: 9L of tap water (PH 6.5). Runoff: PH 6.7, 245 PPMs.
30 likes
33 comments
Share
21
Week 21. Flowering7y ago


42 cm
Height
12 hrs
Light Schedule
29 °C
Day Air Temp
6.6
pH
Normal
Smell
721 PPM
TDS
40 %
Air Humidity
24 °C
Night Air Temp
20 l
Pot Size
9 l
Watering Volume
45 cm
Lamp Distance
Nutrients 3
Fioritura (Bloom)
0.5 mll
Biomassa
0.5 mll
Activator
0.5 mll
TOTEM Howdy ladies and gentlemen!
Last week I was wondering why many leaves were yellowing. Well, I tried feeding the Doc for the last time (in reality twice in a row), and now she’s TOTALLY revitalized. She was actually cannibalizing herself, and this was happening def too early in my opinion.
I think we can finally start talking about harvest!
Trichs are like 95% cloudy and 5% amber. That's a good starting point to forecast the harvest time. But I'm still very uncertain about the look of those flowers. As you can see, the "small balls" are there, and slowly getting (just a little) "bigger". And I need to say I hate all those white pistils and strange looking buds on the top of each flower. I mean, those are not even buds, but just strange green parts with white pistils coming out of them! That’s not helping me because it seems like she needs some more time to develop those areas that never changed in the last 6-7 weeks!
I uploaded some trichomes photos where you can see the few amber ones. Sorry for the bad quality, but I got only this shitty usb microscope bought on Amazon for the same purpose last year.
So....... I say harvest @ week 16 of flowering (or week 23 of the diary). I'll be checking trichomes every day in order to track their changes, and that will be for sure my only safe feedback for the harvest day selection.
Day 142: Feed @ 0.5ml/L in 9L of tap water (PH6.5). Runoff: 654PPMs, PH6.5.
Day 146: Feed @ 0.5ml/L in 9L of tap water (PH6.5). Runoff: 721PPMs, PH6.6.
A little preview for you: when I find a big discrepancy between trichomes status and flowers appearance, I usually do a potency test with one of the smallest buds. Well, that’s what I did, on day 147 (last day of this week), by drying a small sample in a oven at 120C for 20 minutes. The final dried bud was shitty looking and grass tasting, but the effect, even if THC-a didn't convert properly in active THC, was REALLY good. Like more of a very happy indica relaxed feeling, than a heady psychedelic high as expected for a strain like this. The high didn't last long (1:30h), but it was a really fun experience. I think I can then wait a little more before harvesting. Stay tuned for (possibly) the last real and complete update, next week!
18 likes
3 comments
Share
22
Week 22. Flowering7y ago


42 cm
Height
12 hrs
Light Schedule
25 °C
Day Air Temp
6.8
pH
Normal
Smell
721 PPM
TDS
45 %
Air Humidity
20 °C
Night Air Temp
20 l
Pot Size
9 l
Watering Volume
45 cm
Lamp Distance
Nutrients 3
Fioritura (Bloom)
0.5 mll
Florastimo
0.5 mll
Activator
0.5 mll
TOTEM Can you believe this is week 15 of flowering?
I think this is the best photo shoot I've ever made. Do you like it?
Trichomes are very visible. Amber ones are there too.
Everything seems ready for the harvest.
I'm pushing her to the limits, because I want the biggest Dr. Grinspoon balls we've ever seen! Haha!
It's about days, and I'm so thrilled about it. I can't believe she's finally ready. I was getting used to this watering/photo shoot routine! Thanks so much for the love you've all been sending through all the grow..... what a magical community! At this point, I can only say: see you on the harvest page, because I don't think there will be a week 16!
Day 150: 9L of tap water (PH6.5). Runoff: 421PPMs, PH6.8.
Day 153: Feed @ 0.5ml/L in 9L of tap water (PH6.5). 751PPMs, PH6.5.
UPDATE: One more week, maybe?
UPDATE 2: Thanks for your precious feedback guys! I’ll wait a little more then. Let’s see what happens! 💚
38 likes
41 comments
Share
23
Week 23. Flowering7y ago


42 cm
Height
11 hrs
Light Schedule
28 °C
Day Air Temp
6.8
pH
Normal
Smell
721 PPM
TDS
45 %
Air Humidity
22 °C
Night Air Temp
20 l
Pot Size
9 l
Watering Volume
45 cm
Lamp Distance
Nutrients 3
Fioritura (Bloom)
1 mll
Biomassa
1 mll
Activator
1 mll
TOTEM Welcome back everybody!
At the beginning of this week I switched to a 11/13 schedule. Why? Because dropping the period of time that lights are on encourages the plant to finish faster by giving her an environmental cue to put all effort into flowers before senescence takes its course. And even if this theory is not confirmed by science, it's often used for long flowering strains like landrace sativas.
Thanks for your suggestion from last week about waiting a little more before harvesting!
I did this, and even if I'm not noticing many changes, trichomes are now even more amber and some “balls” are possibly bigger.
On day 157 I gave her 9L of tap water (PH6.5), with a runoff of 251PPMs and PH6.7.
But since 251PPMs means she sucked all the nutrients in just a few days, I poured 9 more liters with a nutes solution of 1ml/L. This time I got a runoff of 643PPMs and PH6.55.
Day 159: big flush of 60L (tap water, ~150PPMs, PH6.5) until I got a runoff of ~220PPMs.
I’ll switch to a 10/14 lighting schedule at the beginning of next week, and I’ll harvest as soon as possible, maybe between day 164 and 166 (which is between day 119 and 121 of flowering).
37 likes
8 comments
Share
24
Week 24. Flowering7y ago


42 cm
Height
10 hrs
Light Schedule
26 °C
Day Air Temp
Normal
Smell
45 %
Air Humidity
22 °C
Night Air Temp
20 l
Pot Size
45 cm
Lamp Distance
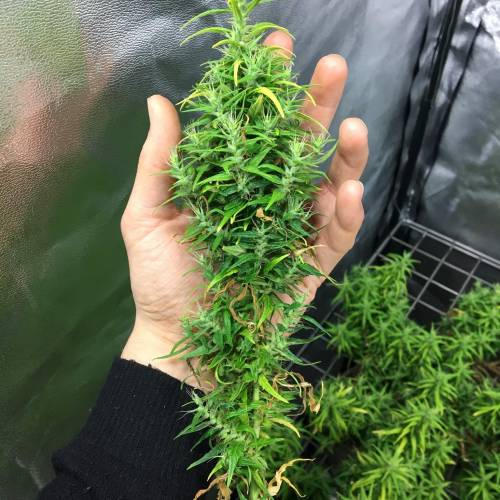
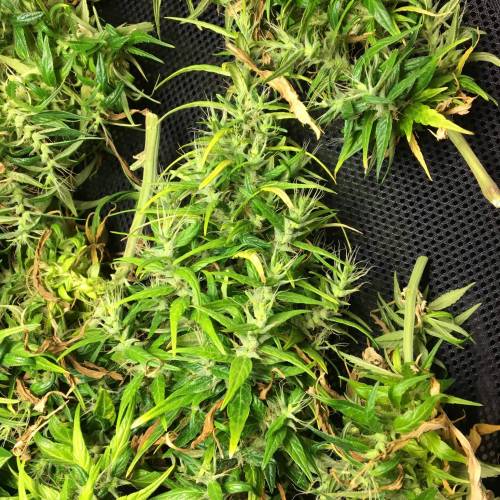
TOTEM HARVEST DAY!
162 days after the sprout, and 117 days after the switch.
It makes almost 6 months!! What a never-ending journey!
I chopped down the princess and decided to place the colas on the usual hanging net without trimming them directly.
I just couldn't. Every cola requires at least 30-40 mins to be trimmed properly. I got something like 50 or 60 colas in total.
It's a total pain in the ass believe me!!! There are layers consisting in calyx, leaf, calyx, leaf, and so on. You basically need to work between every couple of small calyxes in order to remove the leaf in the middle, while being very careful to not cut down everything. It's insane!!!!!!
So.... just wait a little more for the final harvest and the smoke report.
They will come, but definitely not now!
In the meantime I uploaded some harvest photos and videos.
;-)
See you soon!!!
71 likes
63 comments
Share
24
Week 24. Harvest7y ago
Happy Harvest Day!


9/10
Rated
Welcome back everybody!
Haha, you can’t believe how long I took to write this review. Firstly, I wanted to thank everybody for all the positive vibes you’ve always sent. It’s been all a lot more fun with your constant presence. Thank you!!
When I started, I clearly had no idea of what it would be like to wait almost 6 straight months for just one plant! In the end it’s been even longer than expected, and Barney’s couldn’t help me much because this was possibly a new pheno. It’s not really been a relaxing grow, but we can say we’ve now discovered a lot of new things about her! And because the Doc has always been like a mystery, plus you can’t find many infos about her online, I decided to write a long and detailed review including EVERYTHING I learned about her. I really think that sharing is caring, so I hope you’ll enjoy!!! :-)
I think the seeds I got came out from a 2018 production. Barney’s possibly changed something from the past, because neither me, neither @Magnetous_tryko, neither a friend I met on Instagram (@fromthreetrees), got the phenotype the Doc is famous for. I’ve heard many people saying that pheno doesn’t exist anymore, but who knows. Never mind, that’s not really a problem if then you get the same effect! I think it’s now time to get some pop corns, sit down on the sofa and enjoy this review! Let’s go!!
----- HOW SHE GROWS -----
Well, I can tell you she grows like any other cannabis plant and she’s not impossible to grow. If you follow some easy guidelines I’m going to report now, everything will always run smooth.
She tolerates any kind of training, but she takes a little more than other strains to react and get back to her growth. Attention: this DOESN’T mean she likes to be trained! Like other landrace sativas, in fact, she doesn’t. Sativas will always prefer to grow wild and free! But in my case, since I wanted to maximize my production, I opted for a ScrOG setup and didn’t really bother about these “warnings”. Some of you could ask me why I decided to mainline my Doc. Well, it obviously wasn’t necessary, but it was something I still had to do for the first time. If you’re interested in growing single plants in ScrOG, I think it’s always better to opt for a 4-way LST (you can find the tutorial on growweedeasy.com).
----- NUTRIENTS -----
Does Dr. Grinspoon like nutrients? As you may already know, like many other pure sativas, hell NO, she hates them!! If you’re growing the Doc in soil like I did, and you’re using organic ferts, you could follow this schedule I developed for her by a constant trial and error. So... if for some strange reasons you decide to grow her (haha), this is the schedule:
- First 14 days after the sprout: just water.
- From day 14 to 28: 1/4 of recommended dosage of nutrients.
- From day 28 of veg to 2 weeks before harvest: 1/3 of recommended dosage of nutrients.
- Last two weeks: just water.
More than 1/3 of the recommended dosage would be really too much and could create serious and dangerous salt buildups.
----- NOTES ON WATERINGS -----
I always alternated one time feeding and one time only water.
I never poured any water if soil wasn’t really dry on the surface.
Sometimes I preferred waiting for some leaves to curl down a little because I discovered she loves when you let her roots oxygenate a bit more than usual.
In this cycle I always used my tap water, which is around 130PPMs, but I noticed it’s always better to fix your pH to 6.5 before giving anything to your Doc (even just water).
I know we’re talking about soil, but you should never trust 100% its buffering capabilities (in a few words, those fungi and bacteria present in the soil that automatically stabilize the pH to 6.5). In fact, tap water usually contains some chlorine that kills many, if not all, of these organisms. It’s the same thing you should remember if you’re going to use mycorrhizae.
So… this is what you can do if you’re using tap water like me: since chlorine will evaporate in about 24 hours, just arrange a tank with the proper amount of tap water, possibly one day before your waterings, then collect your “purified” water from there! ;-)
----- FLOWERING STRETCH -----
As you can see from the diary, I could’t be able to fill all the grid like I wanted. I tried following the same thing I did with my Silver Haze, but the Doc stretched definitely less. When I grow a single (sativa) plant in ScrOG, I usually switch to 12/12 when she filled about 60% of the grid/net. This time I was a little scared by what other people said about her "monster" stretch rate, so I decided to switch one week before the planned 8 weeks of veg. Bad move. Next time I’ll make sure to follow my instinct a little more :-)
When I noticed she was about to stop stretching at around day 28, I was still tucking branches and many of them were still under the grid. So I just “untucked” them one square back very gently, allowing them growing more vertical and getting more light. Overall, she should stop the stretch after about 4 weeks from the switch, but will keep stretching a few centimeters every week until week 11 or 12.
----- SOME USEFUL INFORMATIONS -----
If the plant is healthy, her leaves color will always be light green.
The pheno I got (there are at least 3 known different ones from the 2018 production) develops rather fast in veg, while flowering seems to stop and stuck by week 8 or 9. This is where you have to activate your patience mode!
You can have great results by setting day temps between 23C and 29C (73F and 84F) and night temps around 21C (70F), especially on last weeks if you wanna get some colorful calyxes (this is the general rule if you want to get some good colors in your strains). Of course, this is not a strain you grow for colors. Her calyxes will often get reddish/brownish, so I don’t know if temperature played an important role in my case.
This pheno doesn’t develop many trichomes, and the upper part of colas will be the last to ripen (trichomes too). So always use your lens/microscope in both upper and lower parts in order to understand when it’s time to harvest. On harvest day my upper trichomes were all milky, while the most of lower ones were almost all amber.
Yes, it’s been quite hard to predict the right harvest day, and many of you will certainly remember!
----- TASTE AND AROMA -----
In general if you vape between 160C and 180C the taste will be more like peach and lime, but also like tropical fruits (especially passion fruit and mango) with some hints of mint and watermelon candy, while at 200C it’s totally different because sometimes it‘s like (get ready) speck with a touch of ginger and tangerine; sometimes it’s just like beer; sometimes lemon that gradually dissolves into some delicious sugared almonds.
----- GENERAL EFFECT -----
The general impression is that the high always starts very strong, except when you vape at 160C. When it starts strong, and it happens frequently, it’s not always so easy to manage because it can cause both paranoia and some trouble when talking to people. But after 30-45 minutes (I know, it's lot of time) your wonderful sativa experience will start.
Please notice that vaping less (less hits) will be less painful if it gets too strong in the first part. It seems like the Doc is more powerful than other strains, and this is why she needs a lower vape temperature to get to the sweet spot. Duration of the high: 5-6 hours, where the first 3-4 are quite intense, and the last two are milder but still very enjoyable. And finally I can tell you munchies will never be so strong. Resisting to food is always a rewarding experience to me! 😄
----- VAPE SESSIONS -----
The reason why I decided to write a review for each relevant temperature is because, as vape users know, different temperatures will produce different effects. Temps around 160C usually create a light effect; around 170C it gets better, a little stronger. It’s great to just feel good, do activities and not being so stoned; 180C is the most suggested temp from many vape users (at this temp you should get the most from your bud); and 200C, the temp that puts you to sleep if you’re vaping an indica, that gives amazing interesting and unpredictable effects if you’re vaping a sativa.
In every test I did, I vaped a full aluminium capsule (there’s a photo in this page) in my Mighty vaporizer, and always used new weed. Every capsule contains between 0.25g and 0.3g, and for every smoke session I did like 50 medium-long hits, each one with a slow-paced breath, always trying to notice the change in taste as the material was being consumed.
----- VAPING @ 160C -----
I decided to test this temp because it’s usually the best one for day activities while keep being functional. I initially felt light to the head with some interesting thoughts, while my body was so relaxed it only wanted to lay on the sofa. Everything was good, except my eyes that were closed at 60%! The taste is a mixture of peach, lime, and possibly watermelon candy. Delicious! 😋
That body high is interesting because it increases when you’re immobile, but immediately stops if you stand up and walk. I could easily focus on a single point and start my flux of thoughts without getting distracted by anything happening around. I didn’t feel any paranoia or psychedelic high, so I did the litmus test by closing my eyes, which made it clear that vaping @ 160C doesn't turn into psychedelic experiences. But the impression is that if I just wanted to chill on the sofa, this would not the best strain out there: it’s like drinking 5 coffees in a row, which hyper stimulates your mind. And to be honest, this is exactly what I expected from a 100% landrace sativa!
She’s very good if you need to focus on something you know you have to do, since you won’t easily get distracted. I think the Doc is perfect for activities like reading, studying, doing creative things, watching movies with a new point of view, or just listening to music (this one is my favorite). I would say it could be helpful if you’re interested in starting something new in your life, like listening to a new genre of music or learning something new that you’ve always classified as “boring” and that you’ve planned for a generic future. Let’s say she helps you find the will. If this is your plan, I give you a little advice: put your phone away! 😉
After just 10 minutes I felt like my upper body was pushing down with all the strength it had. A strength that literally came from nowhere: it’s not like a 100m races where you push yourself from the pedals in order to load your explosive power and start. Here my body was pushing down from the inside. It’s hard to explain, but I felt like my real me was 30cm above my body. I felt this sensation twice in a few days. It’s amazing, but unfortunately it doesn’t last so much.
There’s a nice thing I can tell you about standing up and start walking after about 30 minutes: you feel totally relaxed and your body feels in peace with itself, with zero rigidities. That’s really a good sensation. In the first 45/60 minutes the potency of this strain is quite high, so it’s still better to lay on the sofa or you may feel your head spinning. You could also experience some difficulties with talking. Of course, this is not a strain for beginners since she could create a sense of paranoia in even low temperatures and dosages.
And since it’s not psychedelic at all, it’s not really helpful in transforming your sadness into happiness. It's different: if you were sad or neutral before vaping, it will just help you feel a little more relaxed. But here’s the best thing: if you were happy before vaping, well, the high will be magical, and a lot happier! So... I highly suggest you to be in a happy state-of-mind already before vaping the Doc (and in general any other kind of weed)!
Overall, I can say that vaping at this temperature is very good for creative activities, because increases your focus a lot. Paranoia alert YES, but don’t be scared. If you feel a bit of paranoia, try doing less hits! ;-) I don’t feel it’s very helpful in social contexts where you have to talk, because it’s not something always easy to do. The effect lasted 4 hours, with a bit of good mild sensations for about another hour. Not very strong munchies, but I didn’t resist to a small piece of delicious cake I had in the kitchen and then an apple to refresh my mouth. Haha!
----- VAPING @ 170C -----
The initial taste is limey and peachy as before, but this time there’s some passion fruit too in it. The high now hits faster: 80% on the head and 20% on the body.
The first 25 minutes are so powerful you could even feel some confusion. By the way, at 30 minutes I started feeling so good I couldn’t find any will to get up and prepare my dinner. After 30 hits I could taste some incense too. It was really fresh to the nose: I loved that! After 45 minutes, with the vape off, I tried one last hit and I magically felt a strong MANGO aroma in both my mouth and nose. It’s the first time my weed smells 100% like a specific fruit. I need to say the Mighty here is so great in preserving flavors, and the Volcano would do even better.
For the next 1:30h I think I had one of the best times of my life: 100% happiness, real and powerful connection with people, deep thoughts, introspective hyper power, lot of positivity, creativity and many ideas. This is really the moment where you know from the inside you’re able to get rid of many of your problems. I mean, WOW!! I was about to skip the review of this temp, but I would have missed the best one. What a wonderful experience. DEFINITELY my favorite one (I did the 180C and 200C tests before this, so I’m really certain now)!
----- VAPING @ 180C -----
The taste here is harder to define. It could be something like a vegetable, but I’m not that sure. Can’t find the peach anymore. After some hits the taste turns into incense, with a light watermelon candy aftertaste that I also found in vaping @ 160C. After 5 minutes you can start feeling a light mental effect, alternated with lot of sneezes. Lol, it has to contain some peppery terpenes inside.
The initial effect is now clearly stronger than before because I felt definitely more focused. I’d say it’s a little psychedelic too, even if this could happen only within the first 10 minutes and just for a few seconds. My eyes were more closed too haha!
After 10-15 hits I could smell a fruitier taste. Maybe tangerine or citrus (orange candy?) mixed with some vanilla and a herb that reminded me of mint. A taste that made me also think about that double-apple molasses you smoke with shishas. Not bad! After 30 minutes I really felt good, with lot of introspective thoughts, and didn’t wanna move around because it was easier to lay on the sofa. There's just one thing I didn't like: those continuous sneezes!!
But now it comes the best part: on the 160C effect report I wrote you can easily get happier if you start vaping in an already happy state of mind. But there’s something else you should know about the Doc: if you start vaping when you’re sad or stressed, all you have to do is forcing your thoughts into something happier for even just a moment. Boom. You immediately start smiling and negativity disappears. I ABSOLUTELY LOVE THIS!
Not many munchies this time! It’s not always like this, so get ready to surround yourself with healthy snacks, or you could eat your entire kitchen!
Overall I think that vaping @ 180C is better in the evening, and this because you would end in getting too much focused (the concept of “too much focus” is not really always a good thing). This means your brain could start thinking too much, which is everything but relaxing. A little advice: since your eyes could get very dry, some eye drops applied in the right moment will be your best smoke companion.
----- VAPING @ 200C -----
At 200C the taste is a bit unstable because it doesn’t last for long. It initially tastes like lemon and maybe yogurt, then changes to sugared almonds with a little touch of lemon which may still be there. When you’re about to stop your smoke session because you don’t see any other smoke, the smell is similar to the one of old dusty books. I mean... kind of, but it’s not bad!
The sensation on the head here is heavier. It’s exactly what I reported before, but stronger. This time I didn’t get the usual 15-30 minutes of confusion, but just a happy high instead. Very nice. Every temperature has its own pros, so I highly suggest to try them all. By the way what you’re doing really affects your mood. If you’re chatting with a friend about something fun and happy, the Doc will be more than happy to help making feel you even happier. What an amazing strain!
----- PROS AND CONS -----
- PROS: Not strong munchies, happiness, creative and deep, introspective thinking, makes you funny if chatting with someone. Because it makes you think deeper, it could even help in getting rid of some communication problems with important people in your life because you don’t feel judged anymore and so can say whatever flows in your mind with no problems. And the best thing here is that you’ll later remember you can always be like this, even when you’re not high. This is why I love weed. Some strains are perfect to make people fight and win their inner problems, and this is one of them for sure. The high lasts 5-6h.
- CONS: Some paranoia in the first 30 minutes. It’s hard to talk. Long flowering. Impossible to trim. Not dense bud structure. The high lasts 5-6h. Lol. It depends if you have time to be high for 5 straight hours (while the last hour is usually milder).
----- SOME INTERESTING FACTS -----
- If you’re interested in the “red blood” that came out from her in week 7 (of the diary), there is an interesting explanation of what that “blood” is in week 10!
- On week 9 there is a photo of my solution for manually watering under a ScrOG net/grid. But later I opted for a “manual hand syphon” thanks to a good advice from my bro @TheBudWhisperer (that was a golden advice bro!), that I found extremely more helpful than my previous solution.
- On week 15, in the final part of my comment, I explain how I water my plants (because a very dry soil needs to be first hydrated before pouring all the water!!).
- If you’re interested in the trimming phase, I wrote all the infos you need on week 24, including all the photos and videos from the harvest day. By the way, this is the worst part of the entire grow, and I highly recommend everyone do a dry trimming after 10-14 days of total darkness, instead of the usual trimming did the same day of the harvest.
----- CONCLUSIONS -----
In the end I got 250 grams, and I’m very, very satisfied! 🎉
A very clear and focused effect is what I expected from a pure landrace sativa like this. She’s very very strong and the high lasts about 5-6 hours (understand?! 6 hours later you’ll still feel a mild positive and motivating high that still helps you getting things done). 6 hours is really a lot of time. And while it’s good for deep thinking or deep text conversations (because it’s quite hard to talk), I can’t tell the same for physical activities in general, which are not suggested.
So, in general, it’s clearly a top-notch strain. But let me now compare it with the Silver Haze I’ve grown last year.
Unfortunately, I sadly need to say the Doc can’t beat her. I really hoped to, but the high here is more raw, visceral, primitive, and a little hard to manage sometimes.
Vaping the same quantity of Silver Haze never made me feel that sense of paranoia in the beginning, and with Silver Haze I could always get that little happy psychedelic experience that often gifted me with some amazing introspective sessions that helped me fix some problems and grow a lot like a person and a human. Nothing that vaping the Doc @ 170C or even 180C can’t do, but with Silver Haze it was all a little more peaceful and stable.
So this, plus the very long and unknown flowering time, are the reasons why I’ll not grow this strain again. But my journey to find the best sativa on the planet will definitely not stop here. Thanks for following and I hope you liked this review. Stay safe =)
TOTEM
Show more
Translate
Spent 169 days
Ger Veg Flo Har
250 g
Bud dry weight per plant
1
Plants
1 m²
Grow Room size
Hard
Difficulty

Creative, Happy, Uplifted
Positive effects

Dry eyes, Insomnia, Paranoia
Negative effects

Citrus, Fruity, Tropical
Taste
Height
Day air temperature
Air humidity
PPM
PH
Light schedule
Night air temperature
Pot size
Lamp distance


TOTEM Overall, it’s been a highly educative cycle. I’ve learned how to properly feed sensitive sativas, and how to quickly change my plans if something goes wrong. All positive experience that will come in handy in future grows. OH YES OH YES!
I’m gonna start a new interesting cycle with new Sensi Seeds strains very soon. Don’t miss them! Peace and love, bye!! 😃
157 likes
80 comments
Share
Equipment Reviews


574 comments
Sort by
popularity
popularity
newest
oldest

Green_Friends_Inc commentedweek 187y ago
Pressed the like button, now where's the love button? 😁
likes 7

TOTEM commented7y ago
@Green_Friends_Inc, Nice one, and where is the thanks so much I really appreciate one? 😃
likes

Tonino commentedweek 18y ago
will follow the adventure for sure have a great grow
likes 4
TOTEM commented8y ago
@Tonino, Oh yeah baby, let’s go then!
likes 3

Magnetous_tryko commented8y ago
@Tonino, Tonino is back!! Great!!
likes 3
Tonino commented8y ago
@Magnetous_tryko,you bet my friend and happy to be back😁👍
likes 2

Damonkey commentedweek 197y ago
Looks fantastic, very neat work, beautiful. Have you tried this stuff? Wow ! If not you’re in for such a treat. 🤤🤤🤤
likes 4
TOTEM commented7y ago
A big thank you, @Damonkey! Never tried the Doc before. Can't wait! Will do a very detailed review in the end, don't worry! 😜
likes 2

CRiSPrGrow commented7y ago
@TOTEM, 🏆 🏆 🏆 🏆 🏆
likes
Damonkey commentedweek 197y ago
😂😂😂😂just read your weekly comments, hang in there man the turtle does win in the end😂😂😂😂
likes 4
TOTEM commented7y ago
@Damonkey, Haha! Good one! I can see the finish line! Come on!!!!!!
likes 2

LongJohn420 commentedweek 187y ago
yep sweet huh 👽
likes 4
TOTEM commented7y ago
@LongJohn420, 🙏😃
like 1

blendmedmedman commentedweek 28y ago
will be staying on channel and following this grow, it looks real tasty
likes 4

TheBudWhisperer commentedweek 168y ago
Dude! Lookn great and gotta be coming to the end in short order. How many weeks u think u have left? Read the comment and have to say the following - #1. Think we’ve all seen nute def. and toxicity on GD/in our grows at some point and while there are signs on her you obviously caught it and rectified it early (in all instances). You’re wayyy too hard on yourself 😉. I sincerely doubt this plant has suffered too much as a result👍. Sign of a diligent grower homie😀. #2. I agree with your diagnosis - that spotting looks like cal. Def. to me too. Good news is u gotta be close to the finish now and I don’t think it will have any overt impact on harvest. In short - you rocked this scrog regardless and I’d love to see the follow up grow now that you have some experience with the strain. Been a great read bro, we are not worthy!!!! 👍👊😎.
likes 3
TheBudWhisperer commented8y ago
@CRiSPrGrow, that’s really cool dude! But where the hell did u find the microbiologist??? Lol 😂
likes
TheBudWhisperer commented8y ago
@CRiSPrGrow, lol 😂
like 1
TOTEM commented7y ago
@CRiSPrGrow, Whoa nice! Very interested in this!! I won’t miss your next grows 😉
like 1
Show More (3)

Silky_smooth commentedweek 158y ago
Happy new year my friend 🍺🤘 looking amazing hell of a job keeping her healty 👏👏👏👏😉😉😉😉 mine sadly died better luck next time 🤔😉
likes 3
Silky_smooth commented8y ago
@Hawkbo,but i’m gonna give her another try in a few weeks but first need Some room in my growspaces 😉😉
like 1
TOTEM commented8y ago
@Silky_smooth, Hey there!!!! Don’t worry for the ones who died! I’m sure you’ll do better things next time, and I’ll be following again, and again, and again, until you’ll reach the harvest! Come one little Silky!!!! 😎💪
like 1
Silky_smooth commented8y ago
@TOTEM,thank you my friend you are to kind 😉 looking amazing as always buddy 👏👏👏😉😉😉
likes
Show More (1)

Ganjagrandaddy commentedweek 217y ago
mate , you are amazing for your perseverance with this one. . you deserve a brilliant result and have worked to create one. Brilliant job and so rooting for you
likes 3
TOTEM commented7y ago
@Ganjagrandaddy, thanks for the positive vibes you spread out through all the diary! Loved your support bro, just thank you! 💚💚💚
likes 2
Ganjagrandaddy commented7y ago
@TOTEM, My pleasure mate. You have taken a hit for the team for sure and satisfied a lot of possible growers of grinspoon. Knowing its difficult reputation and lengthy flowering time has cost you immensely no doubt. Thanks for showing its potential and the sacrifice needed to grow this masterpiece. Barneys Seeds need to see this grow and use your agreed pics to show it off properly. When your sat back with a fridge full of chocolate ( hash brownie ones maybe?) and a bowl full of her fruit , you will be grinning from ear to ear , with slits for eyes and solving the worlds problems easily !!!. Top notch mate
like 1
Green_Friends_Inc commentedweek 197y ago
Turtle marathon lol , but the high....🤗
likes 3
TOTEM commented7y ago
@Green_Friends_Inc, He he, the high.... Damn, almost there! 😈
like 1
Green_Friends_Inc commented7y ago
@TOTEM,all your hard work will pay dividends my friend
likes
Tonino commentedweek 48y ago
Just like you always do great diary great work excellent picture what more can I say
likes 3
TOTEM commented8y ago
@Tonino, Thank you brother, comments like this are always VERY motivating, and I never take them for granted! You know, I was thinking about how GD community stimulates growers to continuously improve over time, and it works very well! And what worked pretty well since the very start was pro growers like you motivating beginners growers like me to learn and explore new and fascinating ways to grow these plants. So thank you x2 👊
likes 3
Tonino commented8y ago
@TOTEM,Always happy to be there and to help
likes 3

Cannabud commentedweek 18y ago
Best of luck, mate. One of my favourite strains. I’ll be following this closely.
likes 3
TOTEM commented8y ago
@Cannabud, Thanks bud. Have you tried this in Amsterdam, or already grew one in the past?
likes 2
Cannabud commented8y ago
@TOTEM, I’m luck enough to live in the city so I always pick up a few G’s on my weekly Barneys visit.
like 1

Ga4rd2en0er commentedweek 247y ago
@totem the anticipation of your smoke report is killing me. 😉
likes 3
TOTEM commented7y ago
@Ga4rd2en0er, Haha! Yes I'm still doing some tests vaping at different temps, and trying to define the high in a proper way by comparing more trips and personal sensations! I think I'll take some more days, but not much more!! Fingers crossed! 😃
likes 3

indoorontario commentedweek 247y ago
I applaude you for your patience. Its such a prehistoric looking version of cannabis and i am interested in hearing what you have to say about the smell, taste and, of course, the buzz!
likes 3
TOTEM commented7y ago
Big thanks mate @indoorontario!!! I hope you'll find everything you need in the final review!
like 1

biggreens420 commentedweek 247y ago
cant believe shes down after all that bro thought she was gonna go on and on I would have not lasted as long as you have... at least other 12 wk strains will seem like a breeze to you now iv been checking magnetous diaries and noticed he not been about will he be updating some harvest pics of his ? looking forward to seeing some dry pics and a harvest report from you you killed it 👊👊👍
likes 3
TOTEM commented7y ago
@biggreens420, Thank you very much bro!! Your support has been really precious like always!! I'd call it essential!!!! Like the first one you sent me when I joined GD! High five!!! 🙌👊
like 1

hiervonderpalme commentedweek 237y ago
OMG .. ur grow Looks so amazing. I cant stop looking at ur pictures over and over again.
😬
likes 3
TOTEM commented7y ago
@hiervonderpalme, Haha! Thank you mate!! So glad you like them!!! 😃
likes

udfxrookie commentedweek 227y ago
I admire your grow so much I'm practicing with some unknown seeds while waiting for my good stuff to come so I do it right. I appreciate the detail you took!
likes 3
TOTEM commented7y ago
@@@udfxrookie, Just thank you, mate! Hope I’ve been helpful in some way!
likes

Cogollo_eu commentedweek 217y ago
I'm not an expert, and many many people around know much more than me, even you @TOTEM. But i cant tell you my experience this summer. I had a awesome Lemon Zkittle, that begin to do the same as yours in the leafs, i asked to a friend and he tell me to irrigate adding "Growing Base nutrient", i can tell you that it didn't fixed it, but it helped much, as the growing base nutrient slow down the yellowing much. Enough to end the harvest.
Apart of this, i will tell you again Super awesome job in all ways!!! (Growing, Imaginering and post-processing).
Green regards!!!!
likes 3
TOTEM commented7y ago
@Cogollo_eu, Thanks for sharing your experience bro. Natural senescence will turn leaves to yellow because plants will suck energies from them for the final phase of flowering. Sometimes that natural food is not enough, so you have to add a little more by your own, if you’re still not in the final flush phase. That’s what happened to me!
Thank you for the kind words bro!! So much appreciated. My old Silver Haze scrog helped me a lot with the imaginering process of this king of scrog. The fact that you’re growing a sativa that will stretch a lot when you flip her to 12/12, and how you get slowly used to their net/scrog filling rate. It’s all about trial and error.
Happy growing bro!!!!
likes 2
hiervonderpalme commentedweek 207y ago
Hallo Mister,
any updates on ur grow ??? i would love to See more 😎
likes 3
TOTEM commented7y ago
@hiervonderpalme, Boom, two updates in a row. Enjoy 😃💪
like 1

ROM101 commentedweek 197y ago
Must be driving you crazy you do everything right and she punishes you for it😭 hang in there mate fingers crossed she starts putting in as much effort as you have🤞🤞🤞
likes 3
TOTEM commented7y ago
@ROM101, Thanks for the incitement bro!!! Really helpful! 🙏💪
likes

the end.
Enjoying this diary? Follow for more updates!


Prefer the old Diary view?
Go back to the old Diary view