
Power Buds Plagron x Zamnesia / Biscotti


VEG
Phlizon PH-B6-M Light Emitting Diodes/320W
Phlizon PH-B6-M
FLO
Phlizon PH-B6-M Light Emitting Diodes/320W
Phlizon PH-B6-M

Tent
FYTO BASE G65
FYTO BASE G65


Soil
Custom

Other
Custom
Indoor
Room Type
LST
weeks 3-9
Defoliation
weeks 4, 6, 10
20 l
Pot Size
1 l
Watering
Start at Harvest
G
Germination3y ago


![Power Buds Plagron x Zamnesia / Biscotti. Week 0 - [1] Plant cones for the veggie garden work indoor too.](https://bucket.growdiaries.com/static/post/photo/146971/7496379_grow-journal-by-highmountaingardeningzamnesia-seedsbiscotti_m.jpg)
![Power Buds Plagron x Zamnesia / Biscotti. Week 0 - [1] Keep on growing sweetheart, time is running.](https://bucket.growdiaries.com/static/post/photo/146971/7496380_grow-journal-by-highmountaingardeningzamnesia-seedsbiscotti_m.jpg)
![Power Buds Plagron x Zamnesia / Biscotti. Week 0 - [1] I ordered a macro lens, ill add some more photos in a day ore two](https://bucket.growdiaries.com/static/post/photo/146971/7496382_grow-journal-by-highmountaingardeningzamnesia-seedsbiscotti_m.jpg)
![Power Buds Plagron x Zamnesia / Biscotti. Week 0 - [2] Macro filter lenses are great! Can't wait to shoot ripe buds with it.](https://bucket.growdiaries.com/static/post/photo/146971/7499193_grow-journal-by-highmountaingardeningzamnesia-seedsbiscotti_m.jpg)
![Power Buds Plagron x Zamnesia / Biscotti. Week 0 - [2] So i have to train using it...](https://bucket.growdiaries.com/static/post/photo/146971/7499195_grow-journal-by-highmountaingardeningzamnesia-seedsbiscotti_m.jpg)
![Power Buds Plagron x Zamnesia / Biscotti. Week 0 - [2] and a little bit more](https://bucket.growdiaries.com/static/post/photo/146971/7499198_grow-journal-by-highmountaingardeningzamnesia-seedsbiscotti_m.jpg)
![Power Buds Plagron x Zamnesia / Biscotti. Week 0 - [2] now a bit further away](https://bucket.growdiaries.com/static/post/photo/146971/7499201_grow-journal-by-highmountaingardeningzamnesia-seedsbiscotti_m.jpg)
![Power Buds Plagron x Zamnesia / Biscotti. Week 0 - [2] improvised 2 stories grow tent](https://bucket.growdiaries.com/static/post/photo/146971/7499206_grow-journal-by-highmountaingardeningzamnesia-seedsbiscotti_m.jpg)
![Power Buds Plagron x Zamnesia / Biscotti. Week 0 - [2] the first [2] pic in 100% resolution](https://bucket.growdiaries.com/static/post/photo/146971/7499361_grow-journal-by-highmountaingardeningzamnesia-seedsbiscotti_m.jpg)
![Power Buds Plagron x Zamnesia / Biscotti. Week 0 - [3] On Thursday the Parcel arrived and Bob seems happy.](https://bucket.growdiaries.com/static/post/photo/146971/7506608_grow-journal-by-highmountaingardeningzamnesia-seedsbiscotti_m.jpg)
![Power Buds Plagron x Zamnesia / Biscotti. Week 0 - [3] She has a little deformation but i am sure she will be fine.](https://bucket.growdiaries.com/static/post/photo/146971/7506609_grow-journal-by-highmountaingardeningzamnesia-seedsbiscotti_m.jpg)
![Power Buds Plagron x Zamnesia / Biscotti. Week 0 - [3] One week, incredible what mother nature is capable of.](https://bucket.growdiaries.com/static/post/photo/146971/7506610_grow-journal-by-highmountaingardeningzamnesia-seedsbiscotti_m.jpg)
Nutrients 3
Worm Castings
50 mll

Mycorrhizal Inoculant
1 mll

Seeding and Cutting soil
949 mll
HighMountainGardening Hi, i am High Mountain Gardening.
Yesterday, on the 12. of October i checked my mails and saw the Zamnesia newsletter... contest... free beans... free jugs 😵 im in!
I had created a account on growdiaries a while ago but never posted anything, so i logged in and filled out the form for the contest, top choice Do Si Dos and off it goes!
With the feeling of a good day i layed back, rolled one up and looked up the shop page oft the Strain. 9-10 Weeks... oh sh!#
My 2x2 is in 12 h since 1 Week with 1 scrogged out Lava Cake from Zamnesia and the 4x4 houses 9 Autos that start to shoot the first preflowers.
And even if i had a empty Tent, 9-10 weeks flower + 1 week shipping + vegging = close call for end of January. That was problematic.
So i rolled a 2nd one and put on the thinking hat.
After intensive thinking and smoking i decided to sleep over it.
(Day 0)
On the next morning i had the saving idea! I do not have to grow the strain i had chosen in the form, by rule #5 i can participate with any one of the 5 strains...
And i have 1 free Biscotti seed from one of my last Zamnesia orders.
Biscotti only takes 8-9 weeks in flower and i can germinate right now! That's 2 Weeks saved!
so i mixed about 5% homemade worm castings in some Plagron Seeding & Cutting soil, worked half a teaspoon of Dynomyco in the spot where i planted that 1 seed 1cm deep direct into the substrate and watered with 20ml of rainwater.
I placed the pot in the 18/6 tent with the auto flowers and placed a humidity dome over the nursery pot.
The humidity was around 80% and day/night temp. of ca. 21/25 °C direct inside the dome.
(Day 3) [1]
After 48 hours i saw the soil lifting slightly and now, about 72 hours after planting the seed, she stands, not straight but that will change soon.
Shaded from the fan leaves of the big plants she receives about 75 - 100 ppfd*
(Day 4) [2]
In anticipation of the challenges ahead i channeled my inner Macgyver and went to work. I ended up with a 2nd "floor" in the auto flower tent.
Even tho i am not proud of it, it will be sufficient for a few weeks. At least i hope so.
She stands straight and full of vigor, praying towards the Mars Hydro TS 1000 Dimmed down to 25% (about 40W) and she doubled her height in the last 24 h.
Jeff got me those macro lens- filter thingys for my camera so i tried the +10 lens and the UV-filter.
The first three [2] pics are with this setup, the other two only with the UV-filter.
(Day 7) [3]
Yesterday the contest kit arrived! Thanks again @Plagron_Service and @Zammi_official
I can not wait to see the power buds results!
The first real leaves grow slowly but steady, the little deformation should not be a problem.
It could be that the 200-250 ppfd* she is receiving right now is a little to much.
I only feed a few drops of rainwater every day since she popped out, only 2 ore 3 ml right at the stem.
This is the end of the first week of my first grow diary, it is more fun than i anticipated and it feels a little bit like growing for the first time.
See you in a few days!
High Mountain Gardening
* i measure ppfd/dli with a app on my android phone. In no way the numbers are comparable with proper sensors ore a calibrated sensor on a phone.
despite that i can compare my measures that i made with the same phone and can get conclusions that way.😅👍 Much love 😤
7 likes
7 comments
Share
Used method
Directly In Substrate
Germination Method
1
Week 1. Vegetation3y ago


![Power Buds Plagron x Zamnesia / Biscotti. Week 1 - [2] Eleven days after the seed touched the soil](https://bucket.growdiaries.com/static/post/photo/146971/7522644_grow-journal-by-highmountaingardeningzamnesia-seedsbiscotti_m.jpg)
![Power Buds Plagron x Zamnesia / Biscotti. Week 1 - [2] I should get her a little bit support on the stem.](https://bucket.growdiaries.com/static/post/photo/146971/7522645_grow-journal-by-highmountaingardeningzamnesia-seedsbiscotti_m.jpg)
![Power Buds Plagron x Zamnesia / Biscotti. Week 1 - [2] The decision fell to support the stem with 20 l of soil that i sifted.](https://bucket.growdiaries.com/static/post/photo/146971/7522639_grow-journal-by-highmountaingardeningzamnesia-seedsbiscotti_m.jpg)
![Power Buds Plagron x Zamnesia / Biscotti. Week 1 - [2] than re amended](https://bucket.growdiaries.com/static/post/photo/146971/7522641_grow-journal-by-highmountaingardeningzamnesia-seedsbiscotti_m.jpg)
![Power Buds Plagron x Zamnesia / Biscotti. Week 1 - [2] and mixed](https://bucket.growdiaries.com/static/post/photo/146971/7522642_grow-journal-by-highmountaingardeningzamnesia-seedsbiscotti_m.jpg)
![Power Buds Plagron x Zamnesia / Biscotti. Week 1 - [2] a hand full of red wigglers that volunteered for the job](https://bucket.growdiaries.com/static/post/photo/146971/7522723_grow-journal-by-highmountaingardeningzamnesia-seedsbiscotti_m.jpg)
![Power Buds Plagron x Zamnesia / Biscotti. Week 1 - [2] Moisture reading is around 70 millibar](https://bucket.growdiaries.com/static/post/photo/146971/7522648_grow-journal-by-highmountaingardeningzamnesia-seedsbiscotti_m.jpg)
![Power Buds Plagron x Zamnesia / Biscotti. Week 1 - [2] a bit early](https://bucket.growdiaries.com/static/post/photo/146971/7522646_grow-journal-by-highmountaingardeningzamnesia-seedsbiscotti_m.jpg)
![Power Buds Plagron x Zamnesia / Biscotti. Week 1 - [2] and hopefully not a mistake](https://bucket.growdiaries.com/static/post/photo/146971/7522649_grow-journal-by-highmountaingardeningzamnesia-seedsbiscotti_m.jpg)
![Power Buds Plagron x Zamnesia / Biscotti. Week 1 - [2] 6-6-9 organic fertilizer of my choice](https://bucket.growdiaries.com/static/post/photo/146971/7523058_grow-journal-by-highmountaingardeningzamnesia-seedsbiscotti_m.jpg)
![Power Buds Plagron x Zamnesia / Biscotti. Week 1 - [2] the backside for those who are interested](https://bucket.growdiaries.com/static/post/photo/146971/7523063_grow-journal-by-highmountaingardeningzamnesia-seedsbiscotti_m.jpg)
![Power Buds Plagron x Zamnesia / Biscotti. Week 1 - [2] the stone meal i use for my soil](https://bucket.growdiaries.com/static/post/photo/146971/7523066_grow-journal-by-highmountaingardeningzamnesia-seedsbiscotti_m.jpg)
12 cm
Height
18 hrs
Light Schedule
27 °C
Day Air Temp
No Smell
Smell
80 %
Air Humidity
21 °C
Night Air Temp
20 l
Pot Size
0.1 l
Watering Volume
30 cm
Lamp Distance
Nutrients 1
Effective Microorganisms EM 1
5 mll
HighMountainGardening The growth happens slowly but steady, all i can do is to try to keep the environmental conditions as ideal as possible.
A small humidity dome helps a lot with that.
My other plants received a watering with EM1 effective microbes. It is a product used in KNF for bokashi and as a soil vitalizer and compost enhancer based on molasses .
I water with a mixture of 5ml per liter about weekly. It is quiet a inexpensive product, Jeff sends a 1 liter bottle you're way for about 10€ inc. shipping.
You can get similar stuff with a few 100% green-tax on top but i like to find products that don't make me feel like i am getting ripped of.
As the nursery pot was a little bit dry ill gave the little plant also a few drops from the mixture a bit further away from the stem.
Day 11
The growth rate turned up a little bit and the lengthy stem started to worry me more and more.
I saw that the soil that i had amended on the weekend already had mycelium growing visible.
That is normaly the time when the soil is ready to go.
So i wasted no more time and transplanted with a good buffer of seeding soil around the root-zone of the Biscotti.
My normal way of growing is the living soil style, i like to see the soil as a sort of buffet witch the plant can choose from and get served by billions of little waiters that cant wait to bring the plant the nutrient she wants to get a little tip of carbohydrates in exchange.
But i am also ok with giving her the munchies with some natural growth stimulants, microbial inoculates or even some flower booster, looking at you @Plagron_Service. If you never tried Green Sensation, i dare you to. It is really good! We will see how Power Buds performs but,knowing Plagron, ill expect a good outcome.
The growth and bloom main fertilizers instead ill only use in emergency witch accrues rarely.
The Soil ill mix myself has a lot of different inputs witch vary a bit from time to time because ill do it by hand without exact measuring.
For this batch ill used about 60% reused soil that had only cover crop and a tomato growing in it for the last 3 months on the balcony. No fertilization during that time.
The other ingredients i list below with name; ca. amount; where i get it and what i want to archive with it.
Peat
about 3l; Floratorf from Floragard is pure unfertilized white peat the 100l bale for about 15€.
It aerates the substrate and gives it a fluffy and light structure.
Homemade Worm-castings
about 2l.
It ads rich biodiversity a multitude of micro and macro nutrients some directly plant available others ready to be transformed by the microbes and fungi. It builds humus and is also a pH buffer.
Pumice gravel
about 2l; you can get a 25kg bag for about 20€ in a hardware store, Jeff has smaller bags for a few €'s
Pumice is rich on trace minerals, silica, calcium and manganese witch gets released very slowly, so the next time i am amending this soil i will not put new pumice in it.
The porous structure makes it a great water absorber and aeration.It is hideout and breeding ground for microbes-
Rice Hull
about 2 l; a home brew shop from Belgium sells 200l bales for 17€. With shipping i had to pay 40 but that is still way cheaper then 10l for 12,99 on Amazonk.
It also aerates the substrate and it is very rich on silica witch strengthens the cell walls and is mandatory for a robust healthy plant.
Brown Kelp
A Hand full, ill buy the powder sold for homemade dog-food. It is 100% pure Kelp from the Baltic sea 500g cost about 12€
It is rich on natural plant growth hormones and has the whole periodic table of elements for the plant to choose from
Neem seed powder
A Hand full, you can find bagged stuff from oil mills for a few €'s per kg it is basically wast for them.
The Microbes feast on it and insects do not like it. I am not sure if it really helps with pest prevention but it is another food source for the soil-food-web so why not.
Ground up soap nut
about a Tablespoon, 200g for 2€ in the Supermarket. You have to grind them up, ill used a little electric kitchen chipper.
it increases the water holding capacity of the soil and prevents dry spots that can get hydrophobic.
Different Pellets
about 3-4 hand full, ill use food pellets for rabbits with alfalfa and other clovers as well as soft wood pellets that are sold as organic cat litter.
When that stuff gets wet it breaks down in very small pieces and gets plant available very fast thru decomposition.
Cuxin Orgasan
about 300g; Orgasan is a organic slow release fertilizer made for regular organic gardening. It has a N-P-K ratio of 6-6-9, is designed to release its nutrients with the help of the soil life in about 75 days and the 20 kg bag is regular about 50€ but i got the last on for only 42€ from a sales campaign. That is 2,10€ per kg... similar product with green tax: 0,15kg for 4,95€...
The stuff is made out of cocoa shells, hoof, vinasse, feathers, grape pomace, grape seed, cocos, bone meal, tobacco dust and sunflower seed.
It is a good product and the price speaks for itself.
Activated stone meal
about a hand full, this is normal stone meal enriched with effective microorganism for the use in terra preta.
25kg for 21,50€
And about a dozen red wigglers to colonize the 20l and have a blast at the big buffet
Puh, i hope i did not forget something, if i did, ill ad it later. Let me know if you want to know something more specific or links to products.
Have a great week everyone!
High Mountain Gardening
6 likes
3 comments
Share
2
Week 2. Vegetation3y ago


![Power Buds Plagron x Zamnesia / Biscotti. Week 2 - [2] 21 Days after the seed touched the soil.](https://bucket.growdiaries.com/static/post/photo/146971/7557539_grow-journal-by-highmountaingardeningzamnesia-seedsbiscotti_m.jpg)
![Power Buds Plagron x Zamnesia / Biscotti. Week 2 - [2] The light is now about 50% with 30cm distance.](https://bucket.growdiaries.com/static/post/photo/146971/7557540_grow-journal-by-highmountaingardeningzamnesia-seedsbiscotti_m.jpg)
![Power Buds Plagron x Zamnesia / Biscotti. Week 2 - [2] The foliar spray i used left a few rust marks but that is no problem.](https://bucket.growdiaries.com/static/post/photo/146971/7557541_grow-journal-by-highmountaingardeningzamnesia-seedsbiscotti_m.jpg)
![Power Buds Plagron x Zamnesia / Biscotti. Week 2 - [2] Nice!](https://bucket.growdiaries.com/static/post/photo/146971/7557542_grow-journal-by-highmountaingardeningzamnesia-seedsbiscotti_m.jpg)
16 cm
Height
18 hrs
Light Schedule
27 °C
Day Air Temp
No Smell
Smell
70 %
Air Humidity
21 °C
Night Air Temp
20 l
Pot Size
0.1 l
Watering Volume
30 cm
Lamp Distance
Nutrients 2

Vita Race
1 mll

Sugar Royal
1 mll
HighMountainGardening Day 15
I was out of town over the weekend and she was not bothered at all.
The growth starts to speed up and the top half of the stem is way thicker than the bottom half
but i am sure the lower stem going to catch up in no time.
Day 21 [2]
The last 3 days she exploded in size and starts to form the first branches.
I sprayed her with Vita Race, a fertilizer with iron and other micro nutrients, in a low dosage.
The Moisture reading was around 90 mbar this morning so i watered with about 500ml of rainwater with 0,5ml of Plagrons Sugar Royal.
Now it is back in the optimal zone.
The TS 1000 delivers about 600 ppfd* at 50% with 30cm distance.
Have a nice Weekend everyone and happy growing!
* i measure ppfd/dli with a app on my android phone. In no way the numbers are comparable with proper sensors ore a calibrated sensor on a phone.
despite that i can compare my measures that i made with the same phone and can get conclusions that way.😅👍 Much love 😤
5 likes
2 comments
Share
3
Week 3. Vegetation3y ago


8 cm
Height
18 hrs
Light Schedule
27 °C
Day Air Temp
No Smell
Smell
65 %
Air Humidity
21 °C
Night Air Temp
20 l
Pot Size
0.1 l
Watering Volume
30 cm
Lamp Distance
Nutrients 1
Sugar Royal
1 mll
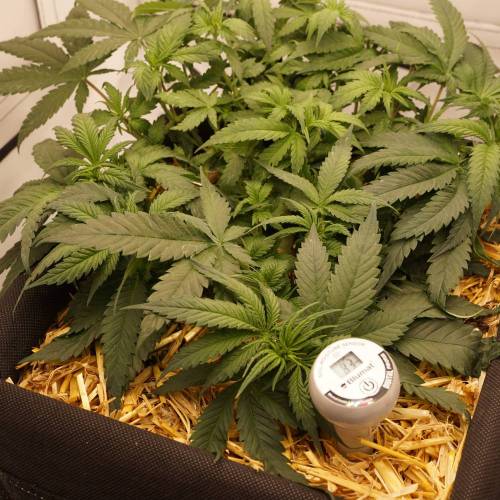
HighMountainGardening Day 23
To make the deadline for the contest i have to flip at the end of November.
That is why i opted against topping because i can not risk to stunt her for a few days.
A strict LST will keep all tops at the same height and the growth hormones evenly distributed.
So i got to work and fixated her with a 90° LST-clip (25pcs. pack for 3€, Zamnesia) and 2 bows made from wire-hangers.
The bows are 25 cm on each side and i bent the tips in an 135° angle away from the center so that they anchor themself in the soil.
I squeezed both sides together while pushing them in to the soil and release them to spread when they sat deep enough.
The stability will be important later on when the plant gets bigger.
Day 24
After just 24h all branches/tops redirected they're growth.
Hopefully she continues to respond that well to training, the bending was easy and i had no fear of breaking the stem.
Other plants sometimes feel way more fragile but this one likes to get bent over and is quite flexible. Ahhh what? Sorry 😳
With the Blumat Digital (45€ at the Blumat Web-shop) i can keep the moisture in the soil at the optimal level.
Ill bottom water with Sugar Royal 1:1000 in rainwater whenever the tensiometer is at about 90-100 mbar.
Half a liter brings the reading down to around 50 mbar.
The lighting situation is the same as last week but she is now about 10 cm further away from the light.
I am not lowering the light because the intensity was a little high for the growth stage.
I will continue to train her for now. Building a ScrOG frame is the other option i consider, what training method would you chose for the given circumstances?
Have a relaxed week everyone!
High Mountain Gardening
7 likes
5 comments
Share
Used techniques
LST
Technique
4
Week 4. Vegetation3y ago


10 cm
Height
18 hrs
Light Schedule
27 °C
Day Air Temp
No Smell
Smell
65 %
Air Humidity
21 °C
Night Air Temp
20 l
Pot Size
0.1 l
Watering Volume
30 cm
Lamp Distance
Nutrients 1
Sugar Royal
1 mll
HighMountainGardening Day 26
3 days after the bending i removed the two biggest leafs to allow all the little side branches to receive light without being shaded.
She got fed 500ml of Sugar Royal and rainwater 1:1000 witch brought the moisture reading down to 40 mbar.
A bit too wet but 2 days later the reading was back to normal (around 60 mbar) and another 4 leaves had to go.
I also redirected the top to the right and fixated it with another wire bow.
Now all side branches have reached about the same height and it seems that the growth energy is evenly split as it is intended with this kind of training.
I will update the diary every Sunday from now on because the multiple edits of the week won't show up as updates and may get overseen because of that.
And this is still a contest, right? 😅😉
As a sneak peak of things to come, a little nugshot from the 2x2, day 35 flower. Enjoy! 😊
As always, i hope all of you have a relaxed and nice week ahead.
High Mountain Gardening
6 likes
7 comments
Share
Used techniques
LST
Technique
Defoliation
Technique
5
Week 5. Vegetation3y ago


15 cm
Height
18 hrs
Light Schedule
29 °C
Day Air Temp
No Smell
Smell
55 %
Air Humidity
21 °C
Night Air Temp
20 l
Pot Size
0.1 l
Watering Volume
25 cm
Lamp Distance
HighMountainGardening The 5th week of the vegetative phase reaches it's end, over the last week she gained a lot of mass and the branches grow equally at least 1cm per day.
Ill kept the Sugar Royal in the drawer this week because she definitely don't need more nitrogen. The feeding was a mix of rain and tap water 50/50.
My tap water here has 100mg calcium and 23mg manganese per liter (that is considered "very hard") and also a pH of 7.4 so i dilute and pH down it with rain water.
So what the hell is cal-mag and what do you use it for? i do not get it.. 😇 jk.
Ill just use both water sources in varying parts. If i see stems get a bit red ill give more rainwater to lower the pH, if the leaves pale a little bit ill give more tap water to counter the deficit.
Normally the initial amendment is enough to get my plants trough the whole cycle so if there is a problem, it is most of the time related to water or environmental conditions.
Today i grabbed some wire hooks and started to redirect the biggest branches to my liking, spreading them out towards the opposite side of the pot.
I have to check and adjust every day from now on, so in the end ill end up with something reassembling a ScrOG'ed Plant without a ScrOG frame.
To archive that ill have to stay unyielding with my metal wires.
Next week is the last full week in vegetative growth. I am still unsure how i will get every plant in the right light cycle. Some of the auto-flowers are not ready in a week or two so ill probably will put them on 12/12 too.
I don't think that this change will have a massive influence on the outcome of the late auto's.
The Phlizon FD6500 illuminating the auto's right now is at 60% so i can ramp up the intensity to get the same dli* at the end of each light cycle.
If i only had more room. Hopefully that turns out as i hope.
Enjoy you're week everyone and be save!
High Mountain Gardening
* i measure ppfd/dli with a app on my android phone. In no way the numbers are comparable with proper sensors ore a calibrated sensor on a phone.
despite that i can compare my measures that i made with the same phone and can get conclusions that way.😅👍 Much love 😤
1 like
comments
Share
Used techniques
LST
Technique
6
Week 6. Vegetation3y ago


15 cm
Height
18 hrs
Light Schedule
29 °C
Day Air Temp
No Smell
Smell
55 %
Air Humidity
20 °C
Night Air Temp
20 l
Pot Size
0.5 l
Watering Volume
25 cm
Lamp Distance
HighMountainGardening Hello and welcome to the 6th. and last week of vegetative growth!
After just checking, watering and adjusting the hooks for the longest part of the week the time has come to get the scissors out.
I took about 2 dozen of leaves that shaded or blocked the growth of nodes.
Then, with the help of some more hooks, i consolidate the the growth direction of all main branches.
Today everything looks great and the plant grows a bit faster every day.
After checking the pictures i realized that the structure is quiet hard to make out if you can't see it three dimensional,
so i made a crude graphic (sort of) to convey my process.
I finally figured out how to get everything in the right light cycles!
I bought another Tent... so if i do not update next week, the missis probably chopped my head of.
I found a small brand that is not even listed in the "Tents" section of growdiaries: FYTO
The quality is amazing, on par with Homebox! I snatched a "Base G65" for a good deal.
It is 65 x 65 x 170cm, a size i have never seen before and coincidentally fits exact in the only space that is available right now.
The Light i am going to use is the Phlizon PH-B6-M, a 50 x 50 cm 6-bar light with 320W.
It is way to much power for that space but it is collecting dust, i can dim it to my liking and i got that fixture for cheap.
So why not? I will show the equipment in the upcoming weeks.
That is all for this week, as soon as i can get the new setup going i will move her to her new home and flip to 12/12.
Time is ticking and the contest page states : 66 days left.
I heard that a 11/13 light cycle in the later part of the flower phase can speed up the ripening,
Have you guys experience with that technique? What are you're thoughts abut it?
Anyway, as always, have a relaxed week everyone!
High Mountain Gardening
1 like
comments
Share
Used techniques
LST
Technique
Defoliation
Technique
7
Week 7. Flowering3y ago


20 cm
Height
12 hrs
Light Schedule
29 °C
Day Air Temp
No Smell
Smell
45 %
Air Humidity
20 °C
Night Air Temp
20 l
Pot Size
0.5 l
Watering Volume
35 cm
Lamp Distance
Nutrients 5

Alga Bloom
1 mll

Green Sensation
1 mll

Power Buds
1 mll
HighMountainGardening Hi, nice that you check on my progress!
A lot of things happened last week, at Monday the new tent arrived and it was ready for the lady in record time.
From there on she received 12 hours of light and now on Sunday the stretch is setting visibly in.
i spayed her with Plagron's Vita Race every other day with a low dosage and fed a light boost mix with each 1 ml/l of Alga Bloom; Green Sensation; Power Buds and Sugar Royal
whenever the moisture reading called for it.
I kept all tops low and will continue doing that till the stretch slows down.
At that point the 0,42 m2 should be filed out.
I am so happy with the new tent, the extra possibility's with that space are huge for me!
Small pheno-hunt's, a small stash of mom-plants and a perpetual harvest!
I am very exited for the things to come.
What piece of equipment did you get from the black-week?
I wish everybody a nice week and a chilled 1st advent.
High Mountain Gardening
2 likes
comments
Share
Used techniques
LST
Technique
8
Week 8. Flowering3y ago


20 cm
Height
12 hrs
Light Schedule
29 °C
Day Air Temp
No Smell
Smell
45 %
Air Humidity
20 °C
Night Air Temp
20 l
Pot Size
1 l
Watering Volume
45 cm
Lamp Distance
Nutrients 4
Alga Bloom
2 mll
Green Sensation
1 mll
Power Buds
1 mll
HighMountainGardening Hi and thanks for passing by,
This week she is going strong, sadly there a still no flower sides forming yet after 14 Days since the flip.
My nice time plan is running through my fingers. There is no way my pheno will finish in 8-9 weeks.
Defoliation and Lollypopping is planed for when the stretch comes to a halt.
I give a light feeding every second watering to support her hunger. For the right time to water ill reference the Blumat Tensiometer as always.
I am going to change the light cycle to 11/13 at around day 30-35, i read a bit about it the last week and it seems to speed up the ripening a bit.
Right now she receives around 900 ppfd* in the center and the light is only at 50% so i can get the same dli* in a bit shorter light cycle without a problem,
60% is almost 200W for 0.42 m2 that should be more than enough.
Hopefully there is more to talk about next week.
Be save in the pre-christmas madness, have a nice week!
High Mountain Gardening
* i measure ppfd/dli with a app on my android phone. In no way the numbers are comparable with proper sensors ore a calibrated sensor on a phone.
despite that i can compare my measures that i made with the same phone and can get conclusions that way.😅👍 Much love 😤
3 likes
2 comments
Share
Used techniques
LST
Technique
9
Week 9. Flowering3y ago


30 cm
Height
12 hrs
Light Schedule
29 °C
Day Air Temp
No Smell
Smell
45 %
Air Humidity
20 °C
Night Air Temp
20 l
Pot Size
1 l
Watering Volume
45 cm
Lamp Distance
Nutrients 4
Alga Bloom
2 mll
Green Sensation
1 mll
Power Buds
1 mll
HighMountainGardening Hello and a happy 3. Advent to you!
The last week was a bit hectic due to a full schedule outside the grow room.
That did not hold her back and the long awaited bud development was visibly setting in at day 15.
I kept adjusting the hooks and wires witch i used to direct her growth till now, that is over now.
Since Thursday (14.12) i had let her go up and she started to pull all the wires out of the
ground and up except the 3 big one's i have placed in week 3 and 4, they are anchored in the soil as planed.
I will end up removing all but the 3 big hooks in a day ore two.
In the same plant care session i try to get the lollipopping done but that will not be easy and maybe
I'll have to do a second round after a day ore two.
The light distance is now at around 50cm, power at 50%/160W and she gets about 1 liter of feeding listed above
plus some additional rainwater if the Blumat sensor is above 90 mbar.
Next week is going to be even more hectic, hopefully you get a few hours to relax.
Be save and, if you not going to check in on the 24, Merry Christmas!
High Mountain Gardening
3 likes
comments
Share
Used techniques
LST
Technique
10
Week 10. Flowering3y ago
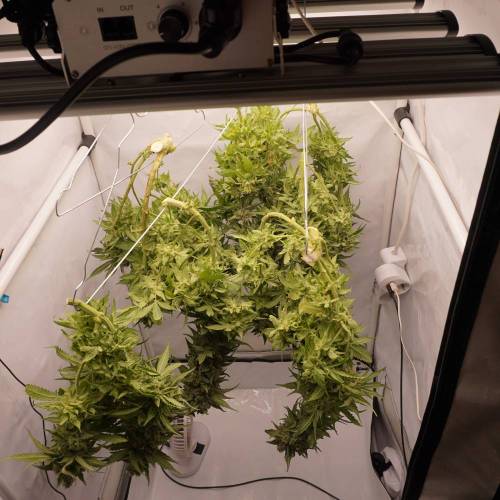
![Power Buds Plagron x Zamnesia / Biscotti. Week 10 - [Day22] of the 12/12 light cycle](https://bucket.growdiaries.com/static/post/photo/146971/7725003_grow-journal-by-highmountaingardeningzamnesia-seedsbiscotti_m.jpg)
![Power Buds Plagron x Zamnesia / Biscotti. Week 10 - [Day22] i decided to defoliate and lollypop](https://bucket.growdiaries.com/static/post/photo/146971/7725004_grow-journal-by-highmountaingardeningzamnesia-seedsbiscotti_m.jpg)
![Power Buds Plagron x Zamnesia / Biscotti. Week 10 - [Day22] a 5 liter bucket full of leaves](https://bucket.growdiaries.com/static/post/photo/146971/780d9e7da68c0cef049883230073e395_m.jpg)
![Power Buds Plagron x Zamnesia / Biscotti. Week 10 - [Day22] and around 30 underdeveloped budsights got removed](https://bucket.growdiaries.com/static/post/photo/146971/7725011_grow-journal-by-highmountaingardeningzamnesia-seedsbiscotti_m.jpg)
![Power Buds Plagron x Zamnesia / Biscotti. Week 10 - [Day22] all but 2 wires and LST clips got removed too.](https://bucket.growdiaries.com/static/post/photo/146971/7725006_grow-journal-by-highmountaingardeningzamnesia-seedsbiscotti_m.jpg)
![Power Buds Plagron x Zamnesia / Biscotti. Week 10 - [Day28] 6 days later there is massive progress](https://bucket.growdiaries.com/static/post/photo/146971/7725009_grow-journal-by-highmountaingardeningzamnesia-seedsbiscotti_m.jpg)
![Power Buds Plagron x Zamnesia / Biscotti. Week 10 - [Day28] the canopy is filled out again](https://bucket.growdiaries.com/static/post/photo/146971/7725007_grow-journal-by-highmountaingardeningzamnesia-seedsbiscotti_m.jpg)
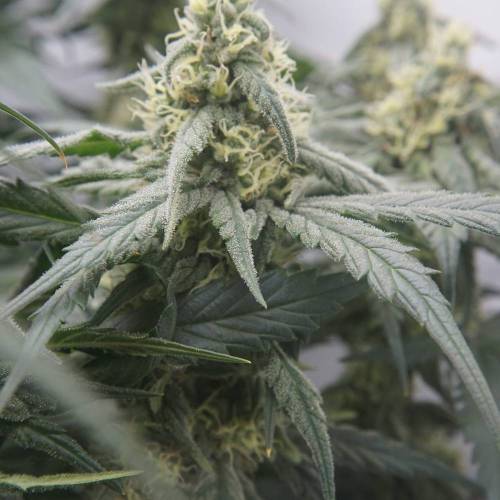
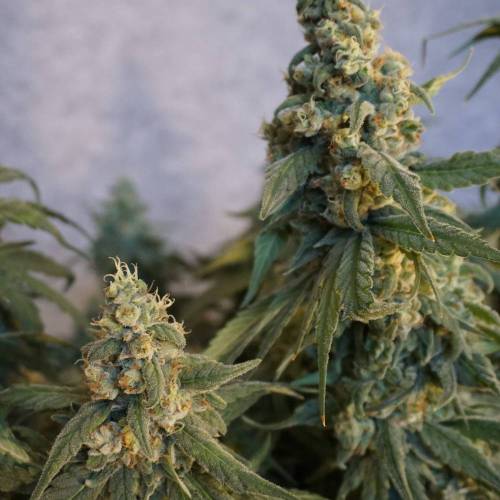
![Power Buds Plagron x Zamnesia / Biscotti. Week 10 - [Day28] and Plagron's "Power Buds" is on full throttle](https://bucket.growdiaries.com/static/post/photo/146971/4fcc90ccaaecb0c2b1f1284ed5441ac3_m.jpg)
![Power Buds Plagron x Zamnesia / Biscotti. Week 10 - [Day28] the second wire bow is hard to see, the stem enclosed it almost fully](https://bucket.growdiaries.com/static/post/photo/146971/7725010_grow-journal-by-highmountaingardeningzamnesia-seedsbiscotti_m.jpg)
![Power Buds Plagron x Zamnesia / Biscotti. Week 10 - [Day28]... Plagron Bloom Bosters and supplements seem to work great!](https://bucket.growdiaries.com/static/post/photo/146971/7725015_grow-journal-by-highmountaingardeningzamnesia-seedsbiscotti_m.jpg)
![Power Buds Plagron x Zamnesia / Biscotti. Week 10 - [Day28] i screwed the macro lens on](https://bucket.growdiaries.com/static/post/photo/146971/8a333fa476c0c52eef103495acae7f7c_m.jpg)
![Power Buds Plagron x Zamnesia / Biscotti. Week 10 - [Day28] trichomes already forming on the bigger leaves, she's going to be frosty](https://bucket.growdiaries.com/static/post/photo/146971/bf5de6076e617a8db4920a6c4336b82e_m.jpg)
![Power Buds Plagron x Zamnesia / Biscotti. Week 10 - [Day28] Biscotti's growth structure is awesome, great job Zamnesia!](https://bucket.growdiaries.com/static/post/photo/146971/b0b7128b17e34014e87aa261b341b050_m.jpg)
![Power Buds Plagron x Zamnesia / Biscotti. Week 10 - [Day28] maybe i will defoliate again in a week ore two.](https://bucket.growdiaries.com/static/post/photo/146971/7725017_grow-journal-by-highmountaingardeningzamnesia-seedsbiscotti_m.jpg)
45 cm
Height
12 hrs
Light Schedule
29 °C
Day Air Temp
No Smell
Smell
50 %
Air Humidity
20 °C
Night Air Temp
20 l
Pot Size
1.5 l
Watering Volume
45 cm
Lamp Distance
Nutrients 4
Alga Bloom
2 mll
Green Sensation
1 mll
Power Buds
1 mll
HighMountainGardening Welcome back and Merry Christmas/ few days off of work!
Ill have to keep it short this week, in true Christmas tradition i am going to run around like a headless chicken for the next days after i am done writing this.
On Monday evening (the 18.12.) ill got the scissors out and did her dirty.
I removed the small buds that were underdeveloped and would end up as airy buds/ larvae.
And that is something i attempt to improve on: bud structure, bag appeal, looks ore whatever people call it.
A 5 liter bucket full of leaves got removed too and she loved it!
Just 6 days later the progress is massive and the canopy filled out already again.
The buds pack on mass remarkable, it is going to be a rich yield.
I already think about doing a second defoliation but that has to wait till next year.
Hopefully ill get the update for next week done in time, till then
have a holy and silent time, stay lifted and be nice to you're neighbor.
High Mountain Gardening
3 likes
1 comment
Share
Used techniques
Defoliation
Technique
11
Week 11. Flowering3y ago


50 cm
Height
12 hrs
Light Schedule
29 °C
Day Air Temp
No Smell
Smell
50 %
Air Humidity
20 °C
Night Air Temp
20 l
Pot Size
2 l
Watering Volume
45 cm
Lamp Distance
Nutrients 2
Green Sensation
1 mll
Power Buds
1 mll
HighMountainGardening Hi Everyone!
I hope you started out good into the new Year!
For me the GD- Web side acted up and and as i got it resolved i did not had time at all to write the post.
So 2 for 1 today!
I still think something is not right with the diary form it seems so crude and off 🤔
Anyway, in the last week of '23 i changed the feed to 1 day water only 1 day 1ml Green Sensation and 1 ml Power Buds.
A light topdress made from wormcastings and insect frass is topped onto and washed into the mulch to give the feeder roots
a airy structure to grow in and absorb the fresh nutrients.
There is nothing much to do from now on, just keeping the soil moisture in the optimal range and the air humidity under 50%.
Have a nice day, maybe there will be a update a bit faster this time.
High Mountain Gardening
likes
comments
Share
12
Week 12. Flowering3y ago


50 cm
Height
12 hrs
Light Schedule
29 °C
Day Air Temp
Weak
Smell
50 %
Air Humidity
20 °C
Night Air Temp
20 l
Pot Size
2 l
Watering Volume
40 cm
Lamp Distance
Nutrients 2
Green Sensation
1 mll
Power Buds
1 mll
HighMountainGardening Hi and thanks for checking out the latest update!
Due to problems with the webside and the normal runaround over the Christmas/New Year i missed a update.
I just managed to take some pictures on new years eve so two weeks in one day.
The progress is noting less than amazing, she drinks at least 2 liters a day and the 8 day old topdress is already
filled out with feeder roots.
In the macro pictures you can see that there is still a lot of room to thicken up.
I will keep the light feeding from last week for now.
The light cycle is now reduced to 11 hours of light to speed up the ripening, we will see how that goes.
The dimmer is turned up another 10% to keep the dli* at the same level as on 12 hours light, if not higher.
Around 180 W from the wall, that should be sufficient.
Not much i can do from now on. Just keep her happy and watch the environment.
I hope you all have a great week!
High Mountain Gardening
* i measure ppfd/dli with a app on my android phone. In no way the numbers are comparable with proper sensors ore a calibrated sensor on a phone.
despite that i can compare my measures that i made with the same phone and can get conclusions that way.😅👍 Much love 😤
likes
comments
Share
13
Week 13. Flowering3y ago


50 cm
Height
11 hrs
Light Schedule
29 °C
Day Air Temp
Normal
Smell
50 %
Air Humidity
17 °C
Night Air Temp
20 l
Pot Size
2 l
Watering Volume
40 cm
Lamp Distance
HighMountainGardening Hi and welcome back,
The 11 hour light cycle and the cut out of any feeding beside water starts to show results.
Even tho still thickening up the flowers start to develop slight color patterns and not so slight smell.
I hope to see ripening in the leaves starting soon.
Ill keep the night temps a bit lower than usual to do everything possible to make the deadline in 2 weeks.
Zooming in on the trichomes makes me think that i am going to get some great Pictures on the 31.
and some even greater smoke 2 to 3 weeks into February.
Hope you guys have success in the grow too and overall a good week,
see you next weekend,
High Mountain Gardening
1 like
comments
Share
14
Week 14. Flowering3y ago


50 cm
Height
11 hrs
Light Schedule
29 °C
Day Air Temp
Strong
Smell
45 %
Air Humidity
17 °C
Night Air Temp
20 l
Pot Size
1 l
Watering Volume
40 cm
Lamp Distance
HighMountainGardening Hi and thanks for checking out the progress!
This week the colors started to show a little more and the water intake is almost half compared to last week.
In the pictures when zoomed in you can see that the trichomes still need a few more days.
The majority of them is milky and the few amber ones are located on the sugar leafs.
Ill keep her happy for the next week and will decide then when to harvest.
Make sure to check out next week, a lot of photos are on the way!
Hope you have a good week and ice free roads, be save!
High Mountain Gardening
1 like
1 comment
Share
15
Week 15. Flowering2y ago


50 cm
Height
11 hrs
Light Schedule
29 °C
Day Air Temp
Strong
Smell
45 %
Air Humidity
17 °C
Night Air Temp
20 l
Pot Size
1 l
Watering Volume
40 cm
Lamp Distance
HighMountainGardening Hello and thanks for checking out the last week of flower and the Power Buds contest!
I am so happy with the outcome, @Zammi_official hooked me up with some great genetics and even tho i did not get the mental beauty of a pheno that the homie @Breadandbuds got,
i will end up with a massive stack of huge nugs that look beautiful and are easy to trim.
@Plagron fueled the chonkey buds with their awesome new Power Buds additive.
Thanks, now i have to buy extra wide Jars... great job Plagron! 😘
And a big thanks to everyone who checked out my diary!
Good luck to all participants, i would not want to be in the judges shoes.
All the best to you!
I will post the harvest update on 31. evening.
have a nice evening,
High Mountain Gardening
1 like
comments
Share
16
Week 16. Harvest2y ago
Happy Harvest Day!


10/10
Rated
It was a pleasure to grow this plant, she responded great to stress/LST and took the high light levels like it was nothing.
She supported the big and heavy buds all by herself, no trellis needed to keep them from falling over.
The yield seems to be quiet big but i will update the report when i add the smoke report.
Overall a great experience, Zamnesia always had great genetics for me so far and always a fair price.
I am pretty sure that this seed came in a Zamnesia Mystery box for 80€. I think it payed for itself... 😋
Show more
Translate
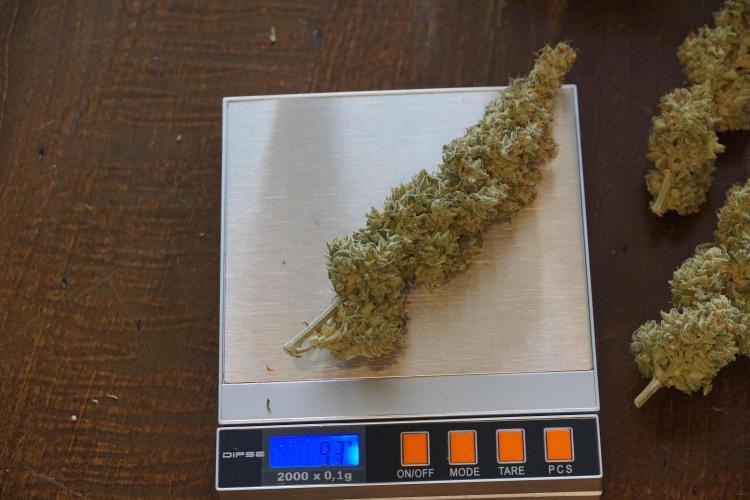
Spent 107 days
Ger Veg Flo Har
1127 g
Bud wet weight per plant
168.6 g
Bud dry weight per plant
1
Plants
0.42 m²
Grow Room size
Easy
Difficulty

Happy, Relaxed, Uplifted
Positive effects

Stress, Depression
Medical effects

Herbs, Pine, Sweet
Taste
Height
Day air temperature
Air humidity
Light schedule
Night air temperature
Pot size
Lamp distance


HighMountainGardening Dear community,
we came together on this gray Wednesday evening to say our goodby to miss Biscotti.
She was strong for the last 16 Weeks and she probably could had 1 ore even 2 more good weeks,
but the end of the contest was her end to. Thanks to GD we will always be able to come back here and remember her in all her beauty.
Clowning aside, i had to fight with the over thumb thick stem quiet a bit till i got her chopped up into 7 pieces that totaled to 1,127 kg wet plant with many leaves and all stems.
Why is this number relevant? there is almost no correlation between this number and the final dry weight, but ok, here you go.
I left her hang on the tripod for a few minute. The light got raised to the top of the tent.
The Tent itself got cleaned out with alcohol disinfection spray and the fans got positioned to move the air but not directly at the plant.
I will monitor the humidity closely and will make sure it stays around 60% +/- 5% and if possible below 20°C
Shots from the dried and trimmed bud's as well as the smoke report will be online as soon as possible.
Now starts the hardest time, gladly my stash supports a little longer wait for her to get done.
Anyway, thanks a lot to everybody who read trough my first diary and even more to the guys who took a little extra time out of they're day to comment, give tips, like and overall spreading positive vibes!
You guys rock! Keep doing you're thing,
growers love ,
High Mountain Gardening
5 likes
1 comment
Share
Equipment Reviews


29 comments
Sort by
popularity
popularity
newest
oldest

Patricia_Zamnesia  commentedweek 03y ago
good luck 🍀💙
likes 5

HighMountainGardening commented3y ago
@Patricia_Zamnesia, thank you for the Seeds and the good wishes! Good luck and no pests to all participants!❤️
likes 3

BudBoutique commented3y ago
@Patricia_Zamnesia, love ya support Patricia 💚
likes 2

love_2_grow commentedweek 03y ago
Happy Growing, Buddy! 🌱🌱🌱
likes 3
HighMountainGardening commented3y ago
@love_2_grow, Thanks man, same to you!
likes 3
love_2_grow commented3y ago
@HighMountainGardening, Thank you :)
likes 3

IndicaVibeMe commentedweek 13y ago
Yeah I'd say to burying her a little bit, I had to with mine
likes 3
HighMountainGardening commented3y ago
@IndicaVibeMe, yeah, i think that is the save way, ill do that when lights go back on in 1 hour.
Thx for the tip!
Happy growing!
likes 2
BudBoutique commentedweek 03y ago
Pretty nice start - going to think about womcasting and plagron seedling soil mixing as well. sounds pretty nice
Good luck and have fun buddy. Plagron and Zamnesia really amazing!
likes 3
HighMountainGardening commented3y ago
@BudBoutique, Thanks Mate! They are indeed! All the best to you. ❤️
likes 3

Herbie101 commentedweek 43y ago
This looks great buddy! Awesome diary and great pics! Keep up the good work! happy growing🌱🌞🍀
likes 2
HighMountainGardening commented3y ago
@Herbie101,
Thanks a lot, ill try to write a diary as i would like to read it.
The 10 years old Sony Alpha 6000 does the heavy lifting on the photos, the automatic is great on that camera.
Anyway, thanks again and happy growing to you to!
like 1
Herbie101 commented3y ago
@HighMountainGardening, Thats so nice! Its a joy to read good written diaries! Love it!💚
like 1

Lemonhazelover commentedweek 33y ago
Living soil ☘️
likes 2
HighMountainGardening commented3y ago
@Lemonhazelover, 💚 my favorite way 🥦 Much love
likes 2
Lemonhazelover commented3y ago
@HighMountainGardening,💚
likes 2

Plagron commentedweek 83y ago
unfortunaly no flowers yet but I am sure they will come soon. So far er very nice dark green color plant.
likes 2
HighMountainGardening commented3y ago
@Plagron,
thanks for checking out my diary and for the great contest-starter pack!
She started with flowers just the next day and it is looking good.
Check my Update after Sunday to see Power Buds at work! 😵🥦🥦🥦
likes

DoughHead commentedweek 43y ago
Goodluck! Really dark green be mindful of to much N in the soil.
likes 2
HighMountainGardening commented3y ago
@@DoughHead,
Thanks, i am mindful of that. Ill cut out the sugar royal because it has N in it. the rest is organic inputs and hopefully will not be a problem in the near future.
Happy growing to you to! 🥦💚
like 1

Golden commentedweek 33y ago
Coming along nicely, keep up the good work growmie 💚🍀
Cheers, Golden 🌞
likes 2
HighMountainGardening commented3y ago
@Golden, i will, thanks for the kind words, Cheers mate! 💚
like 1

Green_Man_420 commentedweek 23y ago
Looking good bro ✌️👊🏻
likes 2
HighMountainGardening commented3y ago
@Green_Man_420, thanks mate! Zamnesia has some solid genetics, ill just provide the environment 😊
Happy growing! ✌️
likes 2

Bread_n_Buds commentedweek 143y ago
Not purple but super well growed and structrured my friend you will be very happy too
likes 2

DisTentAint4Campin commentedweek 103y ago
Oooo laaa laaa she is stacking up nice 👌
likes 2

Tmasm commentedweek 43y ago
Boas sorte 🤞feliz crescimento 🤛😃
like 1
HighMountainGardening commented3y ago
@Tmasm,
Thanks man, same to you! 💚🥦
likes
Patricia_Zamnesia commentedweek 162y ago
Looking good!!
likes

the end.
Enjoying this diary? Follow for more updates!


Prefer the old Diary view?
Go back to the old Diary view