
2xGSC-COCO-COBs


VEG
Fission 300W Light Emitting Diodes/200W
Custom
FLO
Fission 300W Light Emitting Diodes/500W
Custom


Indoor
Room Type
LST
weeks Technique
11 l
Pot Size
Start at Harvest
1
Week 1. Vegetation8y ago


2.54 cm
Height
18 hrs
Light Schedule
24 °C
Day Air Temp
5.8
pH
No Smell
Smell
300 PPM
TDS
60 %
Air Humidity
21 °C
Solution Temp
23 °C
Substrate Temp
20 °C
Night Air Temp
11.36 l
Pot Size
0.57 l
Watering Volume
45.72 cm
Lamp Distance
600 PPM
CO₂ Level
Nutrients 5

TriPart Bloom
0.132 mll

TriPart Grow
0.132 mll

TriPart Micro
0.264 mll
TheWeedMan This is my competition journal for Fastbuds iPhone give away.
This journal will include : growing of plants, weekly watering guide, pictures and videos + tutorials on DIY grow room enhancements !
This is the start of another beautiful run of Fastbuds GSC. I just finished and harvested my previous soil grow - which went fantastic - be sure to check that out too!
To start this run the plants were germinated using the wet paper towel method for approximately 24 hours. The germinated seeds were then placed into 1” Rockwool starters cubes. The Rockwool cubes were set started accordingly- 5.5 PH nutrient water, soaked for 30 seconds and then buried into coco 3 gal pots. I used the Perfect Coco recipe I discovered and will explain it in detail next week. I’ve kept the PH at 5.8 - which is ideal for coco.
Please see the watering video for details on nutrients and dosage.
Make sure to leave a like and follow me !
This time I’ve made a few upgrades :
-Switched to 3gal Fabric pots with Coco Coir.
-Built and assembled a true 500w COB light.
(This light contains 10 CREE CXB3590s)
-Built custom PVC flood tray with drainage.
-Built automatic timed drip irrigation system.
You will see then above items in photos and come into use over the next weeks.
Since the veg weeks are kinda slow , I will provide a tutorial each week week for the upgrades I mentioned above !
Description - FastBuds Website
Girl Scout Cookies is a worldwide phenomenon. As one of the best Californian strains of all time, this world-class hybrid holds a special place in our strain library.
Our Girl Scout Cookies seeds have millions of fans all over the world, and we like to think we've played a roll in popularizing this amazing variety outside of the United States. It took years of R&D to recreate an autoflower GSC that does the original justice. We started with two stellar phenotypes of the original Girl Scout Cookies strain and created an autoflowering version of the legendary GSC genetics. The result is an indica-dominant hybrid autoflower and with enough sativa traits to keep the couch-lock away. Like baking cookies, growing this strain is easy, but requires time and attention. Your childhood wishes have all finally came true: cookies now do grow on trees.
GSC stands out as one of the brightest and most exotic varieties to date. It's a true masterpiece and well worth the price. Want a cookie?
Effects - My Personal Experiences
GSC is one of my favourites , along with probably a couple million other smokers. There is something special about it.
GSC provides a very good high. It is mainly useful for Improving mood, Euphoria and Relaxing. From a medical stand point GSC is best suited for stress, although it can also help with depression or mild aches due to the euphoria and mood elevation.
The genetics from fast buds don’t disappoint and the flowers are superb .. I can’t wait to try this batch in coco.
-TheWeedMan
40 likes
71 comments
Share
Grow Questions

TheWeedManstarted grow question 8y ago
As a first time coco coir grower what are some things to look out for or make sure to do?
This is my 3rd growing experience, my previous two grows were done in soil. So I’m
not a complete noob.
Please provide a good break down on the coco coir growing experience for me.
Solved
Techniques. Defoliation
likes

TheBudWhispereranswered grow question 8y ago
Dude - no reach out on this? I found it on a browse and I’ve been thinking on a Pure GSC strain for a while now!
Both ironic and Sweet! Will follow. Now with respect to coco - IMO it’s not much different from soil but I trust you’ve already seen that it’s got much better drainage properties. The key difference is it’s nutrient holding power in relation to soil as well as appropriate supplementation of the nutrients that soil has, that coco lacks (ie. calmag). As long as you supplement for the first month or so with calmag and keep a close eye out for nutrient burn (go easy/not full strength with nutrient formula for first run) it should be very similar to a soil grow. That’s the best I got for ya. Made the switch to coco myself because I like hand watering but would prefer a slightly faster growth rate. Cheers broski and looking forward to this one growing out!!!👊👍
2
Week 2. Vegetation8y ago


6.35 cm
Height
24 hrs
Light Schedule
24 °C
Day Air Temp
5.8
pH
No Smell
Smell
600 PPM
TDS
60 %
Air Humidity
21 °C
Solution Temp
23 °C
Substrate Temp
24 °C
Night Air Temp
11.36 l
Pot Size
0.57 l
Watering Volume
50.8 cm
Lamp Distance
600 PPM
CO₂ Level
Nutrients 6
TriPart Bloom
0.264 mll
TriPart Grow
1.057 mll
TriPart Micro
1.057 mll
TheWeedMan iPhone Contest Journal!
Weekly Tutorial: The Perfect Coco Coir
See below comments.
Wow! That’s a great amount of growth , these plants like tripled in size in about a week. Very impressive growth in the coco and with the nutrient feeding schedule so far - genetics are likely part of the quality here so far too. The plant last week was two small starter leaves and now it’s got a full set of fan leaves and working on its 3rd node. Fast!
I provide a brief breakdown of my stoned thoughts and highly quality 1080p footage of the plants in my video review.
The colours are very rich green, it looks amazingly healthy and is surely off to a great start in week 2. Currently these beauties are under true 200w of COBs(Four CXB3590s). It’s super bright(850ppfd) and I still can add another 300w more(1250ppfd Max) in flower.... The lights are running 24 Hours a day currently to help optimize and maximize growth potential. The COBs really enhance the beauty of these plants, they are almost identical to sunlight spectrum so you get very vivid and sharp colours under them. Makes for great quality pictures!
I’ve kept the PH of the nutrient water at 5.8 - this is ideal for coco. GH nutrients are fantastic with my RO water system. I am watering basically every 24-36 hours until I get about 10% run off from the 3gal Fabric pots. Please see the video guide for more information.
The primary focus of the current week is going to be starting LST .. I really want these girls to bush out and give me lots of fat juicy colas. I’m going to bend these girls right over, head to toe, just the way I like em.. and then let all those shoots pop up and then tie them down.
I’m very impressed with this weeks potential and these plants fully lived up to it ! I can wait to see what these ladies grow into !
Making the Perfect Coco Coir
Items Required :
Dried Coco Coir brick
Course Perlite
5 gallon bucket
Pillow case
Fabric pots (recommended)
CalMag supplement (recommended)
PH meter (recommended)
First things first , acquire the items above !
I highly recommend getting the suggested materials for this project as it will make your life a lot easier ! You can do this without the “(recommended)” items but it’s not as ideal.
1. Place your coco coir brick into the pillow case. If you can break the brick a bit as well it will make the process go faster in the next steps.
2. Get some good water(distilled or RO is best) and adjust the PH of the water to 5.8
3. (Optional) Add Calmag to your chosen water source, I used 5ml/G of water. Ensure PH is between 5.6-6 PH
4. Place the coco pillowcase inside a 5gallon bucket. Add the PH’d CalMag water.
5. Let this solution soak and absorb the good stuff from the water for about 20 minutes. Add more water if needed, it should be a soupy consistency.
6. Remove the pillowcase from the water and place it in a drainable area. Let the extra water run out for about 20 minutes.
7. Get your Fabric pots and add about 1/3rd volume of Perlite for your size of pot.
8. Place the saturated coco coir in with the perlite. Gradually mix the components together until you get an even mixture and a full pot.
9. You are now ready to use your coco and it is set up for an ideal start - Perfect PH, Extra CalMag and fully saturated !
10. Check out the watering videos each week to learn about watering and proper nutrients.
11. Add your seed, clone or transplant and place under an appropriate grow light.
That’s it everybody! Now you know how to get your Coco Coir off to a perfect start for optimized growth of your cannabis!
Tune in next week to learn about the easy LST method to improve yields!
Happy Growing!
-TheWeedMan
21 likes
8 comments
Share
3
Week 3. Vegetation8y ago


8.89 cm
Height
24 hrs
Light Schedule
24 °C
Day Air Temp
5.8
pH
No Smell
Smell
850 PPM
TDS
60 %
Air Humidity
21 °C
Solution Temp
23 °C
Substrate Temp
23 °C
Night Air Temp
11.36 l
Pot Size
0.57 l
Watering Volume
50.8 cm
Lamp Distance
600 PPM
CO₂ Level
Nutrients 6
TriPart Bloom
0.528 mll
TriPart Grow
1.057 mll
TriPart Micro
1.321 mll
TheWeedMan iPhone Contest Journal
Tutorial: The Easy LST Method!
Please see below comments.
Okay everybody! So it’s the start of week three now, wow is time flying by or is it just me? I can’t believe it’s already the third week into this grow .. these girls are looking gorgeous completely bent over. You gotta see these pictures..the main stem is completely horizontal. I found some garden staples 6” that work amazing for a super easy start. It was important to start LST early to get the development of the new shoots started ASAP.
These girls are looking beautiful as ever, lush healthy greens dominate the scene as the plants develop into their full potential. The fan leaves are enlarging, holding precious nutrients and soaking in the sun-like 3500K spectrum of the COBs. These lights are doing an amazing job so far, they provide more than enough output for very little power consumption. I’m only using 200w total through four CXB3590s currently for veg.. running 24 hours a day / 7 days a week. That’s only costing me less than $0.50 cents Canadian per day..... (to compare my old 600w hps with all the cooling fans was in excess of $1.50+ per day running for 18 hours.)
The plants are really taking to the nutrient feeding schedule and waterings at 5.8PH. I can’t say enough good things about GH nutrients, they really do a good job and are priced very well. For $50 canadian on amazon I got the Flora Trio Set which has lasted me over 3 grows and still has plenty remaining.. Please see the watering video guide for more info.
You can also see the 1080p video review - includes additional stoned commentary on these ladies.
As you can see from the pictures and video the growth this week has been stellar! It’s picked up pace rapidly and responded very positively to the early training. The plants have both grown multiple new branches that are getting bigger everyday. These new branches are going to become extra fat colas..! LST should be an easy way to really increase the yield of these girls down the road! Super excited for these girls to kick into overdrive .. expecting huge growth this week leading up to the switch into flower !!
Tutorial: The Easy LST Guide
Items Required:
Plant ties, string
Garden Staple 6”
So this week we are going to cover the basics of LST. For those of you that aren’t familiar with the term , it stands for Low Stress Training. It is a fantastic way to increase the yield of your plants and maintain an even canopy height. This ensures that you can maximize the potential of your chosen light source. We will also cover leaf tucking , this is an early growth booster that can be used to further enhance the benefits of LST.
LST is actually quite a simple method of plant training , you can probably do it for free. Everybody has some extra string laying around somewhere, I’d assume. So the extra few minutes spent each week in your garden can add up to tens of grams more dried herbals for very little investment of time and basically zero cost. Also, who doesn’t like enjoying a bit more time in their garden? I sure do!
So LST is essentially as the name implies, we are going to gently train the plant to a better suited way of growing for an indoor environment. The first week of training (I started training these plants mid week 2)will just bend the plant over, this will allow light to hit between nodes better and cause some off shoots to form. When these shoots begin forming between nodes is when you want to start thinking strategically and begin tucking leaves. The leaves blocking or shadowing new growth shoots can often be gently bent or tucked behind the newly forming growths. This will allow full light to the new shoots, which will eventually become colas, to get better light and faster growth. We want to spread out these off shoots in a different direction from each other in an attempt to maximize coverage and maintain even canopy height. Keep doing this step over and over until the plant is mid way through flower stretch. You should end up with a flat canopy and a short dense plant packed with nugs! It’s not something I can easily write in 1,2,3 steps as it’s based on each plants unique growth patterns, the best advice I can give is follow this journal - watch and learn!
This is the ideal and recommended plant training technique for autos. The other plant training methods can stunt or severely reduce your yields with autos as the plants don’t have the time to recuperate like photoperiods.
That’s it! Follow along with the journal and you’ll see some examples as I train these plants for some massive yields in Coco!
Be sure to check in!
Happy Growing!
-TheWeedMan
15 likes
4 comments
Share
4
Week 4. Vegetation8y ago


27.94 cm
Height
24 hrs
Light Schedule
24 °C
Day Air Temp
5.8
pH
Weak
Smell
850 PPM
TDS
60 %
Air Humidity
21 °C
Solution Temp
23 °C
Substrate Temp
23 °C
Night Air Temp
11.36 l
Pot Size
1.14 l
Watering Volume
50.8 cm
Lamp Distance
600 PPM
CO₂ Level
Nutrients 5
TriPart Bloom
1.057 mll
TriPart Grow
1.057 mll
TriPart Micro
1.057 mll
TheWeedMan iPhone Contest Journal
Tutorial : Making the best water table
Please see below comments.
Well, just to make sure, yes! These are the same plants as last week..!
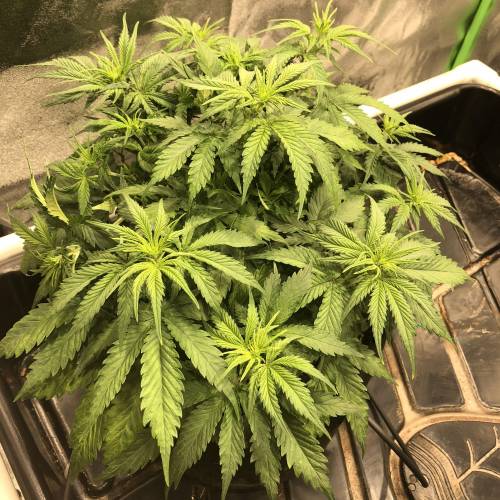
They are much much, much larger now , this is the overdrive week that I have referred to a couple times in this series. ‘Overdrive’ consists of the final veg week and the transition week , I call it this because the plants typically explode in ultra vigorous growth and can double or triple in size. That’s exactly what these lovely ladies did this week .. explode with growth. Compare week 4 in coco/COBs journal to my week 4 soil/HPS .. huge difference! These girls are gonna be massive I think! I’m excited and a little nervous to see how big they get !
These girls are looking bright healthy luscious green. They have zero deficiencies and no burns or wounds from training. This has be an idyllic grow so far , the plants have responded perfectly to the feeding schedule, training and waterings... next week should be the stretch and I’m hoping to pull over 6 oz from these two ladies... The more the better!
From here on out , we should be seeing development of the flowers .. if it comes out as good or better than my last run of GSC I’m in for another super stinky fat set of females. Lovely!
Making the Best Water Table!
Items Required :
Flood tray
3/4” PVC Pipe
Four PVC 3-Way Joints
Four PVC 4-Way Joints
Four PVC T-Joints
3/4” Rubber Grommet
Low and wide tote
1” Hole saw
Power Drill
PVC Pipe Cutter
Tape Measure
Marker
1. First figure out what size of water table you want for your growing space. (I used a 3’x3,’ Botanicare PVC flood tray in my 4’x4’ tent and it fits great.)
2. Once you have the specs for the table you want , go out and get the stuff! I highly recommend the PVC pipe cutter for the $20 it makes this job very easy.
3. Take measurements! Measure twice - cut once! For the water table I built I needed over 40’ of PVC.
4. Measure and cut all your pieces to length.
5. Assemble them together according to the instructions on this website. (https://formufit.com/pages/pvc-kids-sand-and-water-table) I came across this and is very similar to the concept we are building.
6. Now that you’ve got that PVC water table all done - wasn’t too hard , right? - we can get onto the next steps.. the drainage.
7. I recommend setting up your table with the basin inside it so you can see if water naturally flows to an area OR you can put your table on a slight incline to force water to one side.
8. Once you decided on where the water will drain .. empty it out and drill a 1” hole in the bottom of the basin.
9. Insert the rubber grommet tightly into the hole, add silicone sealer if you made it to big.
10. Insert a small piece(1-2”) of 3/4” PVC into the grommet to direct all drainage downwards.
11. Place the tote under the drainage tube.. this will catch all the run off from the waterings + it will allow extra humidity if needed or can be easily pulled out and manually dumped as need / at the end of each week.
12. Congratulations , you now have a fully functioning Watering Table with drainage !
*Everything in this tutorial was acquired from Amazon.ca or Amazon.com
*PVC pipe was from hardware store
Supplies cost: Approximately $250 Canadian Dollars
So that’s it everybody! Now we have the perfect coco and we’re training the plants too plus now we have an easier watering setup!
But don’t worry - I’ve still got more tutorials for you to enhance your grow room!
Next week we will cover building a timed drip irrigation system....!
Make sure to check back for more.
Happy Growing!
-TheWeedMan
17 likes
7 comments
Share
5
Week 5. Vegetation8y ago


45.72 cm
Height
18 hrs
Light Schedule
24 °C
Day Air Temp
5.8
pH
Normal
Smell
800 PPM
TDS
50 %
Air Humidity
21 °C
Solution Temp
23 °C
Substrate Temp
23 °C
Night Air Temp
11.36 l
Pot Size
1.14 l
Watering Volume
50.8 cm
Lamp Distance
600 PPM
CO₂ Level
Nutrients 6
TriPart Bloom
0.793 mll
TriPart Grow
0.528 mll
TriPart Micro
1.057 mll
TheWeedMan iPhone Contest Journal
Tutorial: The Great Drip Irrigation system
Please see below comments.
Wow so these plants stacked up another week of veg, maybe some slight stretch and flowering indicators popping up now at the end of the week. The node spacing is shrinking, a bit of stretch occurred across all the tops and the nodes also changed from parallel to alternating which is a sign of maturity in a Cannabis plant. I’ve been keeping up with the LST training and leaf tucking - it was getting pretty bushy and air flow within the plant was getting compromised so I did a bit of trimming to allow more air flow before the switch the flower.
The plants are starting to also get some more pistils showing up and I think next week is 100% going to be flowering. It’s also starting to get that signature cannabis stink - which we all know and love.
I had to add the carbon filter and exhaust fan on low to reduce the plants lovely odours in the grow room. I also reduced the lighting back down to 18 hours a day from 24 to help aid in the transition. It was also getting pretty difficult to water .. and I wanted it to be even easier so I built a drip irrigation system that I can run until I get run off .. then it automatically drains and can be emptied on demand. It’s a pretty cool set up so far.
These girls are huge for veg.. these girls are bigger than my previous plants were at finish and we are only at the end of veg.. I’m really excited to see these plants bulk up and put on a layer of frost .. and see the jungle change into a sea of buds..!
Building a Great Drip Irrigation System
Items Required:
5 gallon bucket or larger
Drip Irrigation Manifold
Garden Staples
Digital timer
Submersible water pump
1/4” drip irrigation tubing
1/4” T joints
Power drill
1/16 drill bit
1. Acquire the items above and get ready for some easier waterings from now on! Recommend to use with coco and the water table we built in the previous week for hassle free automatic waterings!
2. You can measure this or just guesstimate a little extra length, it’s not super important. Cut the length and number of tubing you need to reach the water storage to your growing area.
3. Cut 10-12” lengths of 1/4” tubing. You want one piece for each plant you plan on growing.
4. Connect each end of the 12” tubing together with a T-joint. This should make a circular shape.
5. Get the drill bit and drill , set it up. Now you want to drill small holes into the tubing. I placed holes all in a line around the circle about 1/3” apart.
6. Once you have all the circles drilled out you can connect these with the T-joint to the longer tubes you cut at the start.
7. Screw the drip manifold onto the submersible water pump output tube.
8. Connect the remaining ends of the tubing to the drip manifold outputs.
9. Place the water pump with manifold connected to tubing into the water storage.
10. Run your tubing to the desired locations in your garden and place the circles we created around the base of your plant.
11. With the circles around the plant , you want to use the garden staples to hold the tubing in place.
12. I recommend using this device once the plant is about 3-4weeks old, this ensures it has established a good root base already.
13. Fill the water storage with appropriate nutrients and water. See the video watering guide for more info.
14. Plug the water pump into a digital timer. You need one that has multiple on/off times per day and 1min settings.
15. Plug the pump directly into the power to for the watering , time it, see how long it takes to get a good full watering with 10-20% run off.
16. Set the timer to the timing length you learned from the previous step. Set this time for the future waterings - as the plant grows it will need more frequent waterings.
17. That’s it! Now you’re set to make your life a little easier with less time spent watering coco!
*Everything in this tutorial was acquired from Amazon.ca or Amazon.com
Total cost: Under $100 Canadian Dollars
Wow ! We have made a lot of progress on this journal .. I hope everyone is enjoying this as much as I am! The garden is looking fantastic and we’ve made a lot of improvements so far.. We got the best Coco, the plants are trained, we have an easy watering area and now this basically takes care of itself .. just add water to the storage tote. It’s a fucking jungle in there..
So what else can we possibly improve? Well the last thing I could think of covering was adding some of the newest(and most expensive) LED technology to the garden!
Next week we will cover what we need and getting started on building a frame for this beast! TEN CREE CXB3590s, 500w !
You don’t wanna miss this!
Happy Growing!
-TheWeedMan
21 likes
17 comments
Share
Grow Questions
TheWeedManstarted grow question 8y ago
Any comments, feedback or critiques are welcome.
Please feel free to let me know how you think this Grow & Journal is going.
Let me know if there is anything I can be doing better , thank you!
Solved
Techniques. Defoliation
likes

Athosanswered grow question 8y ago
Your plants look great. The only thing I believe you should improve is training: a more agressive use of LST and super cropping to keep the plant squat. Good luck mate.
6
Week 6. Flowering8y ago


45.72 cm
Height
18 hrs
Light Schedule
24 °C
Day Air Temp
5.8
pH
Normal
Smell
800 PPM
TDS
50 %
Air Humidity
21 °C
Solution Temp
23 °C
Substrate Temp
23 °C
Night Air Temp
11.36 l
Pot Size
1.89 l
Watering Volume
45.72 cm
Lamp Distance
600 PPM
CO₂ Level
Nutrients 6
TriPart Bloom
1.057 mll
TriPart Grow
0.264 mll
TriPart Micro
1.057 mll
TheWeedMan Things are starting to pick up now! We got BUDS!..Well the start of buds forming on these lovely ladies. Each plant has multiple tops forming on them. If I counted correctly one plant has 20 tops and it’s sibling has 16 tops. You can see the start of all the colas taking form this week and building up on the stems - I recommend taking a look at the video Review for the week as I provide some high quality footage in 1080P like previous weeks. It’s going to become a sea of nugs on these two plants in the coming weeks.
I’m super excited to see these develop.
The smell of the garden is developing nicely, I really missed the smell of freshly flowering cannabis. When I opened the tent this afternoon to inspect these ladies, I was met with a lovely & stinky rush of scent that flooded my nostrils and the room quickly. It’s hard to distinguish any exact scent yet since there is a few strains growing and flowering at the same time. Flowering Cannabis is definitely one of my favourites smells - wouldn’t you agree!?
I’ve been able to keep up on the training of these plants through out the flowering stretch which kept the plants short and fat. One tip that I have for growing in fabric pots is using plant twist ties and some safety pins for training. I don’t see many growers doing this and it is a really cheap and easy way to effectively train plants and have a tie down spot available literally 360 degrees around the plant ! By doing this strategy I was able to keep the canopy height of the garden almost exactly level. One of my GorillaGlues by fastbuds from a different journal had a wild stretch in one night and is taller than the rest however. Fast buds is definitely living up to their name with these seeds, big strong healthy plants that shape up quickly and deliver buds.. fast..!
I’m really pleased with the development this week, it’s always exciting to see and smell flowers forming. It’s also nice to be done training plants for a while. I bet I spent 3-4 hours on each plant minimum trimming, leaf tucking and LST’ing since they were started. I think it makes a difference in final yield , training plants typically results in high quality and potency.
Constructing the ULTIMATE Light!
Required Items:
* 10 CXB3590 3500K
* 10 Ideal Solderless Holder
* 10 lenses or reflectors
* 10 thermal pads or thermal paste
* 10 heatsinks 120mm
* 2 Meanwell driver HLG-240H-C1400B
* 2 10K potentiometer
* 2 electrical connecters
* 2 electrical grounded plugs
* 16 gauge(1/16”) angled aluminum
* 18 gauge solid core wire 30’
* Power drill
* Drill bits - various
* Chop saw or hack saw
* Wrench / Ratchet
* Measuring tape
* Marker
* Rope ratchet hangers
* Wire nuts
* Zip ties
* Bolts
* Nuts
* Washers
* Money, lots.
*Note - All the electrical parts can be sourced from alibaba.com for a decent price or you can alternatively find pre-made DIY kits on EBay with a markup. I recommend sourcing the remaining items from a hardware store like Lowe’s or HomeDepot. You can also buy a prefabricated light like this from timbergrowlights.com but you will pay double to triple the price.*
I highly recommend watching videos on YouTube by “LEDGardener” or “GrowMau5”.
Their videos helped immensely with the project and if they somehow see this - I owe you guys one! Both of them have great instructional videos on the DIY process and core required knowledge.
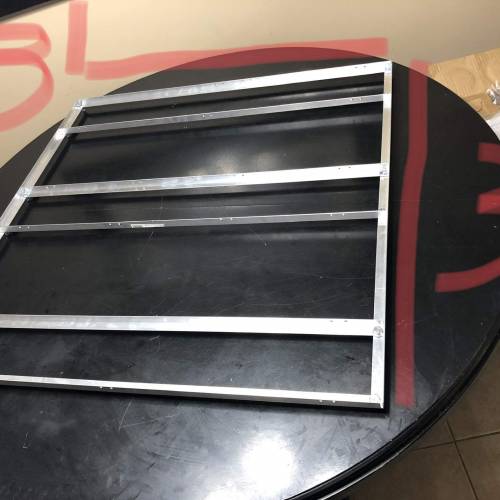
Phase One - The Frame:
1. Visit the hardware store and get the stuff. You will need time and a place to work on this as well. It will take multiple hours.
2. Measure, mark and cut your 16 gauge angled aluminum to desired lengths. I highly recommend a chop saw .. it makes quick work (I made my light 3’x3’ - so I needed eight 3’ pieces.)
3. Do a rough build of your project , line up the pieces to make the shape on your desired frame. Mark where you will need holes to assemble the frame. Make sure to take accurate measurements here .. you need EVERYTHING to line up.
4. Drill your holes. I recommend starting with a small drill bit like 3/16” and progressing up in size to the desired size needed. If you have a drill press your life will be easy - if not a standard power drill and muscle will work too.
5. Assemble the frame loosely - hopefully you were careful - everything should line up!
6. Get your passive heat sinks and place them around your frame , try to get it symmetrical for even light coverage.
7. Once you have your light placement figured out , get out that trusty marker and mark where you need to drill holes to secure the heat sink/COBs.
8. Disassemble the frame and take back the aluminum pieces to the drill and make the holes.
9. Build the frame this time - securely. Then drop in those heat sinks. Hopefully these all line up too!
10. If they line up, great .. now I recommend working on Phase Two - The Electrical!
Ok that’s this is where we will stop for this week! I think that’s enough information for everybody to absorb for a week and get started..
Stay tuned because next week we go over the COBs, electrical work and assembly!
You’ll wanna see this stuff too, trust me!
Happy Growing!
-TheWeedMan
22 likes
20 comments
Share
7
Week 7. Flowering8y ago


45.72 cm
Height
18 hrs
Light Schedule
24 °C
Day Air Temp
5.8
pH
Strong
Smell
800 PPM
TDS
50 %
Air Humidity
21 °C
Solution Temp
23 °C
Substrate Temp
23 °C
Night Air Temp
11.36 l
Pot Size
1.89 l
Watering Volume
45.72 cm
Lamp Distance
600 PPM
CO₂ Level
Nutrients 6
TriPart Bloom
1.321 mll
TriPart Grow
0.264 mll
TriPart Micro
1.057 mll
TheWeedMan Tutorial: Build & Assembly LED COB light
See below commentary.
Colas, colas and more colas...these ladies are putting in some damn fine work! 👌🏻
I know I’ve said this a fair amount during this grow but I am really impressed with the growth this week .. yet again these ladies have yet to let me down. It’s been an amazing journey with these two plants , the whole series so far has gone off without a hitch. I’ve really learned a lot from the community here at GD and put in a ridiculous amount of hours of my own research time plus a few grows under my belt and it’s really starting to show everything I’ve learned..
The smell of the garden is ripening and by that I mean it’s getting dank! I’m glad I got a 6” by 20” carbon filter to suck up all this smell and vent it directly outside. You can’t even tell I have 5 flowering plants in my basement.. until I open the tent at least haha. It’s really starting to smell lovely in my grow tent and this is what I look forward too each and every grow .. these final few weeks are the most interesting and rewarding!
Did I mention flowering cannabis is my favourite smell!?
These ladies are packing on the flowers and they’re swelling up day by day now. I continued to defoliate the bottom 1/3 of the plant to increase airflow around the buds and decrease any chance of humidity problems with how packed the garden is right now. I’m really impressed with the LiquidKoolBloom by GHE , I’ve found it does stack up weight pretty quick .. it’s a great bloom booster that’s pretty cheap too. As you can see in the photos and videos the plants are forming up that sea of cannabis and it’s starting to show what we might be able to expect from them come harvest time in a few weeks. The sight of all the colas everywhere formed across an even canopy looks pretty dope!! It will be even more exciting as this progresses further into flower ...!
Constructing the ULTIMATE Light!
Required Items:
* 10 CXB3590 3500K
* 10 Ideal Solderless Holder
* 10 lenses or reflectors
* 10 thermal pads or thermal paste
* 10 heatsinks 120mm
* 2 Meanwell driver HLG-240H-C1400B
* 2 10K potentiometer
* 2 electrical connecters
* 2 electrical grounded plugs
* 16 gauge(1/16”) angled aluminum
* 18 gauge solid core wire 30’
* Power drill
* Drill bits - various
* Chop saw or hack saw
* Wrench / Ratchet
* Measuring tape
* Marker
* Rope ratchet hangers
* Wire nuts
* Zip ties
* Bolts
* Nuts
* Washers
* Money, lots.
*Note - All the electrical parts can be sourced from alibaba.com for a decent price or you can alternatively find pre-made DIY kits on EBay with a markup. I recommend sourcing the remaining items from a hardware store like Lowe’s or HomeDepot. You can also buy a prefabricated light like this from timbergrowlights.com but you will pay double to triple the price.*
I highly recommend watching videos on YouTube by “LEDGardener” or “GrowMau5”.
Their videos helped immensely with the project and if they somehow see this - I owe you guys one! Both of them have great instructional videos on the DIY process and core required knowledge.
So last week we built the frame and this week we are going to complete phase two!
Phase Two - The Electrical work
1. Place your COBs into the solderless holders , make sure the + and - line up properly.
2. Place thermal pads/paste on back of COBs.
3. Screw on the solderless holders to the Heatsink.
4. Measure the length between each COB on your frame and cut lengths of wire plus a few extra inches to give some slack.
5. Make a long Positive(+) lead from the first COB so you have something to attach to the driver later to power everything.
6. Connect the COBs together in a series power circuit. Which is essentially just one long wire with the connecting positive to negative alternating between COBs as you go down the line.
7. Wire 5 COBs together in a series and leave a long Negative(-) lead from the last COB to hook up to power later.
8. Repeat step 4/5/6 for the remaining 5 COBs.
9. Connect the Grounded Plugs to the input of the Meanwell drivers. Make sure it’s wired correctly.
10. Take your potentiometer and attach it to the Dim+ and Dim- leads. You want the adjustment knob to be facing you. Connect the positive wire to the middle lead , the negative wire to the left lead and the right lead you want left empty on the potentiometer.
11. Now that you have the drivers assembled and your COBs rough wired it’s time to put on the reflectors or Lenses. Screw these in place to enhance the light penetration and concentration.
12. Attach the fully assembled COBs to the frame. Try to get the 4 long Leads(2+ and 2-) heading in the same direction.
13. Take the the positive and negative lead from the first set of 5 COBs and attach to the Output wires from the driver. Make sure to attach positive to positive and negative to negative.
14. Repeat step 13 for the other 5 COBs.
15. Test it out ! Plug the first driver in to power and hopefully you followed these steps .. it should provide a intense blast of light! Repeat for the second driver.
16. Now you can zip tie down the wires securely to your frame so nothing comes loose by accident.
17. I bought heavy duty zip ties and attached 4 of them, one to each corner.
18. Attach the rope ratchet hangers to each corner zip tie and hang in desired area!
19. You now have the ultimate light for a 4x4 tent ! This is just as powerful as 1000w HPS at half the power while providing a Full spectrum to the plant.
Next week I will go over the specifications and nerdy data points about cobs and the light we built.
Wow! So now you should have a working light fixture and hopefully some great looking plants too. If you’ve followed along with this series at all .. we have covered a lot of subjects.
We covered how to make the perfect Coco, plant training, building a water table, building an auto watering system , building an LED light frame plus how to wire/assemble an LED COB light! That’s over 7 tutorials I’ve packed into this grow so far.. we have a few weeks left .. what else can I come up with?
Thanks for following along everybody and as always Happy Growing!
-TheWeedMan
15 likes
21 comments
Share
8
Week 8. Flowering8y ago


45.72 cm
Height
18 hrs
Light Schedule
24 °C
Day Air Temp
5.8
pH
Strong
Smell
850 PPM
TDS
35 %
Air Humidity
21 °C
Solution Temp
23 °C
Substrate Temp
21 °C
Night Air Temp
11.36 l
Pot Size
1.89 l
Watering Volume
45.72 cm
Lamp Distance
600 PPM
CO₂ Level
Nutrients 6
TriPart Bloom
1.585 mll
TriPart Grow
0.264 mll
TriPart Micro
1.057 mll
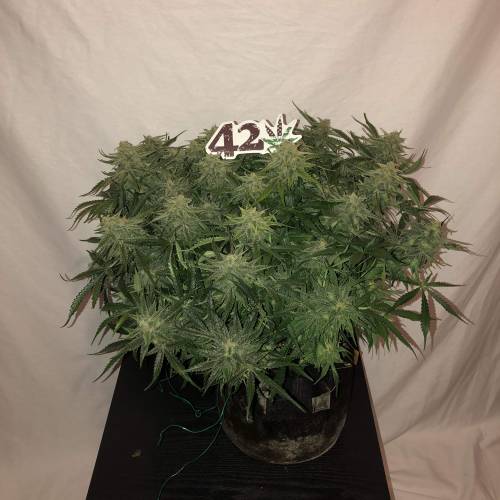
TheWeedMan Alright alright alright .. these ladies are doing great. They are lookin sexy for week 8 😎. The flowers are stacking-on heavy now, these plants are covered in dense buds! The flowers are getting super frosty, just like the snowman.... it’s literally covered in trichomes. The colas are essentially a solid
mass of bud .. and there is about 20 colas on each plant. The nugs are swelling up and getting really juicy , just touching the sugar leaves makes your fingers stick together like glue. I think it’s going to be a huge harvest.. I never realized how massive each plant is in the garden until today when I pulled them out for a look over .. it’s a huge fucking weed bush ! Lmao
The smell is getting stronger and smelling like delicious Cookies! It’s getting the signature Minty musk we know and love from GSC. I feel like the Floralicious plus by GHE is a great addition to the waterings. It starts to really make the aromas of the garden well pronounced and full bodied. It’s an expensive additive to the garden but I got tons of compliments on the previous harvest using it!
This week I also dropped the humidity in the grow area down to 35% RH. This should really make the buds grow a thick protective layer of resin in the weeks leading up to harvest. I’ve read about this producing great results but have yet to try it myself so this is a bit of an experiment but it seems to be working so far.
I’m excited that it’s week 8 and the girls only have a few weeks left at most. Should be just in time for a Christmas harvest! 🌲
COB Light Specs:
This light is a beast. I ran everything through an online calculator .. for those who know numbers of this sorta stuff it’s very impressive!
This light has basically the same power as a 1000w HPS but it has a full spectrum and uses about half the watts and keeps the grow room at a perfect 75F. It even is producing super dense buds.. Much much better than HPS so far id say!
Total Power usage : 500w
Total Lumens : 90,000
Total PPF : 1140
Total PPFD: 1350
Total Cost: $1100 Canadian Dollars
The Sun naturally provides 50-60DLI(daily light integral) each day on good weather in areas like California.
18hours x 1350PPFD x 0.0036 = 87.5DLI
With some simple math , we can get that this light running 18 hours a day will produce a DLI of 87.5. This light is so strong .. I could even add on CO2 to overdrive the growth or simply dim the amount of light during the day!
(I currently dim the light down to about 400w of total power as it’s simply puts out more than the plant can use right now..)
Even for photoperiod plants this light would provide 58DLI , a fantastic number for only 12 hours of light.
Hopefully my geekiness isn’t too obvious! 🤓
The tutorials we’ve covered in this journal have been :
Week 2 - The Perfect Coco Coir
Week 3 - The Easy LST
Week 4 - The best watering table
Week 5 - An Auto Watering system
Week 6 - LED COB frame build
Week 7 - LED COB electrical work
19 likes
9 comments
Share
9
Week 9. Flowering8y ago


45.72 cm
Height
18 hrs
Light Schedule
24 °C
Day Air Temp
5.8
pH
Strong
Smell
850 PPM
TDS
35 %
Air Humidity
21 °C
Solution Temp
23 °C
Substrate Temp
21 °C
Night Air Temp
11.36 l
Pot Size
1.89 l
Watering Volume
45.72 cm
Lamp Distance
600 PPM
CO₂ Level
Nutrients 5
TriPart Bloom
1.585 mll
TriPart Micro
1.057 mll

CALiMAGic
0.793 mll
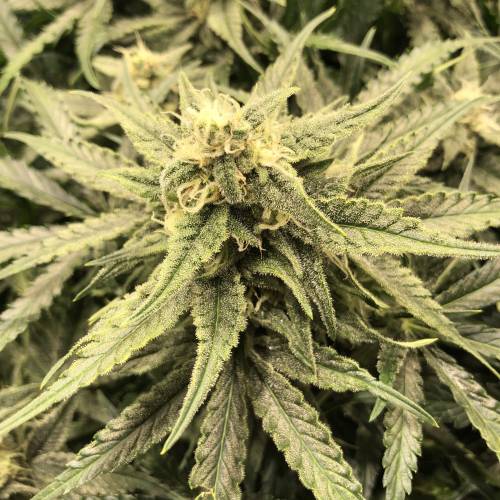
TheWeedMan Hot Damn... these ladies are coated in crystal and smell amazing! They are super sticky and drenched in heavy resin. The buds almost sparkle with the amount trichomes covering them, even the leaves glisten in the light. I think reducing the humidity to 35% is making an impact on resin production.
The garden smells absolutely dank, the smell is almost over powering when the tent gets opened...I love it. The garden would not be feasible without a carbon filter, keep in mind I have 3 other plants in there too. Next run of plants won’t be 5 plants, the tent is too crowded, at most I think 3 - 4 similar sized plants to these ones... (this is a 4x4 tent completely filled, BIG plants)
The pistils are still white, maybe 5-10% are changing colour which is starting to indicate that the ripening and final development phase of the flowers is beginning. I take this as a signal to check the trichomes with a microscope. The trichomes are currently about 50% clear , 50% cloudy on the right plant. 60% clear, 40% cloudy on the left plant.
I think this will get another half week to full week of nutrient feedings depending on trichomes development before the final flush starts. I will start the flush when trichomes become about 70-75% cloudy. This should give it approximately a week of flush time - which is plenty for coco.
Tutorials we’ve covered:
Week 2 - The Perfect Coco Coir
Week 3 - The Easy LST
Week 4 - The best watering table
Week 5 - An Auto Watering system
Week 6 - LED COB frame build
Week 7 - LED COB electrical work
Week 8 - LED COB specifications
Thanks for following along everybody!
We are almost there...!
-TheWeedMan
23 likes
4 comments
Share
10
Week 10. Flowering8y ago


45.72 cm
Height
18 hrs
Light Schedule
24 °C
Day Air Temp
5.8
pH
Strong
Smell
850 PPM
TDS
35 %
Air Humidity
21 °C
Solution Temp
23 °C
Substrate Temp
21 °C
Night Air Temp
11.36 l
Pot Size
1.89 l
Watering Volume
45.72 cm
Lamp Distance
600 PPM
CO₂ Level
Nutrients 1

FlashClean
1.321 mll
TheWeedMan It’s finally here. The last week..! All of my hard work and commitment to these ladies is about to reward me with some super sticky flowers! And lots and lots of them by the looks of it...
These buds look unreal, it looks like amazing quality flowers all over these girls. It’s dense buds that are coated in trichomes and resin.
The flowers came out a bit more dense on this grow compared to my previous soil/HPS run, which I find surprising. This could be due to a variety of improvements within the garden but I’m going to attribute most of it to my increasing horticulture skills.
The flowers also smell so damn amazing.. it’s a very dank minty skunk coming off the GSC. This batch of flowers came out smelling like the best I’ve grown yet. The smell is overpoweringly dank and I wish I could share it with you all ; words cannot express the joy received from smelling these flowers. I’m really impressed with the Fastbuds genetics.
I’m super excited to give these the flush this week, truthfully the flush started a few days ago on these girls. I’m also going to try the “Dark Period” before the final harvest on these plants. There is much debated subject of giving plants a 24-48 hour dark period before the final harvest. Some growers swear by this method to improving trichomes with a final taste and smell increase, other growers say it does nothing. I’m going to give it a shot and leave these ladies in complete darkness for 1-2 days prior to harvest and see if it improves anything. Yes there will be before and after pictures to document any visual improvement if any appears.
This run of GSC came out much better looking than my previous soil run, I think “I’m in love with da coco!” 🎶(maybe that’s what the song is really about?) Im very lucky to live in Canada 🇨🇦. It is legal here to cultivate cannabis for personal consumption, prohibition on cannabis ended here on October 17th, 2018. 🌲
I really enjoy growing cannabis, to me it is such a pleasure to nurture and care for these plants. The ultimate reward is watching them flourish into something beautiful. It’s very rewarding to grow your own cannabis and know exactly what is in your medicine. It is a time consuming hobby but the efforts are definitely worth the work in my humble opinion.
Tutorials we’ve covered:
Week 2 - The Perfect Coco Coir
Week 3 - The Easy LST
Week 4 - The Best Watering table
Week 5 - An Auto Watering system
Week 6 - LED COB frame build
Week 7 - LED COB electrical work
Week 8 - LED COB specifications
Stay tuned for the final harvest update!
Enjoy the pictures and videos!
Hoping for a very green Christmas!
-TheWeedMan
37 likes
8 comments
Share
Grow Questions
TheWeedManstarted grow question 8y ago
What are your thoughts on these plants ?
Do you have experience putting the plants in a prolonged dark period for 24-72 hours before harvest? If so, what happened?
Does this method improve the quality of the final product ?
Solved
Techniques. Defoliation
likes

CRiSPrGrowanswered grow question 8y ago
hey man, there's a lot of FUD about the dark period, basically the main idea is that there's little you can do in the last 48 hours of a 3 month grow that will do something significant on the grow overall. but the dark period for sure has some benefits, for example a dark period before the chop means less photosynthesis chemicals present for the dry + cure. Second the dark period will boost the creation of terpenes. some say it's good for thc, but trychomes take 2 weeks or more to really make THC, so that"s FUD. second thing is that on planet earth it's almost never dark for two days straight, anything really more than 24H and for sure 48H will start messing with the trychomes and they could oxidise which is bad because you loose that much in potency. Hope this clears this up a bit, good luck ! 🚀
10
Week 10. Harvest8y ago
Happy Harvest Day!


10/10
Rated
I can grow cookies from trees (and maybe even an iPhone!)
These buds came out spectacular. I am simply stunned at the beauty this strain can produce. The quality and care FastBuds put into these genetics is clearly evident. Add a little of your own love and care - you can get results like mine!
The flowers smell delicious, I wanted to eat them right off the plant. Every day was a struggle. The lush green colours, covered in orange hairs and layers of glistening trichomes is something best witnessed in person. The flowers look as beautiful as the scents emitted from them. Photos do these buds justice but the smell is an experience all of its own.
The smell of these flowers is intoxicating, I swear this scent fills the room swiftly and pungently in seconds. You get hit immediately with strong notes of mint but this isn’t your typical mint, it’s skunky too. The two scents infiltrate and violate your nostrils like Facebook on your privacy. It’s truly remarkable. Pine is the undertone of these flowers, it’s subtle but it’s there mixed in with some earthy trace scents. It’s a very well rounded potent experience.
The effects of this strain are one of my absolute favourites. The vapours are smooth and delicious. It tastes just like it smells. It’s a very rewarding vaping experience the scents and tastes subdue you as the high THC hits set you into a deep relaxation. It hits you fast and launches into a euphoric and elevated mood. Life is good. It settles down into a balanced experience that is just as enjoyable. This stuff is great.
Cookies genetics has arguably been my top favourite for a long time, competing only with ‘white widow’ cross genetics. That’s off topic but noted my opinion may be slightly bias. These flowers are an almost perfectly balanced hybrid. By my estimation I would say it is sixty-percent indica and forty-percent sativa. This makes for a very balanced day time or evening experience. Effects lasted about 90 minutes.
I would highly recommend this strain. I thoroughly enjoyed the growing experience. These genetics are a pleasure to work with; grown properly it’s a force to be reckoned with.
Yes FastBuds, I do want a cookie.
10/10
Show more
Translate
Spent 71 days
Ger Veg Flo Har
580 g
Bud wet weight per plant
105 g
Bud dry weight per plant
2
Plants
0.11 m²
Grow Room size
Easy
Difficulty

Euphoric, Happy, Relaxed
Positive effects

Dry mouth
Negative effects

Earthy, Mint, Pine
Taste
Height
Day air temperature
Air humidity
PPM
PH
CO2
Light schedule
Solution temperature
Night air temperature
Substrate temperature
Pot size
Lamp distance


TheWeedMan Well we made it.. this has been my best grow to date! I’m honestly very impressed with this harvest. The flowers came out smelling dank and delicious. The buds have a very pleasant minty skunk aroma to them that can overpower the room.
The majority of the buds came out really nice too - solid and crystal coated. The lowest of the nugs came out a little larfy which is to be expected since they got the least light under the thick canopy. I think I can improve this next time with a bit more canopy defoliation.
Ive been smoking “samples” as this batch dries and the stuff is potent and flavourful. I’m sure after it gets a proper cure it will be even better! It’s very rewarding to grow your own top-shelf cannabis and be able to share it with friends and family. This harvest was just in time for Christmas .. just in time to share over the holidays 🇨🇦🌲.
The results from this batch were spectacular.
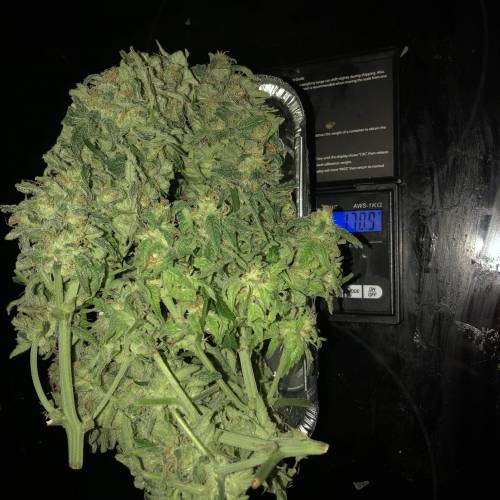
The entire tent was packed full of cannabis.
These two GSC plants yielded approximately 580g each of wet cannabis which resulted in 210g total of perfectly dried cannabis.
That’s 7.5oz dried from two plants! Woah!
The plants I had in my tent during the production of this journal..
The 2xGSC yielded 210g dried. (7.5oz)
The 1xCream Cookies yielded 115g dried. (4oz)
The 2xGorilla Glue yielded very impressive numbers, pulling in 140g and 180g (5 & 6.5oz)
This gives me about 23oz of dried cannabis ..
This equals just short of 650g of dried cannabis , grown in 10 weeks. They call em FastBuds for a reason people! This was achieved with a with my custom built 500w COB LED!
This grow put up a very nice ratio of 1.3g/w dry!!
Tutorials we’ve covered:
Week 2 - The Perfect Coco Coir
Week 3 - The Easy LST
Week 4 - The best watering table
Week 5 - An Auto Watering system
Week 6 - LED COB frame build
Week 7 - LED COB electrical work
Week 8 - LED COB specifications
I hope you enjoy this series as much as me!
Thank you to everybody who followed along!
It’s been a pleasure!
Update: It’s been a couple months since harvest on these lovely ladies. I’ve saved a few ounces of these buds and built myself a DIY 10-Ton Rosin Press for $582.49 Canadian. Pretty good ! The press is a beast!! I’ve added on videos of these nugs getting a press. My first press ever too!
I got a 17% yield on my first couple presses. I’ve since been able to increase this up to 20% by adjusting technique. Awesome! 👍🏻
-TheWeedMan
122 likes
59 comments
Share
Equipment Reviews


228 comments
Sort by
popularity
popularity
newest
oldest
TheWeedMan commentedweek 28y ago
October 17th, 2018. Today is the day Prohibition on Cannabis has ended in Canada.
As a Canadian citizen, I can purchase cannabis from the store and legally grow plants in my residence for personal consumption.
This is a great day for Canadians and the world ..! I hope the other major countries follow our lead in next few years! 😎
likes 2

Mrs_Larimar commented8y ago
@@@@TheWeedMan, just on the papers in reality its hard to get a description .. or find a doctor that describes... or beeing allowed to grow your own medical.... i dont know any... person who gets medical weed personlly only hearing of them its ha rd and long process for the persons who medically need it
the weed is coming from canada, because german medical growers dont exist because of the law. you have to show 2 years of expereience in industrial growing before getting a license for industrial growing.. and so on
like 1
TheWeedMan commented8y ago
@Mrs_Larimar, yeah I knew Canada supply your medical cannabis in Germany. In news paper here they make it sound like everybody in Germany gettin free insurance weed with Aurora cannabis lol.
likes
Mrs_Larimar commented8y ago
@@TheWeedMan,hahahaha....that would be nice. all germans high like ace
like 1
Show More (3)
CRiSPrGrow commentedweek 108y ago
hey man, there's a lot of FUD about the dark period, basically the main idea is that there's little you can do in the last 48 hours of a 3 month grow that will do something significant on the grow overall. but the dark period for sure has some benefits, for example a dark period before the chop means less photosynthesis chemicals present for the dry + cure. Second the dark period will boost the creation of terpenes. some say it's good for thc, but trychomes take 2 weeks or more to really make THC, so that"s FUD. second thing is that on planet earth it's almost never dark for two days straight, anything really more than 24H and for sure 48H will start messing with the trychomes and they could oxidise which is bad because you loose that much in potency. Hope this clears this up a bit, good luck ! 🚀
likes 6
TheBudWhisperer commented8y ago
@@TheWeedMan, yeah dude for sure. It’s a tough thing to gauge however cause every strain will be a little different. Some require nothing and others need to be pillaged every other day! Lol
likes 3
TheWeedMan commented8y ago
I still got quite the haul off one plant.. too tired to keep going... lol. 1 down.. 4 to go lol.
likes 2
TheWeedMan commented8y ago
@CRiSPrGrow, thNks for the info bro! 👍🏻
likes 3
Show More (2)

Kushlove420 commentedweek 107y ago
Congratulations on the great harvest
likes 6
TheWeedMan commented7y ago
@Kushlove420, thank you! 🙏🏻
like 1
Mrs_Larimar commentedweek 107y ago
Congratulations!!! ive seen you on Place one, because of the tutorials and your nce lots of pictures. It was a big project that helped us a lot Thank you
likes 6
TheWeedMan commented7y ago
@Mrs_Larimar, thanks!!! I didn’t see all these ! Whoops!
like 1
Mrs_Larimar commentedweek 88y ago
Great to see That your insane Lights work as promised/ imagined
likes 6
TheWeedMan commented8y ago
@Mrs_Larimar, oh yeah! It’s great when things work out as planned! This light works great so far ! It should last like 10+ years too based on what I’ve read before the COBs need replacing 👍🏻👍🏻
likes 2
TheBudWhisperer commentedweek 88y ago
Sick grow, quality, fat, nugs and only 3 weeks into flower! he desciption on the light and explanation is excellent dude👍. I learned something there for sure when you start comparing to the sun - that's really cool!😎 well done dude.
likes 5
TheBudWhisperer commented8y ago
@@TheWeedMan, should chat on that and seed share👍 Got a new order in with seedsman😉
likes 3
TheWeedMan commented8y ago
@TheBudWhisperer, I’m down bro. I got like 50 seeds right now.. Probs 8-10 auto flower strains and 3-4 photoperiods 👍🏻 So we can do that for sure
likes 3
TheBudWhisperer commented8y ago
@@TheWeedMan, Cool dude! I’ll reach out as soon as my order arrives and see if we can’t make deal!😎🤝
likes 2
Show More (1)
TheBudWhisperer commentedweek 78y ago
Yep - they’re stack on the bulk now. Looks like a couple winners dude👍👌😎
likes 5
TheWeedMan commented8y ago
@TheBudWhisperer, nothin left to do now but add water and wait! This is when the magic happens. I bet these two plants get me close to 6oz dried or more ..!
likes 2
TheBudWhisperer commented8y ago
@@TheWeedMan, yep - that was my guess too👍 Some good smoke on the way🤞
likes 3
TheWeedMan commented8y ago
@TheBudWhisperer, I hope we are both right then! My last gsc run in soil got me 5oz of good weed and those plants were much smaller with defeciencies, soil PH problem.. this time there hasn’t been any issues at all so it should be some fire chronic 🔥 I hope!
likes 3

The_Lone_Wolf commentedweek 107y ago
Congrats...from Mushroommeister...I changed my profile name...figured this one was better since I got my fastbuds beans from Reno...where I used to live a couple different times...and its the home of the Wolf Pack...I told you it was one of the best diaries I had been able to find...and not just for fast bubs either...lucked out too...it was the 10th anniversary 5+5 free deal..so I got 10 each of GSC, Zkettlez, Fastberry & Tangie Matic….not a bad deal at all for $200....If you want the site I can give you the URL...5 days for delivery....but the sale is over now as of 4-1...
likes 4
TheWeedMan commented7y ago
@The_Lone_Wolf, glad you’re a big fan of my work here bro! No worries on the links to buy seeds. I’m good to go! 👌🏻
likes 2

Stick commentedweek 107y ago
Congrats for the award 🥈
likes 4
TheWeedMan commented7y ago
@Stick, thanks bro! Just seeing this now !
like 1

Gr33nFi3ld commentedweek 107y ago
Really good diary man! Love the tutorials and the additional info. Congrats on the well deserved win!
likes 4
TheWeedMan commented7y ago
@Gr33nFi3ld, thank you 🙏🏻
like 1
Mrs_Larimar commentedweek 108y ago
Its an Outstanding Diary. For me the best i have been reading ever. Iam sure its a WinnerDiary
likes 4
TheWeedMan commented7y ago
@Mrs_Larimar, wow thank you! I sure hope you’re right! I’d love to win a new iPhone XS Max!
like 1

Bones commentedweek 98y ago
Fat colas and still a week or two out looks great bro!
likes 4
TheWeedMan commented8y ago
@Bones, thanks bro! These ladies do smell and look great! I’m Super excited to get them harvested soon !! 🌲🔥
likes 2

GreasyLuigi commentedweek 78y ago
Excellent!
likes 4
TheWeedMan commented8y ago
@GreasyLuigi, thanks bro!
I appreciate the support :) hope you found my journal useful homie 👍🏻👊🏻
likes 2

OutForReal commentedweek 78y ago
Boom : explosive flowering here ! Nice update like always and flowering cannabis is my favorite smell too 😁🙌
likes 4
TheWeedMan commented8y ago
@OutForReal, isn’t it the best smell? Nothin better than the smell of fresh dank! She’s packed with flowers in the last week and still has another like 3 left .. its gonna be a lot of weed lol. 👊🏻🔥
likes 3

Momgrowsthechronic commentedweek 107y ago
Beautiful grow and well done with the diary! I will consider trying this strain after checking out ur grow. All the best growing forward and Canada is the best! 🇨🇦😍🇨🇦
likes 4
OutForReal commentedweek 78y ago
Boom : explosive flowering here ! Nice update like always and flowering cannabis is my favorite smell too 😁🙌
likes 4

BeefWellingtons commentedweek 68y ago
Do you prefer the cob over hps? I've seen some awesome yields from growers using cob lighting.
likes 3
TheWeedMan commented8y ago
@BeefWellingtons, I put my build info up you wanna take a look Man! 😎🇨🇦
likes 2
BeefWellingtons commented8y ago
@@TheWeedMan, ships, that is an impressive setup you have. I like the veg lights in middle and flower on the sides! My space to grow is part of a small closet, so I'm stuck with my 1 or 2 plant grow for now. Someday I might have space and money to build like that though. Very informative diary you got bud!
likes 3
TheWeedMan commented8y ago
@BeefWellingtons, thanks bro! Even 1 or 2 plants it’s still good.. it’s all about growing your own! Yeah I pretty much got a maxed out 4x4x7 tent. The only other thing I could add would be like CO2 but I don’t think I’m gonna do that. Seems like too much work for a hobby grower.. goodluckin getting the bigger grow area man! 😎👊🏻
likes 2
Show More (5)
BeefWellingtons commentedweek 108y ago
Really nice yield and beautiful buds!! As for the bubble hash, if you don't have the washing machine, I'm telling you its grueling work. I only have 1 gallon bags, but even with 5gallon, its gonna suck. Might I suggest you research the dry ice method? It looks like it pulls a lot more out than the bubble hash with ice water. Also, you can use same bags for it. Less work, higher return. Good luck, awesome grow!!
likes 3
TheWeedMan commented8y ago
@BeefWellingtons, he is a good guy to know.. plus he has a 100 plant grow op license in Canada lol.
likes 2
BeefWellingtons commented8y ago
@@@TheWeedMan, that sounds like a full time job growing ganja. How awesome! Is he growing in soil, soiless, or hydro? I'm guessing indoor? Does he grow photos or auto? I would love to see the setup of a grow like that.
likes 3
TheWeedMan commented8y ago
@BeefWellingtons, he recently got the license. So it’s not at full capacity yet. He is Pheno hunting for some fire genetics right now. All photoperiods , currently he has them indoor DWC setup under LEDs.
likes 2
Show More (4)

Garedicus commentedweek 18y ago
Looks like a good start, man - like @TheBudWhisperer said, watch for nute burn, especially early in the grow, and good luck with your first coco grow. I'll be looking forward to those GG plants when you get them running.
likes 3
TheWeedMan commented8y ago
@TheBudWhisperer, you’ve really been super helpful bro. I was really impressed with the last run of C.C. and GSC in soil that I just had to try another run in Coco .. of course the GG is a welcome addition to the garden! 👊🏻
like 1
TheBudWhisperer commented8y ago
@@TheWeedMan,np homie - it’s what this site is for. The comparative of yields and grow time for each medium will be interesting for sure.
likes 2
TheWeedMan commented8y ago
@TheBudWhisperer, should be an interesting experiment! The new COB led lights should also prove interesting ... not many examples out there but from what I’ve read/seen the results have been spectacular ! It’s gonna be 10 Cree CXB3590 COBs (Best COB LEDs) @3500K run at 50w each. Should provide over 1200 PPFD in flowering .. I believe cannabis maxes out at around 1000 PPFD so I could even add on CO2 down the road ..!
like 1
Show More (2)
TheBudWhisperer commentedweek 58y ago
Lookn good through transition dude!👍 the drip systems cool!👌
likes 3
TheBudWhisperer commented8y ago
@@TheWeedMan, lol yes indeed dude. North Durham so right across the way.👍.
likes 2
TheWeedMan commented8y ago
@TheBudWhisperer, nice I’m a little north of Uxbridge lol.
Sounds like a budswap might be in the making soon 👊🏻👍🏻
like 1
TheBudWhisperer commented8y ago
@@TheWeedMan, check ur pm homie! 👊😉
like 1
Show More (1)

the end.
Enjoying this diary? Follow for more updates!


Prefer the old Diary view?
Go back to the old Diary view