
3x Lemon Pie Auto (Fastbuds)


Soil
Custom

Perlite
Custom

Vermiculite
Custom

Coco Coir
Custom

Other
Custom
Indoor
Room Type
Topping
weeks 3-4
Defoliation
weeks 3-4
SoG
weeks 1-12, 14
11 l
Pot Size
Start at Harvest
G
Germination6y ago


18 hrs
Light Schedule
6.5
pH
DoDrugs420 NOTE: THE COUNTING OF DAYS STARTS FROM THE DAY THE SEED STARTS ITS PROCESS, IN THIS GROW DAY 1 WAS THE MOMENT THE SEED GOT INSERTED INTO THE EASY START (i do not recomend this method for experienced growers, but higly recomend it to unexperienced growers that might accidentally damage their seedling's new root as they move them from the germination zone into their next or final pot, with easy start you can just pick up the small cube of soil and place it inside the next pot GENTLY).
--------------------------------------------------------------------___________________________________________________________-----------------------------------------------------------------------_____________________________________________________________________----------------------------------------------------------------
An Indica-dominant hybrid that’s incredibly easy to grow and very resilient, suited for new and experienced growers who, with not much effort, will be rewarded with impressive 24% THC packed colorful buds with red and pink highlights, accompanied with light orange and white pistils that stand out from afar. Provides a powerful yet not overwhelming high that comes hand in hand with a unique extremely delicious sweet and doughy citrus pine-sol smell. Lemon Pie Auto performs exceptionally well indoors and outdoors, where it’s recommended to grow in bigger pots to let her show her full potential; being able to yield up to 550 gr/m2 in around 8 weeks. The extremely dense and chunky buds will leave you amazed by the excessive resin production that makes it look like they are completely buried in it, perfect for people looking for potency and great taste while having a balanced cerebral and body effect that will please even the more experienced growers. Also recommended for extractors looking for terpenes that will captivate your taste buds.
Bud Description
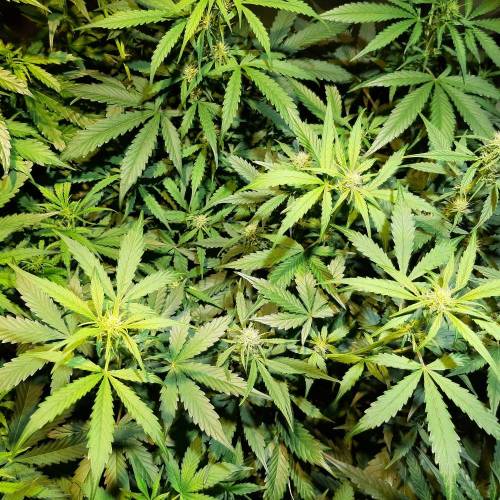
Lemon Pie Auto produces beautiful light green buds with yellow and in some cases, slightly red or pink hues. Her buds look almost completely white because of the excess of resin, sometimes even making it hard to see anything other than the light orange and white hairs.
Smoke Report
The effects will be a really good mix of both body and cerebral effects. It will start as a pleasant uplifting head high that will leave you alert while also deeply relaxing your body without a strong sedating or couch-lock effect, perfect for relieving physical pain while also staying active.
Plant Appearance
This cultivar will grow into a tall main cola with several side branches enveloped in bright green mid-sized thick buds completely buried in resin, with not-so-long light orange and white pistils. The thick buds covering all the branches and main cola will end up in quite a high yield, being able to produce up to 550gr/m2. In many cases, this cultivar produces light-pink reddish hues on the buds, by flushing properly you can spread those beautiful colors all throughout the plant, giving it incredibly good looking details.
Grow Tips
An overall easy to grow plant, great for all growers, especially new ones. This plant requires low maintenance and is very resistant to pests and mold. Due to her branches being full of dense buds, it is a good choice to perform LST techniques to improve the yield and quality of the already incredible buds. Remember to always keep appropriate pH levels for autoflowers, this will ensure your plant is absorbing nutrients properly and will help avoid any problems. If you’re cultivating outdoors it is recommended to use 15L pots and up to make sure the plant develops to its fullest, resulting in denser buds and bigger yields. It is mandatory to flush this cultivar at least for the last week before harvest to make the true flavors and aroma come out.
Flavor
Her flavor can be described as a dank lemon doughy zest. A fresh mix of citrus and fuel that comes hand in hand with a very sweet pie and creamy smell. It will have a herbal, citrus, and pungent skunky flavor on the inhale, and a nice piney aroma with a pinch of cinnamon on the exhale that will leave the whole room smelling delicious.
Tech Specs
Taste
Lemon, Dough, Sweet, Pine
THC
Up to 24%
CBD
< 1%
Harvest EU Indoor
450 – 550 gr/m2
Harvest US Indoor
1.5 – 1.8 oz/ft2
Harvest EU Outdoor
50 – 170 gr/plant
Harvest US Outdoor
2 – 6 oz/plant
Size
XL
Height
80 – 100 cm
Height US
31 – 39 inches
Flowering
8 – 9 weeks
Room
Indoor/Outdoor
Gender
Hybrid
Genes
Sativa 50%/Indica 50%
Genetics
Lemon Pie Auto
Autoflowering
Yes
--------------------------------------------------------------------___________________________________________________________-----------------------------------------------------------------------_____________________________________________________________________----------------------------------------------------------------
First pot substrate mix:
2.5l “Auto Mix 2.0” (CBG)
1l Aged eucalyptus leaf and trunk fibers
1l Organic garden soil
Final pot substrate mix:
47.5l “Auto Mix 2.0” (CBG)
10l Aged eucalyptus leaf and trunk fibers
10l Organic garden soil
22l Coco
10l Perlite
5l “Mega Worm” (Plagron)
1.8l Vermiculite
600g “Nitroguano” (Top Crop)
150g “ProNeem” (Trabe)
100g “Easy Boost Organic” (RoyalQueenSeeds)
100g Wood Ash
--------------------------------------------------------------------___________________________________________________________-----------------------------------------------------------------------_____________________________________________________________________----------------------------------------------------------------
UPDATES:
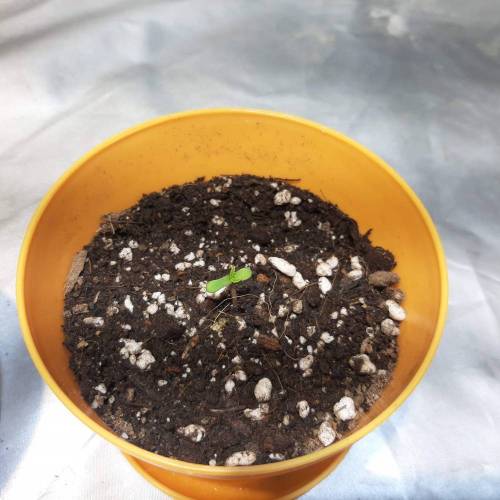
14/10 Seed(s) placed into "Easy Start" kit and placed inside of a humidity dome.
19/10 transplanted 4 out of the 10 and gave those that were transplanted 25ml to 35ml of plain water.
Note: They took a fairly long time compared to my regular germination method and 2 out of the 10 seem to have been stuck inside, as a result i ended up adding one more seed directly into a pot to make up for a total of 9 plants to fill up the SOG, i am not going to use a easy start kit again, seems like they are just a fast and easy way to germinate seeds if you don't already know how to do so properly without said kit.
43 likes
9 comments
Share
Used method
Other
Germination Method
1
Week 1. Vegetation6y ago


18 hrs
Light Schedule
20 °C
Day Air Temp
6.5
pH
60 %
Air Humidity
17 °C
Night Air Temp
0.45 l
Pot Size
0.02 l
Watering Volume
Nutrients 3
Bio Rhizotonic
1.43 mll

pH Perfect Micro
0.21 mll

OG Organics Ancient Earth
0.71 mll
DoDrugs420 NOTE: THE COUNTING OF DAYS STARTS FROM THE DAY THE SEED STARTS ITS PROCESS, IN THIS GROW DAY 1 WAS THE MOMENT THE SEED GOT INSERTED INTO THE EASY START (i do not recomend this method for experienced growers, but higly recomend it to unexperienced growers that might accidentally damage their seedling's new root as they move them from the germination zone into their next or final pot, with easy start you can just pick up the small cube of soil and place it inside the next pot GENTLY).
NOTE: For strain informations, soil recipe and nutrient's stock please do check "Germination Week" as you will find all the information there. (Do not replicate nutrient dosages as these are higly variable depending on the conditions within the grow room or tent, so you may end up damaging or killing your plants even if they are the same strain from the same breeder).
--------------------------------------------------------------------___________________________________________________________-----------------------------------------------------------------------_____________________________________________________________________----------------------------------------------------------------
21/10 Remaining seedlings transplanted into the pots and all plants got 45ml to 50ml of plain water.
24/10- All watered with 60ml to 75ml of water with the nutrients in the above concentrations.
39 likes
1 comment
Share
Used techniques
SoG
Technique
2
Week 2. Vegetation6y ago


15 cm
Height
18 hrs
Light Schedule
24 °C
Day Air Temp
6.5
pH
50 %
Air Humidity
20 °C
Solution Temp
22 °C
Night Air Temp
11 l
Pot Size
0.02 l
Watering Volume
85 cm
Lamp Distance
Nutrients 3
Bio Rhizotonic
2 mll
pH Perfect Micro
0.25 mll
OG Organics Ancient Earth
0.8 mll
DoDrugs420 NOTE: THE COUNTING OF DAYS STARTS FROM THE DAY THE SEED STARTS ITS PROCESS, IN THIS GROW DAY 1 WAS THE MOMENT THE SEED GOT INSERTED INTO THE EASY START (i do not recomend this method for experienced growers, but higly recomend it to unexperienced growers that might accidentally damage their seedling's new root as they move them from the germination zone into their next or final pot, with easy start you can just pick up the small cube of soil and place it inside the next pot GENTLY).
NOTE: For strain informations, soil recipe and nutrient's stock please do check "Germination Week" as you will find all the information there. (Do not replicate nutrient dosages as these are higly variable depending on the conditions within the grow room or tent, so you may end up damaging or killing your plants even if they are the same strain from the same breeder).
--------------------------------------------------------------------___________________________________________________________-----------------------------------------------------------------------_____________________________________________________________________----------------------------------------------------------------
28/10- All watered with 75ml to 85ml of water with the nutrients in the above concentrations.
29/10- Transplanted now as the soil is in perfect condition between wet and dry and plants start to get a little big for their pots, since i expected them to be rootbound before the day after next watering i decided on transplanting earlier and let them fill the 11l pots right away, i only started in smaller pots as to use a lighter soil since the soil i mixed is for the main pots its some HOT ASS soil. Increased the light's height to maintain plant to light distances. Didn't water yet since i had used water to break down the coco bricks and while mixing the soil the moisture got into all of it, so there is enough humidity to maintain them like this for 1 or 2 more days, i will decide on that tomorrow. Plant height before transplant was 8 to 10 cm, i burried it down to 5 again as to spare some vertical space and try to avoid an emergency tent upgrade (highly unlikely if everything goes well, but i am getting ready for it, because with my luck i may expect 1m plants and somehow have a SOG of 1,4m plants basically clubbing with the light, i hope not, but we never know).
31/10- All watered with 750ml of water per plant with dilluted nutrients in the ratios of:
Bio Rhizotonic- 2.2ml/l
pH Perfect Micro- 0.25ml/l
Ancient Earth Organic- 0.9ml/l
41 likes
4 comments
Share
Used techniques
SoG
Technique
3
Week 3. Vegetation6y ago


39 cm
Height
19 hrs
Light Schedule
24 °C
Day Air Temp
6.4
pH
Weak
Smell
65 %
Air Humidity
18 °C
Solution Temp
22 °C
Night Air Temp
11 l
Pot Size
0.47 l
Watering Volume
65 cm
Lamp Distance
Nutrients 3
Bio Rhizotonic
2.67 mll
pH Perfect Micro
0.44 mll
OG Organics Ancient Earth
1.07 mll
DoDrugs420 NOTE: THE COUNTING OF DAYS STARTS FROM THE DAY THE SEED STARTS ITS PROCESS, IN THIS GROW DAY 1 WAS THE MOMENT THE SEED GOT INSERTED INTO THE EASY START (i do not recomend this method for experienced growers, but higly recomend it to unexperienced growers that might accidentally damage their seedling's new root as they move them from the germination zone into their next or final pot, with easy start you can just pick up the small cube of soil and place it inside the next pot GENTLY).
NOTE: For strain informations, soil recipe and nutrient's stock please do check "Germination Week" as you will find all the information there. (Do not replicate nutrient dosages as these are higly variable depending on the conditions within the grow room or tent, so you may end up damaging or killing your plants even if they are the same strain from the same breeder).
--------------------------------------------------------------------___________________________________________________________-----------------------------------------------------------------------_____________________________________________________________________----------------------------------------------------------------
03/11- All watered with 950ml of water per plant with dilluted nutrients in the rates specified above.
Light schedules changed to 19/5 and will be further extended to 20/4 to allow for more hours of heat from the lights as we progress into winter.
06/11- All watered with 1,4l of water with 2ml/l Bio Rhizhotonic + 0.45ml/l of Ancient Earth.
LP1- Topped + Removed first set of leaves as those were not in use anymore completely covered from light.
LP2- Removed first set of leaves as those were not in use anymore completely covered from light.
43 likes
4 comments
Share
Used techniques
SoG
Technique
Topping
Technique
Defoliation
Technique
4
Week 4. Vegetation6y ago


65 cm
Height
19 hrs
Light Schedule
24 °C
Day Air Temp
6.4
pH
Weak
Smell
65 %
Air Humidity
18 °C
Solution Temp
22 °C
Night Air Temp
11 l
Pot Size
0.47 l
Watering Volume
65 cm
Lamp Distance
Nutrients 4
Bio Rhizotonic
3 mll
pH Perfect Micro
1.2 mll
OG Organics Ancient Earth
1.7 mll
DoDrugs420 11/11- Watered each with 1.3liters of water with the nutrient mix specified above.
15/11- LP3 was reaching to the lights, getting way too tall, probably due to the location being off of the highest par area so i had to chop her up at the top, since i did topping many times before i decided to just do some experiementing on this one since i will have 2 other Lemon Pies so i can risk this one and learn something, the other plants in the SoG are also getting a bit too big side wise and start to bend outwards of the center, cutting off a big portion of the tallest plant can solve 2 issues, free up space in the middle of the tent to allow the plants to reach into the center and not into the sides to avoid shadow and it will keep the LP3 within a safe distance of the light to avoid burn and raising the light too much wich would leave the other plants with too little ammounts of par, so i chopped her way under half of her height, only 4 bud producing stems were left meaning only the 2 bottom nodes were left, so i hope this gives some new type of results, hopefully she can still produce 4 huge buds while solving all of the issues mentioned above, we shall see, will add picture on tomorrow's update.
16/11- Very light defoliation, 1 to 2 leaves removed from the bottom portion of all plants, leaves that did not get any light anymore, i trust they won't have excesses or deficiencies too soon so i can just remove these and let them grow without the lower leaves acting as a buffer for mistakes.
Watered each with 1.4liters of water with the nutrient mix of Bio Rhizotonic at 2ml/l, Micro at 0,9ml/l, Ancient at 1,1ml/l and Katana Roots at 0,12ml/l.
38 likes
1 comment
Share
Used techniques
SoG
Technique
Topping
Technique
Defoliation
Technique
5
Week 5. Flowering6y ago


75 cm
Height
19 hrs
Light Schedule
25 °C
Day Air Temp
6.4
pH
Normal
Smell
57 %
Air Humidity
17 °C
Solution Temp
24 °C
Night Air Temp
11 l
Pot Size
0.35 l
Watering Volume
65 cm
Lamp Distance
Nutrients 3
Bio Rhizotonic
0.79 mll
OG Organics Ancient Earth
0.4 mll

More Roots
0.24 mll
DoDrugs420 20/11- All watered with 1,4l of the nutrient solution specified above.
Some lollipopping in a couple plants that had underdeveloped branches unable to even try to reach the light, only the strong ones survive in this SoG.
40 likes
3 comments
Share
Used techniques
SoG
Technique
6
Week 6. Flowering6y ago


100 cm
Height
19 hrs
Light Schedule
25 °C
Day Air Temp
6.4
pH
Normal
Smell
57 %
Air Humidity
17 °C
Solution Temp
24 °C
Night Air Temp
11 l
Pot Size
0.35 l
Watering Volume
55 cm
Lamp Distance
Nutrients 5
Bio Rhizotonic
0.952 mll
OG Organics Ancient Earth
0.595 mll
pH Perfect Micro
0.595 mll
DoDrugs420 25/11- All watered with 1.4 liters of water each with the nutrient mix specified above.
28/11- Identified a problem on the lower leaves seemingly excess or deficiency of phosphorous, i suspect it might be a excess since i can also identify calcium and other micronutrient deficiencies, on the top, wich leads me to belive its just that, a phosphorous excess from the organic bloom, thought i could give them some more power, but apparently not, they are already growing at full power, and any further boosting will hurt instead of help.
29/11- 1st attempt at fixing the issue, watered with 1.35 liters, phased into firstly 675ml of pure ph'd water, followed by another 675ml of nutrient mix at the following concentrations:
Bio Rhizotonic- 2ml/l
Ancient - 1.2ml/l
Micro - 1ml/l
Calmag- 0.05ml/l
42 likes
1 comment
Share
Used techniques
SoG
Technique
7
Week 7. Flowering6y ago


100 cm
Height
19 hrs
Light Schedule
25 °C
Day Air Temp
6.4
pH
Normal
Smell
57 %
Air Humidity
17 °C
Solution Temp
24 °C
Night Air Temp
11 l
Pot Size
0.35 l
Watering Volume
55 cm
Lamp Distance
Nutrients 5
Bio Rhizotonic
2 mll
NeemAzal
0.1 mll
ProNeem (Flour form so its in G by Liter)
1 mll
DoDrugs420 04/12- All watered with 1.35 liters of water each with the nutrient mix specified above.
05/12- All sprayed with a total of 1.6 liters for the whole tent with the bellow products-
Delta Nueve - 6ml total
NeemAzal- 4ml total
(This upper section is part of pest control)
--------------------------------------------------
08/12- All watered with 1.35 liters of water each with the nutrient mix specified bellow-
Bio Rhizo- 1ml/l
Ancient- 1.5ml/l
Micro- 1.5ml/l
Big Boom- 8,13mg/l
39 likes
1 comment
Share
Used techniques
SoG
Technique
8
Week 8. Flowering6y ago


100 cm
Height
19 hrs
Light Schedule
25 °C
Day Air Temp
6.4
pH
Normal
Smell
57 %
Air Humidity
17 °C
Solution Temp
24 °C
Night Air Temp
11 l
Pot Size
0.35 l
Watering Volume
55 cm
Lamp Distance
Nutrients 5
Bio Rhizotonic
2.85 mll
OG Organics Ancient Earth
0.6 mll
pH Perfect Micro
0.6 mll
DoDrugs420 13/12- All watered with 1.35 liters of water each with the nutrient mix specified above.
46 likes
1 comment
Share
Used techniques
SoG
Technique
9
Week 9. Flowering6y ago


100 cm
Height
19 hrs
Light Schedule
25 °C
Day Air Temp
6.4
pH
Normal
Smell
57 %
Air Humidity
17 °C
Solution Temp
24 °C
Night Air Temp
11 l
Pot Size
0.35 l
Watering Volume
55 cm
Lamp Distance
Nutrients 4
Big Boom(Crystal[grams])
12.82 mll
OG Organics Ancient Earth
0.6 mll
pH Perfect Micro
0.6 mll
DoDrugs420 17/12- All watered with 650ml of water each followed by 650ml of water with the nutrients in the concentrations above.
21/12- All watered with 650ml of water each followed by 650ml of water with the nutrients in the following concentrations.
Ancient- 1ml/l
Big Fruits- 0,042ml/l
Micro- 0,2ml/l
46 likes
1 comment
Share
Used techniques
SoG
Technique
10
Week 10. Flowering6y ago


115 cm
Height
19 hrs
Light Schedule
25 °C
Day Air Temp
6.4
pH
Strong
Smell
50 %
Air Humidity
17 °C
Solution Temp
24 °C
Night Air Temp
11 l
Pot Size
0.35 l
Watering Volume
55 cm
Lamp Distance
Nutrients 2
OG Organics Ancient Earth
0.7 mll
pH Perfect Micro
0.4 mll
DoDrugs420 23/12- Had to step away for a couple of days so i watered an extra 650ml of plain ph'd water before leaving.
27/12- All watered with 1.3l of water each with nutrients in the above concentrations.
54 likes
4 comments
Share
Used techniques
SoG
Technique
11
Week 11. Flowering5y ago


115 cm
Height
19 hrs
Light Schedule
25 °C
Day Air Temp
6.4
pH
Strong
Smell
50 %
Air Humidity
17 °C
Solution Temp
24 °C
Night Air Temp
11 l
Pot Size
0.35 l
Watering Volume
55 cm
Lamp Distance
Nutrients 2
OG Organics Ancient Earth
0.7 mll
pH Perfect Micro
0.4 mll
DoDrugs420 will update
40 likes
comments
Share
Used techniques
SoG
Technique
12
Week 12. Flowering5y ago


115 cm
Height
19 hrs
Light Schedule
25 °C
Day Air Temp
6.4
pH
Strong
Smell
50 %
Air Humidity
17 °C
Solution Temp
24 °C
Night Air Temp
11 l
Pot Size
0.35 l
Watering Volume
55 cm
Lamp Distance
Nutrients 2
OG Organics Ancient Earth
0.7 mll
pH Perfect Micro
0.4 mll
DoDrugs420 will update
45 likes
comments
Share
Used techniques
SoG
Technique
14
Week 14. Flowering5y ago


115 cm
Height
19 hrs
Light Schedule
25 °C
Day Air Temp
6.4
pH
Strong
Smell
50 %
Air Humidity
17 °C
Solution Temp
24 °C
Night Air Temp
11 l
Pot Size
0.35 l
Watering Volume
55 cm
Lamp Distance
Nutrients 2
OG Organics Ancient Earth
0.7 mll
pH Perfect Micro
0.4 mll
DoDrugs420 will update.
59 likes
6 comments
Share
Used techniques
SoG
Technique
15
Week 15. Harvest5y ago
Happy Harvest Day!


10/10
Rated
Lemon Pie was one of the best cannabinoid profiles in the tent, head 2 head with the gorilla glue's best pheno when it comes to flavour, imo, but i'm pretty sure its just my personal taste in question at that point, also when it comes to thc percentage, you can definitely feel the density of the resin if you smoke this one, i found it really great to make edibles that are based on a orange flavour, and get it going pretty sweet, and then just adding that good good lemon resin, just takes any snack into a whole other level, its gonna catch u off guard cuz of how good the taste gets, all you need is to be distracted near the cookies and ur clearing the plate from how good it is.
Smoked is that good good citrus pine creamy taste, the high is active and intense but shifts into a "high up in the clouds but with the body relaxed and without couch locking", so you still own ur body and can make ur decisions on where to go, just don't think its gonna be easy cuz them legs get heavy tho. Had some slight paranoia but that's just me, cuz i take tolerance breaks so i get FKD UP. And it do make u get fkd, up, soo, it gets the job done and tastes really good overall, whatever consumption method you pick.
If you-re going for good taste, a great high and a good time, just go with lemon pie and u will be alright.
Overall- 10/10
4 Smoking- 10/10
4 Cooking- 10/10
These babes grow with a beautifull structure and its great for smoking as flower, if you pop out a bud of these and give it to someone, they won't be judging you over bud appearance, nor smell, nor how it hits, all u will get is a "do you have more?" the very second a puff is taken.
Other smoker's random opinions translated: "Oh yeah, i know this one, its lemon haze because of the way the leaves are and the smell is defenitly lemon haze" ( yeah right, the non-grower know exactly what this is) 😂 but he did come pretty close tho. Not quoted 100% as it was said but i tried to get as close as i remember him saying it.
Another one i can't quote exactly but was really excited with the taste and enjoyed the weed (in a joint) and him being a heavy soapbar hash smoker and that often gets that local weed that looks like it was just sifted before selling, so, he was expecting this to be just another joint, but... the mothafucka entered full on "i'm lit 420 blaze it air horns banging on your hears type of mood", now.... i don't know wtf happened, maybe he smoked too much, maybe lemon pie is just the perfect cannabinoid profile for his brain, but dang, he was either too lit and faked it, or he was just too lit, but either way. Good job Fastbuds.
I'm defenitly getting this one going again sometime in the near future. Not for him, but for me, i really liked it :3 .
Get yours at: https://myfastbuds.com/?a_aid=DoDrugs420
Show more
Translate
Spent 93 days
Ger Veg Flo Har
117.09 g
Bud wet weight per plant
33.96 g
Bud dry weight per plant
3
Plants
0.21 m²
Grow Room size
Easy
Difficulty

Citrus, Cream, Pine
Taste
Height
Day air temperature
Air humidity
PH
Light schedule
Solution temperature
Night air temperature
Pot size
Lamp distance


DoDrugs420 Get yours at: https://myfastbuds.com/?a_aid=DoDrugs420
123 likes
31 comments
Share
Equipment Reviews


67 comments
Sort by
popularity
popularity
newest
oldest

DoDrugs420 commentedweek 155y ago
Amazing grow featuring Lemon Pie Auto in its best form.
likes 3
DoDrugs420 commentedweek 155y ago
AMAZING Lemon Pie Auto!
likes 3
DoDrugs420 commentedweek 155y ago
Holy, that's some serious Lemon Pie Auto !
likes 3

Waltwonka commentedweek 155y ago
Awesome. Definitely doing this strain next.
likes 9

Organic_LarF commentedweek 155y ago
Enjoy!!!
likes 9

DreamIT commentedweek 56y ago
Enjoy growth 😁🍀🤟
likes 9

Harukisan commentedweek 155y ago
Beautiful! Good job 👊
likes 8
DoDrugs420 commented5y ago
@Harukisan, thanks growmie
likes 15

Cannabeast40 commentedweek 155y ago
Nice one mate, hope she did you good 😀
likes 8

Igrowneil commentedweek 155y ago
Looking good , best of luck ... if you have any free time check out my current grow
GORILLA GIRL XL AUTO
CREAM MANDARIN XL AUTO
BLACK CREAM AUTO
TOPPED, ScrOG, SOG , LST
HAPPY GROWING
likes 8

hannabis420 commentedweek 155y ago
enjoy the harvest😍
likes 8

PurpleWorship commentedweek 36y ago
😆😆😆😆😆😆😆
likes 8

Smokwiri commentedweek 26y ago
Looks great!
Btw. Was reading the choptober thing and noticed the worm casting thing, i use bat guano by the same company, their advise is 20% on the package, but i only use 2-3small teaspoons in 10l container to keep the soil from being too hot. Their organic nutes seem to be a bit more concentrated than average i think.
My chat function doesnt work since a week, but i can still.read
likes 7
DoDrugs420 commented6y ago
@Smokwiri, thanks.
Most of the plants seem to have adapted and accepted this soil recipe, even the 2 plants in the SoG that had a environment shock since germination but that after transplanting seem to be recovering pretty well, idk if its due to how much coco and fibers i used in the soil recipe or if its because of the eucalyptus fibers and organic soil that were extracted from a area with severely high microbiotical activity, like, the plants will go to extreme heights in that area, and this may be these microbes eating up the worm hummus and turning it into more available less harmfull nutrients, or maybe its the nutrients im supplementing that somehow protect the plants a lil bit, I don't even know anymore, but something happened because they are not burning at all or showing excess of nitrogen(yet), their green got deeper but seems as it has stabilized.
And yeah chat is buggy as hell, i can't even open up new dm windows with people i'm wasn't chatting with already, i hope gd fixes this.
likes 16

Ferenc commentedweek 06y ago
Good Luck! This is a nice smoke mate ;) @DoDrugs420
likes 7
DoDrugs420 commented6y ago
@Ferenc, Thanks, i have tried gorilla cookies and strawberry pie, so i was really looking foward to giving this one a go. can't wait to test it out myself.
likes 16

Taito commentedweek 155y ago
Disfruta de la cosecha compañero 👍
likes 7

Zhabotron commentedweek 145y ago
Красивый конечно-ппц!!
likes 7

Polaskis commentedweek 145y ago
Niiiice work 💪
likes 7

Darksoul commentedweek 155y ago
Beautiful flowers! Nice grow! Good luck friend =)
likes 6

Fast_Buds  commentedweek 155y ago
Hey there, Well done on your grow. We hope you have enjoyed growing our genetics !! Keep up the good work! Happy harvest!!!🌾
likes 6

Martian_D commentedweek 106y ago
These look awesome great grow, my next grow will have some lemon pie in it. Looking forward to the end results
likes 6

Tryhard commentedweek 16y ago
Good luck good start
likes 5
DoDrugs420 commented6y ago
@@Tryhard, thanks bro, this SoG looks like its finally going as wanted, just praying that it actually does.
likes 14

the end.
Enjoying this diary? Follow for more updates!


Prefer the old Diary view?
Go back to the old Diary view