
Likes
Comments
Share


@nanaboham
Follow
So the objective here is to get to harvest as quickly as possibly - Basically got a cheap humidifier and filled it with ph'd water with very little nutrient. Running this as a Fogponics once the roots starts coming out the net pot and then move to standard dwc with air pump during veg and flower. Let see if this speeds things up

Likes
5
Share


@CreoWeed
Follow
Hello nice people!
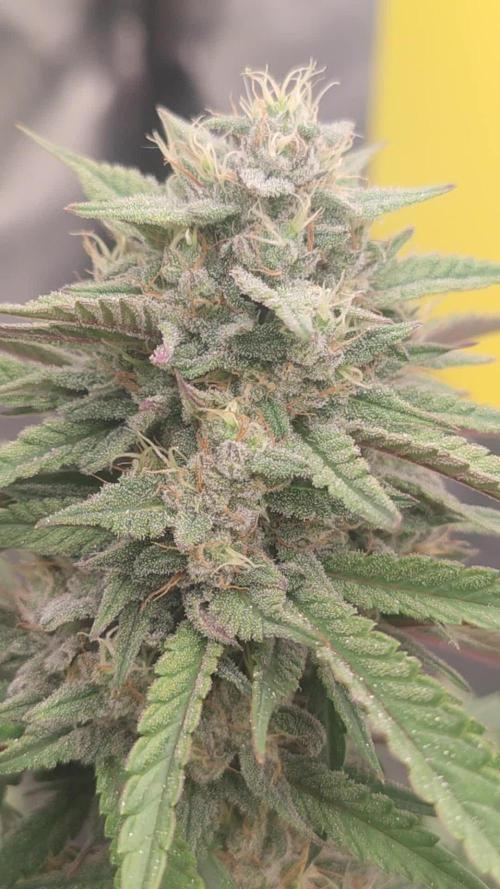
This week number 6 went pretty good... Colas are building up and bringing out gorgeous colours as you can see in the pictures, purple mixed with pink and orange makes this plant the most beautiful I ever grown.
The smell started very softly and it had a kind of pine arome, sublime.
I've started giving her some Bloombastic and will keep doing so for the whole week.
Stretching seems over and she kept a quite compact size, at 62 centimeters.
That's all lads, I cannot wait to update the next weeks of this marvelous plant.
Ah, I also just harvested and rated my other diary, come and have a look if you have done it yet!
Stay tuned and stay high peeps!

Likes
14
Share


Likes
19
Share


@Alice_in_Wonderland
Follow
Day 8 - First official day of veg and both ladies are right on time for a small adjustment in lighting, PH and nutrients. 10ml of Hydro A & Hydro B were added to both buckets (10L of water in each bucket) and the Milwaukee PH controller was set to work. Starting at a PH of around 7.8, it slowly worked down to a perfect 6.0 over about 50minutes. The lights were readjusted to be 60cm from the seedlings who are all between 8-10cm tall and the intensity of the lights increased to about 70% brightness.
Day 9 - Cheech is taking nicely to the adjustment in light and nutrients, but CG 1 is looking a little bit too perky. Going to give her 24 hours to adjust.
Day 10 - We have finally renamed CG 1. Fellow enthusiasts, meet Venezia.
Day 12 - The root systems are clearly visible in the ladies today
Day 13 - The ladies are looking well today. Venezia seems to be showing some light signs of heat stress with slight curling of the leaves. The lights are due to be adjusted tomorrow to account for the seedlings growth over the last week.

Likes
6
Share


@OSHkosh510
Follow
2 day of flipping to flower 2 gmo seed and 2 blueberry clones 1 jealous clone and 3 grap pie
Likes
26
Share


@eriinho
Follow
Hello growers, starting another week.
Weeks 2, 3 and 4 are gone, now I close the application of BIG BUD and continue only with BIG CANDY and SENSI BLOOM.
I would like to ask a question with you, I know that the days to start the flush would be the 15 days before the harvest but which week should I start?
I would be very grateful if you would help me commenting below.
Gratitude family!!! 🙏
Day 62 - Hello growers, day 62 showing a video of how she is. Would you like your help, when should I get this girl's flush? In the seed information it says that her lifespan is 75 days to be ready, I see her I think I will spend a little more than 75 days, but let's wait for the next episodes.

Likes
36
Share


@pifflestikkz
Follow
Day 144
23/09/24 Monday
(Start of week)
De-chlorinated tap water pH 6 with calmag today.
Seeing her starting to really take shape now, buds forming well, trichomes now flooding in. She's looking good 😍
Day 146
25/09/24 Wednesday
De-chlorinated tap water pH 6 today with Plagron PK13-14.
Day 148
27/09/24 Friday
Feed again today using de-chlorinated tap water pH 6 with calmag.
Picture and video update 😎
Day 150
29/09/24 Sunday (End of Week)
De-chlorinated tap water pH 6 only today.
She is now exploding with bud sites 🤤
Will lollipop at end of week to allow better focus on tops. I know it's late in the game but there are some wispy strands that have re emerged so I'll take care of them tonight.
Picture update 😎

Likes
5
Share


@Naujas
Follow
I came back after vacation, the girl is ready for cutting, the rainy weather has started, so there is a threat of rot, you can say I managed to find just a few small pits in time and removed them and threw them away, the big and stiff flowers look fantastic:) but after a long trip I was tired, so I didn't take quality photos :( no everything else, I am very satisfied with the result I got:) its smell already lets me know that it will be good:) a lot of sugar leaves from which I will make bubble hash:) I will update the weight when it dries.
Likes
9
Share


@Xabii
Follow
Values are average of the day.
DATE - °C - RH% (Tent Temp/RH)
20240627 27.6 52.4
20240628 24.2 50.6
20240629 26.0 47.1
20240630 25.7 55.9
20240701 23.8 54.4
20240702 22.1 58.0
20240703 21.7 57.4
DATE - PH
20240627 #
20240628 5.55
20240629 5.40
20240630 6.27
20240701 5.82
20240702 5.91
20240703 6.19
DATE - EC(us/cm)
20240627 #
20240628 633
20240629 663
20240630 1095
20240701 1033
20240702 997
20240703 950
DATE - °C (Reservoir)
20240627 #
20240628 23.7
20240629 23.3
20240630 24.1
20240701 22.2
20240702 20.5
20240703 20.1
Likes
5
Share

@Chrisandweed
Follow
Esta planta es una bestia en todos los sentidos.. con minimos cuidados preventivos, es literalmente del ataque de araña que he tenido en el armario, se centro sobre todo en las feminizadas pequeñas (ya controladas) y en dos autos (en proceso de control xD) a esta planta no le he visto ni una hoja mal, luego por bocachancla tendré los cogollos todos llenos de telarañas, pero a priori nada de eso, fuertisima y robusta como ella sola, aguanta las plagas y problemas de maravilla, esta y la purple sunset xxl son las que menos señales de sobre fertilización muestran!
De verdad que con esta variedad en especifico, ya no se tanto si este fenotipo o en si la variedad que han logrado estabilizar, pero si fuese una feminizada SABE DIOS QUE LE SACABA SEMILLAS HASTA POR LAS OREJAS! Un pto Titán de planta xD
Luego sobre ella, cogollos muy gordos, sin contar la purple sunset que va una semana atrasada con respecto a estas, es la de los cogollos mas gordos, muuuucha resina y un proceso de cultivo aparentemente muuy rapido... Quiero pensar que le queda un mes entero aun para poder hacerle chupar de las hojas al maximo para el lavado de raices... Pero me temo que en 2 semanas y media o así tenga que cortarla. Por si las moscas, entre el domingo y el lunes le hice el ultimo riego de fertilización, ya a partir de hoy o ya mañana por la mañana solo aguita con flush, enzym y calmag si toca.

Likes
6
Share


@czar712
Follow
She is healthy in her 4th week and after her first defoliation. she grew an inch. i also topped her on the two different tops {as i said last week she topped herself bout the 2nd week) i am going to put a photo of this week you can clearly see the split. i also increased the light intensity a bit too between 600-700 ppfd or 44000 lux roughly wanna see what happens pushing the ppfd a bit.


Likes
4
Share


@SuperGluedGrow
Follow
Did LST and topped Pheno 1 & 2, 3 is too funky to mess with. I think PH was just my issue and possible too high intensity light as I lowered to 60%, but also brought my PH to 6.5 so I'm guessing that helped too.
Likes
103
Share


@PEAKYPLANTERS
Follow
Welcome back to everyone in the enchanted valley of Peaky!
Our splendid californian shoots continue to swell and produce sugars stuck under the net where we tried to give space even to the most underlying ones!
see you around
xoxo
Likes
7
Share


@Jays_Not_Here_Man
Follow
Overall, the Girls are doing great. #2 is still showing some nitrogen excess, but is doing well. I’ve adjusted her feeding specifically in hopes to correct. #1 is not showing the same issue, and is motoring along. Both are stacking nicely, and are bringing on some smell now, and are sticky to the touch. I estimate about 3 weeks more, but who really knows with Autoflowers? Happy Gardening 🇨🇦❤️🌱😎💨

Likes
8
Share


@Inceptionist
Follow
On the 15/10 it was my fifth day in a row without any more signs of pollensacks or nanas! It really is worth the try is you think, you got something special on your hands. If you can, better isolate it anyways, I just didn't have the room for this.
Everything else also going great and the Double Dunked is starting to show why this run is called "Purple Beauties". From now on every week was going to blow my mind on just how beautiful this grow could turn out.
Also did some defoliation again


Likes
12
Share


@Jodas
Follow
Waiting game begins. Posted a video as well so you can see a bit more of the plant. Patience is the game we are playing now. Hopefully they can finish soon. Although the trics are 50-50 milky and clear.
Likes
9
Share


@Headies
Follow
So I had a little less nutrient last week then i needed. Def a calcium deficiency. I think it's clearing up but this plant has spot all over it. I changed the water, gave it the right amount of nutrients and a little exra hydrated lime for calcium. Hydro is hard. I hoping It's not sick. I hope It doesn't get the other plants sick. Just a few weeks left.
Likes
4
Share


@Familytrees19
Follow
I’m back!! And sorry I’m using my videos I posted on YouTube..😞😞 I will make sure not to in my posts to come!!
Popped seeds Jun 27
Temps inside some at 80 degrees F
Humidity is at 75-80%
8 seeds planted and all 8 made it!

Likes
Comments
Share

@DogDoctorOfficial
Follow
Chem Brulee – Pheno A | Week 2
Some plants demand attention through explosive growth.
Others earn it through elegance.
Chem Brulee Pheno A is beginning to look like one of those plants.
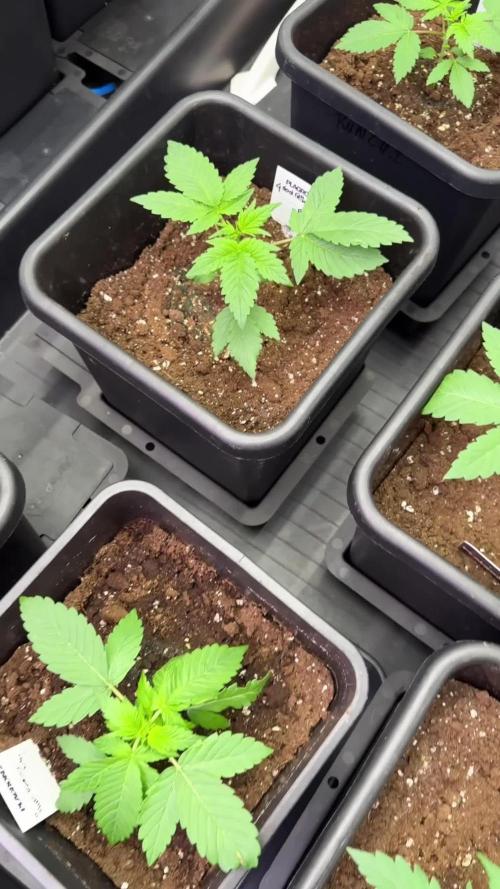
While several of her tent mates are building wider structures, this phenotype is expressing herself differently. The slightly longer internodal spacing creates a more open architecture, giving the plant a refined and balanced appearance without sacrificing vigor. Every node is clearly defined, every branch has room to breathe, and the overall structure already hints at a phenotype that may favor vertical development as flowering progresses.
What stands out most this week is the confidence of her growth. The main stem is thickening nicely, secondary shoots are emerging strongly from each node, and the newest growth displays that bright healthy green color that growers love to see during early vegetative development.
From above, the canopy remains symmetrical and organized. From the side, the increased spacing between nodes reveals the plant’s structure beautifully, making it easy to follow her development stage by stage. Rather than stacking tightly, she appears to be building a framework designed for future expansion.
The stem itself deserves mention. It has developed excellent thickness relative to the plant’s size and shows no signs of weakness despite the more open growth pattern. This combination of strong stem development and longer internodes often creates plants that are easy to manage and train later in the cycle.
The lower branches are already reaching outward with purpose, and new growth sites are becoming increasingly visible. Every node is beginning to establish its own potential future flowering site, laying the foundation for what should become a productive structure once the flowering stretch begins.
Environmentally, conditions remain unchanged from the rest of the Project Blue garden:
* 12/12 from seed
* RH: 60–65%
* Day temperature: ~26°C
* Night temperature: ~18°C
* Root zone temperature: ~21°C
* Watering pH: 6.0
* EC: 1.0
* Nutrients:
* Plagron Terra Grow
* Power Roots
* Pure Zym
* Sugar Royal
* Foliar: Vita Race
* PPFD approximately 600–700
One detail I particularly appreciate about this phenotype is how clearly she displays her structure. The spacing between nodes allows every growth point to be seen and documented, making her a fantastic candidate for following developmental changes throughout the coming weeks. These are often the plants that reveal their personality early and continue to surprise as flowering progresses.
For now, Chem Brulee Pheno A appears healthy, vigorous, and completely on schedule. She may not be the most compact plant in the room, but she is demonstrating exactly the kind of balanced growth that suggests strong genetic expression and excellent adaptation to her environment.
As always, Mr. Baggy remains on quality-control duty, carefully monitoring progress from somewhere nearby and ensuring every leaf receives the appropriate level of professional inspection.
Week 2 closes with a healthy root zone, strong stem development, expanding side branches, and a beautifully organized structure that is becoming more interesting with each passing day.
The journey continues. 🌱💚
Thank you to everyone following along with our Project, and to the friends, growers, sponsors, and community members who continue to support these diaries week after week. Your encouragement helps transform simple plant documentation into a shared learning experience for growers around the world.
Growers Love and on to Week 3. 🚀🌿
