
Likes
Comments
Share


@DevilsBud
Follow
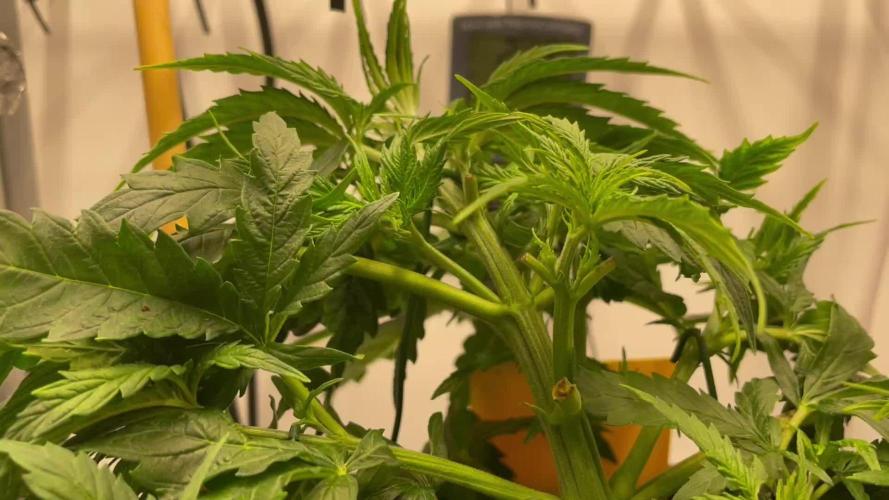
New week for the 7 strain 11 plants grow
Relax week for the girls one good feed off nutrients and then couple watering with call-mag before start of flowering some defoliation here and there and final big haircut and removing lower grow i want to focus on top grow and less popcorn buds going on
24/3/22
Big defoliation for making the 12/12 switch
Will be updating Tru the week
And remember just grow weed and stop growing bullyish behavior
visit www.marshydro.eu
for your best gear and use the PROMO CODE: DEVILSBUD
Some info about the Marshydro FC-4800
Superb Quality LED Chips: The whole light is composed of 1206 pcs Samsung lm301b and Osram 660nm chips. More than two times as many LEDs are used to drive the grow lights at low currents and to avoid overdrive. Quality is guaranteed and efficiency is up to 2.8 μmol/j.
Even PAR Distribution and High PPFD Output: The multi-light bar design and the densely distributed light chips enable the LED grow lights to achieve the optimum PPFD required for plant growth over the entire effective coverage area.
Specifically Designed Spectrum: To ensure even plant growth, blue and red light are enhanced on the basis of a full spectrum combination. Not only does this accelerate plant growth, but it also improves the yield and quality of the plants at the same time.
Dimming Daisy Chain Function: The dimming function saves on electricity costs and enables brightness from 10% to 100% for the different stages of plant growth. A single master light can connect up to 30 lights in a daisy-chain system.
Business LED Grow Light: The light's wavy heat sink dissipates heat quickly and the IP65 waterproof allows the light to operate in humid conditions. 180° collapsible feature for easier installation. All these features provide favorable assistance for commercial cultivation.
And some tent info
●【Lock All Light Insid】MARS HYDRO Grow Tent Interior is made of diamond mylar. Non-toxic to the environment, no harm to plants. High-quality 1680D canvas being double stitched, (ALL OTHERS BRAND grow tent is 601D canvas) which is tear-proof for perfect light locking, No light leaks or rips at all.
●【Durability Grow Tent】Stable Metal corner adapters and poles are the trustful supporters of the tent. No rusting nor paint-falling. Quick easy tool-free installation. Carries strong heavy-duty SBS zippers, double layer lining to create a light-proof seal.
●【Easy Observation of your Plants】Special peeks window made by double layers of cloths. Observe the growing conditions of your plants without opening the tent and avoid disturbing plants. The peek window also serves to dissipate heat and ventilate air.
●【Removable Tray Keep Clean】The package includes a removable waterproof floor tray to hold soil and fallen leaves. The tray can be taken out easily to wash. Removable and water-proof makes cleaning easy.
●【Good Ventilation&Fast Assembly】 Circular double-sleeved vent holes with adjustable nylon strap for air circulation by exhaust fan, ducting, carbon filter, or reflector. Better allows proper light, heat, and airflow. Quick tool-free installation. Reinforced by a sturdy metal frame to ensure security and stability, supports up to 140lb. Perfectly safeguard your plants to thrive even in winter


Likes
5
Share


@Easygrower
Follow
Hello growers day 82 and the bud is in the jar well it was an interesting grow from germination she played right up growing slow and deformed she had white leafs all over her but I let her go and she grow some nice little purple buds I gave her water for the first ten days then gave bio grow/bloom until I see first pistols then I gave grow/bloom/top max/bio heaven until day 61 then flushed until day 75 I clearly had a doggy pheno I will try again hopefully get a better one I had her on a 20/4 hour light cycle through out the grow well that’s all folks until next time be safe and happy growing 😡

Likes
1
Share


@Infomercial
Follow
Def worth the grow, took a good bit longer than expected though that is for sure.

Likes
23
Share


@SonomaSungrown
Follow
French Macaron hit peak purple and trichs are all ready to roll.
Chem Brulee smelling amazing and packing on weight.
Pineapple Meatball remainders have now started going DEEP purple. Could end up with a few head stash nugs off of this late harvest.


Likes
18
Share


@MadeInGermany
Follow
Hey everyone ☺️.
It gets more beautiful from week to week 😍👍.
I have them all this week Sprayed again properly with neem oil in the veggie phase ☺️.
There have been no trips for 2 weeks, but prevention is better 😀.
Because of the neem oil, the plants look very dark and shiny, which I really like when they shimmer like that 😝.
I didn't do any training these days, that will be done again the next few days 👌.
it was watered twice this week with around 0.6 l per plant.
The Ph / Ec measuring device was also recalibrated.
Otherwise there is nothing to report for this week and we'll see you again with the next update ☺️👍.
I wish you and your families a Merry Christmas 😊.
Stay healthy and let it grow 🍀
You can buy this Strain at :
https://sweetseeds.es/de/red-mandarine-f1-fast-version/
Type:
Red Mandarine F1 Fast Version
☝️🏼
Genetics:
Red Poison Auto®️ (SWS39)
X
Tangie (California Orange x Hybrid Skunk)
👍
Vega lamp:
2 x Todogrow Led
Quantum Board 100 W
💡
Bloom Lamp :
2 x Todogrow Led
Cxb 3590 COB 3500 K 205W
💡💡☝️🏼
Soil :
Canna Coco Professional +
☝️🏼
Fertilizer:
Green House Powder Feeding
☝️🏼🌱
Water:
Osmosis water mixed with normal water (24 hours stale that the chlorine evaporates) to 0.2 EC. Add Cal / Mag to 0.4 Ec Ph with Organic Ph - to 5.5 - 5.8 .

Likes
133
Share


@Kitties_and_Colas
Follow
Meow! Week 4 is upon us! We adjusted her ties this week and removed a few of the larger top fans..her color is nice and uniform..her bud development looks closer to week 3 than 4 but she'll probably start plumping quick in the next week..we lost half of our flower lighting for most the week, we use a dual 315watt and one side of the ballast had a short..we remedied this and ordered another 315watt CMH..now that we have more light than we need, moving from a 4ft an 8ft flowering tent may be in our future... thank for reading and happy growing 🐱
7/12/21- light defoliation thru the center to base and removed some large fans from the top of the main stems
Likes
12
Share


@Tmasm
Follow
Saudações
Iniciar diários fast buds
Encomenda chegou dentro do prazo, muito discreto.
Dia 17/11/2023
Selecção de 5 sepas, colocando em papel toalha
Dia 18/11/2023
Colocando em vaso final, com um cúpula para manter umidade alta.
Agora é esperar que corra tudo bem
Não se esqueça de ver novidades em https://2fast4buds.com


Likes
12
Share


@Mikeman1
Follow
The double grape is coming around. But the freebie gelato is spreading out nicely. Dealing with tent temp raising a bit I’ve been constantly monitoring and enjoying the day by day changes.
Likes
10
Share


@Troy_Farms
Follow
Here we go! about 6 weeks into flowering. I just moved to a new place, new Balcony (that receives better sunlight). I cut down about half of the plant because she was ridiculously bushy and not flowering. I cut a bunch o branches (like 6 or 7) in beginning of October in an attempt to stress into flowering to kick start her into flowering and it worked. Finally started producing and flowering. Buds are not crazy big but lots of small nugs going (12 or so tops). Very sativa in its flowering behavior. Nice trichrome production is finally happening, smells delicious. Trichromes are about 90% milked over so probably about 2 more weeks I would guess by looks of everything. Week 8 of flowering.


Likes
7
Share

@Enki_Weed
Follow
In den letzten ein bis zwei Wochen hat sich unsere Pflanze weiterhin prächtig entwickelt und zeigt nun deutliche Anzeichen einer fortgeschrittenen Blütephase. Es gab keine dramatischen Veränderungen, sondern eine stetige Reifung, die uns dem Erntezeitpunkt näherbringt.
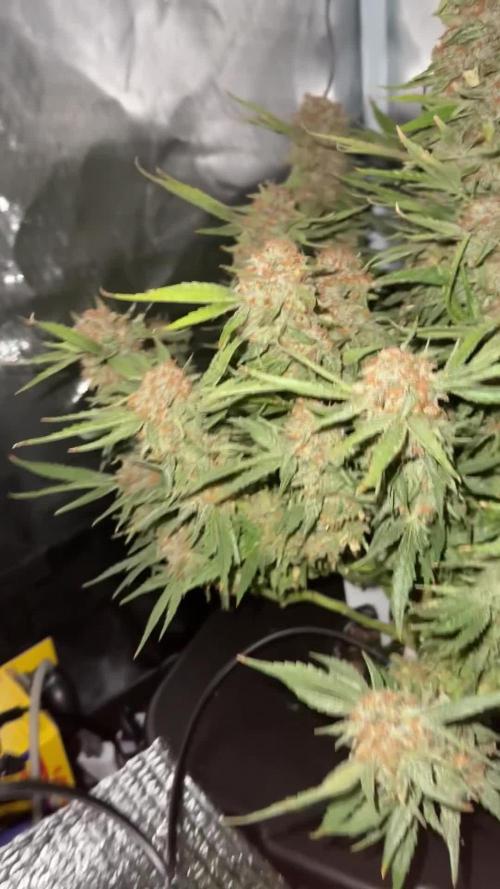
Die Pflanze präsentiert sich sehr buschig und vital, mit zahlreichen dichten Blütenständen, die sich gut ausgebildet haben (siehe Gesamtansicht der Pflanze). Die Buds sind kompakt und haben in den letzten Wochen an Volumen und Gewicht zugelegt. Man kann deutlich sehen, wie die Blütenkelche anschwellen und sich zu reifen Blütenständen formen.
Trichom- und Stigmen-Reife:
Ein genauerer Blick auf die Buds (wie im ersten Nahaufnahme-Bild der Trichome und im weiteren Nahaufnahme-Bild der Buds mit orangenen Stigmen ersichtlich) zeigt den Fortschritt der Reifung. Die weißen, harzigen Trichome bedecken die Blütenstände in Hülle und Fülle, was auf eine intensive Produktion von Cannabinoiden hinweist. Bei den Trichomen ist nun eine gute Mischung aus milchig-trüben Köpfen zu erkennen, die auf die volle Potenz hindeuten. Erste bernsteinfarbene Trichome beginnen ebenfalls aufzutreten, was ein Zeichen dafür ist, dass der Erntezeitpunkt bevorsteht.
Parallel dazu haben sich die Stigmen (die feinen Härchen auf den Buds) von Weiß zu einem satten Orange-Braun verfärbt. Dies ist ein weiteres starkes Indiz für die Reife der Blüten und die nahende Ernte.
Blattwerk und Nährstoffbedarf:
Das Blattwerk der Pflanze ist größtenteils weiterhin gesund und grün, was auf eine gute Nährstoffversorgung schließen lässt. Einige der größeren Fächerblätter können in dieser späten Blütephase leichte Anzeichen von Vergilbung zeigen, da die Pflanze ihre Energie nun primär in die Blütenentwicklung steckt und Nährstoffe aus den Blättern zieht. Dies ist ein natürlicher Prozess, der oft als "Herbstfärbung" bezeichnet wird.
Wir werden die Reifung der Trichome weiterhin genauestens beobachten, um den optimalen Erntezeitpunkt zu bestimmen, der je nach gewünschtem Effekt variieren kann. Auch die allgemeine Gesundheit der Pflanze wird weiterhin im Auge behalten, um sicherzustellen, dass sie bis zur Ernte optimal versorgt ist.


Likes
11
Share


@russrahl
Follow
Got the girls into there flowering tent and there 5 gal RDWC system under a 1000w HPS on a light rail mover. We are flipping them now because these DWC systems produce massive plants. We are going to tuck through the stretch until they stop this time and try and keep them as low as possible. I’ve grown this strain before a few times and ran a couple clone runs of it as well, so I think I know what to expect hopefully. Lol this is a spectacular strain from an A+ breeder(Canuk Seeds) and I can’t wait to smoke her again! One of those tried tested and true strains for me...lol I will also be keeping the light at max height and punching them with 1000w rite from the get go instead of lowering the wattage and trying to get the light closer to try and conserve power. I get a better light spread at 1000w 3 feet away and don’t have to move my light as much to cover the roughly 4x6 foot space of the tent I will be flowing in. The last 2 feet of the tent are reservoir and air conditioner. I don’t want the cold air to close to my plants so I try to keep a buffer zone. I will be adding a cardboard wall I think across blocking the air conditioners direct air output and blow it across the tent with my oscillation fan instead. I also have my second water cooled thermoelectric reservoir water chiller built now and I will be installing it in this reservoir as soon as I get a chance. I’m making a how to DIY video for it so it’s taking a bit longer to build and install as I’m trying to document the entire process. So probably next week I will have it installed and running for the weekly update and I’ll post some links to the DIY video as well if I have it up yet. Couple weeks ago I over nute’d them and ended up with nitrogen abundance so I countered that last week with a very low EC at 0.2 and the rebounded quick, so quick they went the opposite and I had nitrogen deficiency within the week. Lol so they are now in there new homes and sitting in 0.75 EC water with 6.0ph and they are coming around now. Well that’s it for this week folks, Cheers! 💨

Likes
19
Share


@Naujas
Follow
Amazing!!!!! a wonderful girl, she managed to keep herself so beautiful and strong :) she was not visited very often :) the house has a wonderful smell of tropical fruits :) Thanks to Dutch Passion for the opportunity :)


Likes
30
Share


@ktkoi
Follow
Day 87: Cut off two bud sites from Lemon, I'll start putting flower pics in the next post. Still leaving the rest of her to grow and get light. I suspect it'll be a total of 6g dry. Orange is getting denser, definitely going to leave her for a couple of weeks longer. I have a girlfriend coming by to water them when I'm gone. Hopefully every 3 days should be good.
Likes
1
Share


@InsideAz
Follow
Added a second scrog net for the taller plants last Friday. Constantly defoliating to increase light penetration but not trying to stress the plants. (Selective leaf picking, anything but the top 3 fan leaves are up for grabs if necessary)
Plants loved the tea I have them last week. Visual improvements in every plant 2 days later.
Top dressing later this week on 9/29:
5 tablespoons Gaia green 444
5 tablespoons Gaia Green 284
15 tablespoon Wiggle Worm Earth Worm Castings
Light increased to 75%

Likes
3
Share


@Paul_on
Follow
Terps on this cultivar are banging ,colours starting to show now some purples and pink plus yellow n green and she still has 3 wks to go , I've added a second Migro Aray 3 ,to try get fatter buds ,hope it works 💪, happy growing Growmies