
Likes
Comments
Share


@MrJones
Follow
Original Sensible Seeds White Chrystal Meth Auto
🔸🔸🔸04.20.23🔸🔸🔸
Day 51 - Above Ground - Target 65 Days
📝Saturday 06.10.23 - As this week comes to an end, I am seeing signs that the plants need a bit of calcium, so today was a topdressing day with a 70/30 blend of Bloom to Grow, watered in with H20 PG to 6.2 with CalMag at 5ML per Gallon of H20.
📝Thursday 06.08.23 - Watering with H20 PH @ 5.8/6.5 the buds on these girls are just getting crazy fat!, the new light setting is doing very well, and the plants are praying hard, and the Medic Grow Smart 8 Flowering Setting 1.
🔸🔸🔸🔸🔸🔸🔸🔸🔸🔸
▪️Grown By: MrJones
▪️Medic Grow Smart 8 LED / Settings 60% & V1
▪️@medicgrow420
▪️@originalsensibleseeds
▪️@gaiagreenorganics
▪️Soil - ProMix HP
🔸🔸🔸🔸🔸🔸🔸🔸🔸🔸
📝The taste and aroma of White Crystal Meth Auto are equally appealing as her shining stunning looks and hard-hitting effect. The taste and aroma are a throwback to the Old School, Skunky with herbal and citric tones, and overall a great strain for making hash or rosin. These tantalizing flavors and aromas are conjured up from an exquisite formation of terpenes the earthy myrcene and the floral essence of terpinolene being the dominant, a mix of caryophyllene and pinene combine their tones to produce the musky citric scent.

Likes
64
Share


@Kitties_and_Colas
Follow
~_~_~_~_~_~_~_~_~_~_~_~_~_~_~_~_~_~_~_~_~_~_~_~_~_~_~_~_~_~_~_~_~_~_~_~_~_~_~_~_~_~_~_~_~_~_~_~_~_~_~_~_~_~_~_~_~_~_~_~_~_~_~_~_~_~_~_~_~_~_~_~_~_~_~_~_~_~_~_~_~_~_~_
ok..i'm an idiot 🐱🔫 ..they we're clearly overfed last week and without thinking i gave them our usual "full strength" bloom shot as we decided to flower her (no more space)..she's not too happy with us atm, her top leaves are curling very hard..We intend to give her PH water only until she comes around some...normally we wouldn't flower a plant in this condition, we'd wait for her to straighten out and then flip however, space is critical atm...we moved her to the 3x3 to flower with a couple tiny White OG plants...she's a big plant, we have some room for stretch but not a ton, this might interesting in another week or 2 lol...we setup a dedicated exhaust for this tent and temps have been great, lots of air movement...We'll upload in a few days if her condition changes, thank you as always for taking the time to read and happy harvests everyone!! ❤️💡🌱😽💨
~_~_~_~_~_~_~_~_~_~_~_~_~_~_~_~_~_~_~_~_~_~_~_~_~_~_~_~_~_~_~_~_~_~_~_~_~_~_~_~_~_~_~_~_~_~_~_~_~_~_~_~_~_~_~_~_~_~_~_~_~_~_~_~_~_~_~_~_~_~_~_~_~_~_~_~_~_~_~_~_~_~_~_

Likes
4
Share


Likes
3
Share

@420DeepGrow
Follow
📆 Semana 4
Continúa el tiempo inestable, con alternancia de nubes y claros, lo que mantiene un crecimiento controlado pero cada vez más sólido. Aun así, la planta responde con buen vigor cuando aparecen ventanas de sol, mostrando más actividad y desarrollo en los brotes.
Se aprecia mayor grosor de tallo y estructura más firme, señal de adaptación progresiva al entorno. El sistema radicular acompaña, permitiendo aumentar la nutrición sin generar estrés.
Se sube la EC para cubrir la mayor demanda, manteniendo siempre riegos medidos y buen equilibrio en el sustrato para evitar excesos en condiciones de alta humedad.
⚡ EC: 0.9
💧 pH: 6.2–6.4
🌡️ Agua: 18–20°C
🌫️ Humedad: 60–80%
☀️ Luz: variable, con intervalos de sol más aprovechables
🌡️ Temp ambiente: 17–24°C
🔥 Nota: Ajustar la nutrición cuando la planta lo pide, incluso en clima irregular, marca la diferencia en la evolución.
Seguimos creciendo fuerte 💪!


Likes
9
Share


@AustinRon
Follow
2 Week AC3Q - Seedling
Ambassador Cartwright by IRIE Genetics
(Clementine X Arise) X Arise
((Tangie X Lemon Skunk) X Arise) X Arise

Start of Week 2 - 16 July 2022 AC3Q 15:S:2:1 to 22 July 2022 AC3Q 22:S:2:7
Environment:
EC Targets: #
rel.
|
abs (rel + source)
ECseedling:
[0.4, 0.5]
[ 0.7, 1.0]
ECearlyveg:
[ 1.1, 1.4]
[ 1.4, 1.7]
EClateveg:
[ 1.2. 1.5]
[ 1.5, 1.8]
ECearlybloom:
[ 1.1. 1.4]
[ 1.4, 1.7]
EClatebloom:
[ 1.3, 1.6]
[ 1.6, 1.9]
ECripen:
[ 0.9, 1.2]
[ 1.2, 1.5]
ECflush:
[ 0.0, 0.0]
- Seedling (Week 1-2)
- Temp: 78-82°F
- VPD: 0.85 ± 0.05
- Photoperiod: 18/6
- Light Strength Start: 200-300 PPFD
- EC: 1.0
FertigationFoliarMonday:
Solar Wind: [ 2.5, ml, 500, ml]
Silica Skin: [ 1.25, ml, 500, ml]
FertigationFoliarWednesday:
CalMag Fuel: [ 2.5, ml, 500, ml]
Lush Green: [ 1.25, ml, 500, ml]
FertigationFoliarFriday:
Solar Wind: [ 2.5, ml, 500, ml]
Peak Bloom: [ 0.675, ml, 500, ml] # Cease Begininning Flower Week 5
Rooted Leaf:
Primary: # Mix and store for week, not
Primer A: [ 2, ml ]
Primer B: [ 2, ml ]
Silica Skin: [ 1, ml ]
# Mix with Base AT Feeding
AtFeeding:
Root Anchor: [ 1, ml ] # Sprout
Lush Green: [ 1, ml ]
# at Seedling (3 Nodes)
Cal Mag Fuel: [ 1, ml]
Sat 16 July 2022
AC3Q 15:S:2:1
- Remaining Plants , 1,3 - 7 (6 Total)


#7 (The Last One) was a potential Lost-Cause - HOWEVER - Her damaged leaflets were praying this morning. It provided sufficient material for Sex Testing.;
Sex Testing
- [x] Form Filled Out
- [x] Clip #3
- [x] Clip #4
- [x] Clip #5
- [x] Clip #6
- [x] Clip #1
- [x] Clip #7
- [x] Package assembled & Mailed (1400)
- [x] Install Oscillating Fans (2)
- I should have done this LAST WEEK - Wondering why we were growing floppy plants - NEED Light Mechainical (AirFlow) Stimulation to build STRONG MERISTEMS.
#6 After Clip

- Mixed up Sat Night/Sunday’s nutes - Full Panel ~ EC: 1.0
Sun 17 July 2022
AC3Q 16:S:2:2
0800: 30 ml full 0.8 EC
- Wow - Every time I open the tent after extended close - I’m arrested by the Size change in the leaves. Right now - I see hybrid Vigor!
- Installed supports for two leaners, should be ready to come off Wed/Thus
ec 0.3
0.4 ml a
0.4 EC + 0.1
0.4 ml b
0.7 EC + -.3
0.2 si
0.7 EC + 0.0
0.2 cm
0.8 EC + 0.1
0.2 lg
0.8 EC + 0.0
2130: 20 Ml Full 0.8 EC
- [x] Add Fans to Cabinet for plant strength
- [x] Removed supports from 1 & 4 (Flopping Meristem) - Took 6 hours w/ fan for them to stand up!
Mon 18 July 2022
AC3Q 17:S:2:3
0900 - 30 Ml Full 0.8 EC
2030: Mixed up Fresh Full @ 1.05 ± 0.05 EC
2100: 30 ml Full Fertigation
Tue 19 July 2022
AC3Q 18:S:2:4

0800:30 ml Full EC: 0.8
- [ ] Mix up 1.05 ± 0.05 EC FULL
2100 Mixed up Full - EC: 1.05 ± 0.05
Raised ppfd
Wed 20 July 2022
AC3Q 19:S:2:5
o730 ec 1.0-1.1, 30 ml per
adjusted fans
Foliar:
- lush green
- calmat
Thu 21 July 2022
AC3Q 20:S:2:6
- Though fixing’ to harvest - she could use a little water (500 ml) w a littl Rooted Leaf Resin Bloom
Fri 22 July 2022
AC3Q 21:S:2:7
Foliar: Solar Rain

Likes
27
Share


@adam_pawloski87
Follow
First off I just want to say for some reason it’s not letting me change the right temperatures on my diaries ! Each time when I put it in they stay at 50. My day air stays 75 degrees an , night degrees is 70 !
Today is day 58 for all these ladies! This week has been really great ! Girls really progressed a lot , especially for one the Forbiddin Runtz, looks like is gonna finish up in a week or 2 ! Other then that they are coming along well! Keep those eyes peeled for next week! Cheers😶🌫️💨💨💨💨
Processing
Likes
14
Share


@Smokwiri
Follow
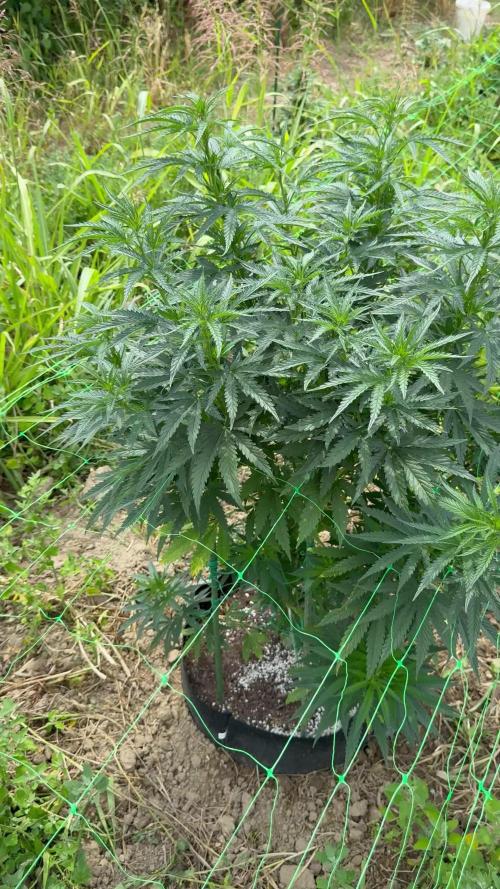
Welcome to my Royal Gorilla Diary
This grow will join the RQS outdor grow contest at later time, I hope i get lucky and bugs won't eat it.
After receiving contest box, i asked about germinating indoors, after confirmation i popped a seed in the soil.
Germinated in pot indoors (gift pack was massive! see pics), after germination i put outdoor but i kinda forgot her.
This one is growing together with a small tobacco plant to keep some unwanted insects away, i want to add some dill and coriander soon.
So our royal gorilla is in her second week already, and she looks pretty healthy. Soil is reused soil with new fertilizers added to the soil.
I'using a mixture of dried cow poop pellets and chicken poop pellets to give the soil some renewed power.
Most of this is in the top layer of the soil (watering from above) so nutrients can be spread extra during watering.
This should be enough for the first 6-7 weeks, so when the buds start to take shape we can start with adding some mineral nutrients in addition to the organic feeding.

Likes
3
Share


@Luv2Grow
Follow
Day 64 - Starting week 10 today and not much happening. I didn’t even take her out of the tent, just left her in, tucked some leaves and got updated pics. Looks like she’s really starting to bud up nicely now.
Day 65 - She’s definitely getting pretty cramped in the tent but not a whole lot I can do about it. Doing what I can to keep all the sites exposed and went and cut a couple lower limbs off that aren’t getting much light. Also gave her 2 gallons of pH’d water and cal-mag today. I’m giving her about 2 gallons every two days, she’s drinking a ton. Next watering, I’ll be giving her a dose of the technaflora nutes.
Day 67 - The pot was dry already today so gave her a feeding of nutes today and following their schedule of feed, water, water feed so next watering will be plain pH’d water. Did a pretty heavy defoliation as well as removing a bunch of lower growth. This will probably be the only time I do this to her and will just removed dying or dead leaves from here on out, I’m just hoping I didn’t over do it but I supposed we’ll see how she does the next few days.
Day 68 - All seems good and chugging along nicely after the heavy defoliation and somewhat lollipopping yesterday. Didn’t even take her out of the tent, just tucked a couple leaves that are trying to stand up and block the light.
Day 69 - Right in cue, she was ready for water today so she got two gallons with cal-mag pH’d to 6.7. Looks like she’s finally stopped stretching at 27.2 inches tall and hopefully now she’ll start beefing up on the buds.
Day 70 - The end of week 10 and she’s still got a ways to go and gonna be way past the 9 weeks they’re “supposed” to take but I always expect things to go longer but this will most likely be a 15-16 week harvest. Other than that, I didn’t do anything with her today but she’s definitely going to be needing more water tomorrow.


Likes
4
Share


@SEGA_Y_Griega
Follow
13.3.23 gegossenes Wasser 150 (ppm) guter Flug . Licht 50%
Kush Mintz Fast von Original Sensible Seeds ist eine der produktivsten und lohnendsten schnell blühenden Cannabissorten da draußen. Animal Mintz x Bubba Kush x Original Sensible Secret Hybrid erschafft eine Cannabissorte mit hohem THC-Gehalt und kurzer Blütezeit. Eine Indoor-Blütezeit von nur 50 Tagen schafft starke, robuste Pflanzen mit einer hervorragenden Produktion von dunklen, dichten Knospen mit einem köstlichen Cookie-Mint-Geschmack. Die Härte und Dichte der Knospen zusammen mit der frühen Blütezeit bedeutet, dass Kush Mintz Fast extrem widerstandsfähig gegen Krankheiten und Schädlinge ist. Die Erntezeit im Freien liegt in den ersten Septemberwochen, um ungünstige Wetterbedingungen zu vermeiden, die die Ernte schädigen könnten. Dieser Aufguss aus minzigem Menthol Kush erzeugt einen glücklich entspannten Effekt und ist eine Must-Have-Sorte für alle Cannabis-Enthusiasten.
Alle schriftlichen und visuellen Materialien sind nur für
Diese Woche habe ich mich entschieden, ein großes Zelt Mars Hydro 120•120 zu installieren, für eins und eine Lampe mit großer Reichweite FC E4800. Ich habe die Klimaanlage eingerichtet, jetzt liegt die Temperatur bei etwa 24, ich habe zwei Lüfter installiert, um den Secret Jardin Monkey Fan 20w zu blasen, ich wollte sie schon lange kaufen. Die Heizung funktioniert auch! Hoffe es wird bald wärmer 😅
Likes
5
Share

@LAShugars
Follow
Removed all the LST clips and did a very light defoliation
She is stacking up very nicely. At least a couple weeks left until chop. I’m gonna feed for the next 10 days and then damper off and begin to flush next week.
Likes
11
Share


@Hippopotamus_Milk
Follow
This plant is shorter then others.. I guess i over watered her this time..

Likes
37
Share


@iMpulsive_Grow
Follow
Day 65!
They are doing so well but they are super thirsty! Also the odor is a lot stronger now 💚💚
Day 66!
32”!
Day 67!
Not much to say
Day 68!
The trichomes are growing quickly and smells great 😊🌱💚
Day 69!
From being so obsessed with the plants I got carried away with the shots lol
Day 70!
Just fed them 2 days ago and gonna have to feed tomorrow. They are thirsty!!

Likes
19
Share


@proud_to_grow_loud
Follow
I switched my nutrients to Nectar For the Gods because I didn't have the funds in the beginning to do so. I got their spartan regiment with the extras. Photo-plus and SLF-100 which I use separately and not during feeding. Im watering everyday and feeding every other day. Water days I use SLF-100 and the next water day I use tea with Photo plus. my tea I use bloom by cultured biologics organic easy bloom and compost worm castings from my personal vermicomposting bed. alternating water days with the slf and photo plus was a massive growth in buds. They dense' nd up and just started putting on trichomes. brilliant brand- Nectar! OCGFAM for life now. Feeding is a pain but damn its worth it.
Pricy but worth the investment!


Likes
46
Share


@Ju_Bps
Follow
Hello my friends,
I hope all's fine for you,
For me all's good
Plant are healthy and buds biggest each day, start to see pollen 😛, and nice smeel.
I've started more than one week
Tera flore and Sugar Royal,
See you next week!
Enjoy 😎😎


Likes
35
Share


@Reyden
Follow
Lst e ML continuano è la bimba inizia a crescere di prepotenza!!!
Da oggi nuove foto e qualità alta con macro e nuovi filtri 👽😼

Likes
10
Share

@Radagast_
Follow
11.07.
OG KUSH
Day 77#
Today is the end of the eleventh week for the plants.
There were storms all week and with the fact that they spent almost the whole week under stress (they were also under heat stress a couple of days before), I am certainly satisfied with the progress.
On Tuesday, they were watered for the last time, with clean water, then it rained, and the next day it rained all day, since then they have not been watered, as soon as the soil dries I will feed them.
Below in the table is the food that they received last time, but it is included in this week, and I introduced that as well.
Stay High and Keep Growing!!!

Likes
17
Share


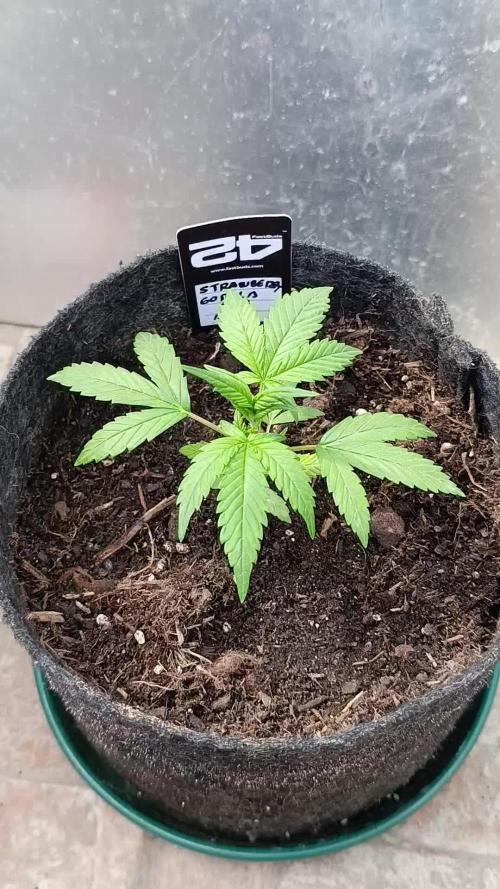
@Naujas
Follow
To tell the truth, I am very surprised myself, how amazing she is FastBuds Gorilla cookies, she copes well with a small space:) she drinks 1 liter every day :) everything looks better than expected:) good luck to everyone.
Likes
25
Share


@BudGardener420
Follow
Currently checking daily and tying away branches/leaves to give the buds more light and watering when the soil is dry. Currently my plants drink exactly 1,5L a day. I have the feeling that the right plant is lacking a bit of potassium. I'll leave everything as it is for now because the left plant (fresh new soil) is growing well. Since the right plant is quite bushy anyway, I'll defoliate it again later and remove any lower shoots. I started adding the Bio PK booster towards the middle of the first week of flowering, 2ml per liter of water; as the pH value drops too much, I correct it upwards with Biobizz pH up - from pH 5.5 to 6.5 for 3L, I add a total of 39 drops. My water is mixed as follows: 3L osmosis water, plus 6ml CalMag, 6ml BioPK 5-8 and 39 drops of pH + BioBizz.
