


Likes
36
Share


@TaterheadJohnson
Follow
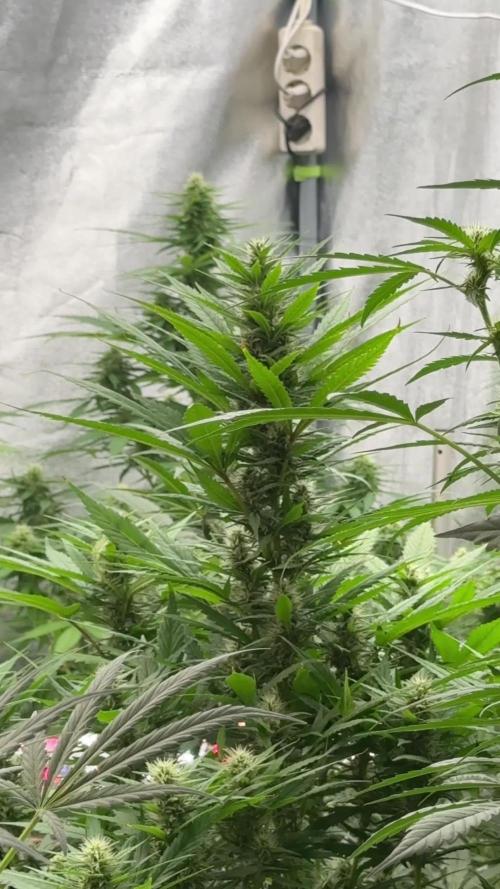
Been a minute growmies but I’m back with some updates. This week I realized I was going to have to get a new tent ASAP. Was really trying not to have to but it is inevitable. She is huge now! Even tried throughout this week and next to do some tie down with string to fabric pots. Sorry for wait…. I know she was sad towards the end of the week 😞.
8/31: Started new batch of nutes. Did a massive defoliation today as well! A lot more light through the canopy now. Cut dying bottom branches.
9/1: Did a lot of defoliation today. Even removed some of the lower branches not getting sufficient amount of light.

Likes
8
Share


@potcommunication
Follow
All good in the neighborhood
2 of 3 moved to the brand NEW FRIDGEGROW 2.0 system.
the orange one lost... ;)
just after a few days in the new home they grew like mad

Likes
7
Share


@BiggBloom
Follow
I did a few things differently than I usually do since I’ve been having problems with germination lately. I’ve grown strawpicanna before, so I know it’s not exactly an easy cultivar. Still, I experimented, and sometimes experiments fail. I’m not crying over it though - things happen in the garden you just gotta grow with the flow. 😝😝 I still have some things in the works. Just got a 10 pack of Blueberry Rose from Lovin In Her Eyes so I’ll be back with a fresher and hopefully far better diary in a few days.


Likes
18
Share


@Grower_Of_Persia
Follow
week intel:
its time to harvest some of plants the ones that is mature enough. indica dominant plants will done first always so we should harvest them first
because my base nutrients and one of boosters was salt based, i'll do flushing this week to get some relieve to plants in the last days
stresses :
flushing
Drought stress via watering only one time with flushing this week
feeding:
day 1 : i flushed them with Advanced Nutrients Flawless finish and adjusted ph
day 3 : no more feeding from now on
day 5 : no more feeding from now on
guide of the week :
i harvest in 2 parts : first i harvest top of the branches and will let the lower buds to ripe another week then ill harvest the second wave.
indica dominant plants will get done 1 or 2 weeks sooner than sativa dominant plants that will often takes more than 8 weeks so be aware to harvest them sooner.
my dry and cure style is this:
3 days of hanging upside down to get water activity lower to around 0.6 in 50% humidity and 26 C temp (i know its a little high but we are in a hot summer right now and i cant get it lower even with air conditioner) and then after 3 days of drying i remove leaves and stalks, trim buds and move them to jar for the rest of their life :D . and in the first 4 days of curing i open the jar door and let hem get some fresh air in the jar for about 5 minutes and close the jar door again, after 4 days of curing like that buds are smokable but they will get better as they getting cured about 1 month.
im happy as hell with this harvest :D.

Likes
13
Share


@Hyperbunny
Follow
das sind die bilder der letzten ca. 2 wochen… ab jetzt gibts passende infos zu den bildern ;)
Processing
Likes
49
Share


Processing
Likes
10
Share


@MichaelMan
Follow
I put them in my grow tent for bloom. For light I’m using Mars Hydro ts3000. Some leaves have brown spots.

Likes
4
Share

@DogDoctorOfficial
Follow
🍰 Lava Cake – Week 8 (4th Week Flower) | The Bulking Phase
The fourth week of flower has arrived, and both Lava Cakes are showing their full potential. Their structure is strong, pistils are snow-white and thick, and bud sites are stacking beautifully. This is the week where the promise of flowers begins to turn into visible production, every day, you can almost see them swelling.
⸻
🔬 What’s Happening in Week 4 Flower
By now, stretch is nearly finished. The plants are redirecting their energy:
• From vertical growth ➝ into flower bulk.
• From nitrogen demand ➝ into phosphorus & potassium demand.
• From building structure ➝ into packing density.
This transition is crucial: the roots, the soil microbiology, and the nutrient profile all work together to feed flowers instead of stems and leaves.
What we see this week:
• Thick, healthy pistils at every site.
• Calyx swelling beginning, the first signs of true bud stacking.
• Leaves still dark and strong — proof of balanced nutrition.
• No stress, no burn, no deficiencies.
⸻
🥤 Feeding Strategy – Why Boosters Matter Now
This week, we removed the Aptus All-in-One Liquid, despite it being in the photo. The reason: the soil’s super soil base + slow-release pellets still carry enough NPK to support the girls. Overfeeding at this stage could risk tip burn or nutrient lockout — and we want the roots to stay clean and active.
Instead, the focus is on precision boosters:
Recipe (per L water):
• Aptus Regulator – 0.15 ml → strengthens cell walls, stress protection, and nutrient uptake efficiency.
• Aptus CalMag Boost – 0.25 ml → keeps calcium steady (critical for bud structure) and magnesium strong (photosynthesis & chlorophyll).
• Plagron Power Buds – 1 ml → directs plant energy into flower production.
• Plagron Sugar Royal – 1 ml → provides organic nitrogen + enzymes to stimulate terpene development.
• Plagron Green Sensation – 1 ml → PK booster + biostimulant, promoting dense, resin-rich flowers.
Why this mix?
• Because the NPK in soil is still sufficient → boosters fill in the extra needs of flowering without overwhelming the root zone.
• Because boosters provide specialized roles → each product targets a specific physiological process.
• Because balance prevents problems → overdoing NPK at week 4 could backfire, while focused boosters guide the plants safely into mid-bloom.
⸻
🌡️ Environmental Notes
• Temps: Still ~31–34°C until AC arrives. High, but plants are adapting.
• Humidity: 55–60%, VPD ~1.8–2.0 kPa — slightly high, but still manageable.
• Watering Rhythm: Once substrate moisture falls near 19–20%, measured by TrolMaster WCS substrate sensor. This ensures roots get oxygen before each feed.
Even under warm conditions, the plants are drinking heavily — proving they are metabolically active and thriving.
⸻
🌸 What to Expect Next Week (Week 5 Flower)
✅ Expect:
• Noticeable bulking → flowers will become rounder, denser, and begin to “stack.”
• More pistils → a full carpet of white hairs covering colas.
• Aroma development → the first hints of Lava Cake’s dessert-like terpene profile may start releasing.
❌ Not to Expect (yet):
• Full frost coverage → heavy trichome production usually comes weeks 5–7.
• Final density → buds will continue swelling for several weeks, so patience is key.
⸻
✨ Closing Thoughts
Week 4 flower is the foundation of yield. It’s when the plants finish their stretch, define their bud sites, and begin to convert light, water, and nutrients into the weight and density we harvest later.
Our Lava Cakes are in perfect rhythm:
• Strong genetics, showing symmetrical growth.
• Balanced feeding, keeping roots clean and buds fueled.
• Stable environment, with monitoring from TrolMaster guiding every adjustment.
From here forward, every day brings visible progress. The journey of seeds to now feels like preparation — this is the beginning of the true show.
🔬 Science Spotlight – The Unsung Heroes: Calcium & Magnesium
Many growers focus on NPK during flower, but two “quiet players” — calcium (Ca) and magnesium (Mg) — are just as vital to ensure flowers bulk properly.
🌿 Calcium (Ca):
• Strengthens cell walls, making flowers denser and less prone to collapse.
• Improves nutrient transport, ensuring phosphorus and potassium (the bloom drivers) actually reach the buds.
• Helps roots resist stress in warm environments (like our 31–34°C room).
🌿 Magnesium (Mg):
• The central atom in chlorophyll → without magnesium, photosynthesis collapses.
• Supports enzyme activity, converting sugars into energy for bud building.
• Directly influences terpene production, giving flowers their aroma and flavor.
Why CalMag Boost now?
• In soil mixes, calcium can sometimes get “locked up” as the pH fluctuates.
• With daily watering at slightly acidic pH (5.8–6.0), we guarantee Ca and Mg are immediately available.
• This ensures strong, vibrant leaves → which means more energy for flower sites.
In short: while NPK builds the skeleton of yield, calcium and magnesium are the glue and spark that hold it all together. Skipping them would weaken the entire flowering process.
✨ Grower’s Analogy:
Think of your plant like a construction site:
• NPK are the bricks and beams (the main structure).
• Calcium is the cement holding every wall together. Without it, the structure would crumble.
• Magnesium is the spark plug in the engine — it makes photosynthesis “run” and fuels the work crews building the flowers.
No cement, no structure. No spark plug, no engine. That’s why CalMag support is never optional — especially in flower when the demand skyrockets. 🌸
📲 Don’t forget to Subscribe and follow me on Instagram and YouTube @DogDoctorOfficial for exclusive content, real-time updates, and behind-the-scenes magic. We’ve got so much more coming, including transplanting and all the amazing techniques that go along with it. You won’t want to miss it.
• GrowDiaries Journal: https://growdiaries.com/grower/dogdoctorofficial
• Instagram: https://www.instagram.com/dogdoctorofficial/ • YouTube: https://www.youtube.com/@dogdoctorofficial
⸻
Explore the Gear that Powers My Grow
If you’re curious about the tech I’m using, check out these links:
• Genetics, gear, nutrients, and more – Zamnesia: https://www.zamnesia.com/
• Environmental control & automation – TrolMaster: https://www.trolmaster.eu/
• Advanced LED lighting – Future of Grow: https://www.futureofgrow.com/
• Root and growth nutrition – Aptus Holland: https://aptus-holland.com/
• Nutrient systems & boosters – Plagron: https://plagron.com/en/
• Soil & substrate excellence – PRO-MIX BX: https://www.pthorticulture.com/en-us/products/pro-mix-bx-mycorrhizae
• Curing and storage – Grove Bags: https://grovebags.com/
⸻
We’ve got much more coming as we move through the grow cycles. Trust me, you won’t want to miss the next steps, let’s push the boundaries of indoor horticulture together!
As always, this is shared for educational purposes, aiming to spread understanding and appreciation for this plant. Let’s celebrate it responsibly and continue to learn and grow together.
With true love comes happiness. Always believe in yourself, and always do things expecting nothing and with an open heart. Be a giver, and the universe will give back in ways you could never imagine.
💚 Growers love to all 💚


Likes
5
Share


@HighOhioAn
Follow
Absolutely has been one of my favorite Grows on day 64 and they are thriving something about testers. I love I think it’s the not knowing .truly some fire genetics.🔥🍻💯
Likes
30
Share


@TragicTerps
Follow
We are currently working on the recovery from the initial stem split on plant A. She's almost all the way recovered with only a slight crack still remaining. Hopefully that split and the overwatering won't disrupt or stunt the growth of this lady too much.
For the sake of experimenting I pulled off the first set of fan leaves that were stunted and discolored in hopes the energy used by the plant will be directed more towards the new growth.
Plant C is looking great and loving the increased Par values from our light as we are getting good vertical growth and the main stem is looking super healthy.
As we get through to the end of the week we will start transitioning plant A for LST in the form of tie down. The fan is currently applying pretty good stress to the already week stalk of plant A, but she again is almost 100% closed back up. The whole purpose of the fan is to strengthen the stalk with very light stress.
Plant C will see LST beginning in 2 weeks as she is 1 week behind Plant A.
Many people ask me about the LL on the guage and I will remind everyone, I live in a high climate desert around the 49th parallel so it's cold and dry. When the tent is closed I usually see rh values near 40% where the normal RH (Relative Humidity) is around 10%. It's just dry here. That said the grow community here and the quality of bud is top shelf as it gets. Rh doesn't necessarily impact the end results.
End goal is still 360g harvest out of this tent we will see if we get it.

Likes
22
Share


@NanoLeaf
Follow
End of Week 11 (Fourth week of flower)
The ladies are frosting up more and more by the day and there are trichomes everywhere!
I Added about 8g per plant of GHF BioBloom and a cup of worm castings a small final feed to make sure the ladies have what they need to grow big dense buds. And increased the CO2 to 1400ppm and in 2 weeks time I will cut the CO2.
The main top-sites are bulking up more and I am very happy with the inter-nodal spacing as well as the bud formation. Trying to keep the training to a bare minimum and ONLY removing fan leaves that are blocking bud sites.
I have been keeping a cooler average temperature - and also keeping the relative humidity lower.
Pest Report: None

Likes
12
Share


@Ctbest2023
Follow
Easy week hoping for a strong finish so only nutes they getting know is rhinoskin a and b ph perfect b52 overdrive and sensizym and bud candy I say they got like another week tops till flush but I take pictures everyday and see colas still getting fatter until that stops I will not cut them so far this grow been a great journey for me and I learned a lot about autos next up will be these gorilla cookies and I can’t wait
Likes
7
Share


@Mo_Powers
Follow
not much has happened this week. there is still some sun per day. however, the temperatures drop to 4-8 degrees at night. these are not exactly the best conditions. maybe this late outdoor experiment was not a good idea after all. however, they have not died yet.
Likes
5
Share


@WickedWeedQueen440
Follow
Growing for the Growers Gauntlet in discord. Come check it out! There's a bunch of amazing growers throwing down right now for the title of Champion Homegrower! This gelat og is doing amazing. This is the first week of flower and she's already got a lot of amazing bud sites.

Likes
98
Share


@SlowpokeFuegobud
Follow
I'm happy. I wish the weed would last forever. 🍊
Thank you, @DutchPassion_Official for the opportunity, I'm definitely a fan from now on! ❤️

Likes
35
Share


@Roberts
Follow
Been flowering good. Buds are more then branches can support. Trichromes are on verge of getting cloudy. Likely last week for nutrients, which I been going light on. Thanks again for likes and follows. Thanks again fast buds. Happy growing everyone and be safe
Likes
5
Share


@GarciasGarden
Follow
Day 19 from switch and look at them😍 been using the same nutrients/ same amount and they are loving it. Temps have been going great and buds are actually forming !
