Likes
Comments
Share


@DrLaggis
Follow
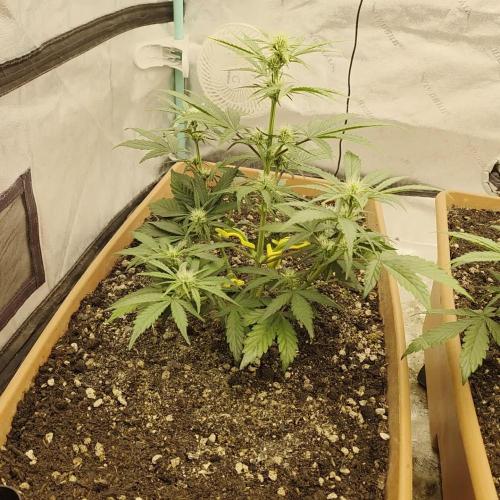
🌱Day 36 - Second Week of Flowering 🌱
Hello growing friends! 🌿 Today marks the beginning of the second week of the flowering phase, and I’m very happy with how the buds are developing so far. 🌸✨
Since this is my first grow, I’m truly amazed by how fascinating these plants are. It’s an exciting journey! 🌱🤩
Last week, I struggled with yellow leaves and a calcium & magnesium deficiency. Fortunately, with the help of BioBizz Calmag, things are slowly improving. 🍃💪
Currently, I’ve set the humidity to 45%—according to my research, this is ideal for minimizing the risk of mold. 💧🚫🌿
🌱 Day 42 - Last Day of the Second Flowering Week 🌱
Hello everyone! 🌿 Today marks the last day of the second week of flowering, and I’ve made some updates to my routine. I’ve increased the nutrients to BioBizz Grow (3ml), BioBizz Bloom (2ml), and BioBizz TopMax (1.5ml). The plants are growing well and have recovered from the calcium deficiency. 🍃💪 I’m continuing to add a bit of BioBizz CalMag to prevent any future deficiencies. 🌱✨
This week, I also added some soil to the pots, as the soil level had flattened out quite a bit. I topped up each pot with about 1.5 liters of soil.

Likes
6
Share

@burnout
Follow
Day 28. Started seeing stigmas on the plant on the left on day 24, now seeing flowering on the plant on the right and just starting on the plant in the middle. The middle plant sprouted first, the other two came up a few days later. Hoping to see some good stretch soon! Took about three days for the reservoirs to go dry last week. Added top dress along with rock phosphate and top watered each box with one gallon of water including the ferment, recharge, and build a bloom. Added another gallon of water to reservoirs today.

Likes
37
Share


@Rangaku
Follow
Green crack had a good week of growth but is still so tiny in comparison to the others. I bent her over to try and get some more bud arms happening. Gave her a flush and looking forward to the stretch and trying to get a decent smoke off it
Likes
1
Share

@BudBeezy
Follow
Strawberry Gorilla Auto - FastBuds
Welcome to week 11 of my grow diary, which is also the last week. As predicted last week, the weather has become even warmer. The heat has now completely taken over the house, and it has also rained for a few days, causing the humidity to rise again. Unfortunately, this led to mold forming on one shoot, so I decided to take action. Normally, the plant could have stayed in place for another 1-2 weeks for my needs, but I didn't want to take any risks and harvested it in week 11. Overall, I was satisfied with the growth of the plant. Environmental conditions are unpredictable in summer and more difficult to control than in winter/spring. I was able to gain more experience with this grow and now know that I should take a break in summer from now on. I really liked the mainlining. Before, I topped above node 2 and left 4 main shoots. With 2 main shoots, it is much easier to work with and does not require as much defoliation as with 4. I will definitely use this technique again in the future.
Here's some initial feedback on the Strain "Strawberry Gorilla Auto" from FastBuds and the Organic Starter Kit from Advanced Nutrients:
The plant grew really well and has enormous potential. The buds were so swollen towards the end that I was amazed. The organic fertilizer from Advanced Nutrients probably also had an influence. This was my very first purely organic grow, and I think I can be satisfied with the result. I can wholeheartedly recommend the fertilizer. I will definitely use it again in future projects and will probably do a comparison grow between the mineral and organic starter kits.
Avg. Temperature - 27°C
Avg. Humidity - 68%
Avg. VPD - 1,16kPA
The lamp runs at 60% which is 356w according to the energy meter. At a distance of 20cm the plant gets around 950-1100ppfd.
Thank you for following me so far. I will give you an update after it has dried. I hope you enjoyed my grow diary. If you have any questions, please feel free to ask me.
See you next week ✌️
Soil:
Plagron Lightmix
N 180 mg/L - P 210 mg/L - K 360 mg/L
Fertilizer used:
Advanced Nutrients - Vodoo Juice Plus
Advanced Nutrients - Iguana Juice Bloom
Advanced Nutrients - Big Bud
Tent: AC Infinity Cloudlab 844
Exhaust air: AC Infinity Cloudline T6 incl. activated carbon filter
Lamp: Kingbrite P55 / 480w, dimmable
Fan: AC Infinity Cloudray S6 Gen. 2
Controller: AC Infinity Controller 69 Pro
Pots: Gronest 25L
PH Pen: Bluelab Onepen


Processing
Likes
10
Share


@JohnnyGrower
Follow
Esta semana los nutrientes siguen de la misma manera, es notorio el exceso de Nitrogeno por ende se disminuira en los próximos riegos, se realizaron podas apicales en los clones que no les hice anteriormente para que alcanzaran más altura. Dentro de esta semana instalare la malla scrog Kanovi para guiar los vigorosos brotes.
Además esta semana ya esta retomando el crecimiento la planta madre variedad Tangie la cual cumplió su ciclo de propagación por esquejes y porfin florecerá.
Leo comentarios, opiniones y recomendaciones


Likes
7
Share


@Salokin
Follow
Hi growmies,
The plants are in full flower now and have been defoliated after the hst of last week and seems like she has recovered. I had removed the filter and vent from the box and have the vent suck the air out of the box into the carbon filter, which gave me another 10 cm to play with. The plant consumes around 2 l of nutrient solution in 24 hours. This whole experience is howling me that I have to change the system in the box as I loose to much height with the grow table and the rockwool blocks. Will probably run a 20 l DWC in it, that I am currently working on.

Likes
17
Share


@BLAZED
Follow
W19 (Harvest)
6-6
Last day before harvest.
7-6
Harvest day!
Installed a humidifier outside the tent, set to 55% aiming for a 60% humidity inside the dry tent.
17-6
After 10 days of drying she is ready to be trimmed.
While posting this a couple of months later i found out that i totally forgot to make pictures and video's of the trimmed buds 😅
End result #1:
37 Grams of dried buds.
35.84 Grams of dried trim and very small buds, into the freezer.
I would describe pheno 1 as normal frosty, almost stone like buds, smells chemical with hints of dish soap (i really like it!)
I cant describe the taste but it was very tasty out of the box, before the cure, very sad i only had 37 grams of it haha.
End result #2:
Around 70 grams of dried buds.
43.23 Grams of dried trim and small buds, into the freezer for bubble hash.
I would describe pheno 2 as very frosty buds, little bit fluffy, smells very gassy, with a nice sour taste after curing a couple of months.
Very interesting strain, i will definitely grow it again!
I have some trim and small buds saved up from different strains and i will be posting a diary of the full process making hash of them!
If you are interested in me making bubble hash feel free to follow me as i will make some in the next month, this way you keep notified!

Likes
16
Share


@IQuSX
Follow
Hyyyh..Hello, topman!!
>>
Its 120 day of growth strains Golosa.
>>
And last 3 day -all night 24/3.
>>
I’m showing next week mass of harvest.

Likes
34
Share


@Mz876
Follow
Finally set up my little grow tent and moved in my bag seed plant . I’ve switched it to a 12/12 cycle and started adding jungle juice bloom from advanced nutrients to her feedings .
Likes
128
Share


@Tropicannibis_Todd
Follow
So this was my first ever Tiny Pot 👈 wasn't sure if I could even do it 🤔 But instead it was a blast , she grew even better then expected , so much so I may do another 👍
She was a hungry plant the hole cycle, figuring out her feeding became a great learning tool , I gained alot of experience growing this one 😀
I used rain water the hole grow , to which she required feeding daily , some day twice 👈
👉I added 4 straws in week 4 to help with air flow to the roots and it worked 💪 So check week 4 to see what I did 😀
👉 Big thanks to all my Growmies out there in GD land 👈 Much appreciated 🙏
Thanks To MarsHydro for the TS1000
👉I used NutriNPK for nutrients for my grows and welcome anyone to give them a try .👈
👉 www.nutrinpk.com 👈
NutriNPK Cal MAG 14-0-14👉 Every Week
NutriNPK Grow 28-14-14👉 Weeks 2 & 3
NutriNPK Bloom 8-20-30👉 Weeks 4 to 8
NutriNPK Bloom Booster 0-52-34👉 Weeks 4 & 9
Processing
Likes
Comments
Share


@Txumy2020
Follow
Ya están bajo el Led 300 en crecimiento. Última semana de vegetación.
Likes
114
Share

@Tropicannibis_Todd
Follow
💩Alrighty Then Growmies We Are Back At it 💩
Well folks we just finished up the last run and so we are back to do it all over again 😁
So what do you say we have some fun 👈 We got some Gorilla Punch 👊 👊 👊 DAY 21
👉 Its been a really good week , lots of growth , shes just now decided to show her preflowers 👌 I believe the stretch is on 👈
So this week I've started her nutrients regiments 👌Just need to remind myself to take it easy 🤔
FC4800 from MarsHydro Lights being readjusted and chart updated .........👍👉Added an RU45 too the mix 👍
www.marshydro.ca
👉I used NutriNPK for nutrients for my grows and welcome anyone to give them a try .👈
👉 www.nutrinpk.com 👈
NutriNPK Cal MAG 14-0-14
NutriNPK Grow 28-14-14
NutriNPK Bloom 8-20-30
NutriNPK Bloom Booster 0-52-34
I GOT MULTIPLE DIARIES ON THE GO 😱 please check them out 😎
👉THANKS FOR TAKING THE TIME TO GO OVER MY DIARIES 👈
Likes
88
Share

@squalino
Follow
🌿 Journal de Culture : Mac 1 Autoflower
– "Bee Happy" 🐝 (Semaine 11)
#Dryrocket
On entre doucement dans la dernière ligne droite. La production de résine atteint son paroxysme et les choix stratégiques pour la récolte commencent à se profiler.
Un Grand Merci
Un merci tout particulier à @mia_biotabs et @Mrs_Larimar pour leur accompagnement tout au long de cette aventure, ainsi qu’à tous les cultivateurs qui suivent ce ce journal depuis le début !
Je tiens également à remercier chaleureusement @Dryrocket de me donner l'opportunité de tester leur appareil. J'espère sincèrement que j'aurai assez de silice pour mener à bien cette session avec, ça s'annonce super intéressant ! ☺️
Paramètres de Culture & Environnement
Taille : Toujours stable à 91 cm.
Le problème de colocation : "Bee Happy" est toujours très impactée et cachée par l'envergure de sa grande sœur Spirit. À cause de ce manque d'espace et de cette ombre imposée, il m'est encore difficile de me prononcer précisément sur la structure globale de la plante et sur l'estimation finale de la quantité. On fait avec, mais le potentiel est clairement là.
Climat & Environnement :
Les constantes restent inchangées. Lampe calée à 40 cm de la canopée, températures fixées à 24°C jour / 21°C nuit, et déshumidificateur en marche pour maintenir l'humidité à 60%.
Nutrition & Gestion de l'Eau
Système :
Le réservoir Autopot gère toujours l'arrosage automatique de fond en eau claire.
Ration du jour :
J'ai donné aujourd'hui une dose légèrement réduite par rapport à la semaine dernière : 4 ml de Liquid PK 5-8 Biotabs. On commence à lever le pied doucement en vue des prochaines étapes.
Étude des Trichomes & Structure des Buds
C'est ici que l'on constate une vraie divergence génétique. Les têtes de "Bee Happy" gonflent de façon totalement différente de celles de Spirit :
La structure :
Alors que Spirit développe des fleurs longilignes en forme de "sapin", "Bee Happy" nous sort des têtes ultra-compactes, très denses et groupées, qui ressemblent à des têtes de choux-fleurs.
L'évolution des trichomes :
Le givre est tout simplement impressionnant et très épais. À la loupe, les trichomes sont presque majoritairement laiteux. Il reste encore quelques trichomes transparents isolés et très peu d'ambrés pour le moment.
État général :
L'odeur sucrée est toujours bien présente et très agréable. Excellente surprise du côté de la santé globale : l'absence de sénescence se confirme, toutes les feuilles nourricières disponibles sont encore bien vertes et captent le moindre rayon disponible.
Perspectives pour la suite 🏁
Au vu de l'évolution des trichomes (majoritairement laiteux), le pic de THC est tout proche. Je pense que je vais la mettre au rinçage dans pas très longtemps. L'idée va être de couper le PK pour laisser la plante vider ses réserves et consommer les nutriments restants dans le sol avant la coupe.
Merci à tous d'avoir suivi cette mise à jour !
La fin approche pour "Bee Happy" et le test de l'appareil Dryrocket s'annonce très lourd pour la suite des événements.
À la semaine prochaine !

Likes
20
Share


@EvilGrower
Follow
This entry covers days 23-31. There is a timelapse of this past week, I hope you watch!
I upped the nutrients DRAMATICALLY! I was quite concerned, checking on the plants multiple times a day checking for signs of nutrient toxicity. Luckily, all was good this week. In part due to upping her nutes, she grew so much! I can't believe how many more leaves she has.
This week was the first week of some bondage for this girl. This was my first time performing that act, so I was nervous and made sure not to hurt her developing nodes. I tied her down in two spots at first, and in a third spot at a later date.

Likes
7
Share


@Krissci
Follow
Ending 1st week of flowering
Mainlining for 1st time
8x Nodes, topped 3x
Tied down to create even canopy
Flavour & yield is my biggest aim
Day 3 - Tie down training and defoliation. Both strong growers..
WC2 is the biggest so far
Likes
10
Share


@steadfast_grower
Follow
#########################################
HARVEST (Day 93 / June 4)
#########################################
-----------------------------------------------------------
GROW SUMMARY
-----------------------------------------------------------
Grown in 4x4 tent - but I only used 2x2 space because of heater and dehumidification and other plants (Outlier Z). This plant used a dedicated CMH 315 light. The plant was grown in hydroponics using a custom single-site PA hydroponics clone RDWC system with Advanced Nutrients Sensi Coco line, Microbial Mass and Orca for beneficials. I also experimented with Rapid start in the RDWC system, but I didn't see explosive root growth relying on Rapid Start as an additive to the system verse using it when starting in rapid rooters which worked well.
All around a pretty easy grow and things went very well. Topped twice for a mainline structure and she really spread out. Sparkling golf ball size nugs down the branches and spaced out nicely. The scent off her was like burned rubber/tires or maybe fresh blacktop. A single water change which was only performed when switching to bloom nutrients around week 7.
-----------------------------------------------------------
HARVEST
-----------------------------------------------------------
No dark period and no flush. On day 93 she was chopped and hung to dry.
-----------------------------------------------------------
DRYING
-----------------------------------------------------------
Entire plant hung upside down for 15 days. The temps were dialed in at 60F by using the S6 intake fan pulling air from the AC through intake vent on side of the tent. Humidity was dialed in at 63%/60F for 24hr, 62%/60F for the next 48hr. Then 60%/60F for the third day and onward. AC Infinity T6/S6 exhaust and intake fans were on the setting of '2' during drying until day 7, then I could turn down to a setting of '1' once the plants were not transpiring excess moisture. Trimmed on day 18. Then the jars were left open in the tent for another 12 more days for a full 30 day dry at 60%/60F while rolling the jars frequently. Also ran dehumidifier in the tent but it only ran for 1-2 minutes every hour because the AC was doing most of the dehumidification on the intake.
-----------------------------------------------------------
TRIMMING
-----------------------------------------------------------
Trimming was an absolute breeze. All swelled nuggets, very little sugar leafs left to trim.
-----------------------------------------------------------
CURING
-----------------------------------------------------------
Flower product was transferred to 1L mason jars averaging 35g of product per jar. I added a mini hygrometer to each jar and chose not to use a boveda this time. The RH averaged 62-64% when trimmed flowers went in jars.
Jars were left open in the tent for a total dry time of 30 days from harvest keeping the tent at 60%/60F.
Once closed, the jars were burped once a day for the first seven days, once every other day for the next seven days, rolling jars often. The burp was only for 3-5 second for air exchange until a. 62% was maintained in the jar.
-----------------------------------------------------------
YIELD
-----------------------------------------------------------
* Weight calculated at 62% humidity after 30-day dry and 14-day cure.
==============================
FLOWER PRODUCT
==============================
180.41g (6.44oz)
==============================
TRIM PRODUCT
==============================
57g (2.03oz)
** All major fan leaves, stems, and branches removed from trim product.
==============================
TOTAL OVERALL YIELD
==============================
Total: 238.41g (8.51oz)
==============================
SPACE YIELD
==============================
238.41g / 4 sqft (2x2 canopy) = 59.60g per sqft
==============================
WATTAGE YIELD
==============================
315 Watts / 4 Square Foot (3x4 canopy) = 78.75 watts per sqft.
238.41g / 315 watts = 0.76 grams per watt
-----------------------------------------------------------
PRODUCT TEST
-----------------------------------------------------------
Bag appeal is top-notch. Trichome covered, with aromas of that unique 'kush' you can quickly identify based on experience.
Best OG Kush I've ever tried, hands down! The flavour is kushy, smoke is smooth and definitely my favorite strain in my tote of cured harvests at the moment. I can't keep my hands off of the jars. Definitely not a daytime strain, even for experienced users, although I'll use it in the afternoon when life is throwing curve balls. The effects rise you up, then sets you right down and will wash away all that anxiety after a long day. Put it this way....if I puff a few hours before bed, I still feel it the next morning when I peel my eyes open. No joke.
I'll definitely be growing this one again, maybe even next run because I'll be sad when I run out.
-----------------------------------------------------------
REGRETS
-----------------------------------------------------------
Not running more of this amazing plant.
-----------------------------------------------------------
NEXT RUN
-----------------------------------------------------------
This was the first run at my new residence so it will take some time to get it dialed in. I had some calibration issues which are now fixed. I'm going to be shooting for 1gram per watt on the next run.
-----------------------------------------------------------
FINAL THOUGHTS
-----------------------------------------------------------
DarkOwl is the best autoflower I've grown yet. I'm now eager to give the Bruce Banner #3 they released a run and will surely acquire future releases from DarkOwl.
-----------------------------------------------------------
THE END
-----------------------------------------------------------
Thanks for checking out my diary! I typically journal in my notebook but I put some time and effort into documenting my grows on this platform in hopes it will help a new or experienced grower with their DWC journey. Any questions or suggestions are welcomed.
Happy growing!

Likes
321
Share

@Tropicannibis_Todd
Follow
🤔🤔🤔🤔🤔 HAPPY GROWING 🤔🤔🤔🤔🤔
(👉Bonus Video Showcases Everything I Have Going on in TropiCannibis HQ 👈)
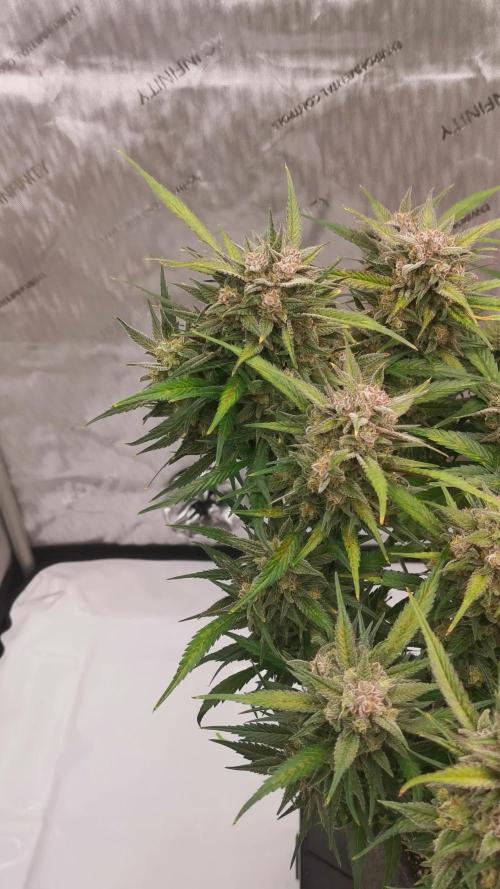
We are now 54 Days into flowering and everything is going great 👍 👈 We are now playing the waiting game👌
Just waiting on the tricomes to amber up a bit 👈
👍 decided to showcase the Mini BigBand , was a extra seed that germed so I kept it as a Mini Me 😊 She's killing it 👈
Except for some watering it's been pretty smooth I've done a little maintenance and manipulation of the canopy 👈
👉Soil Medium Provided by ProMix.ca
👉Nutrients Provided by Agrogardens
👉Lighting Provided by MarsHydro.ca
I would like to thank the many growmies for support throughout the years 🙏 So Let's Do This 👊👊👊 Happy Growing

Likes
20
Share


@Boomdrawfyah
Follow
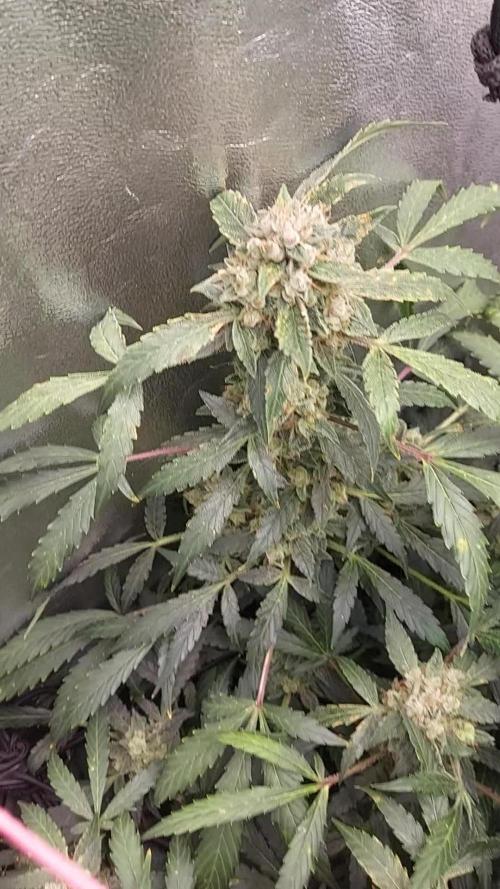
Dia 134 y semana 6 de floración,ultimo dia de vida de las plantas.
Este año ha sido un poco raro las plantas han crecido como monstruos tuvieron un crecimiento espectacular un tallo muy grande y junto con sus ramas flexibles y muy resistentes. Pero al llegar el engorde de floración no se porque les falto el empujon final para hinchar el cogollo, tiene muy buena pinta , mucha resina y muy fuerte buen olor pero me esperaba mas en la fase final. Cortamos ya que tambien habian orugas y no terminaba de eliminarlas por completo, la semana que viene era entera de lluvias así que decidi cortar un poco mas temprano para poder prevenir cualquier mal mayor, hay mucha gente que le gusta cortar antes de tiempo ya que el efecto es muy diferente, este año probaremos que tal.