


Likes
Comments
Share


@BruWeed
Follow
Se secaron rápido. Los cocos son pegajosos y tienen aroma muy fuerte.
En humedo me dio 150g en total. Tengo que esperar que se sequen para ya saber el resultado final.

Likes
51
Share


@cheetah844
Follow
She just gets bigger everytime I see her. I'm excited to watch her grow into what will hopefully be, a beautiful flower filled plant.
I topped every bud site on every plant, both indoors & outdoors.


Likes
43
Share


@Jack_Greenstalk
Follow
Increased the amount of nutrients in the feed this week and got a little bit of burn on V, Nemo handled it no problem! removed the yellow spotted fan leafs as part of general defoliation for this point in flower. Continuing to pluck and tuck, meaning removing extra fan leafs (plucking) and bending tallest colas back under the scrog (tuck). shooting to keep all budsights 18 to 22 inches from the light to prevent burn and allow healthy development. I can see where proper distance has been kept best development has occured.

Likes
3
Share

@JamrockGrows
Follow
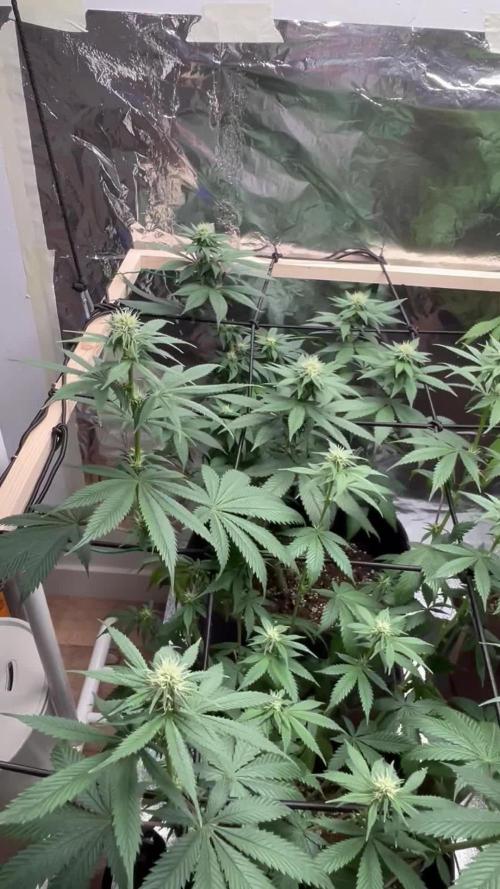
11/08- Week 4 of flower and the buds are really stacking up. The smell is getting stronger and the plants have pretty much reached their final height. The height of the tallest stem is 70cm which is perfect as it gives me about 50 cm of space between the light. I will water them today with some nutes.
16/08 - watered both plants with 1L of water ph 7. Increased amount of nutes as I noticed the plants are demanding more.
20/08 - watered again with 1L of just water ph 7.
Hope you have a great day!
Peace

Likes
12
Share

@GERGrowDesigns
Follow
Dear Growers ,
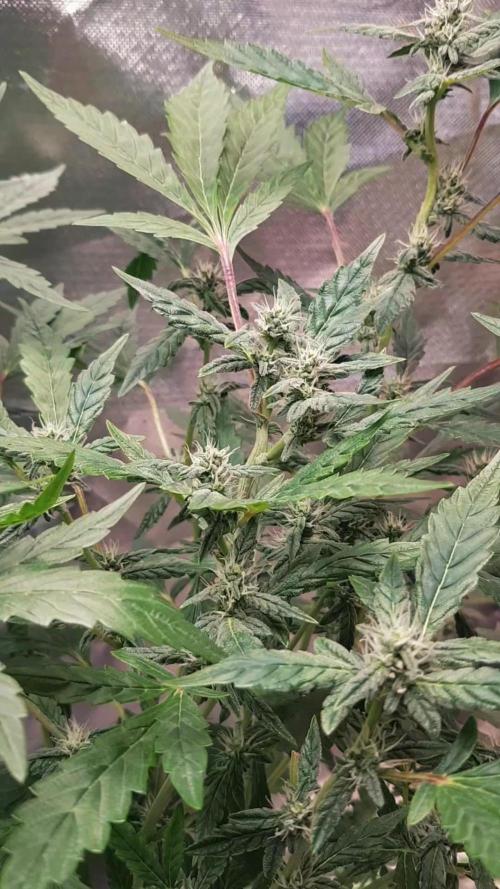
Over the next weeks, we’re excited to share a very special project with you: Sensi Seeds Berliner Automatic 2025 Release
With dedication, knowledge, and hands-on practice, we’ll guide you step by step through the journey—watch with us as growth, development, and small wonders unfold before your eyes.
Whether you're a beginner or an expert, you are warmly invited to join, ask questions, and share your own experiences along the way!
Project Setup & Conditions:
• Brand/Manufacturer: Sensi Seeds
• Tent: 120cmx60cmx80cm
• Light: 2x 200 Watt Full Spectrum
• Humidity: 45%
• Soil: Narcos Organix Mix
• Nutrients: Narcos Products
• pH Value: 5.8
A Special Thanks To
Sensi Seeds
for the amazing collaboration, trust, and generous support in making this project possible. Your contribution is truly appreciated!
Congratulations on Your Own Projects!
We celebrate your growth, your creativity, and the passion you bring to the table. It’s truly inspiring to witness at Each visit .
Stay curious and keep up Growing —we look forward to welcoming you back for the next chapter soon!
Likes
16
Share


@TheCannaProphet
Follow
Brand new here and my apologies as I'm actually on Week 5F at this time and have had to scour my journal, notes and photo's to catch this diary up to the present. Next run is 8 auto's( 2 FastBuds & 2 Seedsman) with 4 different strains so STAY TUNED! ...The babies are doing well with the exception that I had two Power Plant beans that failed to pop, third time was the charm which puts it roughly a week behind it's sista's. GSD is just hanging out desperately waiting for the little one's to catch up so she can flower as she's been vegging for 50 days already (I had her on a 19/4 light schedule with a Auto run that just finished). Temp's and RH good to go, daily light water right now with seaweed extract added @ 1tbs/gl.


Likes
6
Share


@Hommero75
Follow
End of week 5 for Orange Sherbet FF. This week was better than the last week. She Starting to bounce back from her issues she is taking her time in developing and stretching slowly. No signs of pre-bloom yet. I just fed her Goldleaf feterlizer and did some defoliation to the bad leaves. Hopefully week 6 is better.

Processing
Likes
15
Share


@LongJohn420
Follow
3rd veg week was done 6.9 and steady healthy grow. Later germinated The New seems to get along just fine. Meaning no big size difference 👌 Germinated in water glass 36h and nice tail then straight to soil and about 50h after putting that seed to water glass it broke soil. Nice 👌
Little sings of nutriens defs but I won't worry about that. It'll fix when they get in their final homes after couple days. Next weeks they in cleaned tent and in bigger pots 🙏
That's all folks!! Stay high, till next week!
Happy growing!''
"Fuck the humbe laws, I rather have a violent win""
-Ras Kass -
Likes
18
Share


@Chucky324
Follow
Hello. This is the end of week 10 of flowering... and it's harvest time.
Just shot some quick video's to show what they look like after flushing.
Should take around 4 or 5 days to harvest all 13 plants.
With the weighing of the raw branches before wet trimming them and writing down the weight,
And the taking of the photo's, making them look good, it takes a little longer to harvest doing a diary.
OK. See you in a couple of weeks.
Chuck.
Likes
6
Share


@DogDoctorOfficial
Follow
💙 Project Blue Tent – Week 7
Blue Waffle F1 – Pheno B (Folder 13B)
Hello everyone, and welcome back to another chapter of Project Blue Tent! 💙🌱
If you're joining us for the first time, welcome aboard.
Project Blue Tent follows four individual Blue Waffle F1 plants from Zamnesia, each documented separately from seed all the way through harvest.
All four sisters share the same environment, lighting, nutrition, irrigation and training techniques.
The idea is simple:
Keep the environment as consistent as possible and let the genetics tell the story.
And despite all those similarities, each plant still manages to develop her own little personality.
Today we're checking in with Blue Waffle F1 – Plant B.
And if you've been following her journey...
You might remember that this is the girl who had a rather unexpected visitor last week. 🐛
Don't worry.
She's absolutely fine.
In fact, judging by the way she's growing...
She seems to have completely forgotten it ever happened.
────────────────────────
🌿 Week Seven – The Canopy Is Ready
This week feels like the end of one chapter and the beginning of another.
For several weeks we've been building the canopy.
Topping.
Training.
Guiding branches.
Installing the SCROG.
Tucking shoots underneath the net.
Slowly filling every available space.
And now...
We've done it.
The canopy is essentially where I want it.
Plant B is sitting at approximately 60 cm, just like her sisters, with the SCROG keeping the plants at a remarkably even height.
Looking from above, it's becoming increasingly difficult to distinguish one phenotype from another.
That's actually one of the most fascinating things about this project.
Four individual plants.
Four individual diaries.
And yet, under identical conditions, they're producing an incredibly uniform overall canopy.
Plant B has once again filled her section beautifully.
She's healthy, vigorous and absolutely covered in potential flowering sites.
So now it's time for the final preparation before we flip.
────────────────────────
🕸️ The SCROG Mission – Completed
The SCROG has been one of the most important pieces of the puzzle during this vegetative cycle.
Instead of allowing the plants to develop a few dominant vertical tops, we've spent weeks encouraging the branches to grow horizontally across the screen.
Every time a shoot tried to escape upward, we'd gently guide it underneath the net and into the next available square.
Slowly...
The empty spaces disappeared.
And eventually, the screen became one continuous canopy.
That's exactly what we wanted.
The purpose isn't simply to keep the plants at 60 cm.
It's to distribute the growing tips across the available light and create a more uniform structure for flowering.
And Plant B has handled the entire process beautifully.
Now that the screen is full, however, our priorities are changing.
We're no longer trying to add more foliage.
We're preparing the foliage we already have.
────────────────────────
✂️ Defoliation – The Final Vegetative Cleanup
This week's main event is defoliation.
And this is an important distinction:
Defoliation isn't about removing leaves because they look ugly.
It's not about trying to make the plant look "clean."
And it's certainly not about stripping every leaf from the plant.
Leaves are the plant's solar panels.
They're valuable.
So the objective is selective removal, not destruction.
After several weeks of vigorous vegetative growth and SCROG training, the interior of the canopy has become extremely dense.
There are leaves overlapping one another.
Branches crossing through crowded areas.
And sections of the plant where airflow and light penetration can be improved simply by removing some unnecessary foliage.
That's what we're addressing now.
We're opening the plant.
Creating breathing room.
Improving visibility.
And preparing the structure for the much denser environment that flowering will bring.
────────────────────────
🌬️ Why Do This Before Flower?
This timing is very deliberate.
Defoliation is a form of stress.
Even when performed correctly, removing a substantial amount of foliage temporarily forces the plant to adjust to a new balance between its leaves, roots and active growing points.
So I want that recovery to happen before flowering begins.
We're still running an 18/6 vegetative schedule.
The plants are actively growing.
They have time to recover.
And we're not simultaneously asking them to transition into a completely different developmental phase.
Once flowering begins, I want the plant's attention moving toward flower development rather than recovering from major structural work.
So we're following a very simple sequence:
Build the canopy.
Fill the screen.
Defoliate.
Recover.
Flip.
One step at a time.
────────────────────────
🧠 What Defoliation Actually Achieves
There's a common misconception that removing leaves automatically means more light equals more growth.
It's not quite that simple.
The reason we're doing this is to improve the overall efficiency of the canopy.
We're trying to create a better relationship between:
🌱 Growing sites
💡 Light penetration
🌬️ Air movement
🍃 Leaf density
? Plant structure
The upper canopy is already receiving plenty of light.
What concerns me more is what happens underneath it.
A dense interior can become a maze of overlapping leaves and branches.
By selectively removing some of that congestion now, we're creating a more open structure before the flowers begin developing.
And that's particularly valuable inside a compact tent where four vigorous plants are sharing the same space.
────────────────────────
🌿 Plant B – The Girl Who Bounced Back
And then there's Plant B.
The survivor of the infamous caterpillar incident. 😂🐛
Last week she had a tiny visitor arrive from the outside vegetable garden and apparently decided that one of her leaves would make an excellent snack.
Fortunately, the entire event was almost comically uneventful.
The caterpillar was found.
It was removed.
The affected area was cleaned up.
The entire tent was inspected.
And Plant B simply continued growing.
No meaningful setback.
No visible stress.
No drama.
If anything...
She seems to have responded by growing even harder.
Her foliage is now rich, healthy green from top to bottom.
The new growth is vigorous.
The branches remain strong and flexible.
And the canopy has continued expanding exactly as planned.
So I think it's safe to say:
Plant B won that battle.
The caterpillar got one meal.
Plant B got another week of growth.
I'd call that a draw. 😂
────────────────────────
💧 Drip Irrigation – Doing Its Job
The Mars Hydro drip irrigation and automatic drainage system continues to impress me.
Each plant is currently receiving approximately 1.2 litres of nutrient solution per 24 hours, delivered consistently through the individual drippers.
The runoff is then collected and removed through the automatic drainage system.
That consistency has become particularly valuable now that the plants are getting larger and the root systems are becoming increasingly demanding.
Instead of manually trying to reproduce the same watering pattern every day, the system gives the plants a predictable routine.
And the plants are clearly responding well to it.
Healthy foliage.
Strong growth.
Stable development.
It's one of those pieces of equipment that quietly does its job in the background...
Which is exactly what I want from an irrigation system.
────────────────────────
🥥 Feeding Program
The nutrient recipe remains completely unchanged this week.
There is simply no reason to interfere with something that's working.
Current feeding:
• Plagron Hydro A — 1.9 ml/L
• Plagron Hydro B — 1.9 ml/L
• Plagron Hydro Roots — 1 ml/L
Current EC:
1.92 mS/cm
pH:
5.8
For now, I'm keeping the nutrition exactly where it is.
The plants are showing excellent colour, vigorous growth and healthy structure.
We may increase the nutritional strength next week depending on how they respond after this defoliation and as we move into flowering.
But I prefer to make that decision based on the plants rather than simply increasing numbers because the calendar says we should.
They'll tell me when they're hungry.
────────────────────────
🌡️ Blue Tent Environment
The environmental conditions remain wonderfully stable.
This week's average conditions were:
• 🌡️ Day Temperature: 28°C
• 🌙 Night Temperature: 25°C
• 💧 Relative Humidity: 65%
• 🥥 Substrate Temperature: 24°C
• 💦 Nutrient Solution: 18°C
• ⚗️ pH: 5.8
• ⚡ EC: 1.92 mS/cm
• 💨 CO₂: approximately 450 ppm
• 💡 Light Schedule: 18/6
• 💧 Irrigation: approximately 1.2 L/plant/24h
• ? Pot Size: 8 L
• 📏 Plant Height: approximately 60 cm
The consistency between the four plants is one of the things I appreciate most about this project.
We're trying to remove as many environmental variables as possible so that when differences appear, we can look much more closely at the plants themselves.
And right now...
The similarities are remarkable.
────────────────────────
🌱 Four Sisters, One Canopy
This is perhaps the strangest part of the project at the moment.
When I look across the Blue Tent from above, the four plants almost look like one giant organism.
The canopy is extremely uniform.
The colour is consistent.
The height is consistent.
The growth rate is remarkably similar.
And the SCROG has done an excellent job of bringing everything together.
Of course, if you look closely, you can still see the individual personalities.
That's why these separate diaries exist.
But from a distance?
It's becoming increasingly difficult to tell who is who.
And honestly...
That's a beautiful result.
It means the environment is doing exactly what we wanted it to do.
────────────────────────
🌿 Plant B's Personality
Plant B continues to be one of the more naturally cooperative plants in the tent.
She's responsive to training.
She's vigorous without becoming unruly.
And she has developed an incredibly usable structure beneath the screen.
Her branches have thickened nicely, her internodal spacing remains compact, and the new growth continues appearing with that healthy, vibrant colour I've been looking for.
And perhaps most importantly...
She doesn't seem to hold grudges.
We topped her.
We bent her.
We tucked her.
A caterpillar ate her.
And now we're defoliating her.
And she's still standing there saying:
"Is that all you've got?" 😂🌱
That's Plant B.
────────────────────────
👀 Looking Ahead – Flower Is Coming
After today's cleanup, the most important thing we can do is...
Nothing.
Let her recover.
Let the new growth settle.
Keep the environment stable.
Keep the roots happy.
And observe.
This is where patience becomes just as important as technique.
We've spent weeks building this plant.
Now we need to give her the time to respond.
If everything continues looking this good, the next major milestone will be the transition into flowering.
The screen is full.
The excess foliage has been cleaned up.
The structure is ready.
And the plants are healthy.
We're almost there.
Vegetative growth is coming to an end.
The next chapter is going to be very different.
🌸 Flowering is next.
────────────────────────
💙 Thank You
A huge thank you to Zamnesia for making Project Blue Tent possible and for providing these fantastic Blue Waffle F1 genetics.
A heartfelt thank you to Plagron for the Premium Growbags and Hydro nutrient line, which continue providing the plants with everything they need to maintain this beautiful growth.
A special thank you to Mars Hydro for the drip irrigation and automatic drainage system. It has been performing wonderfully throughout this project and has made maintaining consistency inside the tent considerably easier.
Thank you as well to Future of Grow for the UVC LED bar, which remains another tool within my preventative IPM routine.
And of course, thank you to GrowDiaries for giving growers around the world a place to document, learn, exchange ideas and share these journeys.
And finally...
Thank you.
For following.
For commenting.
For asking questions.
For sharing your own experiences.
And for simply being here.
Plant B has already survived topping, SCROG training and a tiny caterpillar invasion.
Now she's clean, healthy and ready for the next chapter.
The canopy is full.
The room is ready.
The plants are ready.
And soon...
we flip the Blue Tent. 🌸💙
Until next week...
Growers Love, happy growing, and take care everyone! 🌱💙


Likes
202
Share


@CrazyHorse
Follow
😁😁😁
Hi grow mates
😁😁😁
As day 43 arrived we are opening 7th week of my grow journey.
Like you can see from the photos girls started to blooms wildly.
Purple Lemonade is getting absolutely purple, flowers gets density and aroma.
Cinderella !! Wow !! Here is an interesting one. She is huge, I never had so many flowers sites on one plant. She's tall girl 118 cm !!
Bruce Banner, she is a real mystery. She started to blooms like all her sisters, but looks a little shy. I think she need just more time. From previous experiences, I know that the "shy" ones gave best results. Fingers crossed 🤞
Day 44
Purple Lemonade 81 cm
Original Cinderella 118 cm !!
Bruce Banner 90 cm
I wish you all, All the best 😇
Likes
151
Share


@BioBuds
Follow
'Not all those who wander are lost'
What started out as an experiment, turned out to be an adventure of epic proportions. What hangs here behind me smells like the weed I knew in the 80's, skunky and full. But look at those buds. DAAAAANG....
These are the biggest buds Ive ever grown, I didn't know what darkness precisely did before.... now I know... My god after a few days they oooze cristal liquid from all its holes.
They are greasy and sticky, full of weight and I think well hit the 300 grams per plant with this one, taking our total to 600 grams what would be 2 grams per watt used.
If that's so, Ill never use another light again! Thank you Mars Hydro for letting us try it. And by god so should anyone wanting to up their growing game.
Well keep you posted with the dried results and smoke report!
For now thanks for checking us out again and see you soon
X
Bud and Sunshine!



Likes
79
Share


@JUNGLE_B4RNS
Follow
Week 12, flowering week 2
Catching up the delay. Accelerated the flowering hormone to trigger a fast blooming, worked well on 80% of the crop. This is where in a Grow Op everyone looks at you like if you were an alien 👽 The boss asking how ... the answer is, this why you are hiring me Boss 😊
Lemon Cream Kush is a stretcher, about x 2.8 in size.
The Mega Power Plant is very remarkable with a perfect structure.
Bubblegum has 2 different phenotypes, Indica and Sativa.
Lights are at maximum high, this is where I wish I could have a full Mars-Hydro lightning equipment in the grow room, the light penetration would be much better.
Added some Organic Bloom this week to follow plants needs in the development of the buds. Cutting the RootBooster, roots development is nearly finished at this stage.
That’s all for the week, stay tuned folks 😊
(I’m looking for a job in the Cannabis industry as Master Grower, Mineralogist, Quality Control)

Likes
52
Share


@SAC87
Follow
Week 5 Day 1: The smells are starting, they’re starting to chunk up from a week ago. The chem is definitely larger than the rest, but the Durban is doing its regular thing and making hard nugs. I haven’t done anything except tuck and defo large shading fans. Just on cruise control. I fed with the above amounts 2 days ago which is that same as suggested for week 5. I’ll be adding the overdrive in week 6 and see what that does.
The Shishkaberry is a little lack luster in size but we’ll see she goes and the Dutch is stacked up pretty nicely with some crowding between the nets.
All in all getting more pistils, size and trichs every day so nothing to complain about.
Happy Growing 🌱
Update: W5 D4- So I opened up one of the ovules from each plant and there are tiny seeds inside, does anybody else have that or does that mean I have seeds again. Also, starting to have a bit of a leaf tip burn but not sure what the reason is yet.


Likes
2
Share


@Comfrey
Follow
Diese Woche war es eine Freude zu beobachten, wie sich die Blüten dieser schönen Pflanze strecken und aufeinander stapeln. Sie produziert Trichome und eine erste Vorstellung vom Geruch liegt in der Luft.
Purple Punch Auto hat sich gut entwickelt, ich bin von der Streckung ziemlich beeindruckt. Etwa einen halben Quadratmeter braucht sie nach dem intensiven low stress Training der letzten Wochen. Alle Pflanzen berühren sich jetzt, es wird eng auf den knapp zwei Quadratmetern.
Gegossen wird morgens und abends nach Topfgewicht und Gefühl, ca. 1,5 Liter in 24 Stunden säuft sie bei bis zu 30 Grad im Schatten.
