
Likes
Comments
Share


@AlpenZilla
Follow
Week 9 – Day 65 (BT41)
Everything went smoothly this week – one of those rare moments where it just flows 😎
🌿 RedPure#4 is now fully mature and ready for harvest!
She put on a bit more bud mass 🍇 and looks great overall.
✂️ She’ll be chopped within the next few days.
Also worth noting:
The switch to BioBizz pH+ is paying off – I’m now able to raise the drain pH by about 0.1–0.2 points 📈
That’s a clear improvement compared to using Canna pH+ with Advanced Nutrients.
For now, it's just routine: water, observe, enjoy 🙌

Likes
24
Share


@BearBuds
Follow
We have made it to the end of Week 6. Conditions in the tent have improved DRAMATICALLY. The heat wave has finally passed and the temperature has finally leveled out. Not only that, the super weird monsoon weather that we were having has also passed and now the humidity is not rising above 60%. This turn for the best is really showing and also fixing the pH problem I had also probably helped a lot. The color of the buds is really coming through now. They are showing lots of light blues and a little orange and I am loving it. I am planning on pushing the nutrients a little higher these next two weeks, around 750-850 PPM. Hoping to give them a larger shot of overdrive to keep them pushing these last 2 or 3 weeks. Overall I am SO excited for this plant, I can't wait to see what her harvest will bring!!!

Likes
3
Share


@julian100614
Follow
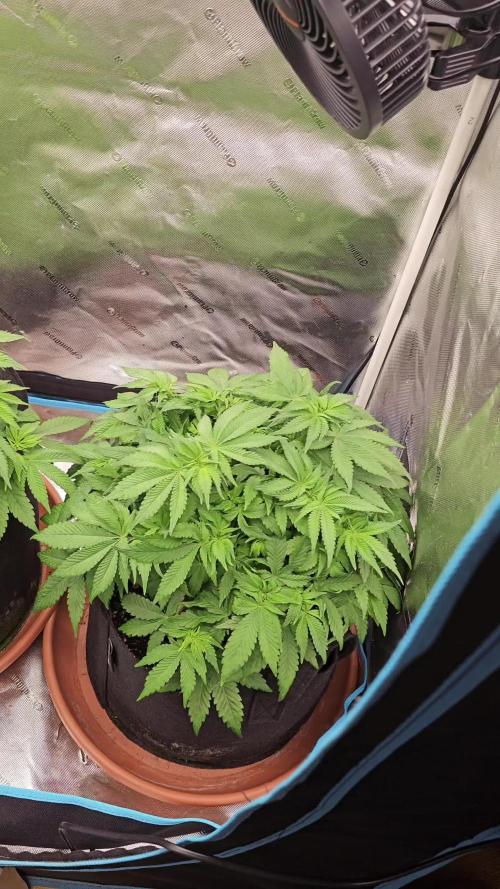
La semana fué realmente bien 👍😌🙌
Esta semana sera la última con el ciclo 18/6 para empezar con un 12/12 y comenzar la floración la semana que viene 💪
Hemos estado aplicando durante todo el proceso 2ml de Terra Vega para la etapa vegetativa de la planta y comenzamos a darle Pure Zym de Plagron para que absorba odos los nutrientes posibles sin saturación 👌


Likes
11
Share


@Miketama
Follow
One of 4 strains grown together in 0.36m² using Migro Array 2 (125W). Variable dimming: W1 60%/24h, W2-10-11-12 60%/20h, W3-5-8-9-13 80%/20h, W6-7 100%/20h. Average real consumption: 95W with 173.6 kWh total.
STRAIN: Divine Seeds genetics - underrated
breeders producing excellent quality!
NUTRIENTS: Full Biotabs bacterial line - positively surprised by the results! Organic living soil approach.
GROWING APPROACH: Focused on DLI (calculated from Migro’s PAR map), VPD, water temperature, and water resting time. Did NOT monitor pH, EC, CO₂, or use PAR meter.
MY BEST HARVEST SO FAR! 🏆
COLLECTIVE METRICS (4 plants total):
• Total dry weight: 210g (+ 10g bubble hash)
• Total wet weight: 890g
• g/watt: 2.21 (or 2.31 with hash)
• g/m²: 583 (or 611 with hash)
• Average per plant: 52.5g
Individual weights: Fractal 55g, Northern Lights 54g, Black Opium 67g (best performer!), Moon Rock 34g. Dense and resinous buds.
Additionally grew 3 outdoor plants (Fractal #2: 21g + 60g frozen, Northern Lights #2: 14g + frozen, Black Opium #2: 50g fresh frozen) - not included.
~300g frozen trim (indoor+outdoor) yielded ~10g bubble hash.
Good luck to everyone in the contest! 🍀

Likes
Comments
Share

@SirNutalot
Follow
First day in flower and they looking good but there some burnt leaves from to much fertiliser is my diagnosis

Likes
2
Share


@Fleetwood
Follow
I am busy all weekend, so I wanted to make sure I got something out of the grow (just in case). I might use a good portion of this harvest for rosin and for when friends ask :) That is if the second plant lasts until next week. I cant ask my wife to keep an eye on water, roots, or bud.

Likes
155
Share


@deFharo
Follow
Bienvenidos cultivadores de marihuana clandestinos y también a los que tienen la fortuna de no serlo!🖐️👨🌾👍
Este es un diario semanal de técnicas de cultivo y Bio preparados orgánicos caseros, los cuales llevo experimentando dos años en cultivos de marihuana interior.
Esta semana dos en uno:
1) ELABORACIÓN DE AUXINAS EN POLVO EXTRAIDAS DE ALUBIAS NEGRAS GERMINADAS.
La primera vez que hice este preparado y lo publiqué en GD fue en Octubre de 2019, lo volví a hacer en Junio de 2020 y llevo dos años usándolo, me ha costado el precio de 2kg de alubias negras.
INGREDIENTES:
- 1kg de alubias o frijoles negros, porque son las semillas que más concentración de auxinas contienen, comparándolas por ejemplo, con lentejas o cualquier otro tipo de leguminosas, también se puede usar granos de maíz.
Preferentemente, se deben usar semillas de alubias nuevas y cultivadas cerca de tu zona.
- Agua pura.
PROCEDIMIENTO:
- Se cubren las alubias con agua y se dejan a remojo durante una noche.
- Al día siguiente se separa el agua. Esta agua la puedes usar para riegos, contienen varios minerales.
- Se mantiene la humedad en el recipiente de las alubias por unos días, hasta que germinen. Se pueden cubrir con un paño húmedo y compensar la perdida de humedad rociando agua. Se debe observar que la mayoría de las semillas hayan germinado.
- Cuando las alubias, en su mayoría estén germinadas, se añade unos dos litros agua pura y se bate todo.
- Ahora filtramos con malla y escurrimos los restos sólidos. (Reservamos esta materia para un segundo lavado)
- Dejamos reposar el líquido durante dos días, hasta que se vea acumulación de materia en el fondo.
- Retirar la mayor cantidad posible de agua clara.
- Dejar al sol cubierto con una malla, hasta la completa deshidratación del producto.
- Moler y guardar en un sitio seco y oscuro, en estas condiciones puede ser efectivo durante años.
-- A los residuos sólidos recuperados del primer filtrado, les añado agua, los bato y los filtro con doble malla, lo embotello y guardo en el frigorífico (no más de 15 días, pues fermenta), lo uso para mezclas de riego. Los residuos finales se aprovechan, para aquellos que tengan tierra en exterior o hagan compost.
QUE SON LAS AUXINAS Y USOS:
- Las auxinas son un grupo de hormonas vegetales naturales, que regulan varios aspectos del desarrollo y crecimiento de las plantas, en la marihuana sobre todo en el periodo de crecimiento vegetativo y en el comienzo de la floración, después no hacen falta.
- Uno de los aspecto más característicos es el efecto que causan en el desarrollo del crecimiento radicular, promoviendo sobre todo la formación de raíces secundarias y adventicias gracias a la estimulación celular que provocan las hormonas.
- Otro aspecto de las auxinas es que distribuye su energía principalmente al ápice primario, reprimiendo el desarrollo de las ramas laterales, lo que provoca dominancia apical, pero esto es en el caso de plantas de marihuana sin corte apical y donde se quiere conseguir un cogollo principal monstruoso, su uso puede dar muy buenos resultados en cultivos SOG... pero ¿Qué pasa si hacemos un corte apical para promover el crecimiento de ramas laterales y que por ende, de buenos cogollos en cada una de ellas? Cuando se hace un corte apical al ápice principal las hormonas se reorganizan por la planta, ahora para mandar energía a todas las ramas y sus ápices, promoviendo el crecimiento!.. es un buen momento, después de un corte apical, aplicar auxinas para potenciar el proceso.
- Finalmente os dejo un gráfico de la actuación de las auxinas en las diferentes etapas de un cultivo, también se ve la importante relación con otras hormonas (Citoquininas o Ácido Giberélico) y los nutrientes claves que no deben faltar para finalizar todo el proceso hormonal. Las Citoquininas y el ácido Giberélico naturales se encuentra en el agua de coco, y es muy interesante conocer como actúan, en la quinta semana de este diario hablo sobre las propiedades del agua de coco.
Bien, una vez dicho lo anterior, yo uso las auxinas en polvo de las siguientes formas.
- Como mezcla del sustrato donde germino las semillas y donde mantengo las plántulas hasta el trasplante a la maceta definitiva, para potenciar el enraizamiento.
- Por la misma razón, lo espolvoreo sobre el cepellón de raíces de la plántula, en el momento del trasplante a la maceta final.
- Lo uso como enraizante de esquejes, impregnando el tallo de polvo antes de enterrarlo.
- 10 días después de realizar el producto, todavía tenía en la nevera un litro de auxinas líquidas, provenientes del segundo lavado de los restos de las alubias molidas... y entonces pensé que sería buena idea incorporarlo a un fermentado, y de aquí vienen esta segunda parte...
2) LACTO FERMENTO DE AUXINAS ENRIQUECIDO CON NUTRIENTES Y MINERALES
En esta ocasión, para la fermentación anaeróbica, elegí hacerlo con suero de leche como base de microorganismos (Ácido láctico, Bacterias Acidolácticas BAL y Lactobacillus) que harán el trabajo de solubilizar los nutrientes y quelatar los minerales, es un preparado muy eficiente para riegos y aplicaciones foliares, en este caso lo hice enriquecido, mezclando diversos materiales orgánicos con otros minerales. Puedes ver la lista arriba.
Sobre esto tengo que decir que después de dos años haciendo diferentes lacto fermentos, ahora los hago más específicos, sin mezclar tantos nutrientes, por ejemplo, si quiero solubilizar guanos, harina de huesos o algas, lo que hago es crear un lacto fermento con cada uno de ellos, en el caso de lacto fermentos con minerales, sigo preparándolo mezclando varios, este preparado es muy eficiente en quelatar minerales, y sobre todo en solubilizar fósforo.
PROCEDIMIENTO:
A veces consigo suero de oveja de un vecino que hace quesos, a veces hago suero de leche cruda de vaca y cuando no tengo ninguna de estas fuentes, hago suero a partir de leche pasteurizada, como el caso de este.
- Mezclo el suero (1l) con la melaza y la miel, lo caliento a unos 30°C.
- Peso los ingredientes. Como regla general, en el caso de componentes orgánicos usar del 8 al 10% como máximo, respecto a la cantidad de líquido. En el caso de minerales del 4 al 5%.
- Añado la levadura al suero con la melaza y la miel.
- Añado los componentes secos al barril.
- Añado el suero con la melaza y la levadura al barril y agito.
- Añado el litro de auxinas líquidas y agito bien.
- Lo cierro hermético con válvula de gases.
- Guardo el barril a oscuras al menos durante 30 días, pero cuanto más tiempo lo mantengas cerrado antes de abrirlo por primera vez el resultado será mejor.
La fermentación comienza violentamente a los pocos minutos dura varios días así y después se hace más lenta.
USOS:
Este es un preparado que uso como complemento a las auxinas en polvo, lo uso para hacer riegos o aplicaciones foliares de disponibilidad inmediata.
- Hago aplicaciones foliares en plántulas, en las primeras semanas de vida.
- Lo uso al comienzo de la etapa de crecimiento vegetativo en conjunto con agua de coco.
- Riego con este preparado después de hacer cortes apicales.
- Lo vuelvo a usar en riego en conjunto con el agua de coco al comienzo de la floración, y esta es la última vez que lo uso en un cultivo.
Una señal inequívoca de la actuación de las hormonas, es que las plantas son más susceptibles al fototropismo, esto se traduce en una respuesta mayor a la incidencia lumínica, las plantas, sus hojas y brotes se inclinan y se dirigen hacia la mayor fuente de luz. Yo lo he visto muchas veces después de aplicar auxinas.
y esto es todo por hoy... 😅
Hasta la próxima semana...
GRACIAS POR ESTAR AHÍ, CULTIVADORES!!🖐️👨🌾💧💦🌞💡
=================================
Likes
33
Share


@nerdz
Follow
Chopped and I'll hang them in the he dry tent and keep it around 60rh/17c for as long as I can. 🤑
Update: got the tent at 15c/61rh and wow the buds have a different type of firmness than before. I can't wait...
So far my best grow of the 3


Processing
Likes
12
Share


@Csmithch
Follow
Felt like growing was slow going this week. I know they’re only 7 days from breaking ground so they’re establishing their roots but there was two days I felt like they didn’t grow at all.
I germinated two more seeds, was going to have a total of 5 in my 4x4 but I somehow managed to kill both my master kush seeds despite having a beautiful tap root when I planted them into the soil. (Any advice/methods for getting seedlings going from germination to 🌱 is welcome and appreciated)
My two Gorilla Breath plants struggled for the last 3 days of this week and went pretty yellow, which I presumed was a lack of nutrients since they’re only in solo cups right now with Fox Farm soil. They most likely used up all those nutrients and thus began showing signs of nutrient deficiency.
I plan to make the next transplant into pro mix with added perlite so I have Advanced Nutrients Micro, Grow, Bloom on standby with RO water for that process. I ended up giving the two gorilla breath a 1/3 dose of micro, grow, bloom in 1L of water for one of their feedings to attempt to get some color back. It seemed to start working as you can see on the pictures.
I was into my local hydro store today to buy some perlite to add to my pro mix next week and the guy talked me into some foliar spray (see attached image) to address the nutrient deficiency. I sprayed it on the leaves right before lights out on day 7 (February 6th)
Hopefully that helps them out. Time will tell.
I also struggled with humidity this week, ended up using a wet towel temporarily to keep humidity levels around 50% but I ended up ordering a humidifier on amazon and got that set up today. Super happy with the results from that 😁
Stay blessed and happy growing!


Likes
25
Share


@XperencdGmanXG
Follow
its been a hot dry week but the girls have fared it well. mound design and soil content have helped keep moisture in the root ball of the plants. Hopefully we get some rain this week otherwise im going to be spending a day just watering them. fingers crossed for rain. We need a rain dance here.

Likes
14
Share


@Insta_SmokeyGrow
Follow
She got put on 12-12 whilst the photo in the tent flowered and she’s started to show signs of flower


Likes
34
Share


@Smokwiri
Follow
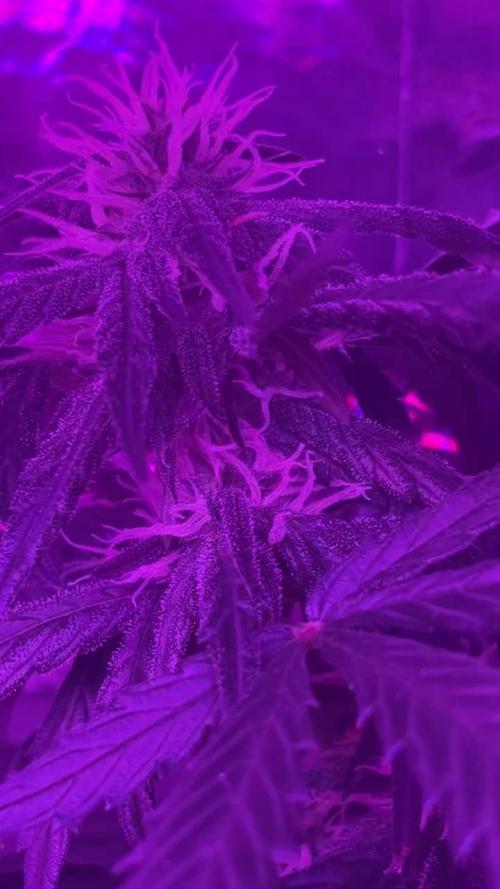
it took some time to go into flowering
i should have done the dark period earlier to induce flowering i lost at least 2 weeks
no problem, first flowering hairs are visible
i topped this plant a bit early so yield won't be so big
i just want to taste this strain from my own hands
hope she does well

Likes
5
Share


Likes
2
Share


It was a nice experience, It helped me with some things that I didn't know before. It was hard at the beginning because the plant was on a bad situation. But thanks to some fertilizers everything changed, also with love and patience. Good production but it could have been more. Next times will be better, now we have to be thankful and ready to continue😜

Likes
42
Share


@Only4passion
Follow
Day29 feeding with 🍀Xpert nutrients🍀
Day30 I start some light défoliation and lst💪💪
Likes
24
Share


@m0use
Follow
***Sponsored Grow*** = Medic || https://medicgrow.com || Grow = ***Sponsored Grow***
Everything is working out well this week, not a whole lot to report about. plants growing well and not many issues I have seen, I think this is my favourite plant in the tent atm. this might change later on. Still giving them a 2:1 or 2.5:1 grow vs bloom nutrient. Its helping with some of the pink stems from last week. Feeding strength is up .2 point to reach 900ppm or aorund 1.8EC will leave it here fro the remainder of Veg. Prob will do for 2 more weeks then flip to flower as I just topped them and want to give them some time to recover.
NPK ratio of 7-7-14 1:1 equal parts grow/bloom.
Grow=8-4-15
Bloom=6-10-14
Boost=1-15-30 "not yet used it yet"
Also took some clones from the plants as well, took two main cuttings from each plant, forgot to do the one so its not shown in the first video up the updated clone pics later in the week. If any of these impress me then the clones will go outside and grow there all year for a extra special harvest. Or I'll give them out to some friends and family maybe a little gorilla gardening project, but I will wait before getting ride of them all as I'm still kicking my self in the ass over the Blue Cindy loss. really liked that plant and wish its clones I gave out where still aorund.
Lights doing well. The V1 spectrum is good on the medic grow mini sun-2's 240w. No issues so far, dimmed at 80% till flower is initiated then up to 100%, Will test out 13/11 I think as the schedule to give them some more photons for an extra hour vs 12/12
.
Till next week.
***Sponsored Grow***
Official Website:
https://medicgrow.com/
+
https://www.emeraldtriangleseeds.co.uk/
Facebook:
https://www.facebook.com/medicgrowled
+
https://www.facebook.com/OriginalETS/
Twitter:
https://twitter.com/medicgrow
+
https://twitter.com/emeraldseeds
Instagram:
https://www.instagram.com/medicgrow420/
+
https://www.instagram.com/emeraldtriangleseeds/
YouTube:
https://www.youtube.com/channel/UCNmiY4F9z94u-8eGj7R1CSQ
Growdiaries:
https://growdiaries.com/grower/medicgrowled
https://growdiaries.com/grow-lights/medic-grow
+
https://growdiaries.com/grower/emeraldtriangleseeds
https://growdiaries.com/seedbank/emerald-triangle-seeds


