


Likes
Comments
Share


@BlaKX
Follow
High Growmies leider habe ich ausversehen den vorherigen Beitrag von der Ernte gelöscht..... deswegen habe ich jetzt einen neuen GMO Auto Harvest report hochgeladen ^^

Likes
26
Share


@eldruida_lamota
Follow
Que pasa familia, otra vez actualizamos la última semana de crecimiento, estás zkittalizious de Exotic seeds están bastante sanas van con un color verde potente y de 2 , 1 desarrollo varias puntas en la parte central. Si sigue así esto va ser proyectazo.
Agrobeta:
https://www.agrobeta.com/agrobetatiendaonline/36-abonos-canamo
Mars hydro:
Code discount: EL420
https://www.mars-hydro.com/
Bueno las maximas de temperatura no superan los 25 grados y las mínimas no bajan 19, así que no me puedo quejar.
Los niveles de humedad también son los correctos van entre 50%/60% de humedad relativa.
Por supuesto el Ph lo estamos dejando alrededor de 6.
Hasta aquí es todo poco más la verdad ya con ganas de empezar la floración , buenos humos 💨💨💨

Likes
20
Share


@Luv2Grow
Follow
Day 71 - She just seems to get frostier everyday, it just keeps packing on. This girl has definitely been on of the frostiest I’ve grown yet. The smell she’s producing just smells like sweet citrus and really looking forward to the chop but will probably give her till the end of week 12. So she’s got about 2 weeks left and the next watering, she’ll be flushed and nothing but water till the end.
Day 72 - Not much I can say about this girl right now, just waiting for trichs to be right to chop. Will give her a flush tomorrow or Friday.
Day 73 - I wish I could get good pictures of the trichs but I never can. I’ve tried different attachments for my phone and everything else but nothing seems to work but either way no clear left and 100% milky but would like to get at least 20-30% amber before chopping but at least I know she’s ready at any time now.
Day 74 - Gave her a flush using Foxfarm’s Sledgehammer and no just letting her go until she finishes off. Still not really seeing an amber trichs so she’s definitely not ready for the way I like it.
Day 75 - She’s starting to show a bit of amber trichs now but only about 1-2%. She could be getting chopped next weekend but possibly sooner depending on how she finishes off.
Day 76 - Was almost ready to cut the girl today but decided to hold off till next weekend. She’s already bulked you’re quite a bit but gonna give her time to feed of the nutes in the leaves and see how much more she will bulk up.
Day 77 - Nothing new, just waiting to chop. Might give her another flush tomorrow or Wednesday, just to make sure all the nutes are out of the soil.

Likes
4
Share

@DogDoctorOfficial
Follow
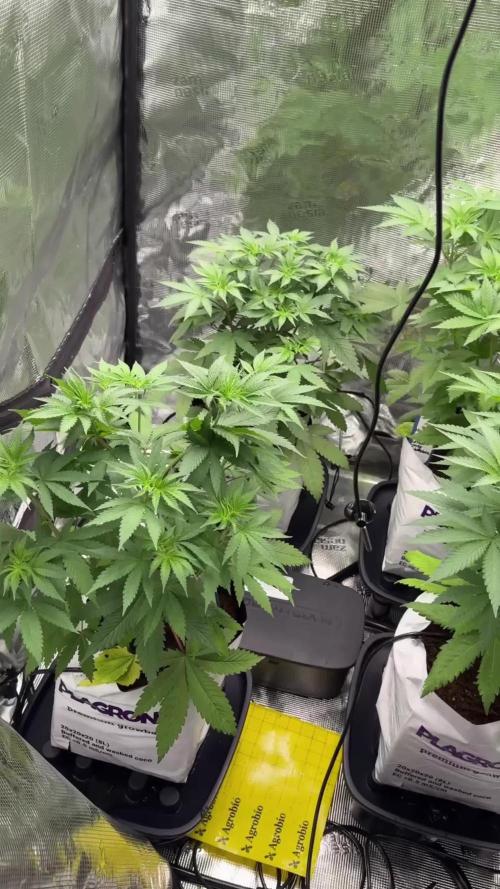
💙 Project Blue Tent – Week 5
Blue Waffle F1 – Pheno B (Folder 13B)
Hello everyone, and welcome back to another chapter of Project Blue Tent.
For anyone discovering these diaries for the first time, this project follows four individual Blue Waffle F1 plants from Zamnesia from seed to harvest. Every plant grows inside the exact same environment, under the same lighting, receives the same nutrition and follows the same schedule.
The only variable...
The genetics.
Watching each phenotype develop its own personality while removing as many environmental variables as possible is exactly what makes this project so fascinating.
Today we're checking in with Plant B.
🌱 Week Five – Finding Her Rhythm
If last week was about recovery after topping, this week was all about momentum.
Plant B responded beautifully to the cut, quickly redirecting her energy into the new leading shoots while the lower branches accelerated their own growth.
She's still carrying that compact structure I mentioned previously, but she's beginning to spread out much more naturally now. The canopy is becoming wider, the internodal spacing remains wonderfully tight, and every branch seems determined to compete for the top.
One thing that continues to impress me is how symmetrical she is becoming.
She almost looks like she planned every branch herself.
The stem has thickened considerably over the past week, giving me confidence that she'll comfortably support the heavy flowers later in the grow.
🌡️ Blue Tent Environment
Consistency continues to be the biggest priority inside the Blue Tent.
This week's average conditions were:
• 🌡️ Day Temperature: 30°C
• 🌙 Night Temperature: 25°C
• 💧 Relative Humidity: 58%
• ⚗️ pH: 5.8
• ⚡ EC: 1.92 mS/cm
• 💨 CO₂: 450 ppm
• 💡 Light Schedule: 18/6
• 💧 Irrigation: 1.2 litres per plant per day
Although daytime temperatures climbed slightly this week, the plants continued growing vigorously with no signs of stress, demonstrating just how resilient healthy plants become when the root zone remains stable.
🥥 Feeding & Irrigation
One of the biggest differences between this project and my previous organic soil grows is the irrigation strategy.
Because coco doesn't store nutrients the same way soil does, the plants are fed little and often rather than receiving larger irrigations every few days.
Each plant now receives approximately 1.2 litres of nutrient solution every day through the automatic Mars Hydro drip irrigation system.
A drip irrigation system slowly delivers nutrient solution directly onto the growing medium through small emitters positioned at each plant. Rather than watering by hand, every irrigation is delivered evenly and consistently, ensuring every plant receives exactly the same amount.
Once the nutrient solution has travelled through the coco, the excess runoff drains away through the automatic drainage system beneath each grow bag.
This is just as important as the irrigation itself.
Removing runoff prevents old nutrient solution from accumulating around the roots, helping maintain a healthier and more stable root environment while dramatically reducing the daily workload.
As someone who has spent years hand-watering plants, I genuinely appreciate how much time this system saves while improving consistency at the same time.
The current feeding schedule is:
• Plagron Hydro A — 1.9 ml/L
• Plagron Hydro B — 1.9 ml/L
• Plagron Hydro Roots — 1 ml/L
The slight increase from last week continues producing exactly the response I was hoping for, with richer colour and strong, healthy new growth.
🕸️ Preparing the SCROG
This week also marked another exciting milestone.
The SCROG net officially entered the grow.
SCROG stands for Screen Of Green.
Rather than allowing each branch to grow vertically on its own, a horizontal net is placed above the canopy. As branches grow through the openings they're gently guided sideways, encouraging the plant to spread across the entire growing area.
Instead of producing one dominant cola, the plant develops dozens of equally exposed flowering sites.
The result is a flatter canopy, more efficient light distribution and, hopefully, a much larger overall harvest.
At this stage the net isn't there to hold flowers.
It's there to guide the architecture of the plant.
Over the coming weeks I'll continue weaving each branch through the net one square at a time, allowing the canopy to fill naturally before flowering begins.
Watching this process unfold is honestly one of my favourite parts of growing.
🌿 Blue Waffle F1 – Plant B
Plant B continues living up to the personality she's been developing since the beginning.
Calm.
Balanced.
Methodical.
She isn't trying to be the tallest plant in the tent.Instead she's quietly building an incredibly organised structure that should become a fantastic SCROG candidate over the next few weeks.
Sometimes the plants that grow the slowest early on end up delivering the biggest surprises later.
I'm very curious to see whether she's one of them.
👀 Looking Ahead
Next week should be all about training.
With the SCROG now installed and both new leaders growing strongly after topping, the real canopy shaping begins.
From here onwards the objective changes completely.
We're no longer trying to grow taller plants.
We're trying to grow wider ones.
Every branch will now be guided with one simple goal...
To create an even canopy capable of making the absolute most of every photon produced by the Zamnesia Phytonaut LED.
The adventure is becoming even more exciting.
💙 Thank You
A huge thank you goes to Zamnesia for making Project Blue Tent possible, from these incredible Blue Waffle F1 genetics to the complete ecosystem surrounding this grow.
A heartfelt thank you to Plagron for providing the Premium Coco Growbags together with the Hydro nutrient line that continues making my transition into coco both enjoyable and educational.
A special thank you to Mars Hydro for the automatic drip irrigation and drainage system that has become an essential part of this project. Although this isn't a sponsored product, it's one of those pieces of equipment that simply works. It has brought consistency, cleanliness and peace of mind to the grow room while allowing me to spend more time with the plants and less time managing runoff.
Thank you to GrowDiaries for giving growers from all around the world a place to document their journeys, learn from one another and build such an incredible community.
And finally...
Thank you to every single person reading these updates.
Whether you've been here since the first seed cracked, recently discovered Project Blue Tent, leave comments every week, quietly follow along, or simply enjoy the photographs, every visit, every conversation, every question and every word of encouragement helps make this journey even more rewarding.
I hope you're all having an amazing week, and I can't wait to share the next chapter of this adventure with you.
Until then...
Growers Love, happy growing, and I'll see you all next week. 🌱💙
Likes
2
Share


@Madman2020
Follow
Vegetative steering
Aiming for:
leaf Temp -70f
CO2 300
VPD +.93
Planning for:
MJ and bras foilar
60%+1.5/-71f set to 68f+1.5
Leaf Temp is about 3f higher than ambient temp
At 68f outside, grow room still wont hit 68 with lights off
Day 24
No Co2
50-55klux
15inch from light
Leaf Temp 71-73f
60%/72F
Veg steering
Coconut water
Uneven canopy(11 at 29inch, 3ag 31 inch
————————
Day 26
56%68f(humidity dropped because i havnt watered in two days 🤡)
23inch-34inch tal. Arranged in order.
52-59klux
Sprayed
5Bras,(23inch)70 leaf temp
4Jas,(29inch) 70 leaf temp
4Bras&Jas(34inch)72f leaf temp
———————
Day 27
Watered once
————-
Day 28
Im pretty sure the sprays worked.
Noticed leaf burn with 3 plants sprayed with MJat 147ppm(.5ml)
No leaf burn with the .1Bras sprays
I wonder how long both are good for. Also, can i pour the unused spray in the medium? I just dont want to waste it.
Plants are noticeably more vigorous.
I am wondering if now is a good time for my defoliation. i was planning for Week 5. I feel like the buds are to developed for me to be pruning off lower buds and makes me feel like i should have pruned beginning of week4
__________


Likes
7
Share


@Mr_nugs_lover_David
Follow
She's starting the week phenomenally, she has gone trough a really nice stretch and she's ready to start producing her beautiful flowers, cannot wait to see her in ful flower!! Follow me on this journey!

Likes
2
Share


@aquaMan
Follow
The Tropicanas are forming some nice Buds.
This week the change to Plagron Nutrition and a higher EC was made. Plants are constantly beeing defoliated due to little space :D

Likes
8
Share


@growing_with_azad
Follow
Hi all, Germination was a 100% success, i had no doubts about Dinafem seeds even though this is my first Dinafem strain, and i'm sure it wont be my last.
I'm very interested to see her grow with her being an XXL, And Amnesia Haze being one of my favorite strains this is why i chose it for my first Dinafem grow.
Plant had a problem with a white cotyledon which is nature, slight heat stress from a heat wave and got a bit leggy because i raised the lights so i buried her stem a little other than that she's got over it with a little TLC and progressing nicely. I will post a video of the grow room very soon and more pictures, keep on growing Azad.

Likes
4
Share


@MoneyMorris
Follow
I finally got my LED light in and installed. The plants are in the first week of flower and are adapting well to the light

Likes
22
Share


@DeepRootsGrowTrees
Follow
Week #18 GSC By Kannabia
Week #18 Mar 8th-15th
Week #7 Flower
This week she's looking beautiful purple through out the plant the orange in the buds. Stay Growing!! Thanks for stopping by!!

Likes
12
Share


@w33dhawk
Follow
Glaub ich hab ein bißchen mit dem düngeplan übertrieben wie man bei dem Video sehen kann bei den Sapphire scout bei den beiden zkittles die vorne stehen auf der rechten Seite sind es die jiffies die sich nicht richtig aufgelöst haben aber die hintere sieht gut aus. Mir ist gestern durch ein Gespräch mit nem Kollegen aufgefallen das ich den spreader von der Lampe schon vor 2 Wochen hätte drauf werfen können ich Trott hab das völlig verplant hab den gestern Abend schnell mal drauf gesetzt besser spät als nie

Likes
11
Share


Likes
2
Share


@Ultraviolet_
Follow
The nighttime VPD does not need to mirror the daytime VPD. Daytime VPD dictates the pull of water and nutrients, while nighttime VPD acts mostly as a prevention tool. A high nighttime VPD increases the risk of the leaf temperature dropping below the dew point, which can trigger bud rot and powdery mildew.
Switched down to 12's hours of light mid-week, changed spectrum, increased light intensity from 840umol up to 1150umol at current height. Overnight from 800ppm to 1500ppm, morning compensation point (microorganisms) 46-47 days from germination, she fills the canopy herself, once the apical dominance is broken.
Measuring a plant's overnight CO2 emissions provides an accurate estimate of its dark respiration rate. Because photosynthesis stops in the dark, you are isolating the respiration process, which allows you to gauge how much stored energy (glucose) the plant has consumed and estimate the scale of oxidative phosphorylation. Oxidative phosphorylation is the final stage of respiration that generates the bulk of the plant's ATP (90%) and relies directly on the oxidation of these respiratory substrates NADH and FADH2 along with the consumption of oxygen.
From a thermodynamic standpoint. Growth is an energy-capturing process, and the rate of that growth is bound by the available free energy (Gibbs free energy) and the First Law of Thermodynamics. While the ceiling or upper limit is dictated by free energy (such as photosynthetically active radiation), the actual amount of growth relies on how the plant balances that energy with other limiting factors. These are often described as the nine cardinal parameters of plant growth. 4 Above, 5 Below. If any one of the 9 becomes bottlenecked, the entire plant's cycle is restricted.
Operating an 80F+ environment at night to force rapid carbon conversion comes with major drawbacks, as the biochemical processes work differently than the deductive logic suggests. While raising nighttime temperatures to 80F indeed accelerates respiration and speeds up the conversion of captured sugars (sink activity), doing so also radically increases the plant's overall metabolic baseline. If the plant's metabolic rate is artificially forced too high via heat, it can actually "burn" through more energy than it managed to assimilate during the day. This leads to carbohydrate starvation, stretching, and a net loss in final biomass yield.
400 ppm is near the standard ambient level; the plant's stomatal intake is the primary limiting factor, not the dark-reaction enzymes. To push 45 DLI without burning out the plant. Trying to force the conversion of a massive daylight DLI in a compressed time frame (12 hours) becomes highly inefficient because the Rubisco enzyme simply hits a saturation limit. To successfully convert a 45 DLI into dense, productive mass, the ambient CO2 generally needs to be elevated to the 1000 to 1200ppm range. This creates a steeper concentration gradient, driving the stomata to inhale CO2 fast enough to match the high photon energy.
It's not all about the amount of light, but the ratio too, as this will dictate growth through the ratio of phytohormones. In order for correct bud development, there needs to be a correct ratio of RGB. Different wavelengths have different penetration depths. When one grows using top-down lighting, only the entire canopy is limited to 2-3 layers of leaf, meaning there will only be correct bud development in those layers, regardless of getting 45DLI.
The biomass potential of a plant is linked to root mass. Generally, when a plant reaches its maximum biomass, you can help to chop off parts of the plant that are in less than efficient areas of the plant (low light) so that it can create new biomass growing towards the light.
Strength is the maximum potential, and power is the rate of conversion. You can have the biggest veg period of 18 weeks, and it means nothing, as soon as you start flowering, the chronological clock starts ticking, the only metric that matters to bud size is how much energy you convert each cycle, not by how long it took you to build the framework, it helps a lot nonetheless.
Not saying anyone should not defoliate for a reason, only that you should have one, and at the right time. Don't defoliate 30+% on autoflowers or 4 weeks into the flower period and expect an increase in yields; it doesn't work like that. There is room for dictating growth patterns and clearing out overcrowded nodes, but it needs to be done in veg because once that timer starts and buds start growing, it's all just energy conversion. One barely needs to defoliate at all in a 4x4 because with side lighting, turning a 2d canopy penetration into a 3d, even lower buds are 90% the quality and density of top ones. The rate of photosynthesis and the ultimate density of lower buds aren't just about the sheer number of photons PPFD. The specific ratio of R:G:B dictates canopy penetration and drives different photochemical reactions. The Electron Transport Rate (ETR) measures the speed at which electrons are driven through Photosystem II (PSII) during photosynthesis. The ratio of Red, Green, and Blue (RGB) light heavily dictates this rate.
Plant leaves continuously perform cellular respiration regardless of the time of day, using energy and oxygen to fuel essential metabolic maintenance. If you over-defoliate, the remaining canopy may be unable to produce enough net sugars during the day to offset the constant respiratory demands of the plant. Must balance fixation with assimilation; there's no point in capturing 45 DLI if you only convert 20% every cycle due to an extreme lack of respiratory capacity to perform cellular oxidative phosphorylation.
You can have a 4x4 canopy or a 4x4x4 canopy, yes, we know that side lights are not as effective at absorption from the sides or underneath, but it's not about DLI, it's never been just about efficiency, it's about the penetration ratios of RGB that drive ETR of/photosynthesis and trigger correct bud development. The size of each bud is its own ability to perform the ETR required for its own personal growth, and bud development is dictated by the ratio of RGB. It drives localised growth and acts as a regulatory switch for that development. Turgor pressure is another very important factor in understanding if you want big buds, for it is the "steam engine" that dictates the rate of bud expansion. Simply, a lot harder to achieve metabolically at ambient 75F than at say 86F
Because buds have less chlorophyll, they do not suffer from the same photosynthetic shutdown that over-exposed, light-stressed leaves do. They can soak up direct light energy to swell in density and size. Their tolerance to intense light is heavily limited by the temperature and humidity, but if you can control those temps and keep the rot away, buds have a much, much higher tolerance to high light than leaves. Beneficial to hammer with high light before trichomes appear. Balancing this with trichome maturity is key for rich terpene and flavonoid profiles, want it just right, somewhere in the middle, not too much, not too little. Find cannabis plants can defoliate themselves come harvest, given the right signals. Every last ounce of potential is recycled into buds by the plant itself (senseceance), given you can keep the level of conversion high enough to prompt a need to do so.
Get the canopy @ optimal PPFD range, 45-55DLI, then let the plant "stretch" the stems into a "PPFD range much higher, one that leaves don't like to grow in, but buds thrive in. What is optimal for a bud is different from what is optimal for a leaf photosynthetically. Genes provide the blueprint, but the environment dictates how, when, and if those genes are expressed. Must first signal the condition to increase the expression you want to exist through stress and response, cause and effect. A well-buffered CEC medium prevents extreme nutrient swings, allowing plants to maximise their dedicated genetic expression.
A plant is either genetically expressing "growing" or "recycling" genes based on its nutrient starvation level in the medium. Constantly toggling between "growing" and "recycling" hormonal states creates a futile cycle that wastes valuable metabolic energy. Plants rely on sophisticated biochemical switches to manage this trade-off and prevent rapid fluctuations that disrupt that balance.
This energy inefficiency is a recognised biological challenge. Plants avoid this costly "flip-flopping" by using hierarchical master regulators (like the TOR and SnRK1 protein kinases) that act as strict molecular switches. These networks enforce cellular commitment to either growth or survival, preventing mixed signals.
This is something that was missing from previous grows.
Under nutrient-rich conditions, TOR promotes protein synthesis, cell division, and structural expansion.
Under starvation, TOR is inhibited, and SnRK1 is activated. This triggers autophagy—where the plant breaks down old macromolecules and organelles to scavenge and reallocate essential nutrients to critical sinks.
"What's the point in flushing?"
The core idea behind a PK booster is to deliver a massive, concentrated surge of P&K exactly when buds are swelling in conjunction with a N starvation. Because these are short, targeted windows, the nutrients must be highly bioavailable so the plant can process them immediately. As soon as you go "organic," that's out the window. Much slower release, uncontrolled, very difficult to "spike". to cause the ratio that will initiate a response.
High-volume PK spikes rely strictly on the immediate uptake capabilities of mineral fertilisers. Making it far less efficient in organic/living soil setups.
When you use organic nutrients, it changes the dynamic with which the plant delivers and trades its nutrients; organic is always releasing new nutrients into the immediate EC. This prevents a lot of autophagic responses from occurring due to a constant stream of new nutrients into the immediate medium's EC. This can prevent nutrient starvation from being signalled.
PK boost is essentially just N starvation, triggering an autophagic response. Concentrated ratio of P&K while tapering off the Nitrogen base. To the plant, the sudden drop in Nitrogen registers as a severe environmental stressor—essentially, the beginning of starvation protocols. She aggressively strips nutrients and proteins from older leaves and vegetative structures and shuttles them directly to the developing flowers and fruit. Ta daaa. Call it a PK booster and sell it. Nothing to do with the P and K itself, it's the ratio immediately available in the medium triggering a nutrient recycling mechanism within the plant itself; all the "booster" sells is the trigger to the signal.
PK BOOST with 50% ammoniacal N signals floral maturation.
PK BOOST with N starvation signals nutrient recycling/sinking.
Very difficult to initiate a response when organic nutes are doing their thing. It takes 4x5x more water significantly to leach or wash ammonia out than it does nitrates. This can prevent triggering N starvation from having its normal impact.
Manipulating the C:N ratio in the medium. One autophagic response has multiple potential signal triggers. Nutrient starvation is not an option.
Likes
12
Share


@thonhash
Follow
Simplemente aplique una PEQUEÑA poda de bajos antes de trasplantar y pasar a floración.
Empezamos la aplicación de enzynabis para crear una buena vida microbiana (también muy útil para evitar excesos o aprovechar cualqier “resto” que contenga nuestro suelo).
También empezamos a regular los watts del led mars hydro ts1000,y a medida q vayan pasando las semanas se irá regulando a mayor potencia, hasta llegar al maximo (150w)
Likes
33
Share


@GrowmieDeLaStreet
Follow
All is said in the video.
The recommended flowering time was 60-66 days and I had to chop on 58. I wish it went to 66 but I couldn't control the environment and air flow so mold developed on a bud.
Some trichomes are still clear but most of them are cloudy and some even amber.
The harvest was impressive considering all the mistakes I made. Big and dense colas, I'm expecting ≈ 100g per plants.
They are now drying and waiting to be delicately unseeded.
Likes
2
Share
@DogDoctorOfficial
Follow
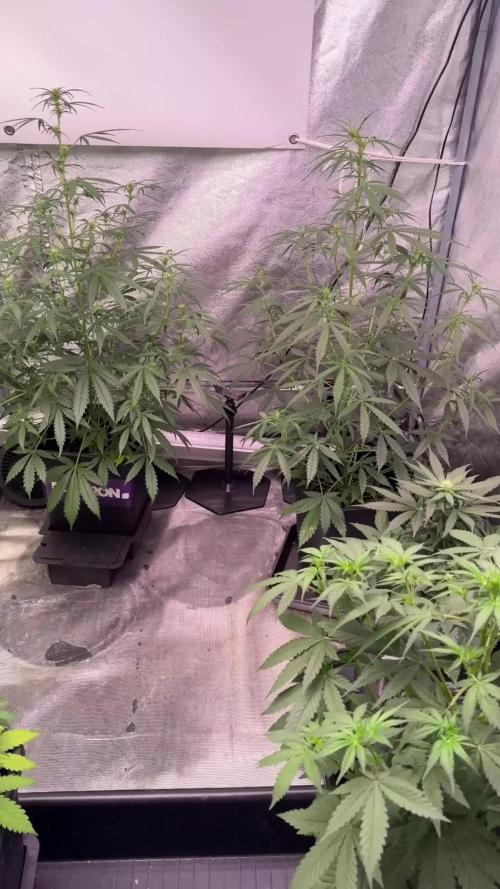
🚂 Cash Express – Pheno A
Week 5 | Full Steam Ahead
One of the most rewarding parts of documenting an entire phenotype hunt is watching every individual plant write its own story.
Even though this lady shares the same room as several of her sisters, she’s following her own timeline with complete confidence.
Welcome back to another week of the 8×8 Adventure!
For anyone discovering this diary for the first time, this project follows multiple phenotypes under identical environmental conditions using the 12/12 From Seed method.
Instead of forcing flowering by changing the light schedule, every plant receives 12 hours of light from the day she germinates, allowing each phenotype to decide for itself when it’s ready to reproduce.
Cash Express Pheno A has made her decision.
There are no doubts anymore…
Flowering has officially begun.
⸻
🌼 The First Flowers
This week the plant truly announced the beginning of her reproductive stage.
Fresh white pistils are now appearing across every growing tip, marking the first real flower sites.
Those tiny white hairs are far more than just pretty decorations.
Each pistil is part of the female flower and serves as the structure that would naturally receive pollen in nature. In an indoor sinsemilla grow, however, they become the foundation for the beautiful resin-covered buds we’re all hoping to harvest later.
It’s always one of my favourite moments in a grow.
The transition from “plant” to “flowering plant” has officially started.
Although she’s still compact, every day now brings noticeable changes as the flowering sites become more defined.
⸻
💧 AutoPot Life
Like her Blueberry Muffin sister growing beside her, this phenotype has now fully transitioned onto the AutoPot irrigation system.
Instead of watering from the top every day, the plants now feed themselves whenever they need moisture.
At the heart of the system is the AquaValve.
This clever little mechanical valve keeps a shallow reservoir inside each tray, automatically opening and closing as the plant drinks. Once the tray is empty, fresh nutrient solution flows in again, creating a continuous wet-and-dry cycle without electricity or timers at each pot.
It allows the roots to decide when to feed rather than relying on my watering schedule.
So far…
She’s absolutely loving it.
⸻
🍽️ Feeding & A Small Observation
This week’s reservoir was prepared using:
• Terra Grow – 1.8 ml/L
• Terra Bloom – 1.9 ml/L
• Power Buds – 1 ml/L
The reservoir remains intentionally simple for AutoPot use, allowing the solution to stay stable while circulating continuously.
During this week’s inspections I also noticed something worth documenting.
Several older fan leaves are beginning to show a gentle loss of colour.
Nothing dramatic.
No burnt tips.
No rapid deterioration.
Just a subtle lightening that suggests she’s beginning to ask for slightly more nutrition as flowering accelerates.
Rather than immediately assuming a deficiency, I prefer making small adjustments and watching how the plant responds.
For that reason I increased the EC slightly this week.
Now the plant gets the opportunity to tell me whether that adjustment is enough.
Growing is often less about reacting quickly…
…and more about listening carefully.
⸻
🌿 Environment
The flowering room continues operating under stable conditions.
• Day temperature averaged 31.1°C
• Night temperature remained around 25°C
• Solution temperature stayed near 21.6°C
• Root zone remained approximately 21°C
• Relative humidity averaged 72%
• Atmospheric CO₂ measured roughly 639 ppm
The humidity may appear a little high, but at this early flowering stage I’m still comfortable maintaining these levels while the plants continue stretching and building new flower sites.
As flowering progresses and the buds begin gaining density, humidity will gradually come down to create an even safer environment for resin production and flower development.
Everything follows the plan.
⸻
📸 Behind This Week’s Photos
This week’s gallery tells a very exciting story.
The close-up photographs capture the explosion of fresh white pistils appearing from nearly every node, confirming that flowering is now fully underway.
The side profiles show a compact but extremely healthy structure, while the overhead shots reveal an even canopy that should make excellent use of the flowering light over the coming weeks.
Some of the photographs also document the slight paling of a few fan leaves.
Rather than hiding these moments, I like including them because they remind us that plants constantly communicate.
Sometimes they’re simply asking for a little more.
Learning to recognise those conversations is part of becoming a better grower.
(And yes… eagle-eyed viewers may notice the photo label accidentally says crash instead of cash. That’s entirely my mistake and will be corrected in the next update. Even diaries have typos sometimes! 😄)
⸻
🔍 Looking Ahead
Next week should be one of the most exciting stages yet.
I expect the flowering sites to begin stacking more aggressively as the stretch continues.
We’ll also be watching closely to see how the increased EC influences the slight leaf discoloration.
If the colour stabilises, we’ll know the adjustment was enough.
If not, the plant will simply tell us she needs a little more.
Either way…
She’ll write the next chapter, and I’ll keep listening.
⸻
💚 Thank You
A huge thank you to everyone following this journey.
Whether you’ve been here since Germination Week or you’ve only just discovered this diary, your support, questions, discussions and shared experiences are what make documenting these grows so rewarding.
Special thanks to:
💚 GrowDiaries for giving growers around the world a place to learn from one another.
Zamnesia for providing the Cash Express genetics that continue to reveal their unique personality week after week.
🌱 Plagron for the nutrition program supporting every stage of this adventure.
💡 Future of Grow LED for delivering consistent lighting throughout the entire room.
? AutoPot for letting these plants feed themselves naturally through one of the simplest yet smartest irrigation systems I’ve ever used.
And finally…
Thank you to every grower, follower, supporter, critic, and curious visitor who stops by these diaries. Every interaction makes this journey richer, and I’m grateful to share it with all of you.
Growers Love and see you next week, where we’ll find out if the extra nutrition satisfies her growing appetite—and watch those first flowers begin transforming into what we all know is coming. 🌱🚂💚

Likes
26
Share


@Myminigrows
Follow
Little summary of the last 2-3 weeks of Flower. Total off 70 days of 12/12 light cycle and 48H darkness.

Likes
24
Share


Likes
4
Share


@Trinidad
Follow
8th.05.25 68
Been so busy I don't even know what day it it. Last night I gave the chem dawg defoliation and add bloom booster and calmag to revervoir. Pumps where out so root rot was developing on all of them, however I think I caught it in time. Smell on tropicana cookies moved from sour citrus to sweet cirtus. Trichomes are clear and starting to trun milky. They are ripening nicely. I don't know how much longer I can hold out. I started counting days as the seeds were placed in water however I should start my count after germination so actually days are less than what I think. Still learning. I must say chem dawg was my least favorite because of longer grow time and less thc which is about 20% compared to other. But after seeing the stucture and how she is shapping up i must say i am quite impressed. No wonder she is a cassic strain. We shall see how things progress.
Likes
29
Share


@HillCountryHempCo
Follow
First full week of flowering and they are finally on AC Infiniti’s self watering bases. Switching to CRONK Nutrients.
Likes
2
Share


@igrowcan
Follow
[Week 3 - Early Vegetative Growth]
The seedlings continue to grow, developing their first true leaves. We maintain optimal conditions within the
minigrow box, including proper lighting and watering.