
Likes
Comments
Share

@DogDoctorOfficial
Follow
Ghost Train Haze — Harvest / Trim / Cure
Part 2 — Trimming, Resin & First Cure
First of all, once again, sorry for dividing this harvest into three different parts. But honestly… there was just no way to fit this entire experience into one single update without rushing it.
This run became something special for us.
So instead of throwing everything into one giant report, we wanted to slow things down and give each phase the attention it deserves.
Part 1 was about harvest day itself — especially the frozen plant and the preparation for the future ice water hash runs.
Now in Part 2, we focus on the monster of the room.
The big Ghost Train Haze girl.
The giant.
And damn… she was beautiful.
⸻
The Giant Finally Ready
After drying slowly and patiently, she finally reached that moment every grower waits for:
the stem click.
Not bending anymore.
Not soft anymore.
That perfect dry snap telling us she was finally ready for trimming.
And honestly, seeing this massive plant hanging there fully dried was already rewarding by itself.
Huge flowers. Dense structure. Long spears everywhere. Frost absolutely covering the plant from top to bottom.
At this point, we brought out the Trim Bin, got comfortable, and of course…
Mr. Baggy joined the session too.
Because trimming alone is trimming.
But trimming with the homies becomes part of the memory.
⸻
Trimming This Beast
Once we started separating the branches and working through the flowers properly, one thing became immediately obvious:
This plant was ridiculously frosty.
And I mean ridiculously.
Possibly the frostiest plant in the entire room.
Every touch released resin.
Every nug felt sticky.
Scissors getting glued together constantly.
Gloves turning darker and shinier minute after minute.
The flowers themselves came out incredibly dense and compact too. Heavy in the hand. Proper weight to them. Not airy at all despite the sativa influence from Ghost Train Haze.
And visually?
Beautiful.
Silver-covered calyxes.
Orange hairs fading perfectly into the resin layer.
Chunky flowers with that classic “don’t squeeze too hard or you’ll ruin the trichomes” feeling.
This girl truly felt like a reward after the full cycle.
⸻
The Trim Bin Surprise
One thing we absolutely loved during this trimming session was watching how much resin naturally collected inside the Trim Bin.
By the end of the session, the amount of loose trichome heads sitting underneath the screen was honestly crazy.
No dry sift machine.
No mechanical shaker.
Just trimming.
And still…
A beautiful golden layer of resin waiting for us underneath.
Of course, finger hash also started building up naturally while trimming. Sticky gloves. Sticky fingers. Sticky scissors. The classic signs of a happy trimming session.
Then came one of our favorite moments of the day.
⸻
Playing The Drums — Moroccan Style
At the end, we decided to have some fun with the trim itself.
Using the dry material almost like traditional Moroccan drum-sifting techniques, we gently worked the trim leaves and remaining material to knock off even more trichomes.
Simple. Relaxed. Traditional-inspired.
And honestly?
It worked beautifully.
What we collected afterward turned into a gorgeous little hash bar that looked and smelled incredible.
We didn’t even bother weighing it.
Sometimes not everything needs numbers.
Some things are simply for the experience.
For the ritual.
For the future session.
For curiosity.
For enjoyment.
And this one definitely earned its place for later tasting sessions.
⸻
Final Dry Weight
After everything was trimmed, cleaned, and separated, the final dry flower weight from this single plant came to:
294.9 grams dry
Honestly?
We’re extremely happy with that.
Almost 300 grams from a single plant in this run is something we can absolutely appreciate.
Especially considering this entire project was:
* 12/12 from seed
* Minimal training
* Minimal intervention
* Natural structure
* Mostly observation and guidance
Just letting the plant express herself while giving her the right environment.
And she rewarded us massively.
⸻
Storage & Cure — Different Approaches
Once trimming was done, we started organizing the curing process using different storage methods.
This time we decided to split the flower between:
* Glass jars
* Metal Zamnesia containers
* Grove Bags
Each one has its own purpose and philosophy.
Glass Jars
The classic.
Simple, reliable, proven for decades.
Perfect for manual burping and personally controlling the curing environment yourself. They also allow us to visually inspect the flowers easily during cure.
⸻
Metal Containers
The Zamnesia metal containers feel more protective physically and also help reduce light exposure completely.
They feel solid. Clean. Almost laboratory-like.
A very nice option for preserving flower while keeping things discreet and protected.
⸻
Grove Bags
These are probably the most modern approach we tested in this run.
The idea behind Grove Bags is that their “TerpLoc” technology supposedly regulates humidity internally while allowing gas exchange in a controlled way.
The theory is that they naturally maintain flower within the ideal curing range around:
58–62% RH
without constant burping.
So now we’re extremely curious to compare all three methods later during the smoke review phase:
* Does one preserve terpenes better?
* Does one keep the flower softer?
* Does aroma evolve differently?
* Does cure quality actually change?
We’ll definitely revisit this in Part 3.
⸻
The Frozen Plant — Flower Comparison
After finishing the main giant plant, we also trimmed and cured the material that came from the frozen/hash-focused plant from Part 1.
This was important for us because we wanted to compare:
* Flower from the “normal dried” plant
vs
* Flower from the plant intended mainly for extraction
And surprisingly?
The terpene profiles feel extremely similar.
Same family. Same identity. Same Ghost Train Haze soul.
Maybe slight differences in intensity or texture, but overall the profile remained very recognizable between both plants.
Which honestly gives us a very good feeling about the future hash quality too.
The frozen plant itself ended up giving:
58.5 grams dry
Plus whatever was already separated and reserved through the frozen material process itself.
So overall, absolutely worth it.
⸻
Macro Photography & Focus Stacking
During all this, we also continued working on our macro photography experiments.
Some of the photos shared in this update were actually focus-stacked images made from:
* 112 photos
* 96 photos
* 33 photos
For people unfamiliar with focus stacking:
Macro photography has extremely shallow depth of field. When you photograph trichomes closely, only tiny portions stay in focus at once.
So instead, we take dozens — sometimes over a hundred — separate images with different focus points and merge them together afterward in software.
The result is a final image where the entire flower or trichome field becomes sharp at the same time.
It takes time.
It takes patience.
But honestly, we love the process.
Because cannabis truly deserves to be appreciated up close.
⸻
Trimming Timelapses
We also recorded trimming timelapses so people can better see the workflow behind everything.
Not just the glamorous final nug shots.
But the actual process:
* separating branches
* cleaning flowers
* resin building up
* trim collecting
* the mess
* the rhythm
* the work itself
Because behind every beautiful cured flower, there are hours of patience nobody usually sees.
⸻
What Comes Next — Part 3
The next and final report will focus on:
* Full smoke review
* Cure evolution
* Drying process explained deeper
* Flavor profile
* Terpene expression
* Effects
* Overall experience with Ghost Train Haze
* Personal reflections after living with this cultivar
That final report will close the entire Ghost Train Haze journey properly.
⸻
Thank You
And as always…
Huge thanks to everybody who stopped by this journey.
To the breeders behind these genetics.
To the companies making nutrients, LEDs, gear, and tools possible.
To the platforms that allow growers to share their passion openly.
To the community members constantly supporting each other.
To the OG followers.
To the new followers.
To the silent viewers.
To the growers.
To the curious people.
To the skeptics.
To the lovers.
To the haters too.
If this grow made somebody stop scrolling for even a few seconds and appreciate the plant differently…
that already means something to us.
From grower to growers.
See you all in Part 3.
📡 DELETED @ 1K Please stay tuned.we never quit https://www.youtube.com/@TheDogDoctorOfficial NEW 🙏 Thank you for your patience and continued support.
FOR DISCOUNT CODES AND MORE JUST FOLLOW THE LINK https://website.beacons.ai/dogdoctorofficial
📲 Don’t forget to Subscribe and follow me on Instagram and YouTube @DogDoctorOfficial for exclusive content, real-time updates, and behind-the-scenes magic. We’ve got so much more coming, including transplanting and all the amazing techniques that go along with it. You won’t want to miss it.
GrowDiaries Journal: https://growdiaries.com/grower/dogdoctorofficial
Instagram: https://www.instagram.com/dogdoctorofficial/
YouTube: https://www.youtube.com/@dogdoctorofficial Deleted by Youtube - https://www.youtube.com/@TheDogDoctorOfficial NEW
Vimeo : https://vimeo.com/dogdoctorofficial Under construction stay tuned ⸻
Explore the Gear that Powers My Grow
If you’re curious about the tech I’m using, check out these links:
🔆 Lighting & Environmental Control
• Future of Grow — Advanced LED lighting technology
https://www.futureofgrow.com/
DISCOUNT CODE: DOG20
• Lumiflora — Under-canopy LED lighting
https://lumiflorade.com/
• TrollMaster — Environmental controllers and automation gear (past collaboration)
⸻
Genetics
• Zamnesia Seeds — Genetics used in this project
https://www.zamnesia.com/
⸻
🌱 Soil, Substrates, Boosters & Root Support
• Plagron — Substrates, bio mixes, and supportive products
https://plagron.com/en/
⸻
🎒 Storage, Curing & Preservation
• Grove Bags — Curing and storage solutions
https://grovebags.com/
⸻
📸 Photography Equipment & Tools
(Not sponsors, but part of my creative toolkit)
• Sony A6700
• Sony full-frame macro lens + few more
• Stacking photography workflow - learning
• iPhone (for behind-the-scenes shots)
We’ve got much more coming as we move through the grow cycles. Trust me, you won’t want to miss the next steps, let’s push the boundaries of indoor horticulture together!
As always, this is shared for educational purposes, aiming to spread understanding and appreciation for this plant. Let’s celebrate it responsibly and continue to learn and grow together.
With true love comes happiness. Always believe in yourself, and always do things expecting nothing and with an open heart. Be a giver, and the universe will give back in ways you could never imagine.
💚 Growers love to all 💚
📸 P.S. – The Eye Behind the Lens
All photos in this diary (for now — except for the ones showing the camera, which I took with an iPhone) are taken with a Sony A6700 paired with a Sony full-frame macro lens and a few more.
Photography is part of the story — it’s how we share the fine textures, the glow, and the quiet details that words can’t always capture.
I’ve also started experimenting with photo stacking — a technique where multiple images, each taken at a slightly different focus point, are layered together to create one perfectly sharp image from front to back.
It’s not digital enhancement or AI; it’s pure photography — a way to reveal the plant’s beauty in microscopic depth, from trichome to petal.
You’ll even see a few shots of "ghost me" capturing the shots — camera, lens, setup — because every grow deserves not just to be cultivated, but documented like art.
FOR DISCOUNT CODES AND MORE JUST FOLLOW THE LINK https://website.beacons.ai/dogdoctorofficial
NEW DISCORD - Official Server Invite Link : https://discord.gg/ksjAkA5T74

Likes
9
Share

@TKCS_Pinoy
Follow
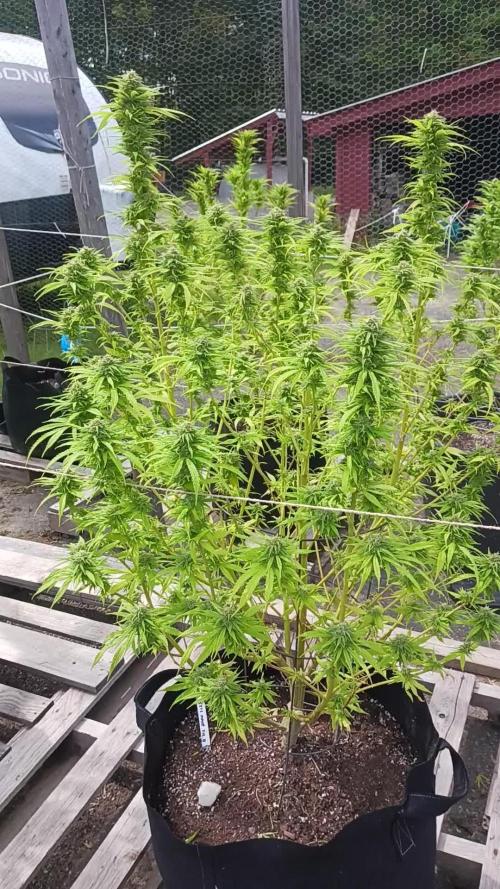
🌸 Woche 15 – Week 15 Gorilla Zkittlez (Fast Buds) – Outdoor Summer
🌡️ Wetter: Etwas Sonne, immer noch Regen, aber endlich mal stabiler – der Sommer zeigt ein kleines Herz 💛.
📏 Wachstum: Höhe unverändert, die Energie steckt voll in den Buds.
💡 Licht & Energie: Mehr Sonne = mehr Power. Man sieht’s direkt an den Blüten.
🌿 Blattgesundheit: Gesund und vital, grün wie frisch aus der Werbung 🌿.
💧 Wasser & Nährstoffe: Regen erledigt den Grundjob, Kein Dünger.
🔄 Entwicklung: Jetzt wird’s ernst – Buds sind dick, sticky und super hübsch. Und ja, das ist tatsächlich die beste Pflanze aus meinem diesjährigen Outdoor-Grow 🏆. Die anderen liefern auch, aber nicht so wunderschön wie diese Lady. Bin echt stolz drauf!
✅ Fazit: Nächste Woche kommt das letzte Update, danach wird geerntet ✂️🍃. Finale Staffel-Folge incoming 🎬😂.
.....................................................................................................................................................................................................................................................................
🌸 Week 15 – Gorilla Zkittlez (Fast Buds) – Outdoor Summer
🌡️ Weather: Still rainy, but finally more balanced – summer showing a bit of mercy 💛.
📏 Growth: Height stays the same, all energy is going straight into the buds.
💡 Light & Energy: More sun = more power. Flowers are clearly loving it.
🌿 Leaf Health: Healthy, strong, deep green – like a plant commercial 🌿✨.
💧 Water & Nutrients: Rain for basics, nutrients only from Mother earth.
🔄 Development: Buds are now fat, sticky, and just gorgeous. And honestly – this is the best plant of my outdoor season 🏆. The others are fine, but not as stunning as this one. Really proud of her!
✅ Overall: Next week will be the final upload, then it’s harvest time ✂️🍃. Season finale is coming 🎬😂.

Likes
51
Share


@Chumpkilla
Follow
2/4/24 - Day 90 - Hello and happy water change day! For sure on the back half of the grow. She's getting bigger everyday! The buds as growing and getting more dense.
2/6/24 - Day 92 - GTFOut of here. She's not showing any signs of distress yet, she's still hulking! Those apples are getting bigger by the day!
2/9/24 - Day 95 - Hello all! Everything is going so good. The buds are getting bigger and the smell is honestly CRAZY. The box does a great job of keeping the smell low. But as soon as you open the box get ready. The whole block is smelling this for sure.
I posted a video of me swapping out the D nutrient. It's such an easy process it takes more time to unbox the nutrients than it takes to install them. It's about 5 maybe 5.5 seconds to install. Watch the video to see the process!
2/10/24 - Day 96 - The trichomes are starting to get much more cloudy. Still not a lot of amber. She still is not showing any signs of going dead. Her leafs still look really green/purple.


Likes
18
Share

@THcHunteR23
Follow
Il en reste 9 sur 11 assez stable j’ai éliminé une de façon volontaire parce que avait beaucoup de retard

Likes
2
Share

@Swanberg
Follow
Had some major ph problems in this strain. Did not prefer the same feeding schedule as the other 2 strains . I think it’s from poor water schedule for couple days. Had very high ph runoff around 6.6. Gave a nice acidic feeding (5.7)mixed with some Epsom salt (5gm)only getting to around 1000 ppm about 3/4 of a full feed for week 4 ( norm ~1600). Going to be bottom feeding going forward with auto pots arriving today.
TENT UPGRADES: 19 L Vivo sun smart humidifier.
Thoughts: very happy with this smart tent feature with vivo sun. Going to really sis in the climate going forward adding some new equipment to make the smart tent complete and watch the plants thrive!


Likes
16
Share


@Spiritual_Herb
Follow
This new week started better as with some flushes I brought the runoff back to 6.5/7, the plant seems to be growing well
Likes
422
Share


@Crashoverite
Follow
Hi all,
Welcome to my🍌💜👊 week update
Thank you so much for all support on this bananas journey. Much appreciate all your likes, follows and comments. 🙏💚❤️💜
Week 13
Jan 8- Jan 14
This was another amazing week. Girls are behaved very well. Drinking their juice like crazy. 2 waterings of 9ltrs on Jan 10th and Jan 13th. Runoffs at ph 6.2. Buds are gaining some serious weight and the trichomes development is of the charts. Girls are covered with frost. Trichomes are mainly milky now with individual ambers here and there. On Jan 10 noticed on one Athena top colas a white topped bud! It's something that has never happened to me. It may be only led bleach or it's something abnormal and phenomenal. It's white and has red and amber pistil hairs in between and all covered with trichomes. Few days after. White coulour is not spreading and not seeing any damages. The smell in my cabinet its insane. Very sweet scents. I wouldn't say bananas but definitely sweet berries and gummies 🤤 new dehumidifier doing an amazing job. Humidity when light is on is between 49-54% and 52-58% when lights are out.
It's all looking that my 🍌💜👊 girls will be ladies very soon. Harvest is coming big time. Next week planning to gradually cut nutrients down and prepare for flush.
Stay tuned for new week update very soon!
Peace and love brothers and sisters ✌️💚👨🌾
Links
https://2fast4buds.com/seeds/banana-purple-punch-auto
https://plagron.com
https://www.biobizz.com/
https://fishheadfarms.com/
Likes
17
Share

@masterofsmeagol
Follow
9/13 Took the last special Kush today. I had too. Those fucking locusts were eating more and more. At least the trichs looked good. The second plant is straight fire! They're ALL good. I'll have to do the review. Tenth planet is swelling up and trichs are getting cloudier. They are starting to eat the chem dog too but it needs to bulk up and the trichs aren't there yet. Mk ultra natural may be some of the best quality this year. I'm losing SOME to the locusts but it seems they avoid the frostier stuff. At least I'm hoping. This is a great plantvand despite the nugs being so tight and stuff it just needs more time and im going to give it to her. Pink kush is actually look9ng like it might finish. But the locusts have STRIPPED a lot of that. I'll keep an eye on them and keep this uuodated. I got a notification saying congratulations on a harvester diary. I know these outdoor seasons are long but what difference does it make? Hopefully I can still add week later.
9/14 Weather is good bit it's so dry that the locusts are deafening. Thrips are still around and there's not much I can do about it. Looking at the tenth planet I isolated I can see that locusts stripped the middle some and it was stunted from the thrips. The pink kush looks good but I'm losing g some to locusts. The 10th planet, Chem Dog #4 and the MK Ultra I left natural are bulking up and trichs are exploding! Since I safely have some quality cannabis I'm go8mg to let these ride. Unless I continue to lose substantial amounts. Then my hand may be forced. The pink kush is nowhere near ready though. The others would still be good taken now. Smell is strong and I've looked them all.
9/15 Rained last night. Plants were wet. I probably should've watered. Had to remove two branches due to mold. I also removed a couple small buds that had molded. These 40 degree nights don't do well with rain. I'm losing more and more cannabis daily from those locusts and from some mold that comes with the damage. I've never had a year like this. The sounds the make are deafening. And it's not just at night, or a specific part of the day. It's ALL. THE. TIME. I'm not growing again without floating row covers. I'll loon for some today bur that's like closing the barn door after the horses got out. Oh well. That big 10th planet is ready. I was just waiting for more amber bur I'm not taking a chance losing more branches. I'll think about it and I'll update what I decide to do. I might take that today. Chem dog had thr most damage but last I looked it wasn't where I needed it to be.
EDIT: DIDN'T TAKE ANYTHING. IVE GOT MY HANDS FULL TRIMMING AND DRYING ANYWAY. SURPRISINGLY THE TRICHS WERE ALL MILKY! THEY EVEN HAD SOME AMBER! CHEM DOG WENT CLEAR TO MILKY REAL FAST AND THE NATURAL MK ULTRA HAS BUDS THAT THE STIGMAS HAVECTOTALLY RETRACTED AND THE LOOK COMPLETELY DONE. AGAIN. TRICHS ARE ALL MILKY. IT THE BUDS ARE EXTREMELY DENSE AND I WORRY ABOUT ROT. BOTH THESE PLANTS COULD COME DOWN ANYTIME AND IM SURE ID BE HAPPY. I JUST HAVE A LOT RO DO AND THE WEAYHER LOOKS GREAT SO AS LONG AS THE LOCUSTS STAY AWAY THINGS WILL BE FINE. I ALSO watered everything a gallon. I may have been underwatering for fear of overwatering. Tomorrow's a new day. We'll see what it holds. 11% chance of rain. But after that it looks like it will be good.
9/16 Guess I didn't do a video. Went over this morning and then again around one. I brought my loupe and checked everything. Suprisingly some of the pink kush are MILKY already and legit hard as a marble. I won't get much from them but I bet it will be good. The tenth planet I probably should've taken. I was tired though and another day or so isn't going to hurt it. I took off a few of the fan leaves that were left but most have dropped already. The strain SAYS it takes longer but the loupe doesn't lie and the buds arent increasing in size anymore. The chem dog has caught up to it by now and the 10th planet WAS much further ahead. They both have been through the same stressors. This cold weather has sped shit up. I've got all MILKY with amber on thatl tenth planet and I don't want to keep losing more shit. The chemdog has swelled to almost the size of the 10th planet and are all MILKY as hell!. The mk ultra's stigmas have retracted on half the buds and are very dense. It has a few ENORMOUS calyxes on it. The only reason its still standing is that ive noticed A FEW clear tricombs and the plant is healthy. It can survive a little longer but its a September strain and we've had some cold weather already. Some have some stigmas still reaching upward (mostly on the cola) but other flowers have no visible stigma on the top. Theyve reached what looks like perfection and are all milky. That plant it frosty. It might be my best quality. Only time will tell. That plant doesn't have as much damage but I'd like to see a little more amber and see if the buds decide to connect. This strain is on time according to the breeder and ive just decided to oush it. I hope I dont regret I have a bud that rotted off a tenth planet branch so at least i can try it before i take it. Same with the chem dog but it's not dry yet. I'd would be good to try a tester bud before I made my decision on pulling the plant.
9/17 I did a video and took the tenth planet after finding a few buds that had molded and a small branch with mold on it. Should've followed my intuition and took it yesterday but I was sick. Still am. I found some mold on the chem dog and more stem mold. I also found some buds that had completely rotted and died. The plants have been through at least one frost. If I wasn't so tired and ill I would've taken the chem dog too. The buds were swelk8ng though and had caught the tenth planet that had stopped growing. I almost just cut it at the base and hung it upside down because I'm worried about the mold and whatever I'd eating it. It smells great, trichs areall MILKY with a little amber. I was just hoping for more size but it's been a strange year climate wise. I still have another 10th planet out but it has a few issues. The natural mk ultra will probably be the best quality out of the garden. It is rock hard and frosty as hell. I can still see some clear trichs or I would've snatched it. It LOOKS totally done. That's what's weird this year. Advanced trichs on small bud, trichs staying clear on big buds that appear finished. It has MILKY and amber so I coukd take it anytime but it looks healthy so I'll give it a little more time. The pink kush surprisingly has grown extremely trichome heavy rock hard buds. I'll get a harvest from them and it will probably be good quality bit it won't be much. I was able to sample the mk ultra and was extremely impressed. After I do the physical shit and take time for myself ill take pictures and put more up on the harvest reports. Hopfully the chem dog does ok tonight. I'm sure she'll be fine.


Likes
12
Share


@Bncgrower
Follow
Another week is over, one of these girls is in the final stretch and very close to harvest, but Xingu and Volta ao Mundo are now showing signs of maturation, Moranguinho do Nordeste has some very dense, resinous and fragrant buds, and soon it will be time for ✂️, otherwise everything is as expected, I noticed some yellowing of some leaves in Xingu, but I believe it is because of the last few weeks.
Thank you for following and happy growing! 🍁🌱🌱
Likes
7
Share


@Big0zGrower420
Follow
Moving along nicely. Plants are looking nice and healthy. No issues just trying to get a few more weeks in before harvest time. Weather will be in the 80s-90s this week
Likes
15
Share


@BushDoctor740
Follow
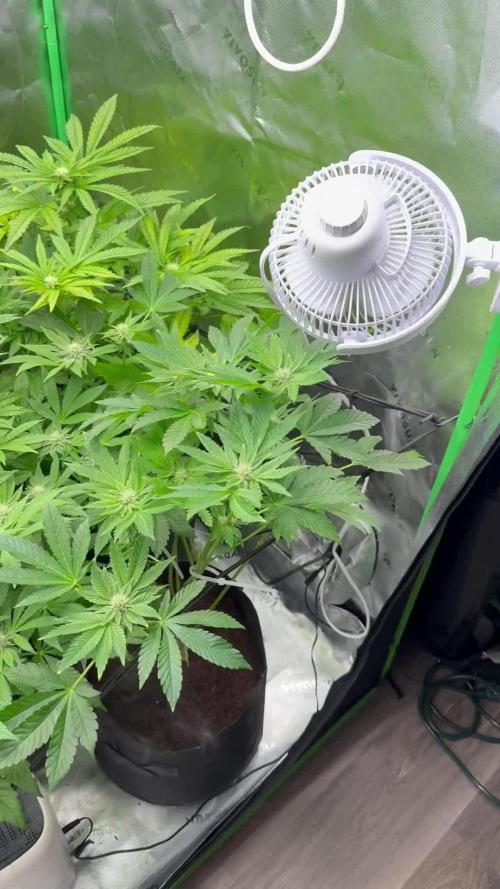
Day 15 things are moving along just fine light intensity still set at 30 percent and raised to the ceiling.The seedling did not make it so replacing with another strain as I would like to have 6 plants in this grow.Not watering much as I’ve kept humidity high and the girls are not drinking much.Day 20 I did some LST on two of the Runtz that are a bit stronger and taller than the rest
Processing
Likes
21
Share


@Stick
Follow
In my quest for the perfect modern grow room, I got my hands on a super cool device: SensorPush. Each SensorPush is a tiny low-energy-bluetooth thermomether+hygrometer. I have 1 sensor in the indoor tent and 1 sensor in the outdoor micro greenhouse. Both are connected to the "SensorPush Wifi Gateway", allowing me to access to the datas at anytime from anywhere in the world. SO COOL! I started to collect datas more than a week ago and it has been already so helpful, I noticed that every single adjustment (side fan speed, thermostat mix/max, window opened/closed, driver dimming..) has a direct and immediate impact on the environment, and being able to see the detailed live statistics is the perfect way to adjust the parameters. I had one important issue this week: my timer was acting weird and the light was turning on 40 mins while the plants were in the middle of their night, but thanks to SensorPush I was able to notice the problem immediately and fix what could have gone dramatical. I love these sensors so much that I've started to dig into the SensorPush API, and guess what: after a few minutes I was able to get the datas showing up on my webcam feed, so now my webcam app is also showing me the temp+RH! SO COOL! Thanks for stopping-by and stay tuned for more big-data 😎


Likes
48
Share


@Focus420
Follow
Zdravím všechny pěstitele marijánky🌍🌞
Minulý týden sklizen BCN critilal xxl - tato rostlina měla od začátku problémy pak se spravila a nakonec vypadá celkem solidně.
Víc se dozvíte ve sklizni🌱🌱🙏
Nemůžu se dočkat dalšího růstu🌞🤗
Tento týden půjde pod kosu poslední automat (sleep)
Zbydou tam 3 celoroční odrůdy, ty vypadají nejlíp... ty ještě potřebují 2 až 3 týdny
Den 99. Hnojení
Celoročky - ph 6,3
ec 2,5
Den 100.🌱 holky vypadají úžasně😍
Dnes proběhla defoliace (focus)(franco lemon cheese)
Den 101.
Sekera🤟 (sleep) zbyly 3 celoroční odrůdy
2× focus , 1× franco lemon cheese
Proplach 8 - 10 dní
Den 102.
Kontrola trichomů -
focus = 10 % jantarových vrchů 🌱🤗
Franco lemon cheese = mléčné trichomy
Den 103.
Kontrola - Teplota,vlhkost,co2 v pořádku🤜
Den 104. Kontrola trichomu 15 procent jantar ( focus )👏
Den 105.proplach
Ph - 6,3
ec - 0,43


Likes
1
Share


@Simon_Says_Smoke
Follow
( 3cm in height )
Looks very healthy with a thin fragile stem.
Only developed the first pair leaves.
( 3cm in height )
With the delay of the germination this lady has been slowed down.
First pair of leaves are developed but are still small.


Likes
4
Share


@Barcelona_Farmers710
Follow
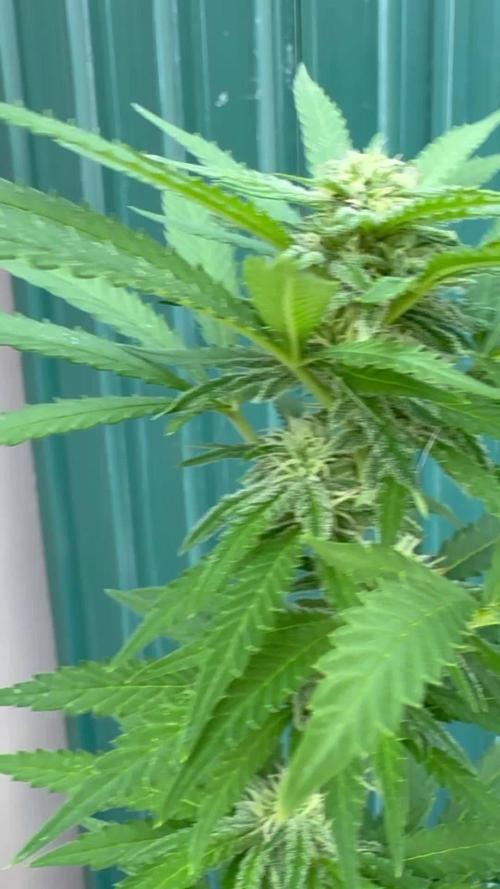
Explosión de resina!!! Una genética que no me deja de sorprender un olor brutal a cítricos y su olor a Haze un gustazo pra la vista y el paladar sin duda esperamos impacientemente el dia de degustar este manjar!! Espero que os guste Salut y força al canut Farmers!🍁
Likes
15
Share


@Sup3rNov4
Follow
Lost the top two colas due to bud rot after 2 weeks of storms :( apart from that she is a fantastic strain to grow an absolute pleasure