
Likes
Comments
Share

@StonedGiants
Follow
Germination in Petrischale mit 0,5% Wasserstoffperoxid.
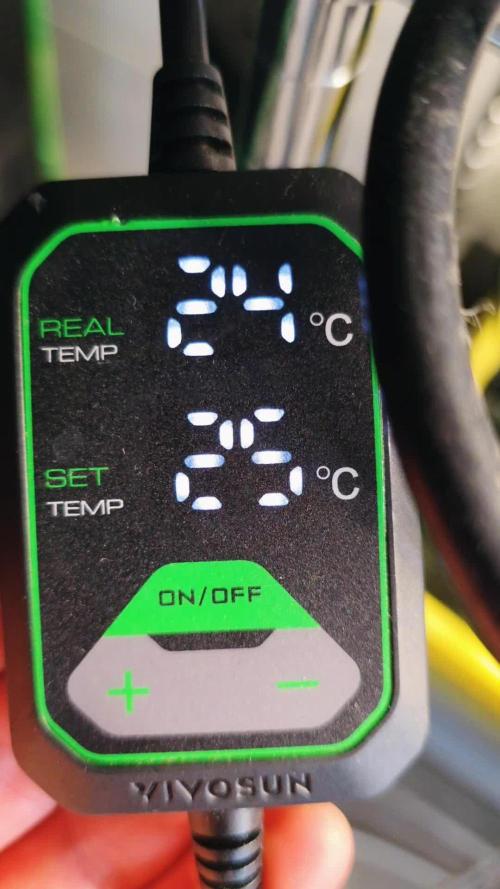
Heizmatte Vivosun auf 25°C.
Alle Samen aufgekeimt 12/12.
Tag 1: Keimung (Germination)
• Heizmatte 25°C
Tag 2: Radicula sichtbar
• Keimlinge abgedeckt
Tag 3: Aussaat in Mineralwolle
• Radicula 3-5mm lang
• 25°C bei 95% rLF
• Dome mit Wasserstoffperoxid 0,5% befeuchtet
• Sproßen sichtbar: schon grün, vereinzelnt gelb
Tag 4:
• 1ml Formulex je Würfel handgegossen
• Dome mit Wasserstoffperoxid 0,5% befeuchtet
• Lüftungsöffnung für Zirkulation
• Alle Sprossen grün - 12/12
• 23°C bei rLf 85%
Tag 5:
• Sprossenhöhe: 0,3cm bis 0,5cm - eine bei 1,0cm
• 24°C bei rLf 85%
• LED Beleuchtung vorbereitet
• keine Anzeichen von Pathogene
• 2 Keimling hängen etwas hinterher:
Blattspitzen braun, tocken
Tag 6:
• 24°C bei rLf 80%
• 1-2ml Formulex [0,5ml/l] Feed
• H²O² Prophylaxe
• bereit für 100 Watt LED Beleuchtung
Tag 7:
• 24°C bei rLF 80%
• H²O² Prophylaxe
• 40cm Abstand zur 100Watt Anzuchtlampe
• 1 Keimling auf Schaumstoff unglücklicherweise ausgetrocknet
• 1,0cm Sprossenhöhe
• erste echten Blätter bilden sich
• gesunde grüne Farbe
• stehen auch aufrecht
• kein damping off / Unfallkrankheit
[Zwischenfazit Schaumstoffwürfel]
2/3 ausgetrocknet,
Einen gestern beinahe verloren,
wurde welk etwas trocken, aber hat sich wieder aufgerichtet.
Eignet sich schon als Medium aber eher in einer Wasserschale, ansonsten trocknet dieser im Vergleich zu Quelltabs, Kokos und Mineralwolle schneller aus.
Seedling-Phase: Tag 8:
• 25°C Heizmatte ,
• 100 Watt Anzucht LED-Lampe bei 40cm Abstand
• Sprossenhöhe zwischen 1,0cm bis 2,8cm
• einige Blätter hängen und stagnieren etwas
• momentan kein Feed
• kein O² Boost
• Ventilator aufgebaut
• reduzieren die Feuchtigkeit langsam auf 70-65%
• ⚠️: oberflächlich trocken, zentral feucht halten
Tag 8 Seedlingsphase - Keimlingsphase abends:
Die Keimlinge wurden in den Cloner transferiert.
Vorsichtig extrahiert und in Klonkragen gesetzt.
Der Cloner versprüht die NL (Formulex) alle 20min für 20 sec.
25°C bei rlF 75% - Dome steht um die Feuchtigkeit zu erhalten.
Es sind sichtbare Wurzelansätze und Wurzeln zu erkennen.
Tag 9-10:
Die Keimlinge haben sich im Cloner akklimatisiert.
Wurzel bilden sich Stück für Stück aus.
25°C bei rlF 75% - Dome steht um die Feuchtigkeit zu erhalten.
Einer hängt etwas hinterher, da zu früh aus der Wolle entnommen. (Waren keine Wurzelansätze sichtbar)
Tag 10-14:
Wurzel deutlich zugelegt - sind bereit um in das RDWC transferiert zu werden.
25°C bei rlF 65 % - Dome ist nicht mehr relevant.
Morgens mit präventiv mit H²O² benebelt.25°C bei rlF 75% - Dome steht um die Feuchtigkeit zu erhalten.


Likes
20
Share


@DabbertGlobberfield
Follow
For the Herbies contest - https://growdiaries.com/diaries/157348-grow-journal-by-dabbertglobberfield#gallery=6777378 - Grandmommy Purple is guilty multiple noise violations for being too loud and for stanky funk.
Harvest - 169 days / 66 days in flower
Well, we did it. I made it to the end. All I can think is...WOW that was A LOT of work. But I think I had very good results for a first time grower. I
For harvest, we took Plant B and D and prepared them for immediate freezing. Altogether, I ended up with 1212g wet on plant B and 1089g wet on plant D. I ended up freezing 1816g of this. There was some from each of these plants that was set aside from freezing because, for whatever reason, I thought they were not worthy of washing because of how progressed the leaf damage was from the root rot battle. So that was cut up and dried as nuggets instead of hanging like the rest. Sawtooth and Plant C were both harvested and hung in the tent to dry for 12-13 days. I think I overdried by 1-2 days because when I jarred them they struggled to raise up to 55%. So I am using rh% packs.
After drying Sawtooth and plant C, I ended up at 459.8g for dried flower and 170.8g in dried trim. So just over 1lbs between the 2 plants and 4.15lbs wet between the other 2 plants that was washed for hash.
So... are you for real with the effort involved with washing bud for bubble hash? I don't think I would do this in the warmth. I only pursued doing bubble hash cause it's cold right now and I figured that would really help. Even in the 30s(fahrenheit) stuff would stick. It's hilarious how sticky of a process this is. I hope you have a bunch of gloves, water, and ice to burn through. I went through over 60 gallons of distilled water and 80lbs of ice to wash the 4 lbs. I am envious of people in videos using a hose to collect, clean, and refill. Also, doing this as a 1 person show is the definition of insanity.
I broke the washings up into 3 parts. The first part was was the tester wash. I broke off 420g of plant D's 848gs available. I used 7 bags to see where I would end up. I used 220, 160, 120, 90, 73, 45, 25. What I determined was that if I was hunting a specific micron with a lot of material this would help find what you can get. But for the next washing I reduced the amount of bags to 4; 220, 160, 45, 25. The time, with the 4 bags, I washed with 809g. I had a much more favorable experience and return this second time but I had green fast and probably used too much ice. The 3rd wash was the remaining 631g and I found an extra 137g I added of sugar leaves and trim, brining the 3rd wash to 768g. I used 5 bags this time; 220, 160, 73, 45, 25.
By the 3rd wash I have become an expert in collection but also never want to do it again. lol.
2 of the 3 washes have dried and I have 43.4g of bubble and 2.8g of dry sift. 37.4g of that bubble is able to be pressed into rosin. I will probably press that dry sift as well. The other stuff is 25u or 160u that I will experiment with or cook with. The other stuff is drying so I can't add it all in.
I pressed a bunch of trim and some flower. The trim presses nice and the dab is decent. I am working out a good temp for the flower. But the problem with all these tests to find the sweet spot is that I have all these testers to go through but want to keep pressing and trying that! I think I will need to work on a better storage solution.
I can't wait for the fresh frozen bubble hash rosin pressing... I have over 20gs of bubble to put in one bag. I am really looking forward to this. But I will need to work up to that pressing since I have never pressed hash/kief/bubble before in my rosin press. So this should be really fun.
I will 100% post an update of the hash pressing once I do that and also after the 3rd wash session is done drying.
In closing, saying I learned a lot from this grow would be an understatement. I fully expect to start it back up in a few weeks after some R&R then some R&D. There's some things I will need to work on before I start again, such as: having a single external reservoir that feeds multiple plants, hard to clog and easy to use ebb and flow system, miscellaneous final run stuff like space for drying. So thanks everyone for hanging out and perusing the photos and or reading all my huge rambling updates and thanks to those for the help along the way.

Likes
26
Share


@XperencdGmanXG
Follow
well short of it is, i overfed boom mix and now there is a K toxicity which always expresses as a magnesium deficiency. So I decided to give the plant the magnesium it needs to process the K. Plants look like they are recovering already. NEVER FLUSH if you are growing organically.

Likes
5
Share


@NY_THC
Follow
Coming down to the wire. Pumping these girls full of overdrive again this week, next week will start flushing. Looking at a late Jan. Harvest for this tent.


Likes
13
Share


@TommyBVRSA75
Follow
Thank you for your support!
Gracias por vuestro apoio!
Finally...por fin....Master on GD
Thanks to Jah God and all of you
420 always!!!

Likes
9
Share


@ThePifferyAndCo
Follow
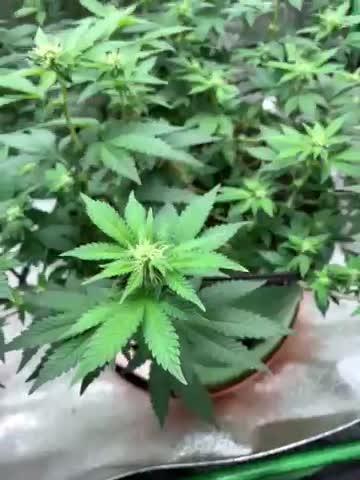
Week 1 of 12/12 light cycle. Hit the plant prior to the flip with a top dress of all purpose/power bloom 50/50 and 2 tbsp of basalt rock dust. Seeing a lot of activity on the top layer of soil. The microbial life is THRIVING. End of week 1. Slowly dropping RH to 50%. Already seeing a decent bit of stretch. May need to figure out a way to get my light level with the top of the tent in the event I run out of headroom. Not sure how much of a stretch to expect with the holy communion being it is my first run with them but the blue dream I should be more than okay as I flipped last run with them way taller than this time around.

Likes
42
Share


@Grey_Wolf
Follow
Barneys Farm Pineapple Chunk update 5th Jan 2020 11th week of veg over and done with.
Ive done quite a bit since the last update as far as this girl is concerned 1st of all i erected a greenhouse that covers all of my Photo period plants.
and secondly I transplanted the Pineapple chunk out of the pot she was in and put her straight into the ground so I'm expecting and hoping that she will explode once the stretch starts in about 5 weeks or so. The soil I moved her into is really nice and fertile as it was used to grow winter vegetables and Broad beans.
The growing of legumes can benefit the soil by bringing nitrogen to the surface to be made available to anything else growwing in the same soil.
I gave the area I transplanted her into a good dose of Azospirillum and Mycorrhizal innoculants after she went into the ground.
Thankyou for checking out my update see you next week 👍

Likes
2
Share


@bigsmoke42069
Follow
Very happy with the grow, big dense nugs with pleasant citrus aroma.
Next grow i'll use 3 gal pots instead of 5 with FloraFlex matrix watering system.
i'll separate the distance between the scrog nets further apart, so the buds won't lean on each other.
Need to dial the light better next time to prevent foxtailing,

Likes
70
Share


@Belverde
Follow
Welcome guys
We are at the final conclusion with this famous strain, the STRAWBERRY COUGH 🍓🍓🗣️
After more than two months of treatment I was able to test it in the best conditions
But first I quickly pick up on what I did after the cut 👇
The whole plant is placed in a cupboard upside down, with the leaves still attached..
After about seven / ten days, when the leaves were pretty dry, the flowers crunchy, but before the branches break cleanly ... I cleaned all the buds thoroughly, I cut them off the branches and put them back inside of a brown bag..for about a day / two
Later I placed everything in a classic glass jar
For 24h I left it closed ⏳
Later I started opening it several times a day
More or less, after about three weeks, I usually close the jar permanently and wait a few more weeks to start using the flowers 🔥
Back to the strain 👇
The inflorescences are slightly airy in Sativa style, but very thick and with a good amount of trichomes
Aroma is delicate but present, as is the flavor..
It is a type of weed that can appeal to more or less everyone 👌
The high is also very pleasant, a soft sativa that keeps the mind quite clear and one feels motivated..
The test was done by smoking it (no tobacco), and the taste is good if everything is done correctly, but I find many more "strawberry" notes using vaporizers
In all cases it is a genetics that I can recommend to everyone 💯
For more info on the cycle, I refer you to the past weeks, where I tried to report everything that happened, in the best possible way.
Thanks to @supersiberia for the seeds 👍👍
And like as always thanks to @growdiaries for this virtual dream garden 🙏
Good crops to all 😎
FC ✌️
🇮🇹

Likes
70
Share


@Mosquito_Haarlem
Follow
We zitten in week 11.
Ze wordt steeds mooier en mooier.
Ze ruikt zeer sterk zoet en heeft harde toppen bedekt met thc.
Ik heb wat meer bladeren weggeknipt
Ik zal haar deze week proberen nog meer op te pompen en waarschijnlijk vanaf volgende week alleen maar mineraalwater geven. ( denk ik)
Laten we kijken hoe ze zich deze week ontwikkeld.
Gedurende de week zal ik nog verse foto's updaten dus hou het in de gaten 🧐

Likes
8
Share


@Fa5Venom
Follow
Good growth on them little bit of nutrients burn on the northern lights. Won’t get much out that small one but I just couldn’t let it go


Likes
52
Share


@CBD_Sweden
Follow
@MephistoGenetics,
Hi all the happy people here in GrowDiaries.
This is my second cultivation ever and it will be fun to try a bigger space than my closet grow.
First, I'm just going to say I'm done with the construction of my new growroom.
The room is 2.14 meters by 1.7 meters and has a ceiling height of 2 meters.
It provides a floor area of 3.6 square meters.
I use a 54 Watt Lightwawe T5 for germination and 2 Pcs 400 Watt HPS lamps.
I have a channel fan that replaces the room air about 40 times an hour to get a comfortable environment in the room, the air enters a fresh air intake from the outside.
The air is purified through a carbon filter to then leave the room to the rest of the basement.
Then I use that heat to heat the rest of the basement.
I will use 10 pcs 15 liter Autopots to grow with and a 100 liter water tank that supplies the pots of water and nutrition.
I will grow completely organically in soil and will watercure my buds to get the best possible medicine for me.
But there are no cultivation rooms to be displayed here, so I continue with what is most important.
I am very excited to see how the new growroom will work and how this Stilton Special will turn out.
Strain Name: Stilton Special F1
Genetic heritage - Sour Livers F3 x Northern Cheese Haze F3
Strain behaviour - Stilton grows well from the off, and develops into a stout but branchy specimine that leads to a fine yield of awesome flowers. She's not too stretchy but also is sizeable enough with good growth, to train and shape to your liking. Flowers develop pretty fast and grow to a good size, it may to advised to clear out some undergrowth and if needs be a very gentle defoliation mid-way through the grow, although leaf tucking may suffice well enough.The end product is of top shelf quality and she doesn't lack in yield either.Give your garden, nose, and body a treat and be sure to indulge in a slice of Stilton this year, You won't regret it.
Size - 50 - 70 cm
Structure - Medium height but bushy
Flower Density - 9/10
Indica/Sativa - 65/35
Cycle Time - 65 to 70 days from sprout
Yield - 90 to 140 grams as a single plant
Best Method for overall high yield - 9-12 per 1,2m x 1,2m sq in 10-15 Liter pots (Soil)
Aroma - Very strong, Cheesey/fruity/sour/spicey/ with a dash of coffee.
Taste - Dank berries
Effect - Good hybrid powerful but balanced effect
Medicinal Benefits - TBA
Best Grown - Indoor/Greenhouse
Cannabinoids - TBA
Extract information - Ideal extract candidate - High in resin, oil and terps.
--------------------------------------------------------------------------------------------------
2017-09-25. Week 5 starts. Added a video of the girls. Gave the girl water and nutrients. This girl is 24 cm high and have grown 7 cm in 7 days.
I flushed the girl yesterday with 40 liters of tap water. Im lowering the humidity in the room with a dehumidifier and try to have 50% air humidity.
----------------------------------------------------------------------------------------------------------------
2017-09-29. Installation of the New light rail in the grow room. Its Advanced star light V 5.0. Added a video of it.
Likes
5
Share


@GrownyStark
Follow
It is getting more humid in the grow tent this week.
I need to do another refresh on my DWC water right away. It's smelling slightly stale. I should have done it sooner and not waited for the smell to be noticeable. Anyways it's looking good and will enjoy a refresh today.
So I touched a leaf today to remove it and after smelling my hand I had a urge to cut her down and smoke it. She's got an omg sweet aroma covering your hands that just makes me wanna pinch a top off and try it.
I feel like a cat hit by the wiff of the nip.
I'll been using sticks to handle from now on.
Likes
9
Share


@Krissci
Follow
This week will defoliate the plant...
Expose more nodes...hard to train due to the height of the plant.
Lovely purple hairs already
Likes
128
Share


@MiyaguiOkPolilla
Follow
Bienvenido a la aventura compañero 🛸❄️✨💐
Una semana espectacular para nuestra Do-Si-Dos de @Zammi_official en combinación con la gama gloriosa de @Plagron
La ayuda en este diario ha sido de la mano del grower y amigo @noNick123 . Recomendando siempre cosas positivas, gran teoría ✨ Espero que Zamnesia tome en cuenta su participación a pesar del inconveniente ocurrido con el frío, hermano 💪🏽
Subimos la temperatura del agua antes de preparar la dosis, 23 C⁰ con 450 PPM aprox, inicial por riego.
Bajamos las dosis considerablemente y llegamos a un ppm de unos 800. Entiendo ahora que significaba cuando @noNick123 recomendó calentar el agua antes de la mezcla...
El día jueves 11/1/24 comenzamos a regar solo con agua.
Esta planta se ha vuelto una bestia creadora de resina, ahora la mantendremos en este estado y quizás necesite ser alimentada alguna vez más 🤔 tengo ganas de cortarla, pero la dejaremos a a que madure un poco 😌
Los tricomas están 70% lechosos 20% transparentes y 10% ámbar. La lámpara ahora está más alta para no dañar ninguna glándula ❄️👌
Por ahora esto es todo, estoy aprovechando todo esto para ir eligiendo la nueva tanda de semillas a cultivar 🤩
Quiero hacer una extracción con esta próxima cosecha, no guardar tanta materia vegetal en casa. Alguien conoce una manera casera sin mucha inversión?! Oil, dry, bubble hash... NO CHARAS 😁
Un abrazo fuerte para todos y muchos ánimos 💐 siempre hay tiempo para hacerlo mejor, para darle al siguiente paso pisando firme
Saludos!

Likes
27
Share


@Pauwela
Follow
11/3 This week the girls seem to be growing more than an inch per day with more branches then previous grows, these girls are 21" to 24.5" tall on Day 22. I did mix in some aged dried horse manure I use in my vegetable garden into my soil mix when I transplanted last week from 4" pots to 3gal grow bags, This grow is slightly different, its got more of everything, I wonder what would happen if I used the worm castings I have in my garden compose buckets in my next grow. I usually get cuttings for clones at the next trimming & transplant coming up in the next 7-days from now to 7 gals grow bags where it will finish off to harvest


Likes
14
Share


@AGrade_Labs
Follow
Just watching them progress so far. Can’t complain with the progress we are getting. Started training early with some lst clips to make sure that they don’t overcrowd each other.

