
Likes
Comments
Share


@PinonAraucano
Follow
El domingo 28 de febrero puse la semilla directo en tierra (estuvo 24 horas hidratándose en agua destilada) con micorrisas.
Al día 3 brotó y de ahí no ha parado de crecer.
Ambas son Lebron Haze XXL Auto (BSF), solo que una ha crecido más, la otra va más como arbusto.


Processing
Likes
10
Share


@MadeInGermany
Follow
Hey everyone 😃.
First of all, many thanks to Zamnesia for the support 👏🏼👍.
I'll start germinating next week 😋.
Until then, I wish you all the best 😊 stay healthy 🙏🏻 and let it grow 🍀

Likes
46
Share


@LittleBigTrees
Follow
Defoliated and trimmed lower fluff from The plant day 20 flower ,
Lots of air and light can now get to the plant and hopefully grow some nice buds

Likes
10
Share


@Growrickbig
Follow
Pruned a bit from the lower part of the plant.
Still using lst
Thinking to change to hps bulb soon

Likes
10
Share


@EastCoastGrows99
Follow
Week 7 now, growth slowed a tad, figured my soil mix would be running a little low on nutes now & started the feeding. Chose to give them a single feeding of Plant-Prod MJ Grow as it has some extra stuff they may have been missing but will feed bloom starting next week!
The bud sites where starting to get a little shaded from the larger fan leaves, removed them & the buds started swelling like mad!
Last day of week 7 update: They drank the grow nutes with vigour, fed bud filler last night (nov 3). The feeding greened up the leaves, now I can confirm my soil mix lacks enough flower nutes for sure.

Likes
9
Share


@Donjuanweedo
Follow
No nutes this week I’m doing a water water feed and when I feed I’m still giving light nutes. Was having issues with the humidity but I found out about dehumidifier bags so I bought those... super beneficial!! Keeping my girls at a steady 48%
Pretty proud of myself so far 😊 also applied the trellis until my new tent and light comes!! Gotta love Mars hydro

Likes
30
Share


@VanTheMan
Follow
Start of week 4 - She is looking real good. She is getting rather bushy but is not growing much taller yet. still only at roughly 13cm.
Day 22 - 23/01-2024 - watered 1.3L (1ml of calmag-grow-bloom-top mixed with 1.5l water)
Day 26 - 27/01-2024 - watered 1.5L (1ml of calmag-grow-bloom-top mixed with 1.5l water) - She has started growing a bit taller and has reached 17cm today
Day 28 - 29/01-2024 - She has been growing a little taller and has now reached 20cm total. I really like how compact and bushy she seems, so many branches on so little stem. 😍
She does not seem to have started flowering yet so i'll start my next week as veg week aswell.

Likes
6
Share


@Mr_nugs_lover_David
Follow
It was such a nice experience for me with this strain, first time ever growing her, she had a little bit of long internodes and thought she wasn't gonna be very productive, however the nuggets are so so hard and compact and the quality is just brutal, doesn't even look like she's s been outdoor grown, I love this strain for the rare strong smell like very sweet and floral with that strange diesel notes mix the sweet tones, I would love be growing her my whole life, I definitely will keep growing this lady FOR SURE!. thank you so much and hope you guys enjoy! 💎🙏🔝💚


Likes
41
Share


@Jjthejetplane79
Follow
All jarred up. This stuff is amazing tasting. Super smooth and tastes like real strawberry. 10 out of 10 fastbuds nailed this one.
Likes
89
Share


@Lukush
Follow
Finnaly its the 1st day of week5 in flower.
The smell of barries is invaiding mi tent 😂🌲🌲👌😘
Il give her 1 more week /2 week's and se how she goes...
Have a good one growmies in Still thanks for the support ❤️✌️✌️✌️😎
Likes
35
Share


@Chedderbob112
Follow
It was a roller coaster ride guys but I started with four harvested I earlier got two ounce quick dry wasent flushed properly but these ones hav been there a some nice buds here n a hopefully will get a decent seed harvest stoned @chedderbob112 s2340420 don’t hav dry weight bud av went for fullness plant
Likes
7
Share

@Bread_n_Buds
Follow
Our Karen Kush #1 Automatic from Zamnesia is practically very tall, very tall, but maybe that's not enough. It's a truly beautiful beast that will give us tons of weed to smoke.
The main cola is magnificent, standing out at the top in the characteristic indica shape where the main cola grows much higher than the side colas, which therefore need to be carefully trimmed at the bottom to avoid producing fake flowers.
We're a week behind the others, and I thank God and all the saints for having planted this seed. It's very tall, but so is the other one, showing great stability in the strain.
It smells really pleasant!
Techniques chosen - Here the plant grew straight, only with careful trimming at the bottom, just like mom did, and as usual with autoflowering strains, nature chose the best method.
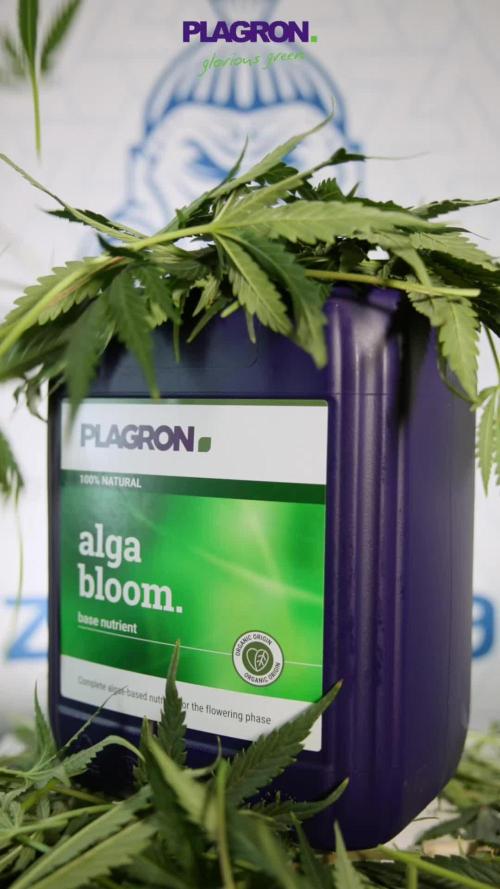
We are 100% organic and 1000% Plagron, as always.
The soil we chose is the recently launched Plagron Bio LightMix, which will allow us to start growing more smoothly and reliably, without the sudden changes that liquid fertilizers can cause. A week is enough, so don't overdo it.
We're in the final flowering stage and things are starting to get serious, so let's add our legendary bloom stimulator and get started with Bloom.
- Pure Zym 1 ml/l
- Silic Rock 1 ml/l
- CalMag Pro 1 ml/l
- Sugar Royal 1 ml/l
- Power Buds 1 ml/l
- Alga Bloom 0 ml/l (Too much dark juice additives to boost buds)
- Green Sensation 1 ml/l
Ready to flush, started on the day of the photos, but last week she was fed only additives to give the flowers a final boost.
Choose your preferred style and calculate your results on the website:
www.plagron.com
Take a look at the new growshop section with everything you need for cultivation.
Z - https://www.zamnesia.io/it/531-growshop
A very good strain, it will grow tall and with wide internodal spacing, making it ideal for LST but also stunning when grown upright.
Z - https://www.zamnesia.io/it/10783-zamnesia-seeds-karen-kush-auto.html
Z - Zamnesia Seeds - There's no need to complain about this strain: Karen Kush Auto will satisfy even the most demanding smokers with its dense flowers, fragrant terpenes, and high THC content. Created by crossing Monster Bud Kush, White Widow, and ruderalis, Karen Kush Auto boasts first-class genetics that leave no room for complaint. Inhale its sweet aroma of spices and diesel and enjoy the physical buzz that envelops you. After a few minutes, the only thing you'll want is a comfortable place to relax. And best of all, you won't find this strain anywhere else, as it was created by the geneticists at Zamnesia Seeds.
Karen Kush Auto is slightly indica-dominant, which manifests itself in its bushy structure, resilience, and moderate height. Despite its name, Karen Kush Auto is anything but demanding. It only requires good soil, regular watering, and fertilizer to fuel its vigorous vegetative growth. When it transitions to the flowering stage, it will stretch to a final height of around 70–90cm, depending on the space available.
If you like what you've read about growing Karen Kush Auto, wait until you smoke it. This 60% indica strain produces dense flowers loaded with resin and vibrant terpenes that evoke aromas of sweet citrus, black pepper, and diesel. The floral notes create the perfect backdrop for the pungent diesel scent. And after smoking, sit back and let the waves of euphoria and heavy physical intoxication glue you to the couch with a big smile and slitted eyes; it's perfect for evening use or weekend relaxation!
You know it, but I recommend it. Here you'll find many beautiful things, essentially "all the best nature has to offer."
Z - www.zamnesia.com
Music // www.radionula.com
+ Feng Shui music
+ Frequency 432t
Likes
7
Share


@BIYEI
Follow
Vegetacion (Tiempo estimado 28 dias)
Segunda Semana de Vegetacion
14/12/2023 - 5:00hrs y 22hrs: Se Hace cambio de solucion nutritiva y se limpia el recipiente, se verifican parametros basicos del agua, mantener cuidados especificos, el Ec y PPm Varean por los aditivos.
Agua de osmosis: Ph 6.0, PPm 650-800, Ec 1.3-1.6, Temperatura 22°C - 26°C, Humedad 65%
Ambiente: Temperatura 22 °C, Humedad 65%, Ventilacion 15%, 18 hrs de luz , 6 hrs de obscuridad.
15/12/2023 - 5:00hrs y 22hrs: Se verifican parametros basicos del agua, mantener cuidados especificos.
Agua de osmosis: Ph 6.0, PPm 650-800, Ec 1.3-1.6, Temperatura 22°C - 26°C, Humedad 65%
Ambiente: Temperatura 22 °C, Humedad 65%, Ventilacion 15%, 18 hrs de luz , 6 hrs de obscuridad.
16/12/2023 - 5:00hrs y 22hrs: Se verifican parametros basicos del agua, mantener cuidados especificos.
Agua de osmosis: Ph 6.0, PPm 650-800, Ec 1.3-1.6, Temperatura 22°C - 26°C, Humedad 65%
Ambiente: Temperatura 22 °C, Humedad 65%, Ventilacion 15%, 18 hrs de luz , 6 hrs de obscuridad.
17/12/2023 - 5:00hrs y 22hrs: Se verifican parametros basicos del agua, mantener cuidados especificos.
Agua de osmosis: Ph 6.0, PPm 650-800, Ec 1.3-1.6, Temperatura 22°C - 26°C, Humedad 65%
Ambiente: Temperatura 22 °C, Humedad 65%, Ventilacion 15%, 18 hrs de luz , 6 hrs de obscuridad.
18/12/2023 - 5:00hrs y 22hrs: Se verifican parametros basicos del agua, mantener cuidados especificos.
Agua de osmosis: Ph 6.0, PPm 650-800, Ec 1.3-1.6, Temperatura 22°C - 26°C, Humedad 65%
Ambiente: Temperatura 22 °C, Humedad 65%, Ventilacion 15%, 18 hrs de luz , 6 hrs de obscuridad.
19/12/2023 - 5:00hrs y 22hrs: Se verifican parametros basicos del agua, mantener cuidados especificos.
Agua de osmosis: Ph 6.0, PPm 650-800, Ec 1.3-1.6, Temperatura 22°C - 26°C, Humedad 65%
Ambiente: Temperatura 22 °C, Humedad 65%, Ventilacion 15%, 18 hrs de luz , 6 hrs de obscuridad.
20/12/2023 - 5:00hrs y 22hrs: Se verifican parametros basicos del agua, mantener cuidados especificos.
Agua de osmosis: Ph 6.0, PPm 650-800, Ec 1.3-1.6, Temperatura 22°C - 26°C, Humedad 65%
Ambiente: Temperatura 22 °C, Humedad 65%, Ventilacion 15%, 18 hrs de luz , 6 hrs de obscuridad.


Processing
Likes
2
Share


@herewegrow
Follow
Day 29 - Everything’s looking good! The Sour Stompers look so different because of training and genetics (runt).
Day 30 - Looking better than last time!
Day 31 - Watered 1.5L each at 6.5pH
Day 32 - 4AM1 has the most developed buds so far but Sour Stomper 1 is already putting on some light frost!
Day 35 - Fed


Likes
47
Share


@Wicked_Stix
Follow
I had to kill one of my photoperiod plants because it was hermie so I decided to move the FBTO1 and FBTO13 into the room with them since I had space in there. So now they are on 12 hour light and they seem to be much happier with the environment. This will be my first time flowering autos on 12 hours so curious to see how they do.
Nutrients per gallon
.5 tsp maxigro
.25 tsp armor si
.25 tsp calimagic
.1 tsp 90/10 humic/fulvic acid
Likes
10
Share

@JoLatto
Follow
Week 6 - they have Officially started to flower ! I’ve started adding 1ml Grow A - B HalfGallon Every other watering PH 6.15 Smell is Super gassy so far. I’ll update next week Happy 420 Everyone!


