
Likes
Comments
Share


@EeyoreTheHomie
Follow
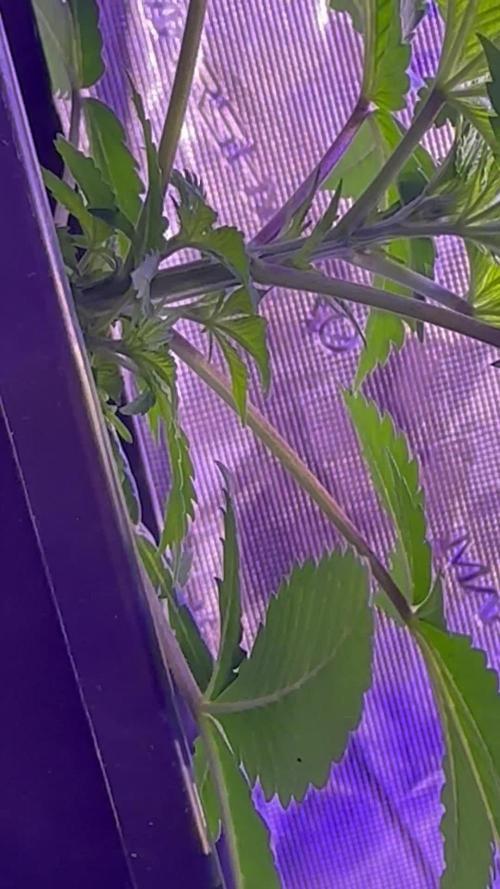
DAY 59: The Lucky Charms has been very stubborn in revealing its sex. I think I have a confirmed pollen sack posted above, but will wait another day or two to make sure. Its giving me low-level anxiety worrying about it pollinating my flowering female in the same room.
The White Widow is itching for some training and a larger pot. I've been using LST to try and open her up, but by the next day, a bushy node has filled the void. Unfortunately, the veg area of my tent is a bit tight, and it will be another 6 weeks or so before the flowering room is available for late-veg. I also just started 2 clones and 3 seedlings so its about to get packed in there lol. A work around for this would be to switch the WW to a 5-gal soon, keep it in the flowering room for the 12 hours of light [lights in the flowering room are on during nighttime hours (KEEPS ELECTRIC BILL DOWN)], then pull it out in the morning for an extra 6 hrs of sunshine. This would free up room for the incoming babies, as well as liberate the WW from the tight space. Because I have a feeling this White Widow is going to be a monster of a plant pretty soon.


Likes
2
Share


@Mr_nugs_lover_David
Follow
Very easy to grow, amazing aromas very mango strong tropical smell, very delicious, just like her sisters, I think it's a very stable genetic because 3 out of 4 were purple and the 4 of them have the same mango smell, very good automatic strain! 🌱 💚 💎

Likes
7
Share

@MARCTAKAHASHI
Follow
Semana 2 de crecimiento vegetativo completada.
La primera foto de esta actualización corresponde al día 15 de crecimiento vegetativo y día 21 desde la emergencia.
La Super Boof sigue mostrando un crecimiento fuerte y compacto, con tallo principal grueso, internudos cortos y buen desarrollo de las ramas laterales. Durante esta semana se adaptó muy bien a la maceta de 7 L y llegó a formar el sexto nudo.
La iluminación se aumentó progresivamente hasta aproximadamente 290–350 PPFD con la Mars Hydro FC-3000 y la Adlite Blue, manteniendo un fotoperiodo de 18/6. La planta respondió bien, sin signos visibles de exceso de luz, carencias ni sobrefertilización.
En el riego se utilizó ATA Rootfast a 0,5 ml/L y ATA Terra Leaves a 0,5 ml/L, ajustando la solución final a pH 6,5.
Al final de la semana se realizó el trasplante a la maceta final de 50 L. El cepellón estaba muy bien colonizado, con abundantes raíces blancas y sanas. Durante el trasplante se aplicó Micro Vita de Top Crop alrededor del hueco del cepellón para favorecer la colonización del nuevo sustrato.
Después del trasplante se realizó un riego de asentamiento de aproximadamente 7 litros, repartiendo cerca de 1 litro alrededor del cepellón y el resto por el sustrato exterior. El siguiente objetivo será dejar que la planta se recupere y vuelva a crecer con fuerza antes de realizar la primera poda de formación.

Likes
210
Share


@Rock_n_Roll_Randy
Follow
I'm really looking forward to these seeds and strains from NUKA SEEDS. I've heard and seen amazing things from them.
CHECK EM OUT:
https://nukaseeds.com
Likes
27
Share


@HAPPY91
Follow
Mars Hydro TS 3000
Dimensions:
25.3" x 22.8" x 2.7"
Weight:
11.3lb
Coverage:
4x4 feet
Watts Consumed:
~450w
Light Intensity:
Up to 1150 uMol @ 18" height
Spectrum:
Full White + Infrared
LED Brand:
Unbranded LEDs
Voltage:
120; 240; 277
Warranty:
3 Years
Week 2 3/31/2021-4/6/2021:
Day 8 3/31:
Played Lizzo Radio. 64.8-80.1 44%-77%
Day 9 4/1:
Played Hozier Radio. Drank 0.25 gallons plain water=27 ppm 6.6 ph 71 f.

Likes
6
Share


@coyotenowhere
Follow
Mar 19
Day 1 of Flower 12-hour light cycle
Mar 20
725ppm / 5.89ph
Mar 22
759ppm / 6.03ph
Mar 24
780ppm / 6.08ph
+defoliation (large fan leaves and lower branches)

Likes
47
Share

@Miketama
Follow
Harvest week for the Milky Way F1 growmies 🙌 Pretty happy with how she handled this cycle, recycled soil first time ever, dead of winter, undersized light for a 100x100 tent… she just kept going 💪
In previous runs I did scaled harvests, and every time I noticed a visible resin boost and even some anthocyanin production on some phenos, confirmed that a sudden light intensity increase late in flower does something interesting.
This time I went a different route: last 6-7 days I stripped most of the non-resinous fan leaves and redirected a lateral bar onto the mid/lower zone to get the same effect. Curious if mechanical stress from defoliation plays a role here too, anyone know anything about jasmonic acid? 🤔
Late flower I pushed the setup to ~200w adding 660nm red bars at 40-50cm, which clearly tightened up the buds compared to previous runs 👀
Pulled the CO2 bottles in flower, without a way to measure it I’d rather focus on VPD and fresh air circulation 🤷 Kept them in veg where humidity tolerance is higher anyway.
Now she’s drying and I can’t wait to see how the wet/dry ratio lands 🌿

Likes
11
Share


@Lahuertade_Bototo
Follow
🌱🌱🌱Continuamos este cultivo, con esta hermosa cepa de FastBuds, Girl Scout Cookies Auto, de lleno en el periodo de Floración .🌱🌱🌱
👨🍳👨🌾🏻 Nutrición y Bitácora 👨🌾🏻👨🍳
-Día 43. Sigue aumentando el engorde de las flores y el aroma es cada vez mas intenso 👌.
-Día 44. Se riega con 3 litros de una solución nutritiva NPK de Plagron Alga Bloom (6 ml) Plagron Sugar Royal (1.5 ml) y Plagron Green Sensation (1.5 ml).
-Día 45. Los aromas se intensifican, ya seco el sustrato.
-Día 46. Se riega con 3 litros de una solución nutritiva NPK de Plagron Alga Bloom (6 ml) Plagron Sugar Royal (1.5 ml) y Plagron Green Sensation (1.5 ml).
-Día 47. Sigue todo excelente 🙌.
-Día 48. Ya seco el sustrato.
-Día 49. Se riega con 3 litros de una solución nutritiva NPK de Plagron Alga Bloom (6 ml) Plagron Sugar Royal (1.5 ml) y Plagron Green Sensation (1.5 ml).
🚀Equipamiento🚀
Indoor de 60x60x159 cm y una iluminación BlackCob F320, se activa solo 1 modulo (160w) a 45 cm del canopy por el resto del cultivo. Intractor de 135mm, extractor de 135mm, filtro de carbón, ventilador "oscilofan", ventilador "clip fan", este ultimo ventilador se ajusta en la parte baja de la carpa para mejorar la circulación de aire bajo el canopy, 2 termohigrometros y una malla SCROG de kanovi a 15 cm de la maceta.
Acompáñenme para ver los resultados de este hermoso desafío, un saludo cultivadores 🔥🔥🔥


Likes
12
Share


@Chamed33
Follow
Second time flushing it.. I’m also running out of time before harvest I should’ve been flushing it a week earlier.. she’ll be ready in 2 days for chop


Likes
7
Share


@Messypies
Follow
With the majority of trichomes now turned milky with some turning Amber, i have decided to begin a 10 day flush using nothing but ph balanced water. Doing a shorter than normal flush as the plants with deficiencies don't have much nutes to use up.

Likes
30
Share


@SooSan
Follow
12/12 + 35 jours
1️⃣
🏠 90x60x90
☀️ FC-E 4800 => puissance a 75%
🍁
1x Black Bomb / Philosopher Seed
2x Amnesia Lemon / PEV Seeds
1x Blueberry / PEV Seeds
1x Blueberry / 00 Seeds
1x Wappa / Paradise Seed
1x Dark Phoenix / Green House Seed
1x Quick Sherbet / Exotic Seeds
1x Mango Cream / Exotic Seeds
1x Banana Frosting / Sensi Seed
1x Hindu Kush / Sensi Seed
4x Fast Mix / Sweet Seed
📎 https://growdiaries.com/diaries/122084-grow-journal-by-soosan
📎https://growdiaries.com/diaries/124052-grow-journal-by-soosan
2️⃣
🏠 30x60x50
☀️TS1000 => puissance a 100%
🍁 4x Quick Sherbet - Exotic Seed
📎 https://growdiaries.com/diaries/122080-grow-journal-by-soosan
Sponsorisé par Mars Hydro


Likes
7
Share


@CalGonJim
Follow
4/29🐼👍 I gave her about 2 L of water yesterday with a little bit of bud factor X I think about 2 mL into that and I don’t think it needed it but I’m trying it with some other plants and I had good results but that also could have been a result of the way I mixed up my regular general hydroponics nutrients which are my favorite.
5/5 🐼👍🔥💫

Likes
20
Share


@HisHope
Follow
11/4 Week 6
Light training to get the buds in light and keep her dry.
Watered 11/3 one gal @6.5PH - Fish Sh!t 5ml - Karo syrup 5ml
Just keeping an eye on her
11/5 Gorgeous smell coming off her purple buds, reminds me of a taffy shop.
Drooling over her
Growing well got her into the canopy better.
11/7 Update and bragging! Watering/feeding day today, she loved it! She is turning so pretty! The deep purple looks like fairies stole in the night and are using the little brushes to color her leaves. He hairs stand tall! First strain I have seen with them this tall. The smell is sweet with a warmed fruit smell...for those that bake, closest I can come. Still have some questions as if this is a true Runtz. From her coloring and bud development and her leaf shaping she is a good match. Have added some close ups of my lady for anyone out there wanting to take a stab at figuring her out, any info would be welcome.
1 gal 6.5 PH - CalMag 5ml - Fish Sh!t 5ml - Bio_Bloom 5ml
Likes
6
Share


@IQuSX
Follow
Hi, topman!
This report is about bending the "@" plant into a shape.
A week has passed since the transplant and during this time a 35% flush was carried out,
form laying,
burr removal,
but nothing was done to add stress!
Look & rejoice!

Likes
21
Share


@VicFor
Follow
Start of flushing week, we’re close to the harvest, buds are becoming so heavy and sticky !!

Likes
18
Share


@TheUndercoverGrower
Follow
I've discovered this week my timer that was powering the 600w LED had developed a fault and was turning on roughly an hour early, explains why Holy Punch has been taking a while to kick in to full flower. Has probably put the grown behind by about 10 days which is a bit annoying but these things happen.
The Holy Punch is getting pretty thirsty and I have to say she's looking very nice.
I've taken the 600w led out and replaced it with 2 x 300w leds either side of the hps to spread light more evenly.

Likes
1
Share


@critwat
Follow
Day 19 - Girls are growing very bushy! Turned light intensity down to 75 and raised them a bit to promote more vertical growth. Also fimmed the main colas on this day.
Day 21 - Transplanted the OG Glue from its red solo cup into a 5 gal container and added mycorrhizae to mitigate any shock. Seems to be doing well.
Day 25 - girls are all healthy and showing no signs of issues! Growing like.... Weeds


Likes
15
Share


@ThePotFactory
Follow
Just flushing the girls this week, waiting for most trichomes to go cloudy instead of clear. Ive now switched the lights off for 36/48 hours and will harvest in the next couple of days :))