
Likes
Comments
Share


@TheBudWhisperer
Follow
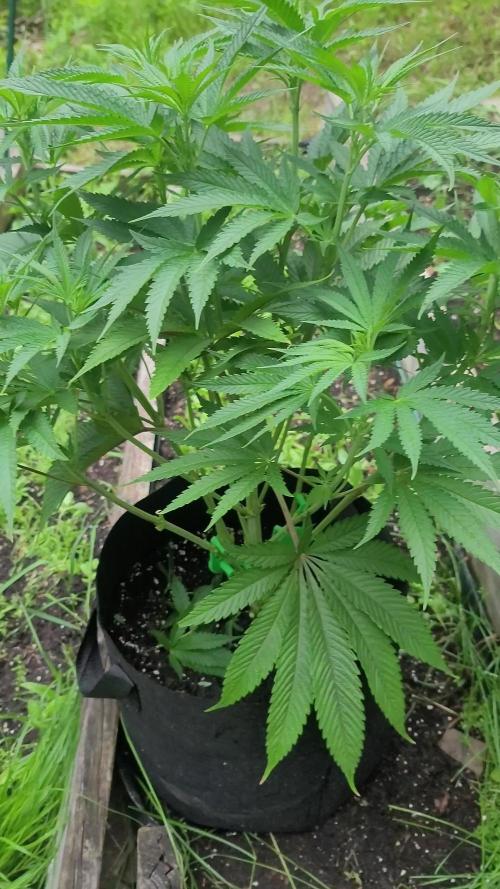
6th week of veg. Is finally in the books and all systems are go for the flower show. As they’re revegged clones, their branching structure is just ridiculous. Sucker branches everywhere pulling nutrient flow away from the winners. Right before we flipped and as per videos - we gutted every single plant and crushed it down to no more than about 7 tops max per plant. The whole goal is only to flower select, top shelf bud with every opportunity (and space) to grow to its fullest potential. So far, Druid nutrients has fit the bill for every one of em and they’re all extremely happy on this system👍.
We also couldn’t resist and snipped another run of clones off each one but the Skywalker. Not sure if the boogie nights or blueberrys will make it but u never really know do you🤷. That said, the diy aerocloner has been a beast for us and minus an aphid issue last round - she puts out a 100% success rate😉.
We’ll use the best of these as complimentary to reg. Run of some spicy bitch we’ve got coming up. Even if the pollen chuck is a failure - we won’t be losing any of the elite white widow or blueberry genetics🤞🤞🤞🤞. Other than that - it’s all wait’n on the buds now👍👌👍. Until next week.
Background
This ones tied to part 2 of the pollen chuck. They were supposed to be a clone run for pollination but the mothers all reveg’d due to a timer incident and high stupidity. These will be the inaugural flowering run of the revamped dutchy system. Growing made easy😉. Shit ton of finagling and setup but once she’s ready - sit back, relax and watch em grow😍😎. Thanks for take’n a look.


Likes
14
Share

@For2itous
Follow
Just defoliating a bit pretty much lollipoping it to take out any super lower stuff. Seems to like the nutes and it's rained recently so haven't had to water as much which is nice. Hopefully she continues to grow as she is and adds some height can't wait to see how she turns out. Happy growing 🌴


Likes
9
Share


@CrazyRussian
Follow
Beautiful, and productive week. They drink a lot of water, I give them 10 litres/4 days. They are truly enjoying the environment, hopefully we will have a large harvest.


Processing
Likes
46
Share


@PureMedicin
Follow
2 of my Blueberries were root bound one more than the other.. i transplanted them into soil in a bigger pot. I Have a bunch of strains going on but one vegging mother soon ready to get in under the CFL. Loving the HPS tho wont go back to LED any time soon. Feeding with CANNA terra nute line and using the last Bud candy and big bud from Advanced Nutrients before going full canna. The monster crop was a succes but it took long before shooting. Hope my other clone will do better. I have a very healthy strawberry banana that will be my motherplant as well as a sweet valley kush that are just a seedling now. I am very happy with the HPS from phillips it work wonder in my oppinion :) I started 12/12 as well this week

Likes
21
Share


@ArucambaAutoflowers297
Follow
Never thought id yield over a pound from 1 autoflower. At time of weighing humidity in the jars dropped to 58% a little lower then id like it to be. Still, cure has barely started and it already smells and tastes amazing. This tester will be released soon. Dont miss out on this one😍. The zkittlez and forgotten cookies are done stretching, i hope. Not much else to update on for now


Likes
24
Share


@BearBuds
Follow
End of week 8, she is so close now!!! All I have to do is guide her through this final week of flush and hope that nothing crazy happens. All fingers and toes are crossed. Cannot wait to see the final yield on this one. I really can't even take a guess at it. I hope its large, but ya just never know.

Likes
12
Share


@eldruida_lamota
Follow
Buenas noches familia, sorpresa, jueves noche por aquí , actualizamos las power plant xL.
Es la última semana antes de nuestra cosecha, el tiempo se nos echó encima y las Flores ya están echas, se preparó un lavado de raíces y tijeretazo,para sucesivamente colgarlas.( PRIMERA VEZ que se me echa el tiempo encima con la floración, jurao)
Me habría gustado darles algo de estrés hídrico, pero lo veremos con las lemon kush y las northern light xL.
-power plant xL es una cepa con predominancia sativa, con una corta floración,es un ejemplar fácil de cultivar, fuerte, y vigoroso.
Estos ejemplares se cultivaron en 7L en sustrato light MIX de plagrOn, controlando en todo momento el PH de nuestras plantas, y dándoles de comer una gama advanced nutrients bastante básica.
-PROS: facil cultivar, flores llenas de resina , flores compactas, ramas laterales largas.
-CONTRAS: hay que tutorar por el peso de la flor, floración demasiado rápida a mi gusto (no te das ni cuenta).
*Aquí ya me despido hasta la cosecha familia.

Likes
82
Share


@UnorthadoxDude
Follow
Hello growmies!
Welcome to week seven of An Epsilon Adventure! Massive thanks to both Shogun and Royal Queen Seeds for sponsoring this grow!
I have just completed the final defoliation for the three least advanced (and largest) girls. I have also rearranged the tent again to try to maximize the space available and light usage.
I have not fertigated for 5 days after the last fertigation was a flush without coco base. I am struggling with humidity at the moment so I have been trying to let the plants go more dry than usual.
Daily Updates
###
Week 7 Day 2 02:30 7/8
Heavily defoliated plants 1, 5 & 6 and removed some of the lower branches. Rearranged tent then photographed & measured:
Plant 1 is now almost unbelievably 2nd tallest at "only" 141cm in height! Her stretch has just about ended.
Plant 2 has stopped stretching at 111cm and is 2nd most advanced into flower.
Plant 3 has stopped stretching at 95cm and is most advanced into flower.
Plant 4 has stopped stretching at 100cm and is 3rd most advanced into flower.
Plant 5 has gained 6cm this week and may add few more but she is pretty close to done stretching at 119cm.
Plant 6 has gained 22cm this week and isn't quite finished. She is now the tallest plant in the series at 142cm.
###
Week 7 Day 2 07:00 7/8
Fertigated 1.6l each
###
Week 7 Day 4 02:00 9/8
Fertigated 1.6l each reduced coco a/b to 2m/l each.
Spent a bit more time photographing and videoing to try and capture the changes and the developmental differences. These 140cm+ plants are going to STACK. I am bracing myself for a lot of trimming and a monster harvest. 🙏
The current order of maturity and likely order of harvest is 3 2 4 1 5 6. I think the first and last plants will be at least a week apart in harvest, perhaps 2 or 3.
###
Week 7 Day 6 23:00 11/8
Fertigated 1.6l each
The smell in the tent is there now, really not that strong but there are 6 plants motoring through flower here now so it's not insignificant either.
Plant 3 is absolutely stacking now, she's more or less run out of space around her cola and is now growing some foxtail like structures, exciting!
Plant 6 the least mature is 2-3 weeks behind plant 3, but her stretch has finally stopped at 144cm.
Took wide angle in tent photos today.
All of the girls are drinking a lot now, but especially plant 1 who is really thirsty.
---
Thanks for reading growmies! 👊
==========
Tent: 120cm x 120cm x 180cm
Light: 600w HID Elite Dual Spectrum HPS + Angel Wing Reflector
Air: 5" duct fan system with carbon filter ~300 m3/hour + RAM 9" floor fan + 4" intake fan
Pots: Air Pruner Fabric Pots 30l - UGro XL Coco + horticultural grade perlite (~20%)
Seeds supplied by Royal Queen Seeds https://www.royalqueenseeds.com
Nutrients supplied by Shogun Fertilisers https://www.shogunfertilisers.com/en
==========


Likes
66
Share


@JieGrow
Follow
Girls are growing and growing , gave them another trim as they seem to bounce back 10x harder and bushier lol! Starting to think there may be one to many girls in there so hoping everything stays on track or I'm going to need to upgrade their house! Still unsure on doing a sog or using it as a spacer , sorry about the double photos on both diaries , one of the granddaddy purple plants somehow ended up at the back of the tent when one of the super skunk started tailing off and we had to rearrange their place in the tent , not much to report flowers are coming through nicely 😁
Happy growing 😎
Likes
Comments
Share

@Antarctic
Follow
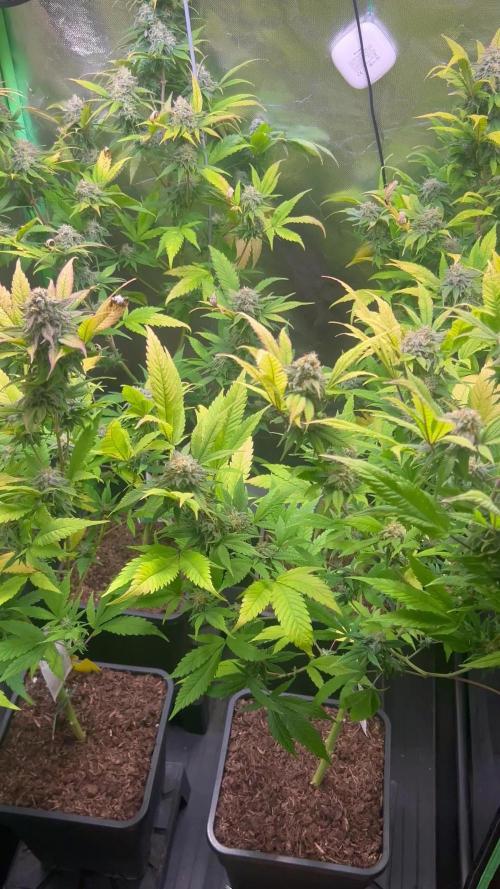
Week 7 update (start of flowering):
The autos have officially entered early flower – pistils are popping everywhere, and the stretch is slowing down. The canopy is already pretty filled, so I’m focusing now on feeding for bloom.
Nutrients this week:
• Terra Aquatica Grow A + Grow B → lowered slightly as plants shift into flower (~650–750 ppm).
• PK booster added for the first time to support early bud development.
• CalMag still at 1 ml/L to keep leaves healthy and prevent deficiencies.
• Silic Rock 1 ml/L for stronger stems.
• Microbes (Great White + Trikologic) to keep roots active.
Training:
• Final round of LST to open budsites before flowers set fully.
• Light defoliation on big fan leaves shading potential bud areas.
• No more heavy stress training – from now on just guiding.
Observations:
• Runtz is clearly leading with stronger bud formation, pistils are already stacking.
• Amnesia autos are slightly slower but catching up.
• Mike Tyson is still behind (due to earlier overfeeding) but slowly recovering.
• Plants are smelling more day by day – fruity and sweet terps are starting to come out.
Plan:
• Keep PK booster in rotation.
• Watch EC/PPM carefully (don’t push too hard – better to underfeed than burn at this stage).
• Prepare for rapid bud growth in weeks 8–9.
Likes
9
Share

@eldruida_lamota
Follow
Vamos familia vamos actualizar la segunda semana de floración de estas Kritical.
Es una variedad sencilla amarillean un poco por una carencia de magnesio que solventare con los productos de Agrobeta ya veréis cómo recuperan.
En las fotos podréis comprobar que 3 de 6 sufren bastante la carencia de magnesio.
Agrobeta:
https://www.agrobeta.com/agrobetatiendaonline/36-abonos-canamo
Mars hydro:
Code discount: EL420
https://www.mars-hydro.com/
Las maximas de temperatura no superan los 26 grados y las mínimas no bajan 20, así que no me puedo quejar.
Los niveles de humedad también son los correctos van entre 50%/65% de humedad relativa.
Por supuesto el Ph lo estamos dejando alrededor de 6.
Hasta aquí es todo, buenos humos 💨💨💨

Processing
Likes
18
Share


@DjDaveAtHome
Follow
Heavy defoliation the day before the photos were taken. Will leave alone now to stack and mature for a month. Feed regularly.
*(If anyone has seen the little blue heater that I use in the room in one of the photos or videos, I noticed a tiny LED on the side. Since it was daylight when I tested the heater and it's so small, hadn't noticed that it turns on when the heater is activated. It is red and I think that it's intermittent off/on/off during flowering was having an effect on the plants on the right side where the light is. Put duct tape over the light and hopefully, that's that, although if the element inside glows red and lights up the room, I may have to deal with it).


Likes
2
Share


@BigGGrows
Follow
she is pushing through the initial HST fimming very well. Nothing seems to slow her down. I am starting 1/4 strength nutes now to help her push through the stress. I also initiated some LST and tied her up, pulling down the branching. The fim job has produced a tripple top crown cola, top new side tops, and 2 new internodal branches, that will be tops down the line. Things are getting interesting folks! Stay tuned!

Likes
10
Share


@Minuteman_Organics
Follow
Beginning of week 2!
Going great! The plant are bouncing back after transplant
Mid week update! Day 10.5. the roots are definitely finding all that new soil now. Been watering with tap water. I should probably be pHing this water. Gonna start using fish emulsion and fpj to lower my solution pH cause I know out of the tap municipality is 9+pH so we gotta do something to prevent lockouts in such a small volume of soil.
Numbers next week! Based on biomass


Likes
43
Share


@GODSGIFT_2005_JM
Follow
🍼Greenhouse Feeding BioGrow & Bio Enhancer
⛺️MARSHYDRO
The ⛺️ has a small door 🚪 on the sides which is useful for mid section groom room work. 🤩
☀️ MARSHYDRO FC 3000 LED 300W
☀️Also special thanks to VIPERSPECTRA P2000 (200W) & XS2000(240w) LED growlights
🌱 FastBuds 420


Processing
Likes
14
Share

