
Likes
Comments
Share


@Hippity
Follow
Refilled the Botaniums today, 7 days after the previous fill, as I saw they were completely empty. One of the plants is starting to show a tiny bit of weird coloring on some leaves and the texture of the leaves is also a bit strange. The other plant looks completely healthy.


Likes
9
Share


@Limp_D_McGuillicutty
Follow
I'm gonna pull it soon with my other plants. Was stoked how this performed after a slow start. A good learning process. I'll plant the rest next year. Smells good 👍

Likes
3
Share


@Strangelet
Follow
Day 92 Last day. Ready to harvest. Smells nice, will update after drying.

Likes
16
Share


@KushSlayer
Follow
Everything is ready to smoke. I got 40grams from imperium x. Overall i got 230-240. Imperium x is good and strong, smell is too strong. I wish that nugs had been more dense but nothing else to say :))


Processing
Likes
10
Share


@CanadianFillmore
Follow
Start of flowering week 1. This girl is already bigger then her round 1 sister and she's starting to stretch after just a few days of 12/12 light. The only nutrient difference this grow, will be the addition of sensizym, hopefully she helps pack on a few more grams per plant.

Likes
38
Share


@GMSgrows
Follow
The AK2.0 is rockin. She is flowering the strongest. She is near the light, because she is so tall., but it doesn't seem to affect her at all. Very good strain to grow no issues at all, just having some fun watching her bulk up quickly.


Likes
104
Share


@Hou_Stone
Follow
Photos taken on day 60 / Flowering 28
✂️I'm doing another defoliation this week, maybe the last.🤔
I cut off some lower leaves and those that obstruct the buds of the other branches✂️
Lots of bud sites with lots of pistils. 🙏🌲🙏
Really happy with the growth of my plant so far. Can’t wait to see the final buds! 😇
------------------------------------------------------------
💧Watering
On average I water each pot with:
Day 58 : 1 Liter
Day 62 : 1 Liter with 0.3 Gram of BoosterPK+
I alternate watering, one with booster in my water and the next without.
I add Bioenhancer once every 14 days +/-.
I add very few nutrients to my water because I have already placed Bio Nutrients directly in my soil 😉 (BioGrow & BioBloom added on week 1 & 5)
------------------------------------------------------------
🔥❄️Temperature of the week :
Day : 21-24°C (Humidity : 55-70%)
Night : 16-19°C
------------------------------------------------------------
🚀Equipment of the week ⭐️ :
Lamp Led 300W : power 95% at 40cm
Extractor+ carbon filter ON 24/24h
2 fans ON 12/24h
------------------------------------------------------------
📜Links :
🌱Zamnesia Gelato seeds :
https://www.zamnesia.fr/5671-zamnesia-seeds-gelato-feminisee.html
Food for your plants 🔥🔥👍
https://www.greenhousefeeding.com/
👨🚀My Instagram 🌱❤️️:
https://www.instagram.com/hou_stone420/
------------------------------------------------------------
☮️Thanks for your visit💚☮️

Likes
8
Share


@Hiroots420
Follow
Comienza un nuevo cultivo hidropónico de la mano de unas Glueberry de Dutch Passion en un sistema re-circulante de 3 contenedores de 20L mas 20L de cisterna.

Likes
3
Share

@kickthebass
Follow
Week 4 – Veg State:
Manual watering with RO water, compost tea, molasses, and liquid seaweed with topical application of Mycorrhizal fungi spores 1x per week. FIM'ed both plants on Friday to increase bud sites.
Likes
8
Share


@Kushflavouredsativa
Follow
She took of this week I’ve noticed today 2/3 pistols so she has got to stretch yet as well, il start first week of flower next week :)

Likes
12
Share


@StoneyMelony
Follow
Overview of my grow:
Tent: Secret Jardin DS120 4 x 4 (120 cm by 120 cm)
Lights: 2 x 120 Watt CTlite c4 clusterled
Climat: Trotec Dehumidifyer 240 watt- 10L/24h
Filter: Prima Klima carbon filter PK2600
fan: 2 x Secret Jardin 20watt osc. fan
Pots: Gronest 4 x 11 liter airpots
Water : automated water system
PH: bluelab
Nutrients: Plagron cocos A + B
Plagron PK 13/14
ATA cal/mag
Epsom salt
no rights to music in the videos
Week 9. I did read it, but somehow i didn't expect her to be this fast, so instead of boosting her a final time, i decided to start to flush allready. Today is day 63 i think this is insain how fast this big sativa looking buds where developed. I'm going to harvest her next week ,She is smelling freaking delicious, the diesel smell is still there but now with some sweet smell and also the lemon as well. I hope she is as tasty as all the smells coming from this wunderfull plant. The buds are a bid foxtailing, like a sativa she is building flower on flower. Thanks for checking 😋

Likes
13
Share

@GERGrowDesigns
Follow
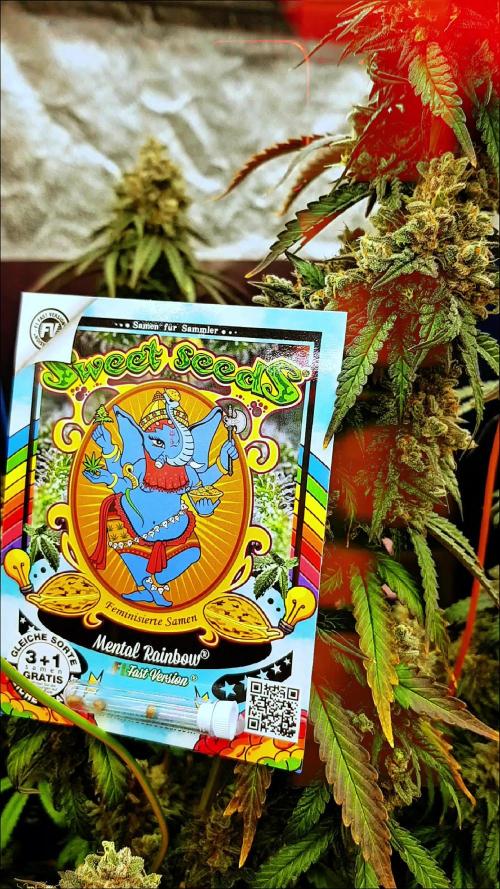
Welcome to Flower week 10 and harvest of Sweet Seeds Mental Rainbow F1
Harvested Bud Media / Details will be added in After Dry Stage .
For this Project , I’ve chosen the Feminized Photo strain Mental Rainbow F1 :
Here’s what I’m working with:
• 🌱 Tent: 120x60x80
• 🧑🌾 Breeder Company: Sweet Seeds
• 💧 Humidity Range: 40
• ⏳ Flowering Time: 7-8weeks
• Strain Info: 22-30%THC
• 🌡️ Temperature: 26
• 🍵 Pot Size: 16
• Nutrient Brand: Narcos
• ⚡ Lights : 600W x 2
A huge thank you to Sweet Seeds for allowing me to try my Best with this amazing collection from Photo Strains they managed to Sponsore . Big thanks for supporting the grower community worldwide! Your genetics and passion speak for themselves!
Let’s grow together – and don’t forget to stop by again to see the latest updates!
Happy growing!
Stay lifted and stay curious!
Likes
3
Share


@sunnykuyall
Follow
08 - 14 May 2023 - Germination Week
15 - 21 May 2023 - Veg week 1
22 - 28 May 2023 - Veg week 2
29 - 04 June 2023 - Veg week 3
05 - 11 June 2023 - Veg week 4
12 - 18 June 2023 - Veg week 5 - Final Veg
19 - 25 june 2023 - Flowering week 1
26 - 2 july 2023 - Flowering week 2
Likes
2
Share


@Mytrichomedgarden
Follow
Estoy en la ultima semana todo salio genial vamos por ese secado y curado
Processing
Likes
3
Share


@Ogbangbang2981
Follow
week 9 was a good week I watch my pollen sacks grow into beautiful pods cant wait to use it plant doing pretty good health and strong

Likes
46
Share


@GanjaReaper
Follow
Day 10:
They have been growing nicely. Beautifull green leafs, no deficiencies or stress.
I did some Defoliation and I'm planning to top some plants but not all of them since they make nice main colas as well.
Also nice roots so far, will let those grow for another 1-3 days before repotting them into 7L pots.
While doing that I will add some new clay for beneeth the pots to have a good run-off. I will add some mycorizza as well to improve the roots and
I will water them again with lots of Regulator(anti-stress) and Rhyzotonic( root stimilator).
Some days after that, they are ready to get pushed into flowering. Sativas like to grow twice and sometimes even more in size.
So the size which they are at the end of this week will be enough.
So at the end of this week you will see them being in 7L pots and in a bigger grow space under lots of lamps.
There are like 3-5 plants not growing nicely. Might have to kill them. I'm not going to waste time,energy,nutrients on those if they don't grow in size in a couple of days.
So might end up with just 235 plants.
Il update again at the end of this week.
Day 14:
I almost finished the rest of the grow room. I still need to adjust and replace the lamps some more and other things.
Did many defoliation below the plants. Thoose branches are never going to preduce nice and thick buds anyways. Such a waste of energy and nutrients.
Because of the removing of branches and leafs, They get a better airflow and better exposure of light as well.
So for now they look a little bit ugly haha and not so bushy anymore, but they will grow into fine looking ladies.
I kept 5 or 7 branches each plant and some bigger plants I even topped because I don't want them to stretch alot.
Another reason is that I want bigger stems. If other plants that didnt get topped, not improving stems I can still top them until the end of week 1 of flowering.
I'm putting them into flowering, by putting the lightschedule to 12hours of light and darkness. It will take a few days before they start preflowering.
The first buds will be seen in like 10-14 days.
Untill next week!

Likes
12
Share


@brosef_b_baggin
Follow
Week 3: Roots started getting bigger so I moved the plant to a bigger pot. Watered too frequently so algae began forming on the topsoil surface, note the black cover. Started LST early.


