The Grow Awards 2026 🏆 


Processing
Likes
Comments
Share
@Smokwiri
Follow
Welcome to my Royal Gorilla Diary
This grow will join the RQS outdor grow contest at later time, I hope i get lucky and bugs won't eat it.
After receiving contest box, i asked about germinating indoors, after confirmation i popped a seed in the soil.
Germinated in pot indoors (gift pack was massive! see pics), after germination i put outdoor but i kinda forgot her.
This one is growing together with a small tobacco plant to keep some unwanted insects away, i want to add some dill and coriander soon.
So our royal gorilla is in her second week already, and she looks pretty healthy. Soil is reused soil with new fertilizers added to the soil.
I'using a mixture of dried cow poop pellets and chicken poop pellets to give the soil some renewed power.
Most of this is in the top layer of the soil (watering from above) so nutrients can be spread extra during watering.
This should be enough for the first 6-7 weeks, so when the buds start to take shape we can start with adding some mineral nutrients in addition to the organic feeding.


Likes
124
Share
@CBD_Sweden
Follow
2018-04-03. Week 22, day 3.
Remo Nr 1 is doing fantastic and she is a big and massive beauty.
The flowers/buds is growing bigger and bigger and smells strong of summer and earth.
I think she will yield a lot by the look of her right now.
Nr1 have grown 3 cm in height last week.
Nr 2 is still recovering and she is getting better but still dont look that good, but the flowers grows and you can start smelling her more and more.
I have faith in this girl and that she will produce some nice medicine.
Strain information.
Remo Chemo cannabis seeds by Dinafem Seeds belong to a feminised Indica-dominant marijuana plant born from a collaboration with the legendary Canadian cannabis grower Urban Remo, a real high-flyer within the international cannabis field. Remo Chemo, created by Urban Remo after crossing a UBC Chemo with a regular Bubba Kush male, is the genetics selected for developing this project. The results obtained when testing a cutting of such magnificent cross were so amazing that we backcrossed her to ensure the genetics was not diluted but remained pure and intact.
With this creation, we’ve managed to make Urban Remo’s favourite cannabis strain accessible to all: a potent and stable strain, with major therapeutic properties and high THC content.
One of the strains within this marijuana seed's genetic structure, UBC Chemo, is a really potent strain that, according to legend, was developed by some researchers from the University of British Columbia with the objective of alleviating the side effects of chemotherapy in cancer patients. Her extremely high THC levels not only make her a must for cannabis gourmets with a liking for mind-blowing genetics but they also confer a myriad of therapeutic properties on her. In fact, her effectiveness in relieving the back pain he is in contributes to her being Urban Remo’s favourite marijuana strain.
His YouTube channel has lots of subscribers and his strain reviews have become indispensable for most marijuana users. At Dinafem, we had long been itching to work with him. Therefore, we didn’t hesitate when the opportunity came up. When travelling to Europe, this world-renowned cannabis activist was surprised by the lack of Canadian cannabis genetics at international fairs. That’s why we decided to join forces with Remo and create a Canadian feminised strain that bears his name.
Morphology
Remo Chemo is a dense and sturdy Indica-dominant plant that must be evenly pruned, low branches included. At the end of the flowering, her dark-green leaves tend to acquire purplish hues which are sometimes so dark as to seem almost black. A real sight to behold.
Yielding capacity
Without her being particularly heavy-yielding, Remo Chemo’s crops are really potent, which balances the final outcome. Her buds are round, uniform and compact, noted for their remarkable density and amazing resin count. On top of that, the THC levels are high, easily exceeding the 20 %.
Cultivation
Remo Chemo thrives when grown in dry environments and provided with intense light. Thanks to the legacy of Bubba Kush, the lack of water is not a problem for her. However, if we want to boost her yielding properties, she’d better be well hydrated. As for the right amount of nutrients, we must ensure our plants are not overfed since this could be detrimental to the flavour’s intensity.
Aromas and flavours
The predominant scent is that of a classic Kush, i.e., strong and intense, lingering long in the palate and bringing to mind the typical classic Californian flavours. If we’re to be more precise, she also delivers hints of earth, petrol and black pepper. Her taste and aroma are simply delicious, almost instantly captivating those who smell her.
Results
Remo Chemo delivers a potent effect that, thanks to her high THC levels, helps alleviate the side effects of cancer treatment (vomiting and nausea), boosts the appetite and reduces pain. But Remo Chemo can be used for recreational purposes as well, with a really intense physical high. No doubt her effect being so amazingly psychoactive will delight THC-lovers.
1st prize −Indica category− at the 2017 Expogrow Cup.
1st prize −Indica category− at the 2017 Karma Cup (Canada).
Suitable for Indoors and outdoors
Sex Feminized
Genotype 35% Sativa/ 65% Indica
Cross Remo Chemo x Remo Chemo
Indoor flowering period 65-70 days
Outdoor harvest time Mid-October
Indoor yield 500 g/m2
Outdoor yield 1000 g/plant
Outdoor height Up to 250 cm
THC 24%
CBD 0.1%
-------------------------------------------------------------------------------------------------------------------------------------------
https://www.youtube.com/watch?v=Xc0tAt2nd3M
https://www.youtube.com/watch?v=Nrsq8_gK_Oo
https://www.youtube.com/watch?v=jmv8i106lZc
https://www.youtube.com/watch?v=IUiUIR_Wxqo
--------------------------------------------------------------------------------------

Likes
2
Share
@Edibleplant
Follow
5 X Caramelo EV in 40 gallon fabric pot
3 X Sugar Black Rose EV in 50 gallon fabric pot
2 X Eleven Roses EV in 100 gallon fabric pot

Processing
Likes
12
Share
@rhodes68
Follow
9/14 Week 9 and she is doing fine
Little vid she is front rt
Nuets not changing for now
9/16
Doing well but some white tips are saying we gotta reduce the salts so will be dropping CT nuets 10% and upping PK to 2.5
Extra space is really doing them well
Defoliation again tonight the war on stemmed leaves has begun
9/17
Held a meeting of the minds and decided the best course of action is to flip the light schedule so I can feed them more appropriately, twice a day.
Leaving nuets as they are as this will drop pot EC. Setting the alarm for the AM before lights out at 7:30 and changing the sched to 6AM-6PM summer is done no need for current schedule. Lights be out from 7:30AM to 6AM long I know but should not bother them.
9/19
Lights on girls feed buds look fine
Video enjoy

Likes
21
Share
@Smokey89
Follow
Week 2 and the clones are starting to veg nicely. Got some nice roots starting to develop in the nutrient solution so hopefully over the ne t week or so I should see some nice growth. Couple of the older fan leaves that came with the clone were starting to do more damage than good so decided to strip some and I'll do the others over the next few days
Day 10
Uploaded some more pictures of the root system these babies are developing quickly. Next feed/water change is due tomorrow so I'll up the white shark powder to help aid the root growth and I'll also increase the fulvic acid to 2mm per litre of water
Day 11
Added some shogun sumo boost at 1ml per litre and increased the cal mag 3ml per litre and increased the great white rooting powder to one and a half spoonfuls. Ok so now the plants they are looking nice and green the newer leaves have a really healthy smell of chlorophyll the older leaves that came with the clones look a bit worse for ware but are still doing more good than bad so they will stay for now. So I tried some kushman chiropractic techniques to increase strength and nutrient transfer. The first one my stomach was doing flips I was so nervous I thought I might snap the stem completely but all was good the plants dropped a little but have started to recover after only half hour in the tent. I will repeat this process once a week on the new growth
Day 13
Started to use sumo boost foliar spray at 1ml diluted with 1 litre of ph 6.5 water. Cut off some more of the damaged leaves and they are all looking back to good health after the kushman chiropractic treatment
Day 15
Got myself a ppm meter and checked my reservoir as I haven't used one during the grow I was expecting to be around the 450ppm mark but to my surprise it was at a lovely 380ppm. Solution temp is now constant at 22.2c humidity fluctuates between 55%rh and 73%rh
Day 18
so I've added two carbon dioxide bags to the grow room to give these ladies a little extra boost. Nutrients and temps have all stayed the same. Now the plants they are all growing well some better than others but that was to be expected considering I'm using clones that where half dead when I got them. So I stopped the plants and did a little defoliation
Day 20
New spider farmer ts2000 has arrived and what a piece of kit it is currently got it set to 60% will be keeping an eye on them to make sure this is not to intense for my girls. Viper 300 carbon filter kit installed and I'm very happy with the filter and the fan supplied got my intake fan set to about 20% to give a good airflow through the tent all in all very happy with my upgrades. Now the girls as you can see they are getting bigger and have bounced back after the second chiropractic treatment and the topping I did to them. I've moved my two 1000w led lights over to one side of the tent to give the coco experiment a bit more light. Not sure if I mentioned this but my tent I's 8ftx5ftx6ft. Please feel free to give me any feedback. Happy growing guys

Likes
6
Share
@Headies
Follow
this is weeks 5 and 6.I topped them and trained the branches out to the side. Plus I broke one... I tried to save it but it broke again later
Likes
16
Share
@HowtoBubatz
Follow
Today marks the 7th week of flowering for my cannabis plant, and it's truly fascinating to observe the changes that are taking place.
The stretching phase has officially come to an end, and now the plant is fully focused on developing its buds.
I can see that the buds are starting to swell and gain size, which is a promising sign of a healthy flowering process.
I've adjusted the feeding schedule with BioBizz products to match the plant's current needs.
Overall, the plant looks healthy and vigorous. The pistils are turning a beautiful shade, and the resin production is beginning to increase.
I’m excited to see how the buds will continue to develop over the next few weeks. I’ll keep monitoring closely and make sure everything stays on track.
Be excited for the coming weeks 💚🌱🌱

Likes
22
Share
@Fresco
Follow
Hi. Unfortunately, I can't write much, I even left last week without comment, although the plants got stressed on it in the form of a lack of water. I increased the amount of watering. This week, the bushes have already become noticeably cramped, I cannot transfer them to flowering for technical reasons, besides, the clone has not grown enough yet. I very much hope that the bushes will not get another stress from the crowding and I will soon be able to change mode to 12/12

Likes
24
Share
@myrceneCB1
Follow
WEEK 11 - 17/4/2021 - 23/4/2021
17/4/2021 - 20 gal water mixed with the following:
Liquid silicon - 1ml/L - 76ml
Cal Mag - 3ml/Gal - 60ml
Micro - 2.5ml/Gal - 50ml
Gro - 2.5ml/Gal - 50ml
Bloom - 2.5ml/Gal - 50ml
Fulvic acid - 2.5ml/gal - 50ml
Hydroguard - 2ml/gal - 40ml
Nitrozyme - 0.5ml/L - 40ml
pH - 6.28
EC - 1.12 mS/cm
T - 25
18/4/2021 - Plant 1 Moby Dick is the tallest and I have been consistently supercropping it to maintain even canopy with the other 3 plants. When the other 3 pkants have caught up with the growth, the suppercropped branch is straitened back and a soft twist tie.
21/4/2021 - I'll be away for few days. So I decided to go back Autopot for the few days I wont be around. I think it should be fine. Once I'm back, I'll go back to top feed and fertigate enough to have significant run off to wash off all the salt build up. 10 gallon of water mixed with the following -
Cal Mag - 3ml/Gal - 30ml
Micro - 2.5ml/Gal - 25ml
Gro - 2.5ml/Gal - 25ml
Bloom - 3ml/Gal - 30ml
pH - 6.28
EC - 1.12 mS/cm
T - 25
22/4/2021 - the Autopot idea didn't work out. The new tubing I got was 1mm bigger than its supposed to be. And thus caused leakage at all the connections. Well back to top watering then. But the plants won't be watered for two nights. I really hope they'll be able to hold on till I come back.


Likes
Comments
Share
@Nickeluring
Follow
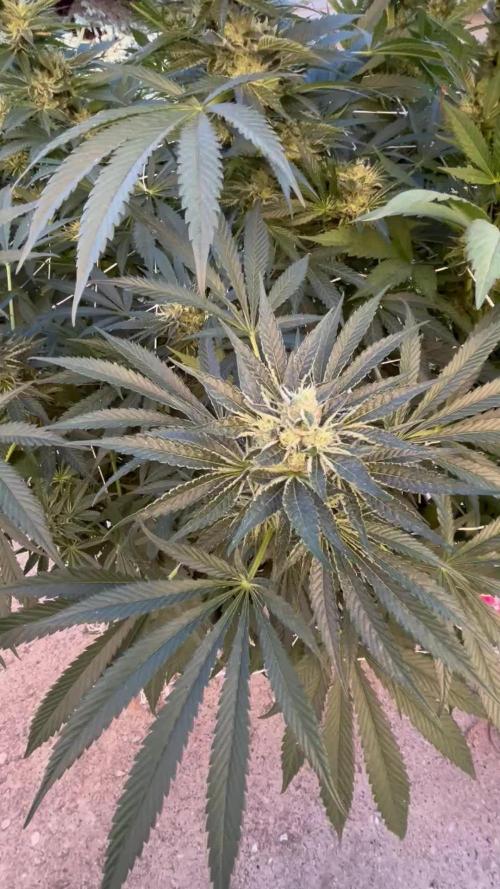
It is so very hot now every day here. All my girls are suffering from the heat and they need to be watered very frequently. I avoid drying them out completely.
She is developing nice long colas that start to smell really good.

Likes
216
Share
@CRiSPrGrow
Follow
Week 13 :
This wraps up the last week of flush for the biotabs, they got 2.5 ml/L of humic acid each feed 3x 4 pints this week. These have a real funky smell to them, cant really put my finger on it, kinda plant musty, really strong smell, maybe skunky or something, main thing is they're getting the chop soon ! Clipped a fair few leaves but the idea is a dry trim and hanging the plants whole for 10-12 days of slow drying before the cure. Man i cant wait to wrap this grow up ! These kinda grew crowded, i can tell because the biotabs and mrB's have a few branches that are anemic, small, useless, so they're all gonna go into the bubble hash, let's see if i can extract anything from these beauties ! wish me luck 🚀
Likes
24
Share
@MadeInGermany
Follow
Hi everyone 🤗.
Welcome to a new diary.
Cuttings were cut and rooted last week 🙂.
Today they were placed in 11 pots in Canna Coco Proffesional +.
Green Buzz Liquids is used for the fertilizer 😀👍.
Made in Germany 🤗.
I looked at the compositions of the individual elements and I am very impressed and excited about him 😎.
Greetings go out to Green Buzz Liqudis, and a big thank you for the support 🙏🏻👍.
Which training methods I will use will be decided spontaneously each day 😃.
I wish you a lot of fun with the diary, stay healthy l and let it grow 🌱.
You can buy this Strain at
https://www.amsterdamgenetics.com/product/kosher-tangie-kush/
You can buy this Nutrients at
https://greenbuzzliquids.com/
Type:
Kosher Tangie Kush
☝️🏼
Genetics:
Kosher Kush
X
Tangie
👍
Vega lamp:
2 x Todogrow Led
Quantum Board 100 W
💡
Bloom Lamp :
2 x Todogrow Led
Cxb 3590 COB 3500 K 205W
💡💡☝️🏼
Soil :
Canna Coco Professional +
☝️🏼
Fertilizer:
Green Buzz Liquids :
Organic Grow Liquid
Organic Bloom Liquid
Organic more PK
More Roots
Fast Buds
Humic Acid Plus
Growzyme Big Fruits
Clean Fruits
Cal / Mag
Organic Ph - Pulver
☝️🏼🌱
Water:
Osmosis water mixed with normal water (24 hours stale that the chlorine evaporates) to 0.2 - 0.4 EC. Add Cal / Mag 2 ml per l water every 2 waterings . Ph with Organic Ph - Pulver to 5.8 .

Likes
16
Share
@Northern_Ent
Follow
Sep 13: nearing the finish line. Doing a chemical flush this year cuz my buds lasy year often didn’t burn very well due to too much P. Using Final Flush from Grotek which uses citric acid as a chelating agent. Other flushes like Flawless Finish use EDTA which I’d rather avoid.
Sep 15: removed fan leaves that were shading buds.


Likes
184
Share
@Still_Smoq
Follow
#seedsman420growoff and #SeedsmanSeeds
📆 Week 14, 27 July - 2 August 2024
27 July - 1 August - Observed and let the plant grow.
2 August - Turned light power down to 65%.
📑 Pineapple OG continues to swell and pack on resins! I’ve turned the light power down from 75% to 65% to help in maturing the plant. This brings the canopy’s DLI to about 40.
The trichomes were checked this week (see pictures). Mostly milky in appearance, with few clear and amber. A good sign she is well into the finishing phase. Just a couple more weeks to go!
🍶 27 July, 1 Aug nutrient solution changed
🍽️ 27 July, 1 Aug feeding schedule updated
💧 Using reverse osmosis water with EC/TDS at 0
🐉 Nutrient Solution EC 1.8 at 74 degree F
🔆 Light power at 65%, DLI 40 canopy coverage at 12hrs
😤 Using General Hydroponics, HGC728040, Dual Diaphragm Air Pump, 320 GPH
That is it for this week. Thanks for the look, read and stopping by.

Likes
8
Share
@IndigoMist8
Follow
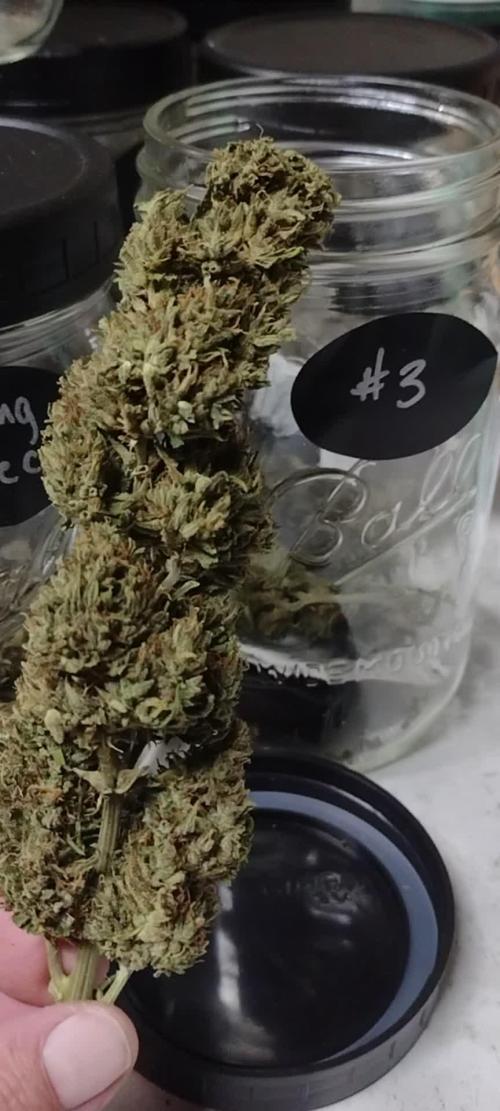
Overall happy with her yield considering how small she was. Curious to see how it smokes.

Likes
8
Share
@Appoldro420
Follow
03/01 Wow, I’m honestly blown away by how this grow is progressing! In the last 24 hours alone, they’ve guzzled an incredible 45 liters of water. 😲 I mean, seriously, that’s insane! The stretch is probably just about wrapping up, so I’m keeping busy tying them down for now. Once the stretch is over, I’ll be going in for some selective pruning—there are just so many new shoots popping up. I’ve got to say, I’ve never seen growth like this before.
It’s exhausting, though, and I’ve already run out of zip ties again! 😂 So, tomorrow’s mission: stock up on more.
I’ve noticed a few slightly discolored leaf tips here and there, but it’s really minimal. That’s exactly what I’m aiming for—pushing them right to the edge without overfeeding. 🎯 Also, I just realized it’s been over a week since I added any CO2. Maybe that’s why I’m seeing these tiny signs? 🤔 Something to experiment with moving forward.
Honestly, I’m so curious to see where this grow takes me—there’s so much potential in these plants! Stay tuned, folks. 🌿💪
06/01: Last night, I started defoliating, and I really went at it with a ruthless approach. I didn’t worry about branches snapping while scrogging—my philosophy is simple: the strongest will survive, and the weakest will wither away. Survival of the fittest in action!
I also noticed that one plant seems to be either too wet or too dry. I’ll need to keep an eye on this one because there’s quite a bit of dying foliage at the bottom. My gut tells me it’s slightly overwatered, although that shouldn’t really be an issue with coco. Still, better safe than sorry! 🌱💪