The Grow Awards 2026 🏆 


Likes
Comments
Share
@Northern_Ent
Follow
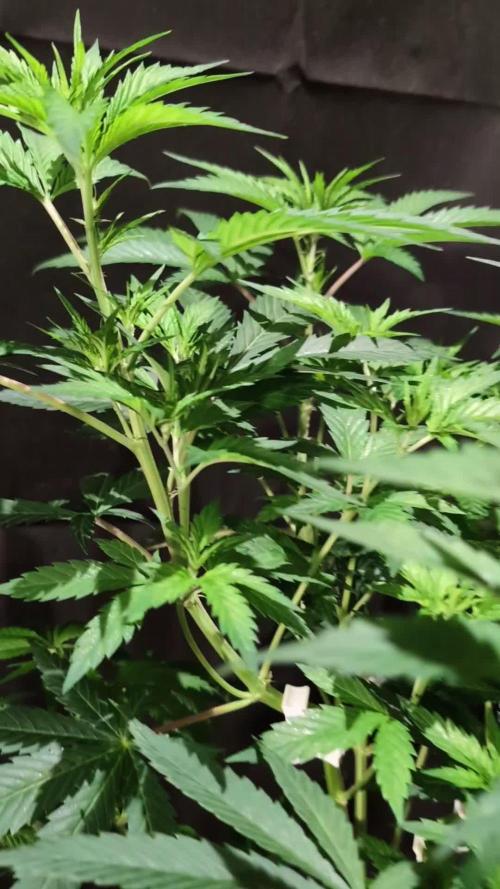
Aug 24: starting the sixth week of flowering and this Blueberry Pie F1 Fast is amazing. The development of the flowers has been very fast and they are nice and big and thickening quickly.
Thanks to Mrs.Larimar and I totally agree that these F1 hybrids are amazing.
Did a watering round with potassium silicate, and likely the last one but we’ll see.
Probably three weeks at most to go, so no more molasses and now mostly just pHed water to the finish line.
Did a final light application of malted barley and Power Bloom and watered in. Removed fan leaves that were growing inward and shading buds.
Aug 25: Flash pics are only okay when using a far red light after. Don’t take flash pics of plants unless you also have a red light. Having said that, I love taking flash pics of my plants.
Aug 26: sunny again but not too hot and had the UV lights going. To spread the UV around I rotate the plant 90 degrees three times. This seems to be okay. This plant is the furthest along in flowering so I’m giving it most of the UV light and the slower ones can wait until they’re closer to harvest.
Aug 27: she’s doing great. Up to 12 h of rain tonight with the potential for a pretty intense thunder or hail storm in middle of the night. All plants are in the garage tonight to ride it out.
Aug 28: spent last night in the garage to stay out of the all night rain that was forecast. Turned out to just be light rain. Overcast all day and no UV light today.
Aug 29: this plant is amazing, but I’ve said that before. The other day I noticed that some branches on the side are heavy enough that they are now slumping against the SCROG net. Fun to see that.
The flowers are noticeably bigger each day and she still looks very happy. She is also becoming quite top heavy but the water bottle weights and five gallon pails of water hold it stable in the winds.

Likes
6
Share
@qbi07
Follow
i started feeding them more water now, i feed them 4L water but i measured runoff at 2000+ ec i dont know if thats important the strawberry lemonade really outgrows all high levels. 2 look very healthy, the one looks like ph lockout i dont know how to fix that, i ll just look further if nothing more happens .. i will defoliate the strawberry lemonade day 14 and the healthy one at day 14 and defoliate the other one at day 21 maybe


Likes
10
Share
@Deniguez
Follow
Siamo quasi giunti al termino di questo ciclo.. queste bestie si sono dimostrate forti, e trasudano terpeni da ogni parte. Son davvero curioso di ció che sarà il prodotto finale!

Likes
14
Share
@Kakui
Follow
11 Noviembre: Primer riego con 2.5EC y 5.9pH, runoff de 2.9EC y 6.2pH, en una semana más ya deberían estar recibiendo 3.0EC y seguir con esa concentración por todo el cultivo. Alturas están entre 15cm y 20cm.
13 Noviembre: Riego 2.5EC y 5.9pH, runoff de 3.3EC y 6.2pH. Hoy se removieron los primeros nodos de cada planta y se les hizo poda apical.
14 Noviembre: Riego 2.5EC y 5.9pH, runoff de 3.3EC y 6.2pH en la mañana. En la tarde se realizó transplante a maceteros definitivos de 5 litros con 4 litros de sustrato aprox. el cual fue pre cargado hasta la capacidad de campo, con 3.0EC y 5.8pH, desde este punto se debe esperar un par de días hasta que el dryback(secado) del sustrato sea de un 35-40%, lo cual vendría siendo el primer P3 del cultivo, una vez se alcance ese porcentaje de secado, se comenzará con los primeros riegos de precisión llamados P1.


Likes
8
Share
@eldruida_lamota
Follow
Vamos familia cosecha de Original de GrowBarato.
La verdad que el secado muy bien 7 días en Malla y a los botes, 40% humedad y 24 grados es la temperatura ambiental que han tenido en el secado.
Por lo demás de miedo os la recomiendo.
Gracias Agrobeta y Mars hydro , sin ellos este proyecto no sería igual 🙏.
Agrobeta:
https://www.agrobeta.com/agrobetatiendaonline/36-abonos-canamo
Mars hydro:
Code discount: EL420
https://www.mars-hydro.com/
Buenos humos.

Processing
Likes
20
Share
@Silverback_Guerilla
Follow
1/14:
This morning, I did a foliar application of big bloom and fulvic acid, then about 5 hours later I watered them with about a half-gallon of rainwater each and added armor si, humic acid, endoboost myco/tricho, liquid molasses, and a bunch of cal-mag. Today, I also I wired up and mounted my new samsung sun board strips (660nm/730nm) and my Solacure FlowerPower UVB fixture.
I'm running the deep red/far red bud boosters a few hours per day right now, but will run them for the entire photoperiod once I start flowering them. I'll run the UVB for 4 * 15-minute sessions a day for the full flowering cycle, and if they don't protest too much I'll increase each session by 5 minutes and evaluate again. Some strains are more forgiving than others and I've got 5 different strains in this space...so really not sure much time I'll get away with exposing them to the deadly rays without damaging them too much...😈
1/15:
I received one of the rapid led/growmau far red initiator pucks today. With the placement of my UVB light, I'm realizing I'll need another far red puck to have even and intense far red coverage, so I'm ordering another with Prime delivery and waiting to start flowering until I receive it.
I sprayed them down really well with ph adjusted rainwater tonight to rinse off nutrient build-up from foliar applications.
1/16:
I'm really excited to try flowering under 14/10. I grew photos indoors on an off for 15 years before I semi-retired. If I added up all the additional flowering time I could have done through the years if LED technology existed, I'd have had an extra truckload of bud to smoke.
I did another application of Axiom Harpin a|b Proteins this evening, right before dark. I'm expecting a big growth burst this week, leading up to the flower stretch. I really need them to trigger under 14/10 within 4 or 5 days🙏
...if not, I'll switch to 13/11 and wait a few more days🙏😟..if still no pistils are poppin, I'll go to 12/12 and chalk it up as bad luck or varietal indifference to Pr and Pfr manipulation.
1/17:
I fed each of them about 3/4 gallon of full strength veg nutes. This will be the last. I'll go with half-strength veg and half-strength bloom for a week, then go with full strength bloom nutrients until I start flushing them in 6-8 weeks.
1/18:
I installed the second far-red flowering initiator today and got all my timers configured for flowering:
=========================================
timer#1 - power strip with qb's and red boosters
10:00am -12:00am
timer#2 - (dual/independent setting)
sideA- 3-way cube with uva bars
10am - 3pm
7pm - 11pm
sideB- flowerpower uvb
1pm - 1:15pm
4pm - 4:15pm
7pm - 7:15pm
11pm - 11:15pm
timer#3 - far red pucks
11:00pm - 12:15am
timer#4 - sub-canopy tube
10am - 1pm
3pm - 6pm
8pm - 11pm
========================================
I also did some testing on the timers and sealed myself into the closet to check for any light leaks. All good.👌
1/19:
Tonight is their first long night. It's ON!👍
1/19:
Looks like the FIM job didn't take on one of them..but she's got perfect symmetry. WIll probably have to just top her again next week...gonna be a tall one I think. Tonight is their first long night. It's ON!👍
1/20:
I watered them today with about a half gallon each. I'm seeing calcium and magnesium deficiences here and there, so added some boomerang and heavy cal-mag-Fe along with liquid molasses, humic acid, and endoboost myco. I also foliar fed with big bloom and fulvic acid.
That's it for week 4-


Likes
13
Share
@Robeeriegenetics
Follow
Plants recovering well …heat is causing some problems in the indica room otherwise all is well …1 more week till flush then 1 more week after that til harvest
Likes
5
Share
@BudsPerMinute
Follow
Zeit zum ernten!
Die Pflanzen stehen jetzt noch 24h im dunklen und werden dann als ganzes aufgehangen.

Likes
8
Share
@GREENPHOENIX6262
Follow
12/30 - Dropped the 3x3 net for spacing - Micro dosing Silica and Green Planet through harvest - Sick plants have bounced back and are flowering accordingly - Update concluded 😎😎😎😎
01/01 - First update on the new year!! (2026) if you are reading this, many blessings and prosperity to you and yours - Closing out in the first 30 days of flower - thus far all running accordingly - dropped the light intensity down to 50 for offset heat index down to 71 degrees, humidity around 50-60%
01/03 - Thus far all is rolling right a;ong - Feedings are increasing from once every three days to once a day between clean water and nute feeds - ran out of Cane Molasses subbed with light brown sugar - Trichomes are setting in nicely - water temps for feeds are between 52 and 65 degrees.


Likes
14
Share
@Jays_Not_Here_Man
Follow
Overall, this plant was a producer! Easy to grow, no surprises and stayed healthy throughout. 11 weeks from seed to harvest. It was squat, but stacked, so airflow and humidity control were key to preventing powdery mildew or bud rot. Took the nutrients like a champ, didn’t show too many demands. I’d like to run this again to see if I can get them taller, to potentially produce more. Otherwise, a very good, potent strain choice for someone who is short on space, and would do well with a sea of green style…Happy Gardening 🇨🇦👊❤️

Likes
25
Share
@NONSENSE
Follow
Hi all!
Today I continue to record my DARK Phoenix lady vegetation stage.
This week the plant has grown a little. I continue to stretch the branches to the sides, thereby freeing up space for air circulation and light penetration.
There are enough fertilizers from the Green House Seeds and the plant looks healthy and strong. I added some root food from GHE and also the Urtica from GHE.
I continue to water every day, since it is COCONUT and it should always be wet - then there will be no salting.
And I keep the PH in the range between 6.3-6.5. I Added slightly more fertilizer to water this week, so the PPM is about 650-700.


Likes
Comments
Share
@GoodTimesOrganics
Follow
Hi liebe Community! 💚
Der zweite Strain von Good Times Genetics. Entwickelt sich wunderprächtig und es sind sehr schöne große und Breitgefächerte Blätter zu erkennen. Ein schönes Wuchsbild verreint mit einer starken Indica Dominanz.
Dieser Genotyp entwickelt sich sehr homogen mit gleichmäßigen Abständen zwischen den Seitentrieben. Es ist allerdings ein starkes Blattwachstum erkennbaren, welches hoffentlich dann bei der Leaf to Bud Ratio nicht so übertrieben aus wuchert.
Wir sind mega gespannt, wie sich die Pflanzen weiter entwickeln.
Am Freitag, den 02.01.26 würde der Lichtzyklus auf 12/12 umgestellt.
Die Wachstumsbedingungen im Growzelt sind weiterhin am Optimum und Stabil:
———————
🌞 Temp: 23°C
🌚 Temp: 20 °C
💨 RH: 58%
VPD: 0,86 kPa
😎PPFD: 330 mqm
———————
Stay Tuned! 💚
Likes
76
Share
@GrowBeforeHoe
Follow
This week was awesome!
Great weather + little support from Royal Queen Seeds!
The sunshine which the plants got this week was amazing. 3 days without any clouds only blue sky and sun... Lovely!
The ladies enjoyed the great weather and showed some really good growth this week! 💚☀️
I let the new seeds which I hot from RQS germinate right now... The majority of them already showing the first root poking out.
I had found also a new side where I'm going to plant some ladies too ... So stay tuned what's coming next week!
Keep Growing everyone! 💚💚🌱
Quick One · Royal Queen Seeds
Northern Light Automatic · Royal Queen Seeds
Royal Haze Automatic · Royal Queen Seeds
Special Kush #1 · Royal Queen Seeds
Purple Queen · Royal Queen Seeds
Royal Jack Automatic · Royal Queen Seeds
Royal Critical Automatic · Royal Queen Seeds
Royal Cheese Automatic · Royal Queen Seeds
Sherbet Queen · Royal Queen Seeds
Amnesia Mac Ganja · Royal Queen Seeds
Likes
18
Share
@BufoAlvarez
Follow
Still nute burn on new growth even though I'm not feeding them at all. I just got a new water filter and thinking about a distiller. Previously was just letting the chlorine evap off by letting the water sit over time. Still havent tested my tap water yet but i assume its bad b/c i can feel that it is hard water for sure. Just rolling with the punches for now. Got my gf to take a decent pic of the most mature plant this week. It is almost ready i believe.
