
Likes
Comments
Share


@Drawer
Follow
Removed some buds that weren't getting any light, I ran into some issues regarding mold and that is most likely due to the fact that the RH % of my tent goes up to 70/80% at night.
I've removed all mold I could see (2 branches) and I am keeping a close eye on them, I've placed a new tower fan and another small adjustable fan in the tent for more airflow, my dehumidifier is coming in 2 weeks (around the time this grow is finished..)


Likes
47
Share


@FreddyGrows
Follow
From this week on i stop with the vitarace.
Further i keep her on the same diet.
I try to keep everything as steady as possible the only thing im changing is the humidity.
From now on im gonna keep it as low as possible around 40%
The freaky plant is the only fuck factor in this growth she stays very small.
I think she got more of a kush phenotype very bushy.
We will see what kinda trick she's gonna pull.

Likes
209
Share


@BioBuds
Follow
Another week has passed and this lady seems to have recovered from last week's sudden problems. I just kept feeding with clear water, I suspect low PH and my solution fixed it.
I also raised the light a little more, this SP 3000 is a true beast of a light, and especially the Kush in the middle couldn't handle it that well. Thank you @MarsHydroLED
I did some final defoliating, only bundled up leaves and leaves covering major bud sites.
This Orange Hill Special is something else though, Im happy to grow this, she is pretty and sophisticated in all, almost majestic. The buds are speckled with orange hairs, the shape of each like a round ball of ice cream.
She was pretty from seedling on and looking back, I would have loved some offspring of this pheno. She is a thrill and no signs of male parts on this one, although it can happen with this strain.
So glad I have some more seeds and cant wait to put a tentful of this. Don't let its low score dissuade you, yes there is a chance she hermies but when she doesn't my my my... Check em out here @DutchPassion_Official
She smells of orange and tangerine with a very strong hazy undertone. This combination promises a great smoke and frankly, I cant wait.
Thanks for reading up on me and thank you for the comments and likes again!
Hug Bud
Likes
4
Share


@theplantdaddy
Follow
Temps and humidity stable at 81-83f and between 72-78%. Ppms up to 700 for both. Dli at 20-22 roughly. 300 ish ppfd for 20 hours.
The gelat.og is super vigorous and looks the healthiest in the bunch, with super thick stems for its age and lush green. 0 issues just chugging along.
The orange sherbet is healthy af too going good going great. Its already smelly, sour and planty.


Likes
3
Share


@Unculti_responsable
Follow
Bueno esta semana ya regamos con guano de murciélago y abonamos con humus de lombriz hice unos riegos solo con agua después de eso y a los días ya arrancamos con el fertilizante de engorde , me gusta como bien esta muy fuerte y sana esperemos que siga así, vamos a ver la semana q viene como venimos

Likes
10
Share


@ScottShelby
Follow
I watered my girl in day 10 with merely 250 ppm and 5.8 pH. Hope it wont cause any nutrient burn !
Update: watering every 1-2 day with 300ppm and 5.8pH.
Likes
20
Share

@Susquihanna
Follow
Frosty Frostbanger isn't growing any taller. I started measuring the cola today for height and width. It is 10 inches tall and I am not really sure how one determines its width. I took a picture and will ask a question to someone who is more experienced than me. I plan on entering this cola in a contest, however, I don't really know what I am going up against. :)😬
I have continued to feed my plant on a regular basis. It has been hot enough here in this area that I water/feed on a daily basis.
We have a few more weeks to go until its harvest time. I am curious to see how big the buds are going to get.
I can definitely see the dense, tight, resin-soaked buds that glitter like fresh snow in a sparkling winter wonderland as per its description of Fast Buds. . Buds also appear to be very compact. And, it is definitely putting of a super strong smell.
That's all for now, Stay tuned for more news next week.
Susquihanna
Likes
12
Share


@StrontiumGrow420
Follow
Sun 16 Oct 2022
Harvest is nearing, looking for amber Trichomes to appear.
Likes
98
Share


@DogDoctorOfficial
Follow
I love growing its a big passion of mine , and the fact that GD exists makes everything so much better, one can interact with others and enjoy and learn from each others. Thank you all growers love and keep them green <3 <3 <3

Processing
Likes
30
Share


@victor_lion
Follow
I think everything is fine with this little girl, except for the insects' marks, she is beautiful and she is showing more dense coloring, because at night the cold is noticeable, you can even look at red or pink hairs, it is beautiful and begins to smell very rich, like a wood varnish
Likes
20
Share


@MeaCulpa
Follow
Hey people.
So far everything looks good.
I highly doubt that any lady here will be as productive as one of my “Runtz”.
But we'll see.
Have a nice week everyone.
Likes
19
Share


@DrLaggis
Follow
🌱 Start: 17.07. 🌱
Hello everyone! This is my very first grow and I'm thrilled to share every step with you! 🎉 I'd appreciate any tips you might have to help me achieve the best results! 😊
Equipment:
I've geared up with an Indoor Grow Kit from MarsHydro along with some BioBizz supplements to ensure my plants get the best care. 🌿
🌼 Seeds:
I opted for Fast Buds seeds after hearing great things about them. They were delivered super fast—just two days! I’m particularly excited to test the Grapefruit strain. 🚀
I've begun soaking the seeds and setting up my space. Eagerly awaiting the transition to the next stage in a day or two! 🌱
📅 Update: 19.07.
My Grapefruit seeds sprouted 1-2 cm within just 1.5 days! 🌱 It’s often recommended that autoflowers be planted directly into their final home, so I'm following that advice.
I'm working on improving the air circulation in my tent to ensure the best environment for growth. 🌬️
I'm currently using 0.2L cups with big holes over the sprouts to maintain higher humidity during their initial two weeks. 💧
🎉 UPDATE 22.07. - THEY ARE ALIVE 🎉
My Grapefruit sprouted on 20.07., and I'm overjoyed to soon share photos and a video of my little green buddy! 📸🎥
PS: My plant enjoys 2 hours of chill jazz music every day! HAHA 🎷🎶
Likes
48
Share


@TheCannaProphet
Follow
~ WEDDING CHEESECAKE FAST FLOWER by FastBuds ~
Well fam, here we go again with another epic strain from FastBuds Fast Flowering stable. After having such tremendous success growing their Gorilla Cookies Fast Flower outdoors last year, I've decided to run another of their fast flowering strains outdoors this year... Wedding Cheesecake Fast Flower!
The best description of this awesome cultivar comes directly from my friends at FastBuds which is as follows:
"A delight for the mind and body: Wedding Cheesecake FF (Fast-Flowering) is a delicious strain that offers XXL yields in a 7-8 weeks flowering cycle. This terpene powerhouse produces loads and loads of mouth-watering vanilla-creamy-cookie-scented terps with hints of citrus and cinnamon. In addition to its delicious aromas, this variety grows very well in both indoor and outdoor setups, yielding up to 650 g/m2 without extra maintenance, making it the ideal strain for beginners as it allows you to maximize yields while minimizing work. This super-fast feminized photoperiod version offers upbeat and energetic yet deeply relaxing effects that are perfect for consumers looking for a heavily focused, motivating, and creative high. It’s the ideal strain for those needing that extra energy boost to start a busy day on the right foot.
Wedding Cheesecake FF boasts chunky, large-sized buds with a thick layer of silvery-white resin and bright orange hairs scattered all over: that just screams ‘quality’. The lime-green flowers sparkle with an array of hues ranging from dark to light green, to magenta and purple, and reek of a delicious aroma that’ll remind you of fresh store-bought cheesecake.
This is an XXL hybrid that grows extremely tall in height, reaching up to 3m with one huge main cola and multiple long side branches that can withstand enormous yields of up to 650 g/m2 with ease. Wedding Cheesecake FF is extremely resilient to the elements and can be grown in almost every climate as long as you’ve got the space and basics covered, making her an excellent choice for those looking for large-scale harvests with a quick turnaround time without much effort."
________________________________________________________________________________________________________________________________________________________________________________________________________________________________________________________________________________________________________________________
The Setup:
This is going to be an outdoor grow, but I have started the Wedding Cheesecake FF indoors as our weather is still too cold to put her outside (nighttime temp's dipping regularly into the 30's℉).
The plan is simple... let her grow inside under a 19/5 light schedule until the nighttime temperatures stay above the mid 40's℉, at which point she'll be moved outside and transplanted into the soil which I have already setup and inoculated with beneficial microbes, and then let the fun begin!🤪💚
________________________________________________________________________________________________________________________________________________________________________________________________________________________________________________________________________________________________________________________
Weekly Updates:
4/26- Week Five... here we go!
The Wedding Cheesecake FF from FastBuds has her 6th set of leaves now and is looking nice and healthy. She has good color and her growth is beginning to pick up.
4/28- All is well with the Wedding Cheesecake FF. Today I checked the moisture of the soil and decided to water via the garden hose with well water along with a good drink of fresh Compost Tea.
4/30- Rain showers today took care of my watering duties! Yesterday I sprayed her down with Neem Oil to see if it helps to mitigate whatever is beginning to chew on her leaves.
5/2- Another week gone by and this lady is beginning to look like she might end up being a standout!
Thank you for checking out my diary, your positive comments and support make it all worthwhile! 💚Growers Love!💚😎🙏
Likes
19
Share


@Sergio_721
Follow
despite the maximum temperature with lights on she grows very well, drinks a lot and I hope she will produce dense and juicy buds soon. 😂
Processing
Likes
36
Share


@Island
Follow
Week 4
Broad Mite still making victim.
On this week I watered she with water + diatomaceous earth
Still waiting for better days, I hope hv succes 😐
Apparently the diatomaceous earth is working against broadmite 😅

Likes
15
Share


@38PLAN
Follow
Mezza pianta di 7 é stata tagliata,era il suo momento,ora incomincieranno quasi tutte il flush,mentre la pianta gigante sta ancora molto indietro e rimane sotto fertilizzante per almeno altre 2 settimane.le piante hanno un odore fortissimo,e la formazione dei fiori risulta compatta nonostante gli internodi molto lunghi.Se vuoi parlare seguimi e vieni a trovarmi


Likes
34
Share


@MadeInGermany
Follow
Info:
Unfortunately, I had to find out that my account is used for fake pages in social media.
I am only active here on growdiaries.
I am not on facebook instagram twitter etc All accounts except this one are fake.
Have fun with the update.
Hey everyone :-).
This week the baby saw the light :).
She came out 2 days ago.
It is sprayed into the main area every day so that the humidity stays at the upper level :-).
Until the main comes down next week, it does not have to be poured but only sprayed :-).
I am very curious how it will develop in the coming week and until then I wish you a lot of fun with the update 😊.
Stay healthy 🙏🏻 and let it grow 🍀👍
You can buy this Strain at :
https://www.exoticseed.eu/
Type:
Quick Sherbet
☝️🏼
Genetics:
75% Indica / 25% Sativa
Sunset Sherbet X Black Lemon
👍
Vega lamp:
2 x Todogrow Led
Quantum Board 100 W
💡
Bloom Lamp :
2 x Todogrow Led
Cxb 3590 COB 3500 K 205W
💡💡☝️🏼
Soil :
Canna Coco Professional +
☝️🏼
Fertilizer:
Green House Powder Feeding
☝️🏼🌱
Water:
Osmosis water mixed with normal water (24 hours stale that the chlorine evaporates) to 0.2 EC. Add Cal / Mag to 0.4 Ec Ph with Organic Ph - to 5.5 - 5.8 .

Likes
11
Share

@IslandTerps
Follow
Strain: Fast Buds – Banana Purple Punch Auto RF3 (2 Plants – Purple & Orange Pheno)
Grow Type: Indoor
Pot Size: 4 Gallon Fabric Pots
Medium: Coco Coir
Nutrient Line: Athena
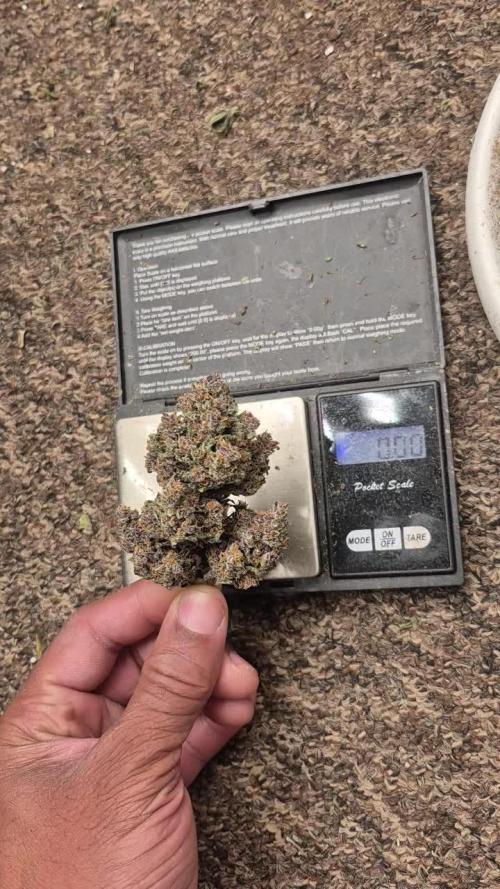
Harvest Log
These two were a pleasure to run from start to finish. Even though they were relatively small.
After harvest, the plants were hung to dry for about 12 days before moving them into jars for curing. The buds dried really well and trimmed really nice as well
I did end up taking a test smoke and wow… these two are STRAIGHT ⛽️⛽️. Definitely some high-AF buds 🤣. Even early in the cure they’re already smoking smooth.
Overall this was a really great run, especially considering the plants didn’t grow very large. Sometimes the smaller plants still surprise you with quality over quantity, and that’s exactly what happened here. I’m definitely running Banana Purple Punch RF3 again in the future.
Drying Conditions
🌡️ Temperature: 20–22°C
💧 Humidity: 55–60%
⏱️ Dry Time: 12 Days
Another solid run in the books 🔥
Don’t forget to use my code ISLANDT for 15% off at Fast Buds 🌱


