
Wi-Fi OG - My Story about The 4 Beast's


VEG
Fission 300W Light Emitting Diodes/250W
Custom
FLO
Fission 300W High-Intensity Discharge/250W
Custom
FLO
Fission 300W High-Intensity Discharge/400W
Custom
Indoor
Room Type
LST
weeks Technique
ScrOG
weeks Technique
Defoliation
weeks Technique
23 l
Pot Size
Start at Harvest
1
Week 1. Vegetation8y ago


4 cm
Height
24 hrs
Light Schedule
5.8
pH
60 %
Air Humidity
26 °C
Solution Temp
24 °C
Night Air Temp
17 l
Pot Size
50 cm
Lamp Distance
Nutrients 11

pH Perfect Sensi Grow Part A
0.1 mll

pH Perfect Sensi Grow Part B
0.1 mll

pH Perfect Sensi Bloom Part A
0.1 mll
MrOgchemist Starting this new grow, going to order the second LED light on the way, still cant make a decision on what light to buy.. BUT ANYWAY
A little bit about this strain:
Quick Kush is a feminised cannabis seed that speeds the legendary OG Kush up. While the most notable Indica ever needed some 55-63 days to flower, this Quick version is ready for harvest in just 49-56 days. But don’t be fooled by her flowering time: quicker doesn’t mean of poorer quality. She’s still armed with the oil and lemony scent that has attracted so many devotees throughout the history of cannabis as well as with the mind-blowing effect of the most famous strain in California. Because she’s indeed a full-on OG Kush, but way faster.
-- AND--
The Quick version is indeed far quicker. Yes, but how quick? Well… about 20 % quicker. This means that, should you decide to grow indoors keeping the lamps on all year long, with OG Kush you’ll obtain 6 crops per year, while with Quick Kush it’s possible to get 7.5 crops/year. No more and no less than 1.5 extra crops per year. Pretty good, right?
Genotype75% Indica / 25% Sativa
CrossOG Kush x OG Kush Auto
Suitable forIndoors and outdoors
Indoor flowering49-56 days
Indoor yield500 g/m2
Outdoor harvest timeMid-September
Outdoor yield1000 g/plant
Outdoor height3 m
THC18-25%
CBD0.1%
THC/CBD ratio250:1
Yeah, im excited for this grow hope its gonna be a good one😊 bless up 🙏 BTW. i buffered the coco coir like so in the video but with vitalink cal mag. https://www.youtube.com/watch?v=OQi8AMMIyyA
All my nutrients listed above.
first feeding after dropping the shell was 0,5 ml of power roots per 1 L of water i used 5 L of water day 7 01/02/2019 i am adding 10ml of canna start to the mix with 0,5 ml per l of power roots and thats a feeding for 24 hours because power roots stays stable for 24 hours after dissolving in water.
4 likes
4 comments
Share
Grow Questions

MrOgchemiststarted grow question 8y ago
when to start giving them calmag?
Solved
Techniques. Defoliation
likes

2
Week 2. Vegetation7y ago


10 cm
Height
18 hrs
Light Schedule
25 °C
Day Air Temp
5.8
pH
53 %
Air Humidity
26 °C
Solution Temp
24 °C
Night Air Temp
18.93 l
Pot Size
3.79 l
Watering Volume
54 cm
Lamp Distance
1400 PPM
CO₂ Level
Nutrients 10

pH Perfect Sensi Coco Grow A
1 mll

pH Perfect Sensi Coco Grow B
1 mll
pH Perfect Sensi Bloom Part A
0.1 mll
MrOgchemist So... start of week 2.. I am watering the girls every day now, yesterday i prepared a mix of nutrients as follows, 1GAL/5L of water, with 3ml of Cal-Mag, 10 ML of Canna Start and 3ML of Power roots i will continue this feeding untill day 10, -| 05.02.2019"update: I will Feed them day 8 with 1ml of Sensi bloom and see how they react" and I will update every Monday guys ! im usally not missing a single day and updating nearly every day anyway.. so if anyone is interested then please follow ! and share your opinions🙏
Update"04-02-2019" I will Upload a photo of Quick Kush from Dinafem's webside to give an overview on what the plants might look like, and what I am going to try to make my plants look like my dropping the temperature to very low in the last few days of their life.
Update: Changed Sensi Grow normal to, Sensi Grow Coco Specific
2 likes
comments
Share
3
Week 3. Vegetation7y ago


10 cm
Height
18 hrs
Light Schedule
25 °C
Day Air Temp
5.8
pH
53 %
Air Humidity
26 °C
Solution Temp
24 °C
Night Air Temp
18.93 l
Pot Size
3.79 l
Watering Volume
54 cm
Lamp Distance
1400 PPM
CO₂ Level
Nutrients 6
pH Perfect Sensi Coco Grow A
1.321 mll
pH Perfect Sensi Coco Grow B
1.321 mll

B-52
1.849 mll
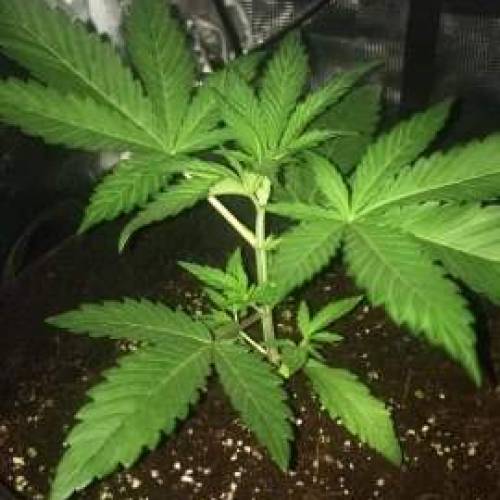
MrOgchemist Quick kush is called quick for a reason 👌, nice big indica leaves starting to grow and stretch pretty fast, i had to re pot one of the girls so one of them might look a bit sad but she will get better (its the salts)
Flushing and Buffering-
I am personally using Canna Coco Coir,mix with one brick of plagron coco coir(had one left).
1. Why you Should buffer your Coco. Lets get to reading! (Its Worth it for those that dont know about it)
There are cation exchange sites in coco that will interfere with nutrition until they are buffered. The cation exchange sites in coco naturally come loaded with sodium (Na) and potassium (K) cations. However, the Na and the K are only weakly held to the exchange sites. In the presence of calcium (Ca) or magnesium (Mg), the sites will release their Na or K cations and lock onto the Ca or Mg. These processes are known as “cation exchanges”.
Buffering coco is accomplished by soaking it in Ca and Mg. This allows the cation exchanges to take place prior to adding plants. Simply soak your coco in a solution of Cal/Mag water and the exchange sites will release their K and Na cations and lock onto the Ca and Mg. When the cation exchange sites bond with Ca and Mg rather than Na and K, it is “buffered”. The bonds that hold the Ca and Mg to the sites are very strong and cation exchange will largely stop. This means that all of the nutrients that you add to the water will be available to the plant at the ratios that you provide them.
2. Alot of growers Grow in Unbuffered coco coir and its a big mistake guys, I myself was a "victim"😬of unbuffered coco and it does cause alot of problems... now i am going to try and fix them!
-----GROWING IN UNBUFFERED COCO---
Many growers are unaware of the need to buffer the coco and they try to grow plants in unbuffered coco. In unbuffered coco, the cation exchange sites will strip the nutrient solution of the Ca and Mg and replace those cations with Na and K. This creates a sub-optimal Nutrient Element Ratio (NER) and renders Ca and Mg unavailable to the plant.
Failing to buffer the coco is why so many growers suffer calcium deficiencies in coco grows. Manufacturers of prepared coco products try to exploit these problems and convince growers that only their proprietary products are suitable for growing. However, it is actually very simple to properly buffer your coco yourself. This tutorial walks you through the process and provides all the information you need to turn even the cheapest brick of dehydrated coco into a superior growing medium.
I hope i Helped out someone who didnt know about this link on how to Buffer your Coco Coir is Here https://www.youtube.com/watch?v=OQi8AMMIyyA&t=18s
14/02/2019- I Decided tp raise up the amout of nutes and im giving them 1,5 ml per L so 15 ml's for 10 L / 2 Gallons of water
4 likes
6 comments
Share
4
Week 4. Vegetation7y ago


23 cm
Height
18 hrs
Light Schedule
25 °C
Day Air Temp
5.8
pH
53 %
Air Humidity
26 °C
Solution Temp
24 °C
Night Air Temp
18.93 l
Pot Size
3.79 l
Watering Volume
49 cm
Lamp Distance
800 PPM
CO₂ Level
Nutrients 5
pH Perfect Sensi Coco Grow A
1.5 mll
pH Perfect Sensi Coco Grow B
1.5 mll
B-52
2.642 mll
MrOgchemist Soo thats how we rollin this week I started LST did some work on it and, the little beasts are doing fine its day 24 from shell drop and we are starting the stretch right away! she is building up pretty fast and fattening up her stems, no red'ning or purple stems nice and green!, I am now rising the amount of cal mag because i am using coco and LED grow lights so that will need to be raised from time to time, so far I am waiting on another light that is on the way! and i am rising the current one a little bit to help them stretch. and they seem to pray so they like it! I am using foliar spray velokelp once a week and we are going to flip next week ! under a 600 HPS with 2 connected Mars hydro ECO 98 ! hopefully i can keep the temps down
1 like
comments
Share
5
Week 5. Vegetation7y ago


34 cm
Height
18 hrs
Light Schedule
25 °C
Day Air Temp
5.8
pH
53 %
Air Humidity
26 °C
Solution Temp
24 °C
Night Air Temp
18.93 l
Pot Size
3.79 l
Watering Volume
49 cm
Lamp Distance
800 PPM
CO₂ Level
Nutrients 5
pH Perfect Sensi Coco Grow A
2 mll
pH Perfect Sensi Coco Grow B
2 mll
B-52
2.642 mll
MrOgchemist So we got 8 cm stretch!, going nicley so far just a little bit of burn and one broken branch growing back together nothing serious and nothing to worry about, i will just drop down the dosage to 1.8(A+B), I think this will be the sweet spot and will push the girls to their limits, so far i decided i will use 400w HPS with 200W mars hydro i will have 3 lights for 4 girls but the light will spread nicley and give me 600W of power all together but im going to end up with a power of 650W because this led is rated to be the same as a 250w hps :P and 870par at 12" , seems pretty fine for a cheap LED like Mars Hydro i will update on more of that soon tho, so far i am doing 2 different ways of LST, one starts in late veg, and second in the beginning and is continued all the way to flower and what we are trying to do is basically make the plant grow in a circle(Around the Fabric Pot or whatever you are using) and so the top part of the plant is not bothering the new branches that are shooting up and need light, next we remove all leaves that try and cover them!, yes it takes a bit more work and a bit more veg time but im sure it is worth the yield! how much do you guys think they are going to yield? let me know! And ps. next grow I think i will grow Royal Gorilla and Sweet Zkittlez! as RQS just send me some seeds and gifts and I think i decided i am ging to grow them in a new tent and new monster setup, so stay tuned for that if you are interested, this grow is going to be a big one!🙏.
2 likes
5 comments
Share
6
Week 6. Flowering7y ago
42 cm
Height
12 hrs
Light Schedule
26 °C
Day Air Temp
5.8
pH
Weak
Smell
40 %
Air Humidity
26 °C
Solution Temp
24 °C
Night Air Temp
22.71 l
Pot Size
3.79 l
Watering Volume
54 cm
Lamp Distance
800 PPM
CO₂ Level
Nutrients 4
pH Perfect Sensi Coco Grow A
2 mll
pH Perfect Sensi Coco Grow B
2 mll

VeloKelp
0.2 mll
MrOgchemist Hi everyone, so its day 38 and i just flipped the girls to flower yesterday! i plugged in my 400W HPS(mars hydro is going to be added in later stages)- with my new electric LUMII ballast and, they got pretty nice and bushy.. everything seems to go well so far, i lowered down the humidity and now we are starting our one and a half month journey that is going to bring us some serious buds and bring back some great history! i am going to keep giving them grow nutes untill the end of the week because i want them to stretch nicley for my ScrOG, From what i know plants that are stretching always have a bigger need/taste for nitrogen so this is why i made this decision, if i would give them sensi bloom now i would cut out the nitrogen a little and that would cause the plants to be a little smaller then i want them to be, but there is bad news today aswell.. i ran out of b52 so i am going to be foliar spraying with Velo Kelp today, and i will try not to spray the "bud" leaves, i am aimng for big fan leaves here, i did some defoliation but i decided i am going to take it easy and not rush with something i dont have alot of knowledge about! keep it safe and happy growing! i will update in the next 7 days!
3 likes
6 comments
Share
Grow Questions
MrOgchemiststarted grow question 7y ago
I had a horrible Accident and one of the fans fell down on one of my plants and broke the top of the main step”like topping” and Its in 4 days bloom is it worth keeping and trying to fix it? It broke it nearly clean off Seal it back together?
Solved
Techniques. Defoliation
likes

CRiSPrGrowanswered grow question 7y ago
Hey JJ , sorry to hear about this accident ! The good news is that you're growing a photoperiod, so it's much more "forgiving" than an auto. What I suggest is to keep the plant, and all the good work you put into it, but "re-veg" it by increasing the light schedule back to 18/6 or something, and keep it in veg for a few more weeks maybe 2 or better yet, 3 weeks. It will have time to recover again and then when you've flipped it back into flower afterwards it will have been "monster-cropped" which is when you flip between flower and veg a few times, leading to much bigger yields. It will take a bit longer than planned, but it will be shorter than starting over, and in the end probably much bigger yields, so that's a good thing right? Hope this helps ! 🚀
7
Week 7. Flowering7y ago


50 cm
Height
12 hrs
Light Schedule
26 °C
Day Air Temp
5.8
pH
Normal
Smell
40 %
Air Humidity
26 °C
Solution Temp
24 °C
Night Air Temp
22.71 l
Pot Size
3.79 l
Watering Volume
38 cm
Lamp Distance
800 PPM
CO₂ Level
Nutrients 4
pH Perfect Sensi Coco Grow A
2 mll
pH Perfect Sensi Coco Grow B
2 mll

B'cuzz Root Stimulator
1.1 mll
MrOgchemist Hi everyone, so this week we got some nice stretch and everything seems to be going well... except that plant that got damaged.. but i decided to keep blooming the girls as they were because i really wanna taste this OG and i am runnin out 😢 but good news again! we got about 7/8 CM of stretch this week, we setted up the Scrog net and worked at it for a while we also started seeing some pistils and we got some of that lovley strong smell coming out of the tent allready! im interested to see how fast this strain is going to be in flower now i am also raising A+B to 2,1 just to see if the girls are ok with that and we will try to look for the sweet spot and write down our perfect recepie😎
3 likes
5 comments
Share
8
Week 8. Flowering7y ago


71 cm
Height
12 hrs
Light Schedule
26 °C
Day Air Temp
5.8
pH
Normal
Smell
45 %
Air Humidity
26 °C
Solution Temp
24 °C
Night Air Temp
22.71 l
Pot Size
3.79 l
Watering Volume
42 cm
Lamp Distance
800 PPM
CO₂ Level
Nutrients 3
pH Perfect Sensi Coco Grow A
2.5 mll
pH Perfect Sensi Coco Grow B
2.5 mll

Cal Mag
1.5 mll
MrOgchemist Hi everyone 😁 this week(day 21 bloom) we just got some more stretch and now the the 4 girls started creating buds allready😊 so far no nutrient burns no leaves falling off everything is going ok,now we just have to take care of them wait and see what them new genetics can do ! not only quality but quantity also counts! hopefully Dinafem did not lie😎 and this girl can produce some nice fat buds! we are using 600w of light i am expecting 270 grams dry at least if not, well we are going to try another grow and see what it will bring us! so far i am pretty happy with where they are heading and i cant wait to taste my new medicine soon!
Happy Growing🙌
3 likes
1 comment
Share
10
Week 10. Flowering7y ago


71 cm
Height
11 hrs
Light Schedule
26 °C
Day Air Temp
5.8
pH
Strong
Smell
38 %
Air Humidity
22 °C
Solution Temp
26 °C
Night Air Temp
22.71 l
Pot Size
3.79 l
Watering Volume
44 cm
Lamp Distance
Nutrients 4
pH Perfect Sensi Coco Grow A
2.4 mll
pH Perfect Sensi Coco Grow B
2.4 mll

AstroFlower
2 mll
MrOgchemist Hi guys! so we are in day 35 of the bloom phase! im happy to be back i was out for a little while because i didnt have any access to the PC or Phone but i am back!😎 They wanna catch a Rasta but Rasta dont let dem catch a Rasta!.
Continuing the diary I started backbuilding my buds again because it gave me really nice results in my last grows and i could see the difference for sure.. Ice flushing not so much difference and i dont think putting nails and other thigs trough your plants to scare them works either so i dont recomment doing it, but supercropping,lst,scrog,backbuilding and 48hours of darkness do work thats for sure from my experience
Next I also wanna admit that Quick Kush kicks ass, it develops very nicley even tho i had a small bit of a heat issue but we are all good now my loved one, has been giving them Ph'ed water for a about 3 days and just now they got some extra kick of Astroflower and i lowered down my A and B to 2,4 for safety and i think this is the maximum that i can push them for now anyway.
The buds are allready very hard sticky and super nice smelling! they developed quicker then I tought too and we allready got some orange hairs, I was slowly starting to get dissapointed but after i came back home after few days I had to grab myself by the head, It smells like a citrus air freshener with such a pefect little note of smokeynessss in the backround.. i never smelled a bud like that before i have to admit i cant wait to meditate with this strain and hopefully its going to be a great pain killer for me aswell !😂
2 likes
1 comment
Share
11
Week 11. Flowering7y ago


71 cm
Height
11 hrs
Light Schedule
26 °C
Day Air Temp
5.8
pH
Strong
Smell
38 %
Air Humidity
22 °C
Solution Temp
26 °C
Night Air Temp
22.71 l
Pot Size
3.79 l
Watering Volume
44 cm
Lamp Distance
MrOgchemist This week im in a rush all the time but i managed to take a few quick photos
This week day 41 of bloom im starting to flush since i started seeing red hairs on the buds that means that my plants are about 20 days from harvest and my flush might last as long
The smell of the plants is allready strong that it stinks up my whole place in exactly 20 seconds 😂
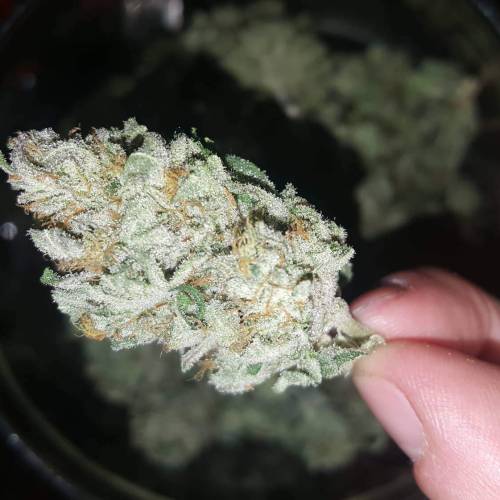
They got extremely frosty and sticky like super glue (im dead serious) now when im flushing i am also hoping for a little more swell on the buds i am giving them 250ppms now
I cant wait to dry them cure them amd smoke them they smell amazing😍
3 likes
9 comments
Share
Grow Questions
MrOgchemiststarted grow question 7y ago
can i chop plants if after 16 days of flush the leaves dont go yellow? will this mean more poor quality of the end product?
my girls just dont wanna yellow for some reason they are tough and its day 9 of flush i think and i cant see deficiency whatsoever
Solved
Leaves. Veins - stay green
likes
CRiSPrGrowanswered grow question 7y ago
Hey JJjunior , senescence is a good but not necessary process : if it happens, then great, if it doesnt then it's okay, most important is the trichomes, if they're ready then you're good for the chop ! great work on the long flush btw, you'll see how smooth the smoke it ! hope this helps ! 🚀
12
Week 12. Flowering7y ago


91 cm
Height
11 hrs
Light Schedule
26 °C
Day Air Temp
5.8
pH
Strong
Smell
38 %
Air Humidity
22 °C
Solution Temp
26 °C
Night Air Temp
22.71 l
Pot Size
3.79 l
Watering Volume
44 cm
Lamp Distance
Nutrients 3
Plain wata
1 mll
love without limits
1 mll

FlashClean
3 mll
MrOgchemist So today i am finally going to update i had some problems with the growdiares website and i could not use it for some reason but lets continue
DAY 55
Incredible bulk.. in matter of few days, beautiful leaves turning dark purple the smell is super strong and the girls are super frosty i think this is my new favorite if it smells the same (if not better) after a nice dry and cure
backbuilding is a great thing.. cutting just the little top of your bud can bring out suck a beautiful and round structure of the bud and no matter the genetics. This is a commercial type of technique its aiming not to boost the yield so much but to focus on the look of the bud, when we cut off the top of the bud what we get is more growth on the side of the buds while their top part stays low and buds look really packed and they also are! they become harder for sure especially after dropping the temperature in the room a little bit and giving plain water thats pretty cold for 2 or 3 days works like a charm, dont go crazy with lowering the temperature tho! it can do damage to your roots and shock them and we dont want that.
I took off the scrog net (it wasnt the best idea but it worked) to take the girls out and flush them reaally well with plain un PHed water for the last few days
most of the buds on the girls are as big as a can of coca cola if not bigger and i am very happy about that however. We had little heat issue and i am not very.. happy about that but i learned my lesson and i will take care of it next time for sure as this is unacceptable for me.
So far i think i will chop those girls at day 57/58 give them nice 6 to 9 days of drying and then we are going to grab the jars and cure those beautiful buds
I have to say that i did have to cut off a bud earlier, dry it and smoke it just to see what its like, the bud was super frosty nearly white, just like the ash and i have to say that after finishing the joint (that was not the tastiest yet because no cure) i just layed down and talked to nasa for the rest of the evening this is called some heavyweight smoke but i will give a full review of what its really like when i cure those girls after drying.
Happy growing everyone!
(and i updated my height of the plant because i mesured it wrong it was 91cm at the highest point)
4 likes
7 comments
Share
12
Week 12. Harvest7y ago
Happy Harvest Day!


10/10
Rated
Nice smoke even after just few days of curing it becomes really smooth and gets that, smokey citrusy pine and earthy like taste at least thats what im tasting now.. growing was super easy, girls didnt wanna yellow but were able to give me some supreme smoke at the end anyway so i recommend this smoke for everyone who have not tried it, it is really interesting and i never smoked anything like that before in my life! i love nearly all weed strains but this one just like the tangie from the last grow, i threat it special because it is.. in every aspect great medicine for my migranes and sleep but i am also able to continue dialy tasks while smoking it even tho it is a heavyweight strain to smoke and its loaded with thrichomes and beautiful smell. harvested day 59.
Show more
Translate
Spent 78 days
Ger Veg Flo Har
162.5 g
Bud wet weight per plant
162.52 g
Bud dry weight per plant
4
Plants
1 m²
Grow Room size
Easy
Difficulty

Happy, Hungry, Uplifted
Positive effects

Dry mouth
Negative effects

Citrus, Sweet, Woody
Taste
Height
Day air temperature
Air humidity
PH
CO2
Light schedule
Solution temperature
Night air temperature
Pot size
Lamp distance


MrOgchemist Well well... This grow was an intersting one ! i got a SCROG net i did some defioliation and i learned absolutely huge amount of things about growing my cannabis the girls grew so well that i didnt worry too much and did my research in peace!👌
In these 13 weeks all together my life has changed alot, cant say if for better but this plant will help to bring a few smiles back for sure!
Backbuilding: I did some backbulding that i read about on 420magazine and decided to try it last grow, i tried it again and it worked! so for me it confirmed that backbuilding works and it works magic!
SCROG: scrog.. i liked it but i dont know if i will do it again personally... i wanted to get my plants out of the tent but i was not able to do so, and I had to get rid of the scrog net to flush my girls properly like they should be flushed did i gain something or did i lose something? i am not sure but it was for sure some great experience and i think you guys should try it if you are not worried about having to flush your plants like i had to.
Genetics: A few words from myself about the genetcis that i grew and that i am smoking... i cant complain about the smoke that is for sure, its OG Kush, but one thing that i found kind of hard in this grow was being able to manipulate the branches but OG is known for growing super long lower branches. Growing it was so easy that i did not think too much about overfeeding or underfeeding my plants, they stayed in great shape all the time and looked healthy, all the way till the end of their life,
Coco Coir And Buffering.
In my first grow i did not wash or buffer my coco at all and i learned my lesson with the dutch passions blueberry, after i washed the coco with some ligtly warm water and then buffered it 2X times for 8 hours with tap water and calmag and it gave me exactly what i needed! a full spectrum of control that every new grower should try to learn more about those beautiful plants.
Lamps and wattage:
So.. i used 630watts of power from the wall however.. i might have done it too late into flower as i did it 3 weeks in if i remember correctly and i can bet i would get even better results if i did it a bit earlier but next time when i connect an LED with a HPS in the same tent, its going to look a little bit different then before.. we all learn out lessons.
Trimming jaring etc.
I had to dry all the plants for about 8/9 days for them to be perfectly the way i wanted them, trimming was a hard work, it took me a few days and it gave me a few grey hairs but well.. those hours of work rewarded me with a bud that is legendery👽
Happy growing everyone! and thank you for the support, God Bless !😇
Song for today Rick James Mary Jane -00
8/4/25 update.
The final weight was exactly 670g but without stems around 650, before I moved to Germany I took all my old notebooks with me.
8 likes
8 comments
Share
Equipment Reviews


52 comments
Sort by
popularity
popularity
newest
oldest

growdoctordc commentedweek 77y ago
You have a lot of free time, Junior.
You’re gonna love scrog!
likes 4
OutForReal commentedweek 37y ago
They are looking good bro ! Will they be bigger than the tangie ? Haha 😄
likes 3
MrOgchemist commented7y ago
@DinafemSeeds, Thanks Mark, i hope Its gonna be a Nice flower show too✌️🏻 Haha I have to Say those genetics are strong! So i am expecting Good yield but i am just curious How much they are going to stretch now
like 1

DinafemSeeds commented7y ago
@MrOgchemist, by the look of things the stretch phase is well underway 👍
The stretch typically with Quick Kush should not be more than 1.5-1.75x . What sort of stretch have you had my friend? @MrOgchemist
All the best ✌️
Mark..
likes 2
MrOgchemist commented7y ago
@DinafemSeeds, Hi Mark! Always nice to see your comment, I got stretch that is more on the higher side i think 😇 i tought that my girls will stay smaller then i expected but wow, they changed up their minds and decided to blow up with some stretch and absolutley perfect bud structure very nice i must say! Lets see how much she can yield under 650 watts of power now all the best Mark 👌🙏
like 1
Show More (4)

Budofpray commentedweek 117y ago
yop ! 's me again 😀 just out of Curiosity...wich led did u choose finally ? i made so much studies on Spectrum analyse for MJ and devices on the worldwide market so i would like to know what u chose and for what reasons ?? thanks JJJ
likes 3
MrOgchemist commented7y ago
@Budofpray, and i texted u back on private too
likes 2
Budofpray commented7y ago
@MrOgchemist, yep i just saw ur answer…. thks dude….
but i saw before ur first answer, when you only talk about the mars hydro eco 98 and i said to myself... seriously ?? this grow with this kind of leds ??
then i saw your second comment and i understood better 😏 what s u said sounds good to me ! in fact u have counterbalanced the lacks of this two lights 👌
for a cheap led light m hydro is not so bad in quality for the price but like many led light chinese fixtures they have lacks in far red but good in blue…
same build than unit farm, same mpcb, same led diodes provider (may be same fans but not the same price^^ but i don t know if it is the same driver inside) farm unit balanced not so bad their Spectrum wavelenght to have more effficienty in bloom stage than eco 98 and depending of what diode wavelenght u choose surely the price can be affected but not in those proportions…. to my point of view M hydro is clearly the manufacturer of unit farm…
So in addition with ur Hps we have the proof that its working very well 👍
TY dude.
I'm in a hurry to see the rest of ur grow journal with ur final project…. i keep the secret secret !!
🙏
i texted u back on private too 💪
likes 3
MrOgchemist commented7y ago
@Budofpray,Thanks for keeping the secret haha :D 👌 you got everything i said exactly and ye i agree those chinese leds are not the best option to be honest but this is what i went with when i was on budget and i figured why not pump the power up with a hps later on, so far i will stick to this led but for my next grow i might get something of a better quality and i might try some other nutrients not sure what yet tho :D
like 1
Show More (2)

The_Projexx commentedweek 57y ago
Looking good so far ! Keep up the great work and best of luck to you on this grow !
-Happy Growing!
likes 3
The_Projexx commented7y ago
@MrOgchemist, Thanks !
Thanks for taking the time to respond as well :)
-Happy Growing!
like 1
MrOgchemist commented7y ago
@The_Projexx, i will also follow some grows man! cant wait for them Purple Maroc buds👌
like 1
The_Projexx commented7y ago
@MrOgchemist, Its going to be a tasty treat , I can't say that I've ever smoked any of that strain before so I'm very interested to see how it will preform growing as well as the finished product . I always try to grow something new that I haven't had before so I can say I tried it :) . Plus I just really like growing plants be it a house plant a veggie plant or a cannabis plant :) .
Thanks for taking the time to reply :)
-Happy Growing!
likes 2
Show More (1)

Puffer_Bill commentedweek 127y ago
👀 Awesome buds! 💪🏽😎👊🏼
Back building .. something new for me to learn about. Thank you 🧠👍🏻
likes 3
MrOgchemist commented7y ago
@Puffer_Bill, no problem ! always here to share and help man! hope it will work for you, and extra tip for you, when the hair are starting to get red its a good time to start it, but dont to it all at once, do it over 2 or 3 days and take it slow on those buds
here is a link to backbuilding :
https://www.420magazine.com/community/threads/las-quick-guide-to-simple-backbuilding-technique-for-buds.209274/
likes 2
Puffer_Bill commented7y ago
@MrOgchemist,
Many thanks for the link. 😎👍🏻Definitely going to research and maybe put into action on a couple of plants to start off with.
like 1
MrOgchemist commented7y ago
@Puffer_Bill, you will like it for sure buddy! :D enjoy
happy growing🙏
likes 2
CRiSPrGrow commentedweek 67y ago
Sorry to hear about what happened, but the good thing is you can re-veg and it should recover ! Anything else comes up just let me know ! 👊
likes 3
MrOgchemist commented7y ago
@CRiSPrGrow, Thanks Bulbi! Great to from such a Good grower! Thank you for the anwser i will chat u up in future for Sure if you dont mind! ✌️🏻
likes 2
CRiSPrGrow commented7y ago
@MrOgchemist, you're very welcome, i'm a newbie and always learning, but sometimes you just need help from someone to put yourself at ease and fix something that could be a problem or find a solution you simply didnt know about right?
likes 2
MrOgchemist commented7y ago
@CRiSPrGrow, haha we are learning something new everyday bro! I agree 100% on that thanks again 😏 Happy growing!
likes 2
DinafemSeeds  commentedweek 127y ago
Another Quick Kush harvest on the grow diary platform and some lovely colours coming through prior to harvest 👌
Congratulations on the harvest my friend and thank you for choosing our genetics for this adventure 👍
The time has come to sit back and enjoy that dank and frosty end product 👌
Thank you for the diary my friend and I hope to see you growing more Dinafem strains in the near future 👍
All the best ✌️
Mark..
likes 3
MrOgchemist commented7y ago
@DinafemSeeds, Hey Mark! Thank you for the kind words, im actually chilling wit a backwoods right now and enjoying the smoke after this whole adventure! :D
like 1

Waters commentedweek 127y ago
Congrats. Awesome looking bud!
likes 2
MrOgchemist commented7y ago
@Waters, Thanks man! :D
like 1

zgt00 commentedweek 37y ago
nice man! looking good😎 follow!
likes 2
MrOgchemist commented7y ago
@zgt00, Thanks man !
like 1

Smowkabowl commentedweek 18y ago
I just smoked-a-bowl of OGK so my interest has been peaked. I'll climb aboard if you don't mind? It sounds like a BEAUTY and I have to see how this story ends. Peace
likes 2
MrOgchemist commented8y ago
@Smowkabowl, Bless Up brother ! i hope you will have a nice journey along with me and my diary!
likes 2
DinafemSeeds commentedweek 87y ago
@MrOgchemist How are things going my friend since your last update?
You must be approaching week 5 of the flower show now so around 14-18 day's away from harvest 👌
With this amount of LED being used I'm confident you will smash your 270g target from over 600w LED power 👍
Is that 600w of actual power drawn from the wall mate?
Until next time mate ✌️
All the best
Mark..
like 1
DinafemSeeds commented7y ago
@MrOgchemist, Thank you for the added info mate 👍
That crystal coverage is crazy and the buds are swelling up fantastic 👌
Keep the updates coming my friend. Harvest is approaching fast 👍
All the best ✌️
Mark..
like 1
MrOgchemist commented7y ago
@DinafemSeeds, i will update in about 2 hours mate! if you will be up by then and have a bit of time, visit my diary and give it a look ! :D there is a nice suprise coming i am very suprised by the swell on them girls
like 1
DinafemSeeds commented7y ago
@MrOgchemist, So glad your happy with the performance so far mate 👍
Until the next update ✌️
All the best
Mark..
like 1
Show More (1)
Puffer_Bill commentedweek 127y ago
You have harvested awesomely. Gr🎱 genetics and gr🎱 farmer. 👷♂️🚜
I'm super pleased the smoke will help your migraines. I ❤️ hearing how marijuana helps people with their conditions. It certainly helps me.
😎✌️🏼
Ps I have been looking at back building tutorials. Smart.
like 1
MrOgchemist commented7y ago
@Puffer_Bill, Thanks for the kind words man! cannabis is for sure the greatest natural medicine when it comes to all kinds of this stuff from cancer to insomnia when i saw how it helps all people with those symptoms and decided to try it and it helped me aswell! what an amazing plant my friend, and backbuilding is a pretty cool trick i agree, my friends were very impressed by the look of the buds they become really nice after this method.😇 happy growing! 👌
like 1
Puffer_Bill commented7y ago
@MrOgchemist,
Cannabis is one of lifes greatest secrets destined to help many people in so many different ways. That i find, just so uber amazing.
💖💖🌱💖💖
like 1
Budofpray commentedweek 127y ago
Strange !! i posted a comment one hour ago…. still not here !! is this site got this sort of bugs ? 😜
WOW !! those buds seems to be soo tasty due to backbuilding ! Good job buddy 👌
can't wait your smoke test ! I talked with Df about this strain…. announced up to 25% THC so we can imagine a high buzz at first with a balanced strong boby effect….i stay tuned about your feelings 👍
'cause with his weed fully mature and correctly cured….. may you can talk to aliens ? 👽 😁
👊 bro
like 1
MrOgchemist commented7y ago
@Budofpray, haha yeah bro i might talk to aliens very soon haha, first thc overdose in history 😂 you should try out backbuilding like we talked man! very good technique 😇
likes 2
Budofpray commented7y ago
@MrOgchemist, definitly adopted in my mind….dude !! 👊!
finally I had to recover my parcel personnally….delivers here sucking a bit sometimes….!!
so i got my seeds (including this quick kush) and the worms waste for flowering stage…
still missing my bio char PFFFF....
but Don't worry for my outdoor run i'm gonna cut a large part of buds and let a little part for comparaison….
and still talking with GrowD so that they can include the method Terra Petra has their grow medium category….
i want also if they are agree with this, so they can include a pre-veg part dedicated to some preparation (with pics) before seedlings to show for example the stage for a good bio char activation or others tips/things…every good growers got tips on his sleeve.
😁
Ôm nama Shivaya 🙏
likes 2
growdoctordc commentedweek 77y ago
“... we got about 7/8 CM of stretch this week ...”
I love a curious story! Here we see the mixed use of both English and metric measurements. That’s a first!
7/8 CM - better known as nearly 9mm, doesn’t seem like any stretch you’d notice.
Your garden looks great. That’s what counts. Enjoy your harvest
like 1
MrOgchemist commented7y ago
@growdoctordc,
9mm = 0.9cm,
0.9cm x 8 = 7,2 cm I check my girls few times a day and I try to track their moves as close as I can.
Instead of writing calculations i would rather say (7/8 CM ) wich gives me an easier transalation and makes things simple, so thanks for the comment nice one! bless.🙏
likes 2
DinafemSeeds commentedweek 18y ago
Nice to see some of our newer "Quick" ladies hitting the grow diary platform 👍
Best of luck with this grow my friend and thank you for choosing our genetics for this adventure 👊
Let's see what you can do with our Quick Kush 👌
We will be watching with interest mate 👊
All the best ✌️
Mark..
like 1
MrOgchemist commented8y ago
@DinafemSeeds,Hi, thanks for your comment Mark 👊, I cant wait to see what I can do with them gals myself this is my second try in coco but I think I am well prepared, chat me up if you will enjoy my diary man👌. Bless up all the best 🙏
like 1
Budofpray commentedweek 127y ago
hey my friend !! what a great diary 👍👍 with gorgeous buds porn to the end 😘
thx for all things we shared 🙌
wishing that everything goes well for you buddy !! 🙏
like 1

the end.
Enjoying this diary? Follow for more updates!


Prefer the old Diary view?
Go back to the old Diary view