


Likes
26
Share


@Batista
Follow
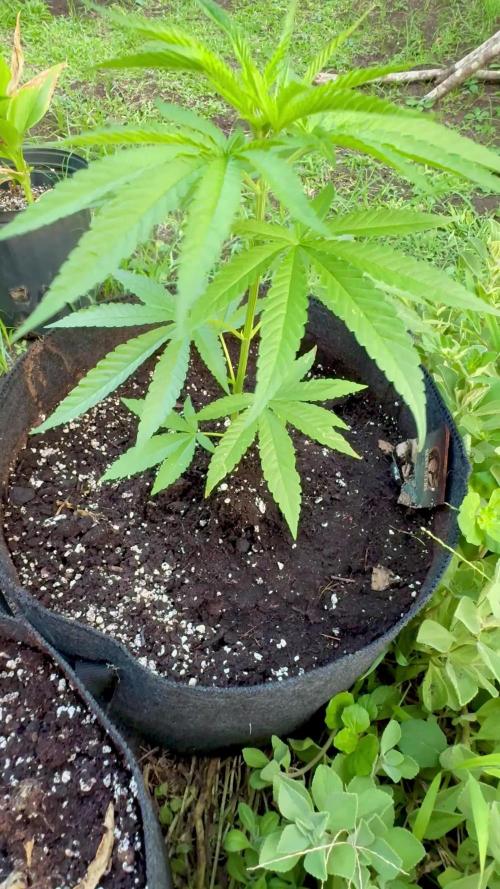
This week we increased the quantity of fertilizers and transplanted it into a 5 liter container.
Next week we will start LST.
The total height decreases due to the transplant.
We use mycorrhizal fungi (Mykos) in the transplant.

Likes
18
Share


@Grow_for_Happiness
Follow
Wow week two of flower is done and I am SO happy with how these four girls are doing.
Day 9F/72S they got their first top dressing of Power Bloom at 75ml right before watering, dug into first few inches of soil like usual. I make sure to top dress the Power Bloom every 3 weeks and the other additives every 4 weeks, seems to keep the plants happy.
Day 12F/75S things are looking healthy but quite bushy and I'm seeing some growth on the low parts of branches and below main canopy level so did a good cleanup at lights out. Helps to keep from wasting energy on bud sites that will get very little light and produce small/larfy buds. Also redirects that energy into the tops for bigger yields 🤞. Took off a good amount lots of airflow down there now.
Day 14F/77S. All the girls are looking happy and healthy. Spending their days praying to the light and packing on bud sites! Looking down on the canopy she is just about full, glad I left some space to start! Oh and there was no noticable shock to the plants from the trim on the 12th day so that's good.
Have been keeping the light at 16" from main canopy (aside from 3-4 extra tall branches) and running 100%. Goal is to let them grow another 3" so they are 13" from light and then will raise daily for the last bit of their growth. Should keep it around 750-950umol/s. Still watering 3L per plant every 3 days with just the slightest runoff from each. Tested runoff and is 6.7, usually don't do this but had enough one watering and was curious so figured why not.
Was a great week can't wait to see next week's changes!

Likes
4
Share


Likes
7
Share
@MetropGrower
Follow
Trichomes are about 45% amber
Now we cut this lady off
It whas not a fun grow
Had much problems
She don’t like training and topping definitely
Not stable in my eyes sr
Likes
4
Share


@Adam22
Follow
Smell is amazing like fizzy pineapples it overpowers the cookie dawg smell but the combo of the strains is also amazing the slight cookie and chem smell inside the tent. Will re pot these all and hope they all females due to the seeds being regular and not feminised. All looks good will keep eye on pistils to appear or not. I am always using the same feed:
Coco A
Coco B
Canna Rhizotonic
Cannazym
Canna cal mag
Canna boost
Ph up
Likes
10
Share


@Hempire
Follow
Hello growers !
This week started the pistils colours white into orange /red. Let’s check at the final of the week it should be ok for the harvest :)

Likes
2
Share


@Ddddgbbb
Follow
As u can see trichomes slowly turning milky even amber so starting to flush with ripenner then r/o some
Buds might catch alight foxtail i’m trying to maintain air circulation there as hard as i can to prevent rot cuz buds aregetting rly dance

Likes
33
Share


@420DeepGrow
Follow
Gracias al equipo de Sweet Seeds, Marshydro, XpertNutrients y Trolmaster sin ellos esto no sería posible.
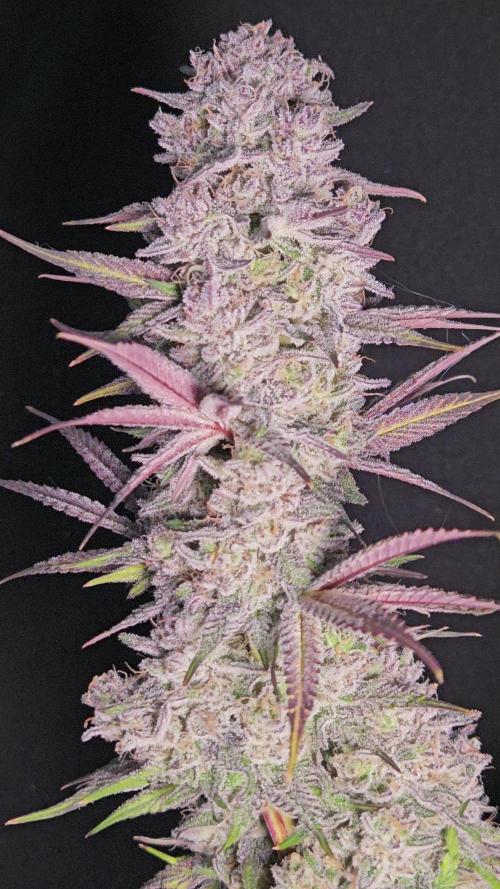
💐🍁 Sweet Mandarine Zkittlez F1 FV :
Genética feminizada y fotodependiente de floración ultrarrápida. Primera generación filial (F1) resultante del cruce entre un clon élite de Zkittlez (muy potente y resinoso, con un marcado aroma tipo Sour Diesel cítrico, entre naranja y mandarina) y nuestra Sweet Mimosa XL Auto (SWS94) que también tiene tonos aromáticos cítricos entre naranja y mandarina.
El resultado del cruce es una vigorosa variedad híbrida fotodependiente muy resinosa, potente y aromática.
El aroma de esta variedad es delicioso, con tonos Sour Diesel muy especiados, tonos de naranja y mango, fondo amaderado y lejanas pinceladas frescas como de pino o hierba recién cortada.
Algunos individuos pueden mostrar flores y hojas con tonos púrpuras y rojizos al final de la floración.
El efecto es enérgico, alegre y estimulante de la concentración y la creatividad.
💡TS-3000 + TS-1000: se usaran dos de las lámparas de la serie TS de Marshydro, para cubrir todas las necesidades de las plantas durante el ciclo de cultivo, uso las dos lámparas en floracion para llegar a toda la carpa de 1.50 x 1.50 x 1.80.
https://marshydro.eu/products/mars-hydro-ts-3000-led-grow-light/
🏠 : Marshydro 1.50 x 1.50 x 1.80, carpa 100% estanca con ventanas laterales para llegar a todos los lugares durante el grow
https://marshydro.eu/products/diy-150x150x200cm-grow-tent-kit
🌬️💨 Marshydro 6inch + filtro carbon para evitar olores indeseables.
https://marshydro.eu/products/ifresh-smart-6inch-filter-kits/
💻 Trolmaster Tent-X TCS-1 como controlador de luz, optimiza tu cultivo con la última tecnología del mercado, desde donde puedes controlar todos los parametros.
https://www.trolmaster.com/Products/Details/TCS-1.
🍣🍦🌴 Xpert Nutrients es una empresa especializada en la producción y comercialización de fertilizantes líquidos y tierras, que garantizan excelentes cosechas y un crecimiento activo para sus plantas durante todas las fases de cultivo.
Consigue aqui tus Nutrientes:
https://xpertnutrients.com/es/shop/
📆 Semana 1:
Ha sido una buena semana, ella ha dado otro gran cambio en su lugar definitivo 😎.
La carpa está ocupada al 75% y comienza una floracion explosiva gracias a @Marshydro y @Xpertnutrients y @Trolmaster con esta gran genética 💪.
A partir de ahora se riega manualmente con las dosis recomendadas por el fabricante.

Likes
27
Share


@Bread_n_Buds
Follow
Our Zamnesia photoperiod plants have also started their journey into the magical flowering period, this is the first week.
So born on September 1st, on October 1st they went into flowering and these are the photos of the first week, when the ladies begin to understand that they have to do their magic.
---- The general environmental conditions are good, the heat has increased a little more but for the first weeks of flowering it is not a big problem, let's remember to never exceed 27 degrees centigrade in the last 4 weeks to avoid compromising the quality of the flowers. If necessary, open the growbox but never let it exceed 27-30 degrees
where 30 is already a lot. The positive thing is that as soon as the lights go out the change is already a little visible and as autumn progresses we will also improve. The humidity is fluctuating but we try to control it with two dehumidifiers when necessary, pushing both of them possibly not into the growbox but directly into the room. (I dehumidify the room and the air in the growbox should be dehumidified too)
--- We are at a top secret level here so I can tell you that it is called XXXX Test 2 and we really like how they are growing. They were practically identical so I decided to top one and let it grow like a bush keeping some branches underneath but not in main lining style. The other one is growing straight and beautiful as the sun. Very wide internodal distance, wide plant, definitely to be supported soon.
--- Fertilization schedule - The fertilizers are always Plagron and I am following the table that I generated on the site depending on the chosen substrate. Create your own card and follow it, never be presumptuous my friend as I have been in the past, follow the card and look at the plants, not all need the same amount of fertilizer. We have come to the time to give a good dose of iron in the first weeks of flowering, already of race life not sprayed but mixed with fertilizers. Alga Bloom is now running instead than alga grow
---- https://plagron.com/en
- Power Roots - 1ml/l
- Alga Bloom - 4ml/l
- Pure Zym - 1ml/l
- Sugar Royal - 1ml/l
- Vita Race - 5ml/l
--- Dehumidifier now runs between 50% and 55%
--- Plagron 100% Organic pack can be found on Zamnesia at: https://www.zamnesia.io/en/11457 -pla gron-easy-pack-natural.html
--- new strain coming soon no description of the strain because it is a secret
- Fully organic soil and nutrients -- https://plagron.com/en buy on www.zamnesia.io
- air system --- https://www.secretjardin.com/
- Growbox & Light —— www.Marshydro.eu
- Music and sound --- I made my girls listen to 432hz frequencies and music from www.radionula.com
- Z --- You can find these seeds, much more from the world of cannabis, mushrooms and an incredible series of accessories and gadgets on the reference site not only mine but of many growers
—— https://www .zamnesia.io
Likes
18
Share


@Grey_Wolf
Follow
Outdoor Auto #2 Sour Diesel
fastbuds originals sour diesel auto
13th November 2020
BLACK FRIDAY 😱👻 lol
Only if ya superstitous 😁
Okay so you may have noticed there is only one sour diesel plant featured this week?
That is because I have put the other plant out bush somewhere alongside a Male auto plant to be open pollinated.
I didn't want the risk of having any of my other plants pollinated so I took the male auto and the sour diesel
a fair ways out into the bush , found a protected spot and will leave them both there for atleast a week or until
the male has well and truly released pollen into the air.
Once I feel that the plants have had their "sexy time" I will collect some extra pollen for freezer storage
before pulling up the male and bringing the sour diesel plant back home to finish off the seed production process.
By doing it this way I hope to get quite a few "auto" beans to play with 😎
* Now for a quick report on the other plant that is still here and flowering.
She is finally starting to put on a little bit of bulk and smell which is encouraging. 😀
The bio bloom and worm castings reall made a difference I feel .
That is about it for this week , When I go out to check on the ones out bush I will take the camera so I can get some snaps.
Thanks for stopping by 👍
Edit 14th November I went out to water the Sour diesel and Male auto that are out bush.
Above you will see a video of my highly technical and advanced methods of pollination 😉
Likes
19
Share


@MonroeGrow
Follow
Amazing strains! My favorite by far, that I have grown. I have lots of clones too, I’ll
Be keeping these around as long as I can! holler at me on Instagram

Likes
26
Share


@datrobspeoria
Follow
Hello. this plant is in the first week of stretch and along with the worms hoping to get to about 5 feet tall.... Thanks for checking out my grow and have a great day!

Likes
1
Share


@VirginiaGrownExotics
Follow
She’s really starting to smell and frost up. Smells sweet and gassy
Processing
Likes
154
Share


@CBD_Sweden
Follow
@FAST_BUDS,
Hi all the happy people here in GrowDiaries.
This is my second cultivation ever and it will be fun to try a bigger space than my closet grow.
First, I'm just going to say I'm done with the construction of my new growroom.
I put some pictures on the construction here in week one.
The room is 2.14 meters by 1.7 meters and has a ceiling height of 2 meters.
It provides a floor area of 3.6 square meters.
I use a 54 Watt Lightwawe T5 for germination and 2 Pcs 400 Watt HPS lamps.
I have a channel fan that replaces the room air about 40 times an hour to get a comfortable environment in the room, the air enters a fresh air intake from the outside.
The air is purified through a carbon filter to then leave the room to the rest of the basement.
Then I use that heat to heat the rest of the basement.
I will use 8 pcs 15 liter Autopots to grow with and a 100 liter water tank that supplies the pots of water and nutrition.
I will grow completely organically in soil and will watercure my buds to get the best possible medicine for me.
But there are no cultivation rooms to be displayed here, so I continue with what is most important.
Today I have put my seeds in my moisture dome and hope the seeds have germinated within a few days.
I am very excited to see how the new growroom will work and how this new secret CBD plant from @FAST_BUDS, will turn out.
..............................................................................................................................................................................................................................................................................................................................................
Update 2017-08-15. Both seeds have germinated and planted in small pots inside the humidity dome.
I'm so glad it worked so well and now it's just hoping they'll start growing and become 2 big healthy girls :)
...............................................................................................................................................................................................................................................................................................................................................
Update 2017-08-16. I have mixed my own soil today. Its 40% sieved peat harrow H2-H4 0-30 mm, 45% sieved peat harrow H4-H6 0-30 mm. 5% sand and 10% of compost soil. And i use 15% of perlite and mix it all together.
....................................................................................................................................................................................................................................................................................................................................................
2017-08-21 The 2 sisters are doing great, Nr2 is a bit after Nr1 . Some new pics.
............................................................................................................................................................................................................................................................................................................................................................................
2017-08-23. Transplanted from humidity dome and the small germinating pots to 15 liter autopots.
................................................................................................................................................................................................................................................................................................................................................................................
2017-08-27. The girls have settled in to there new home of the 15 liters autopot after a little transplant chock. Now the real week 1 starts for me and the girls. 4 new pics.
---------------------------------------------------------------------------------------------------------------------------------------------------------------------------------------------------------
2017-08-29. New movie of the girls. Its no water for 3 days now so the roots develop more and match the plant above the soil. The temp controlled fan is awesome, its easy to set what temp you like to have in the room. Right now its 28 celcius. And humidity is 56%.
--------------------------------------------------------------------------------------------------------------------------------------------------------------------------------------------------------------------------------------------------
2017-08-29.
Hello to you who read my diary, I just want to say that I am pleased that you have chosen to check in with me and in my diary.
I just want to say that I do this for myself and for a steady flow of my medicine.
Everything you read and see in my diary is 100% honest and I will never distort or beautify anything here.
I document my crops so that I can learn from my mistakes and also to look back at those different crops.
I try to update with pictures every day and with text if something special has happened in the garden.
This is my strainhunt for the best medicine and the beginning of my journey with cannabis and the cultivation of it.
-----------------------------------------------------------------------------------------------------------------------------------------------------------------------
2017-08-30. Cleaned the room this morning, just vacuuming and cleaning with chlorine solution. Im testing the fan to control temp and humidity, it works great.
Added some pics with measurements and a movie. Everything is looking great right now.
-----------------------------------------------------------------------------------------------------------------------------------------------------------------------------
2017-08-31. New video of the girls.
-------------------------------------------------------------------------------------------------------------------------------------------------------------------------------
2017-09-01. New pics and videos. Gave each of the girls with 2 ml Alg-A-Mic, 4ml Bio-Grow, 4ml Bio-Heaven and 10 ml Formulex mixed in 2 liters of water.
I hope they like it :)
-------------------------------------------------------------------------------------------------------------------------------------------------------------------------------------------------------------------------------------------
2017-09-02. New pics and the girls liked the water and nutrients yesterday.
-----------------------------------------------------------------------------------------
2017-09-03. Video of the girls this morning.
Kl 16.00. Did some defoliation on the girls. Videos added.
KL. 23.00. New video.
----------------------------------------------------------------------------------
2017-09-04. The start of week 3. New pics. Im trying to LST the girls.
KL 23.00. Added new video.
--------------------------------------------------------------------------------------------
2017-09-05. KL 08.00. Cleaned the room this morning, just vacuuming and cleaning with chlorine solution.
KL 12.00. The girls got 2 liters of water each with nutes in it, added a video.
-----------------------------------------------------------------------------------------------------------------------------------
2017-09-06. KL 08.00. The girls woke up after their beauty sleep, the leaves are always a bit down after 6 h of darkness, but they will stretch now when the HPS lamp starts.
Everything looks good and I keep trying to tuck the leaves so they get the maximum amount of light where needed. Added pics and video.
KL 23.30. Did some LST and leaftucking.
--------------------------------------------------------------------------------------------------------------------------------------------
2017-09-07. This is day 21 from sprouting. I have never tested PH in my grows, when growing organic in soil iv learned that it adapt PH by it self. But im curious by nature so i had to test.
Kl 10.00 Tested PH in the soil, it was 6.9 and tested my tap water and it was 6.8. Added video/pics of the girls, its 10 H after defoliation, LST and leaftucking. I think its looking good.
Kl 22.30. New pics
-------------------------------------------------------------------------------------------------------------------------------------------------------------------------
2017-09-08 KL 08.00. Good morning, added new video.
2017-09-08. Kl 23.50. Gave every girl 3 liters of water and nutes, added new video.
-----------------------------------------------------------------------------------------
2017-09-09. Kl 21.00. Defoliated a lot today, new pics.
---------------------------------------------------------------------------------
2017-09-10. Kl 08.00. Last day of week 3. New video.
2017-09-10. Kl 23.00. 3 New videos.
---------------------------------------------------------------------------------------------
Likes
17
Share


@Naujas
Follow
To tell the truth, I am very surprised myself, how amazing she is FastBuds Gorilla cookies, she copes well with a small space:) she drinks 1 liter every day :) everything looks better than expected:) good luck to everyone.
Likes
16
Share


@Ganjagrandaddy
Follow
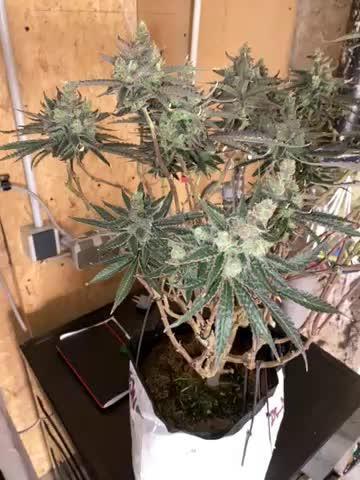
Day 50 flowering. Despite my punishment with the calmag she is doing well considering. I dont doubt she could have been a hell of a lot bigger and would have been a big yield. She is covered in buds that her branches cant keep up now. she looks a little of a tangle with the way I have to support her now and any handling of her leaves my fingets tacky as hell. I did find a little budrot to deal with too which is a concern for the harvesting time now. Hard to keep the rh down with the uk weather at present and a dehumidifier is on my list now.
All in all another week for her will give me some lovely sweet smoke when she is done. Trichs are still showing quite a few clear so she is good to go on

Likes
9
Share

@420DeepGrow
Follow
📆 Semana 1:
La planta acompaña el ciclo del sol y se adapta al vaivén del clima. 🌞🌿
Los brotes comienzan a tomar forma y los entrenudos se estiran, preparándose para sostener las flores. El verde sigue intenso y saludable, reflejando unas raíces activas y un entorno equilibrado.
Las horas de luz van marcando el cambio. Es buen momento para pequeñas limpiezas de hojas bajas y revisar que el aire circule bien entre las ramas. ✂️
Todo se alinea con la temporada. La transición se siente en cada amanecer.
¡Seguimos creciendo fuerte! 💪
Likes
5
Share


@Localbudz
Follow
This past week I pushed the nutrient EC value to 2.8 these plants need it! Tomorrow is the first 12/12 light cycle, will be adding Si to help with internodal spacing. Chitosal definitely sparked growth, one more foliar application before I add it to the reservoir. Am excited to see flower formation this scrog is large. Timing will be improved next time by popping more seeds to guarantee germination.


Likes
16
Share


@Foggedaboudit
Follow
These are steady cruising towards the finish line. Really pretty bud structure and trichome coverage. The smell is straight pineapple hard candy. No piney-ness, no skunk funk, not even a hint of citrus. Just straight tropical fruits and sugar and a tad bit of earthiness at the end. They have been on plain water for the past week. A majority of trichomes are cloudy with about 20% still clear. Another week I’m thinking.
